
How to set up DMARC/DKIM/SPF for Zoneedit

Published 21 Nov 2026
Updated 21 Nov 2026
12 min read
Summarize with
Set up email authentication in Zoneedit by publishing your outbound service's SPF and DKIM records, then adding a DMARC TXT record at _dmarc. For ZoneOut SMTP, the documented SPF include is include:spf.zoneedit.com. DKIM requires signing on the sending server as well as its public DNS record.
I first distinguish Zoneedit DNS hosting, Mailmaps forwarding and ZoneOut outbound SMTP. Hosting DNS or forwarding incoming email does not make Zoneedit the sender. Authenticate the service that actually sends your website, application or mailbox messages.
Add your domain
I check the active nameservers before editing records. Zoneedit changes affect public DNS only when Zoneedit is authoritative for the domain or relevant subdomain.
- Open the domain. Sign in to Zoneedit. For a new DNS zone, hover over DOMAINS, select Add a Domain and enter your registered domain. If it is already listed, open its dns link.
- Preserve existing DNS. Copy the complete current zone before moving DNS hosting. Retain working website and mail records, then set the registrar's nameservers to the exact servers assigned by Zoneedit.
- Verify delegation. Run dig +short NS example.com and compare the result with the assigned nameservers. If another provider remains authoritative, publish authentication records there.
- Enable ZoneOut if needed. For Zoneedit outbound SMTP, open MANAGE > DOMAIN SETTINGS > ADD ONS, select a ZoneOut package and complete the order. DNS-only users can skip this step.
- Configure outbound SMTP. After activation, open EMAIL > OUTBOUND MAIL > EDIT, enable OUTBOUND MAIL, set a password, select NEXT and confirm. Configure your application's SMTP connection with the settings displayed there.
Zoneedit's 'ZoneOut' support article documents that activation path. I verify the domain by checking live DNS and sending a message through the configured SMTP connection, rather than assuming that adding a zone proves the mail setup works.
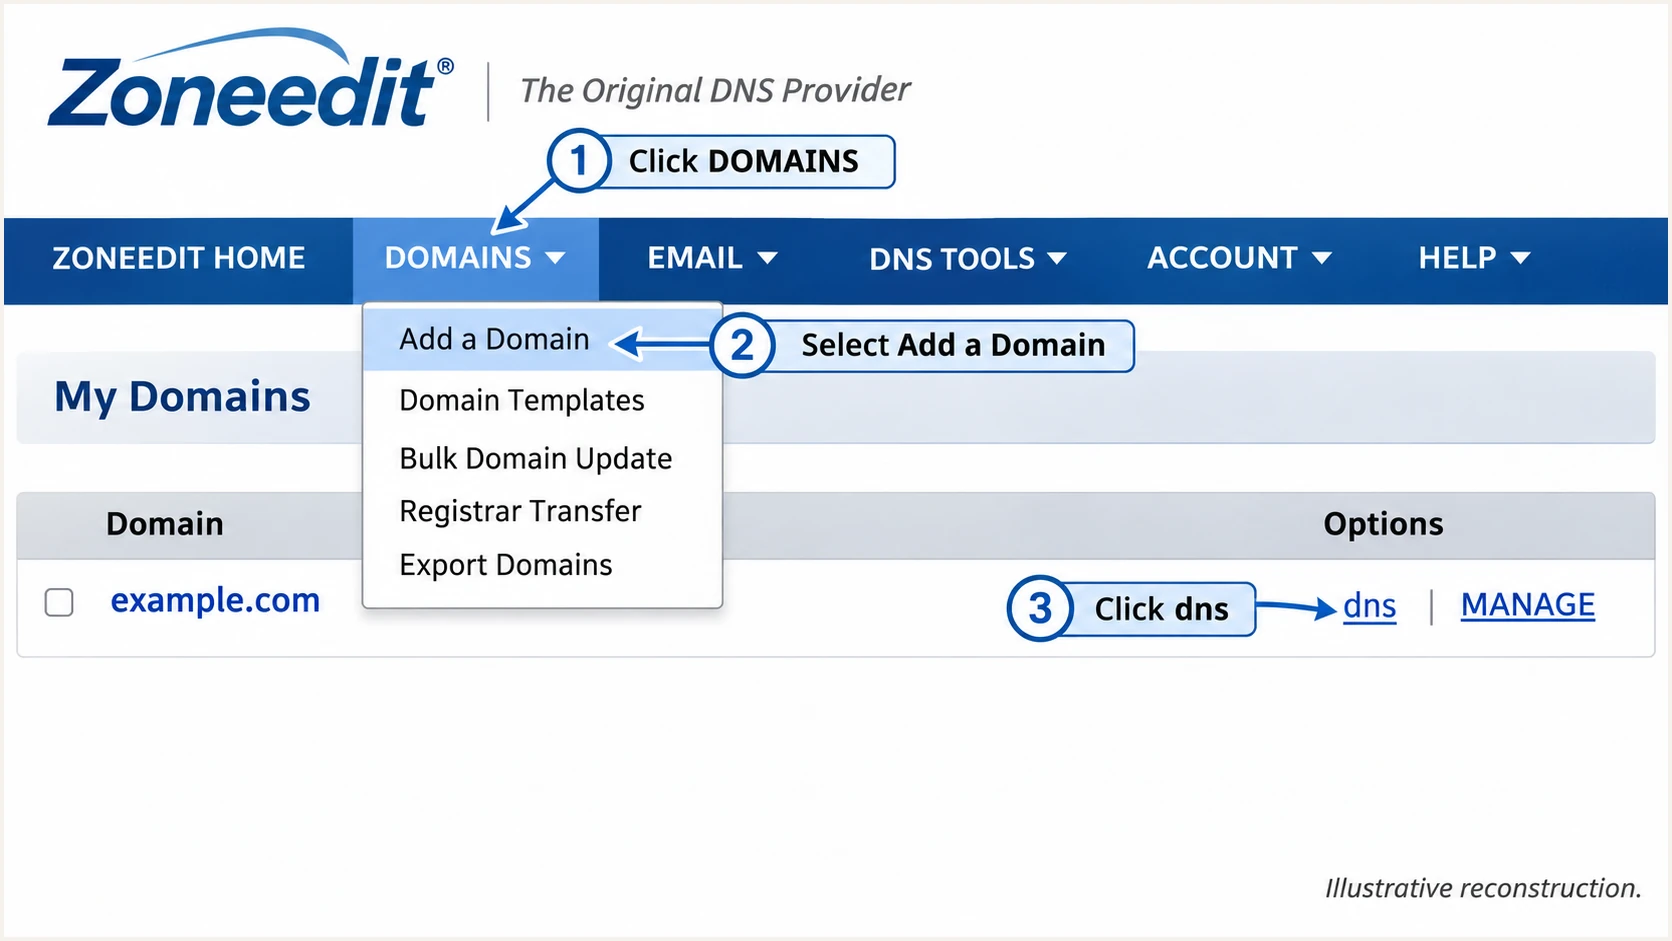
Illustrated Zoneedit navigation for adding a domain and opening DNS settings.
Set up SPF
For messages sent through ZoneOut, Zoneedit support documents include:spf.zoneedit.com. I use this maintained include instead of copying a relay IP address or guessing an include based on the SMTP hostname.
Use that include only for ZoneOut outbound traffic. A domain using Zoneedit solely for DNS or Mailmaps needs the SPF authorization supplied by its actual outbound service.
- Open TXT records. Open the domain's DNS settings and the wrench beside TXT Records in the classic editor. Enter SPF as TXT, rather than the obsolete SPF DNS record type.
- Choose the host. Use @ when the envelope sender domain is example.com. If the service uses a custom bounce subdomain, publish the required record at that subdomain instead. SPF does not inherit from the parent.
- Keep one SPF record. Edit an existing v=spf1 record and insert include:spf.zoneedit.com before its final all mechanism. Preserve other authorized senders and an existing -all ending. Do not add a second SPF record.
- Check the Return-Path. Inspect smtp.mailfrom in a delivered message. For DMARC's default relaxed SPF alignment, its domain must share the organizational domain of the visible From address. Configure the envelope sender in the application or outbound service.
- Save and validate. Enter the value in TEXT, continue and confirm. Keep SPF within the limit of 10 DNS-querying terms during evaluation, including nested includes. Check the actual envelope sender domain below.
SPF for a root domain sending only through ZoneOuttext
Host: @
Type: TXT
Value: v=spf1 include:spf.zoneedit.com ~all
This example uses ~all for an initial setup. It is a complete replacement only when ZoneOut is the sole sender authorized at that name.
Our SPF checker evaluates the published record and lookup limits. Enter the Return-Path domain, which is not always the domain in the visible From address.
SPF checker
Find SPF syntax issues, lookup limits, and weak records.
?/16tests passed
A successful DNS check confirms the policy is readable. I still send a real message to confirm that the outbound IP is authorized and the envelope sender domain satisfies DMARC.
If another outbound service cannot use your domain in its Return-Path, adding its include at your From domain will not fix SPF alignment. Expect SPF alignment errors for that route and require passing DKIM with a matching domain instead. Keep SPF for your other senders.
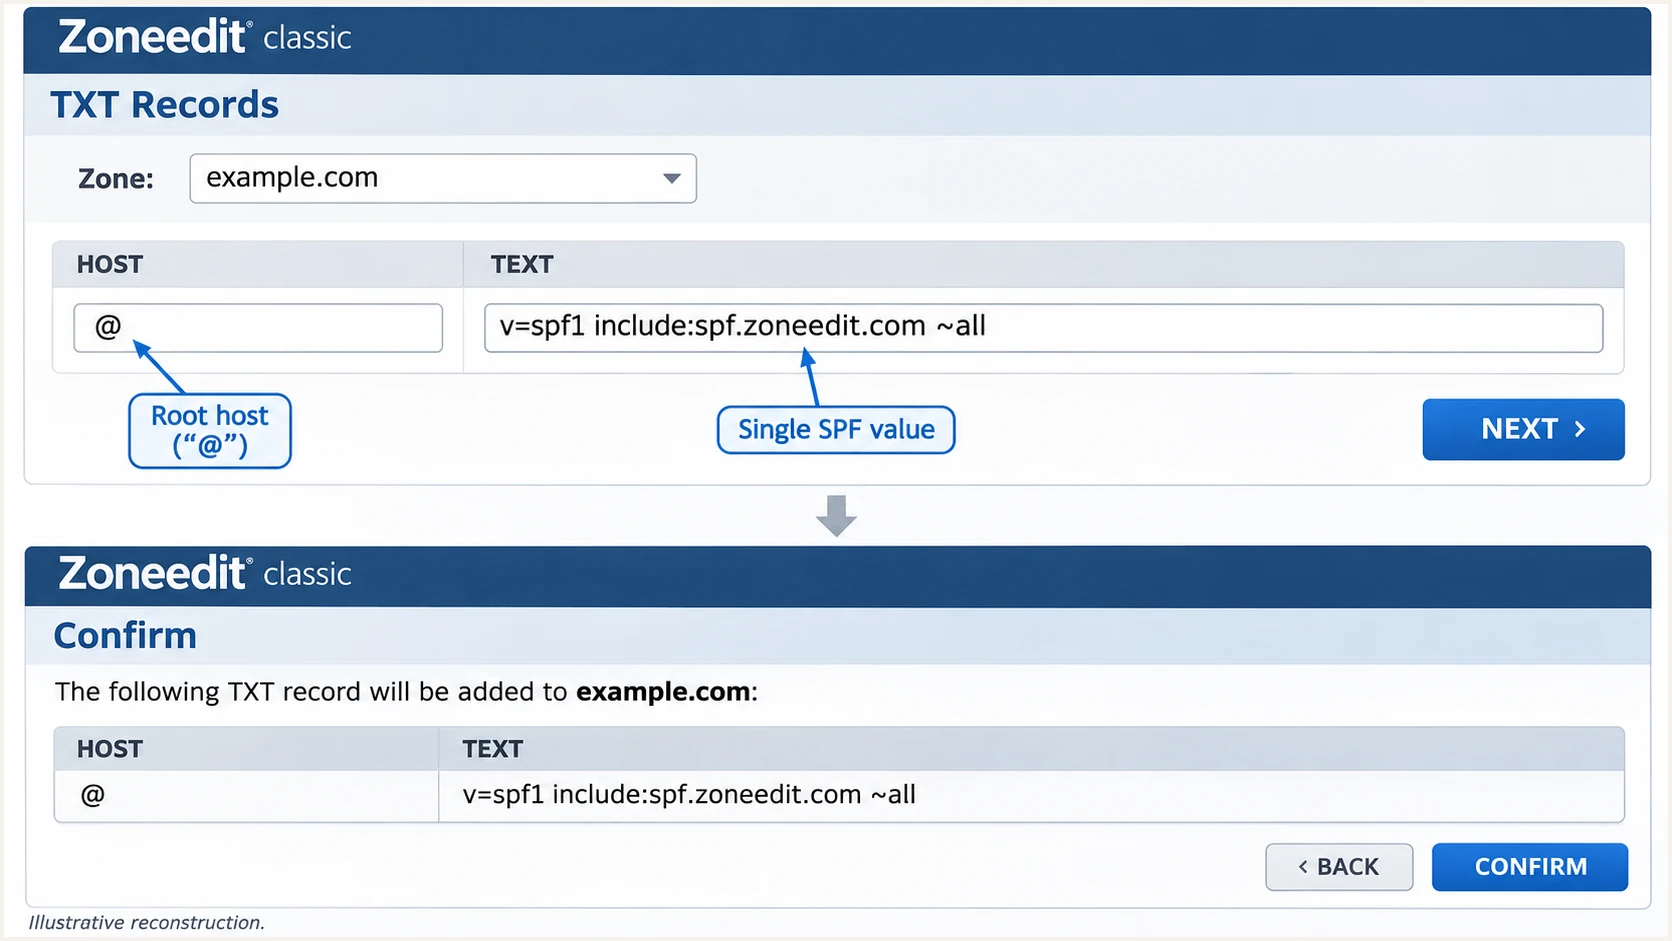
Illustrated Zoneedit TXT entry for a domain sending only through ZoneOut.
Set up DKIM
I obtain DKIM settings from the server or service that sends the email. Zoneedit publishes the public record; the outbound system holds the private key and signs messages.
Zoneedit's public ZoneOut instructions do not document a DKIM signing switch or a universal selector. If ZoneOut is your sender, use Get Support to request confirmation of signing support for your domain and the exact selector records.
- Get the signing records. Copy the selector, record type and complete value from your outbound service. If you control the sending server, generate and install its DKIM key pair. Use a 2048-bit RSA key when supported.
- Publish a TXT key. In Zoneedit's TXT editor, enter the supplied relative host, such as selector._domainkey, and the complete public value. Confirm the resulting name is selector._domainkey.example.com, without the domain appended twice.
- Publish CNAMEs when supplied. Use Zoneedit's CNAME editor for provider-issued aliases. Copy each target exactly. A CNAME and a TXT key cannot coexist at the same selector name.
- Enable signing. Complete the outbound service's DNS verification and signing activation. If ZoneOut cannot sign for your domain, sign on a server you control before relaying, or use an outbound service that supports domain-specific DKIM.
- Verify the signature. Send a new message. Check for dkim=pass and inspect d= and s= in DKIM-Signature. The signing domain must satisfy DMARC's domain requirement for the visible From address.
TXT public key
Publish the complete public key supplied by the sender. Keep long keys as one logical TXT record, using multiple character strings within that record if required.
CNAME selector
Publish the supplied alias target. The outbound provider manages the public key at that target, while the private key stays on its sending system.
A public DNS key without a corresponding message signature does not provide DKIM authentication. I check a delivered message after activation, including mail sent by each application.
Do not copy the legacy _domainkey policy shown in older Zoneedit examples. Modern DKIM uses selector-specific records and does not require a separate _domainkey policy record.
Set up DMARC
Publish one TXT record at _dmarc.example.com. For a domain without an enforcement policy, I start with p=none to collect reports while checking legitimate senders.
Keep existing enforcement
If the domain already has p=quarantine or p=reject, retain that policy while fixing the sender configuration. The sample below is for a new monitoring setup.
- Build the record. Use the generator below to choose the policy and reporting destination. Replace the example reporting mailbox with an address that actually receives aggregate reports.
- Enter the TXT value. Open Zoneedit DNS settings, edit TXT Records and enter _dmarc in HOST. Paste the DMARC value into TEXT, then continue and confirm. Check that the published name is _dmarc.example.com.
- Preserve existing settings. Edit the existing DMARC record instead of creating a duplicate. Retain required reporting destinations and any intentional subdomain policy settings.
- Validate publication. Use the DMARC checker below for syntax and policy checks. When reports go to another domain, ensure the destination provides the required external reporting authorization.
Configure the reporting address with our DMARC record generator. Keep the generated value as one logical TXT record.
Initial monitoring record, replace the example mailboxtext
Host: _dmarc
Type: TXT
Value: v=DMARC1; p=none; rua=mailto:dmarc@example.com
Replace dmarc@example.com with your real report destination before publishing. A regular mailbox receives XML attachments; a reporting platform processes those reports for analysis.
Enter the visible From domain in the checker. Unlike SPF, DMARC policy lookup starts with that domain, rather than the Return-Path domain.
DMARC checker
Look up a domain's DMARC record and catch policy issues.
?/7tests passed
The p=none policy requests monitoring without a DMARC quarantine or rejection action. Receivers still apply their own filtering, so it does not guarantee delivery.
If the new Zoneedit editor appears to hide the record, search for DMARC. Zoneedit support explains that the newer editor labels these TXT records by purpose; DOMAINS > DNS Settings opens the classic Modular Editor.
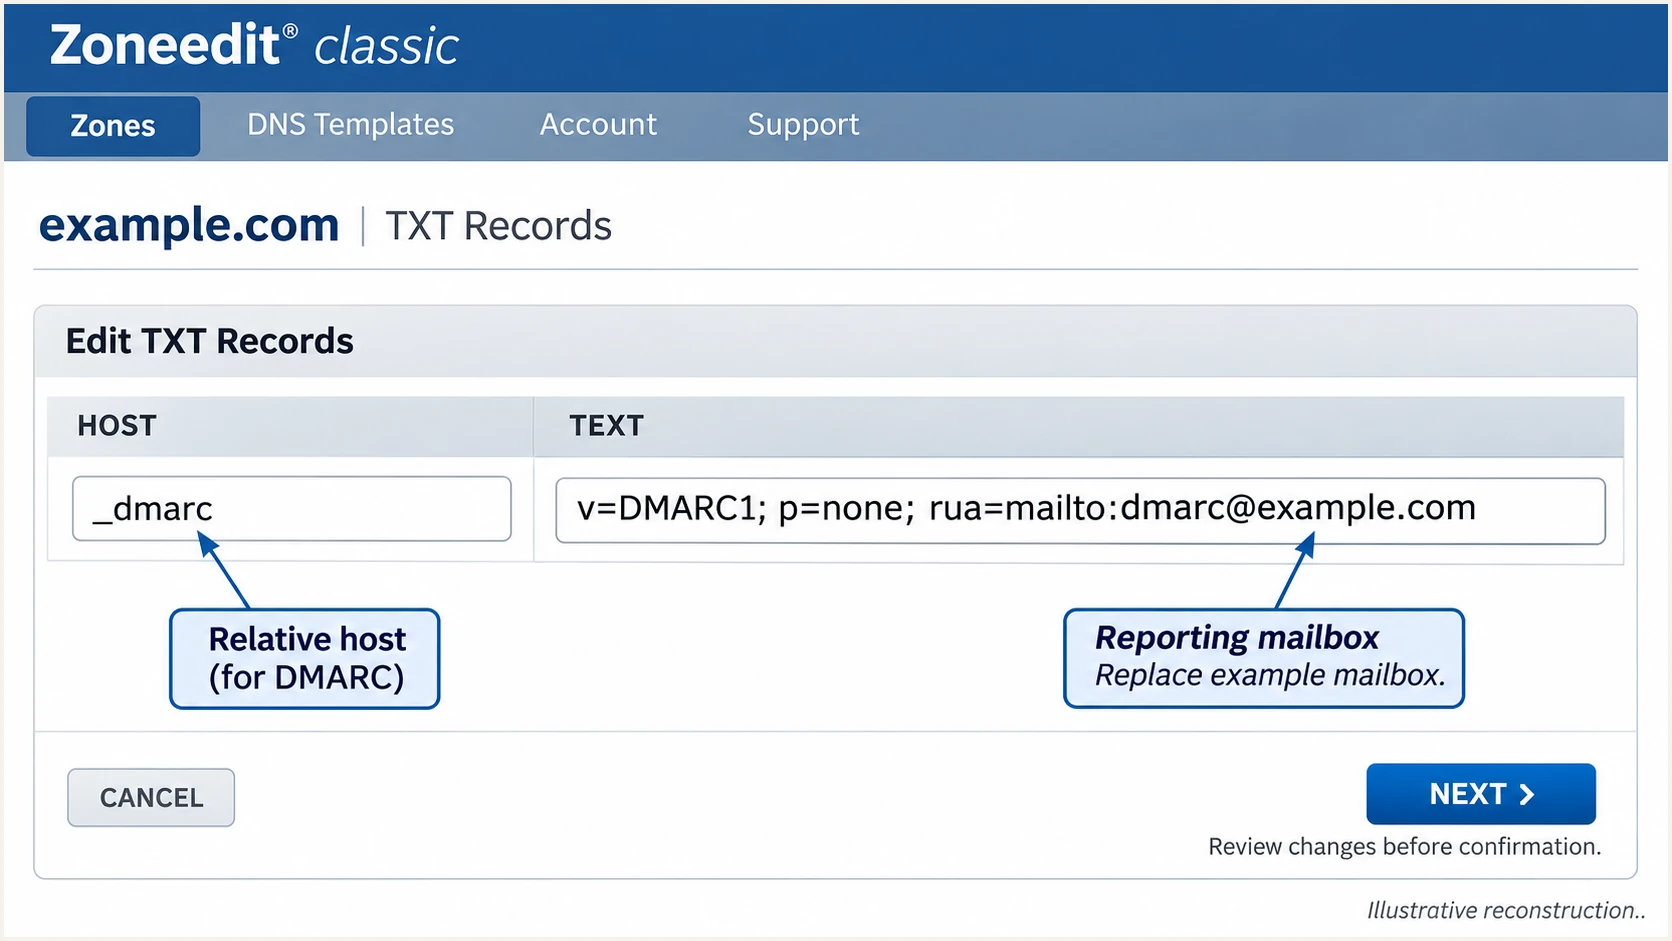
Illustrated Zoneedit DMARC entry using a sample reporting mailbox.
Verify and troubleshoot
I verify public DNS and a freshly delivered message separately. Correct DNS does not prove that an application uses the intended SMTP connection or signs with the right domain.
Query the actual DKIM selector supplied by your sender. The placeholder selector in these commands is not a universal Zoneedit selector.
Inspect the public DNS recordsbash
dig +short NS example.com
dig +short TXT example.com
dig +short TXT _dmarc.example.com
dig +short TXT selector._domainkey.example.com
dig +short CNAME selector._domainkey.example.com
- Test the real path. Send through the website, application or mailbox you configured. A message sent by a different mail client does not validate the application's SMTP route.
- Read receiver results. Inspect the receiving server's Authentication-Results header for spf, dkim and dmarc. Compare smtp.mailfrom and the DKIM signing domain with the visible From domain.
- Separate pass results. SPF pass or DKIM pass alone is insufficient when both authenticated domains belong to another organization. DMARC needs at least one passing method whose domain meets its matching rules.
- Check DNS consistency. If records are missing, verify delegation and query each assigned authoritative server directly. Allow cached positive and negative responses to expire according to their TTLs.
The quickest end-to-end check is our email tester. It provides a test address; send a message there through the actual sending route to receive a diagnosis of authentication and other delivery checks.
Run a separate test for each application and after any SMTP or DKIM change. A passing test covers the message and route tested, rather than every sender using the domain.
Email tester
Send a real email to this address. Suped shows a results button when the test is ready.
?/43tests passed
Look for dmarc=pass in the test results. When both methods are available, I fix both SPF and DKIM; valid domain-specific DKIM also helps preserve DMARC through forwarding when the signed content stays intact.
Aggregate reports generally arrive daily, with initial data often taking 24-48 hours. Use those reports to check other sending paths after the immediate message test.
|
|
|
|---|---|---|
SPF permerror | Duplicates or lookups | Merge or reduce |
DKIM none | No signature | Enable signing |
DKIM fail | Key or content | Inspect signature |
DMARC fail | No matching pass | Compare domains |
TXT missing | Wrong zone or host | Check delegation |
Common failures and the next check
Get alerted when it breaks
Our DMARC platform, Suped, monitors reported authentication results and identifies issues by sending source. Its DMARC monitoring connects a failure to the affected traffic and provides steps to fix it.
I keep authentication alerts active after the first successful test. A changed SMTP route or an expired DKIM configuration needs attention even when the Zoneedit DNS records still exist.
- Route aggregate reports. Use the domain-specific reporting address supplied by Suped in rua. Make that change in the existing Zoneedit DMARC record and retain its current policy.
- Enable notifications. In Suped's notification settings, enable Issues detected and Sending sources need verification. Turn on DMARC summary emails for scheduled review.
- Investigate the source. Open the issue and inspect the affected SPF or DKIM results. Verify a source only after confirming it belongs to your organization; an unfamiliar source is not a reason to authorize it.
- Verify the repair. Apply the relevant fix in Zoneedit or the outbound service. Send another test, then check subsequent report data to confirm the affected traffic recovers.
Alerts depend on incoming evidence
Suped notifies you when an issue is detected in available data. DMARC aggregate reports arrive in batches, so they do not provide a live delivery result for every message.
Use the email tester for immediate validation and Suped's report history for ongoing coverage. DNS history helps investigate record changes when a working sender starts failing.
Secure your domain with p=reject
I advance enforcement after verifying every legitimate sending route across a representative business cycle. Include infrequent invoice and account messages before deciding the domain is ready.
Suped's verified sources and individual DMARC records make this review practical: inspect legitimate traffic by source instead of treating the overall pass rate as the enforcement decision.
- Complete the inventory. Confirm every authorized application and outbound SMTP route. Leave unauthorized traffic failing; do not add SPF entries just to increase the domain's overall pass rate.
- Fix legitimate failures. Require DMARC pass for each approved route, with domain-specific DKIM wherever supported. Test important forwarding paths before relying on SPF alone.
- Stage quarantine. For a domain currently at p=none, edit the existing Zoneedit TXT record to p=quarantine. Keep rua active and review subsequent legitimate traffic in Suped before advancing.
- Publish rejection. Change the policy to p=reject once approved routes are working. Check explicit subdomain DMARC records and sp settings separately, then send fresh production-path tests.
- Keep monitoring. Leave Suped issue notifications and source verification enabled. Review every new sender before production use, and retest after DNS changes or DKIM key rotation.
Enforcement record after legitimate senders are verifiedtext
Host: _dmarc
Type: TXT
Value: v=DMARC1; p=reject; rua=mailto:dmarc@example.com
Keep your real reporting address in the enforcement record. If the domain already uses quarantine or reject, continue at its existing enforcement level while repairing any newly discovered sender issue.
The p=reject policy asks receivers to reject messages that fail DMARC. It protects use of your domain in the From address; it does not stop messages using a lookalike domain or a misleading display name.
Frequency asked questions
For a domain sending only through ZoneOut, Zoneedit support specifies v=spf1 include:spf.zoneedit.com ~all. If an SPF record already exists, merge the include into it before the final all mechanism. DNS hosting and Mailmaps forwarding alone do not require this include.
There is no universal selector to copy for domains hosted in Zoneedit DNS. Obtain the selector and TXT or CNAME value from the actual sending system. For ZoneOut, ask Zoneedit support to confirm domain-specific signing support and provide the required records.
Yes. A passing DKIM signature whose signing domain meets DMARC's matching rules is sufficient. If a sending service cannot customize its Return-Path, expect SPF alignment errors for that route and verify domain-specific DKIM instead. Other receiver requirements still apply.
A reverse DNS hostname under zoneedit.com is a clue to Zoneedit infrastructure. To identify ZoneOut outbound traffic, compare the connecting IP with Zoneedit's current SPF authorization and inspect the message headers. Forwarding infrastructure also exists, and rDNS alone neither proves authorization nor passes DMARC.
Zoneedit's newer editor labels DMARC and DKIM TXT records by purpose. Search for DMARC, or open DOMAINS > DNS Settings to use the classic Modular Editor. Confirm the record exists publicly at _dmarc followed by your actual From domain.
Keep the existing enforcement policy while configuring Zoneedit or a new sender. Fix that sender's SPF or DKIM domain settings and verify a fresh message. The p=none example is for domains starting DMARC monitoring, rather than a routine replacement for an enforced policy.




