
How to set up DMARC/DKIM/SPF for Zen Internet

Set up Zen Internet authentication by publishing your domain's cPanel-generated SPF and DKIM TXT records in its authoritative DNS, then adding a DMARC TXT record at _dmarc. I copy the values shown under Email > Email Deliverability > Manage, test a message sent through Zen, and review reporting before enforcing rejection.
These steps apply to custom-domain email on Zen's cPanel hosting. Zen manages authentication for addresses ending in @zen.co.uk or @myzen.co.uk. Its March 2026 service notice restricts mailhost.zen.co.uk sending to those addresses, so use your cPanel mailbox's own SMTP settings for a custom domain.
Add your domain
I check that the domain belongs to the correct Zen hosting account before changing authentication. If it already appears in cPanel, keep the existing domain and mailbox.
- Open hosting. Sign in through Zen My Account. Open My Services, select your cPanel package, and choose "Manage Your cPanel Hosting". Sign in with the hosting credentials.
- Add the domain. Open Domains > Domains > Create a New Domain. Enter example.com, select "Just Use" if offered, check the document root, and click Submit.
- Prepare a mailbox. Open Email > Email Accounts and create a mailbox for the domain if needed. Keep its SMTP settings available for testing.
- Verify the domain. Confirm example.com appears in Domains and in Email Deliverability. Check its public nameservers before choosing where to publish TXT records.
Adding a domain to cPanel registers it with the hosting account. Public DNS queries confirm whether its authentication records are actually available to recipients.
Keep existing MX records unless you are deliberately moving incoming email. A domain registered with Zen still needs authentication changes at another DNS host when its authoritative nameservers are elsewhere.
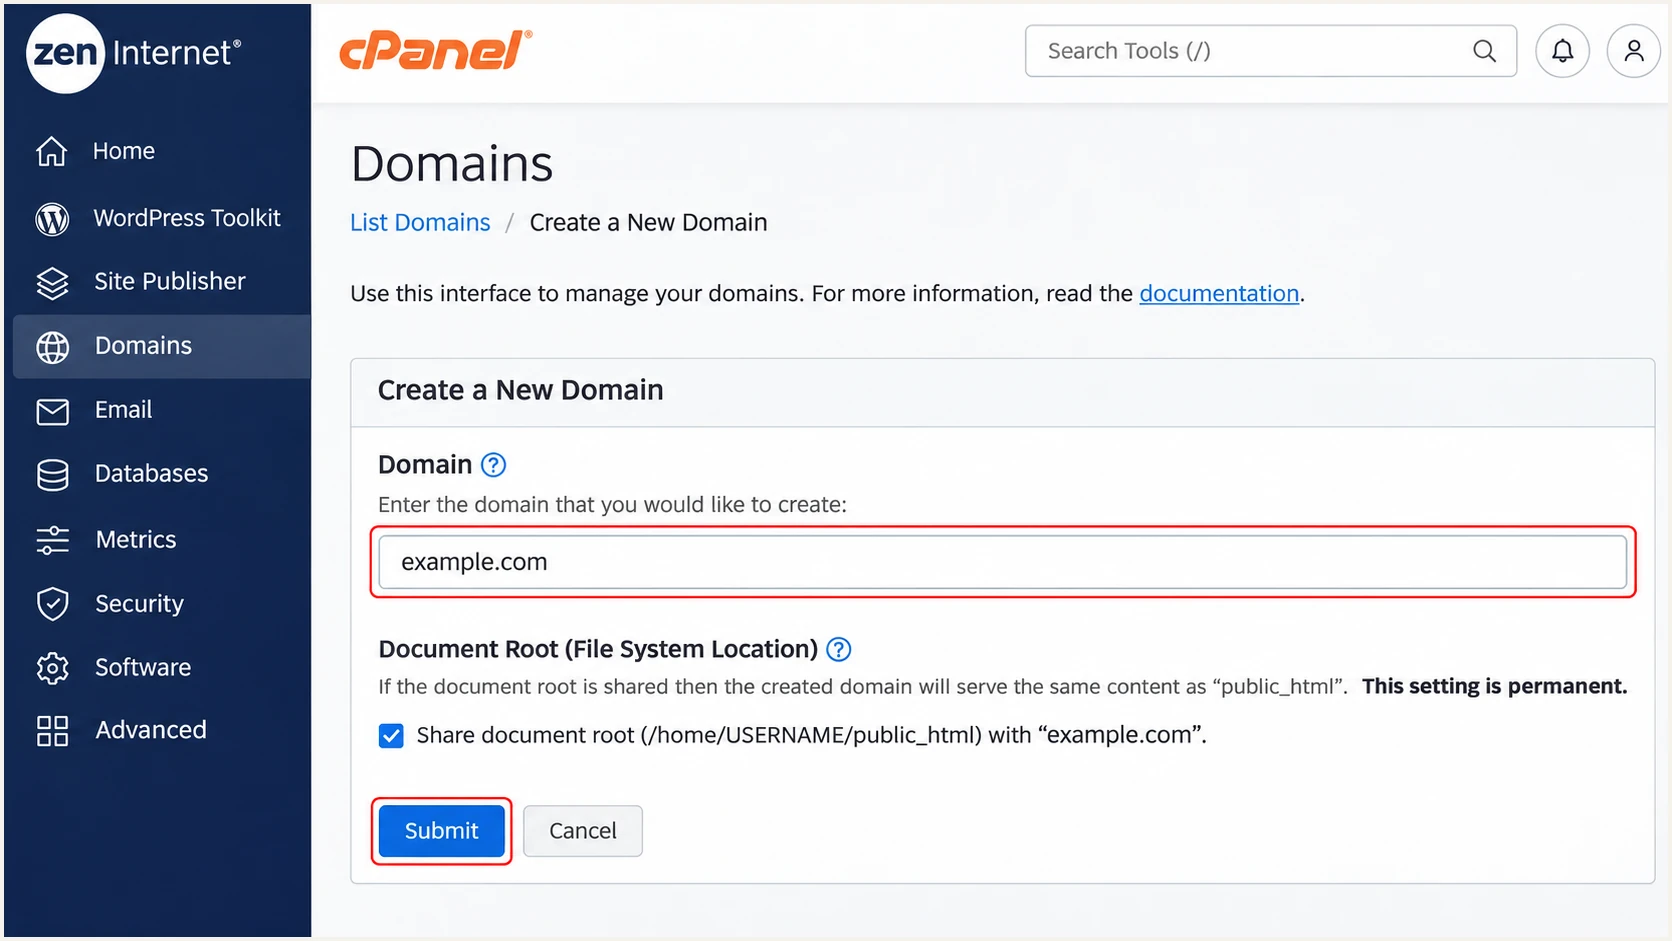
Illustrative Zen cPanel form for adding example.com to the hosting account.
After submitting, return to the domain list. Select the same domain throughout the SPF and DKIM steps so records for a different hosting account are never copied across.
Set up SPF
I take the SPF value from the domain's own cPanel page. Zen's published setup uses account-specific suggested records, so copying a guessed universal Zen include is unsafe.
- Copy the suggestion. Open Email > Email Deliverability, find your domain, and click Manage. Copy Name and Value under Suggested "SPF" (TXT) Record.
- Preserve other senders. Read the existing SPF TXT record first. Merge Zen's required mechanisms with other authorized senders into one policy beginning with v=spf1; keep one final all mechanism.
- Publish one policy. In the authoritative DNS editor, select TXT. Use @ for the root in Zen's relative hostname field, paste the complete merged value, and save. Edit an existing SPF policy instead of adding a second one.
- Check the envelope. Send through the cPanel mailbox's SMTP server. Check the received Return-Path domain against the visible From domain; a shared organizational domain satisfies relaxed SPF alignment.
Zen documents different routes to its DNS editor for Home and Business accounts. Use the route for your account, then open the TXT record controls.
Home portal
My Account > My Services > expand your domain > Things you can do > Go to DNS settings > Advanced DNS tools administration.
Business portal
My Account > Services > DNS > search by Domain name > select the domain > DNS settings > Advanced DNS Tools.
SPF authorizes the public IP that delivers the message, rather than the address of the computer running your mail client. Keep Zen's generated mechanisms intact unless the actual sending configuration requires a change.
Run the check below against the Return-Path domain. For a root-domain Return-Path, enter example.com. SPF permits at most 10 DNS-querying terms during evaluation, including nested includes.
SPF checker
Find SPF syntax issues, lookup limits, and weak records.
?/16tests passed
Resolve duplicate records or lookup-limit errors before continuing. A syntactically valid policy still needs a real-message test to establish that Zen's outgoing IP is authorized.
Zen cPanel supports a matching custom-domain Return-Path. If another sender uses a provider-owned Return-Path without customization, editing your root SPF cannot fix that sender's SPF alignment. That stream can pass DMARC through passing DKIM with a matching signing domain.
Set up DKIM
I publish the public key generated by Zen's cPanel, then verify that Zen signs an outgoing message with the matching domain. Creating a DNS key alone does not activate signing on an unrelated sender.
- Open the DKIM panel. Return to Email > Email Deliverability > your domain > Manage. Locate Suggested "DKIM" (TXT) Record. If no key exists and the option is available, select Generate Local DKIM Key.
- Copy the public value. Copy the complete DKIM Name and Value. Use the DKIM value even where a support instruction accidentally repeats the SPF label.
- Publish the selector. Add a TXT record at default._domainkey when that is the selector shown by cPanel. Use the actual displayed selector if different. Paste the full public value and save.
- Verify the signature. Recheck the domain in Email Deliverability, then send a fresh message. Confirm dkim=pass and a DKIM-Signature d= domain matching your From domain under your DMARC alignment mode.
Zen's SPF/DKIM support articles use default._domainkey in the portal's relative hostname field. Avoid entering the domain twice when the editor appends example.com automatically.
Use the complete TXT value, including its public key. If DNS displays multiple quoted strings inside one TXT record, they are concatenated; they are different from publishing several separate DKIM records at the same selector.
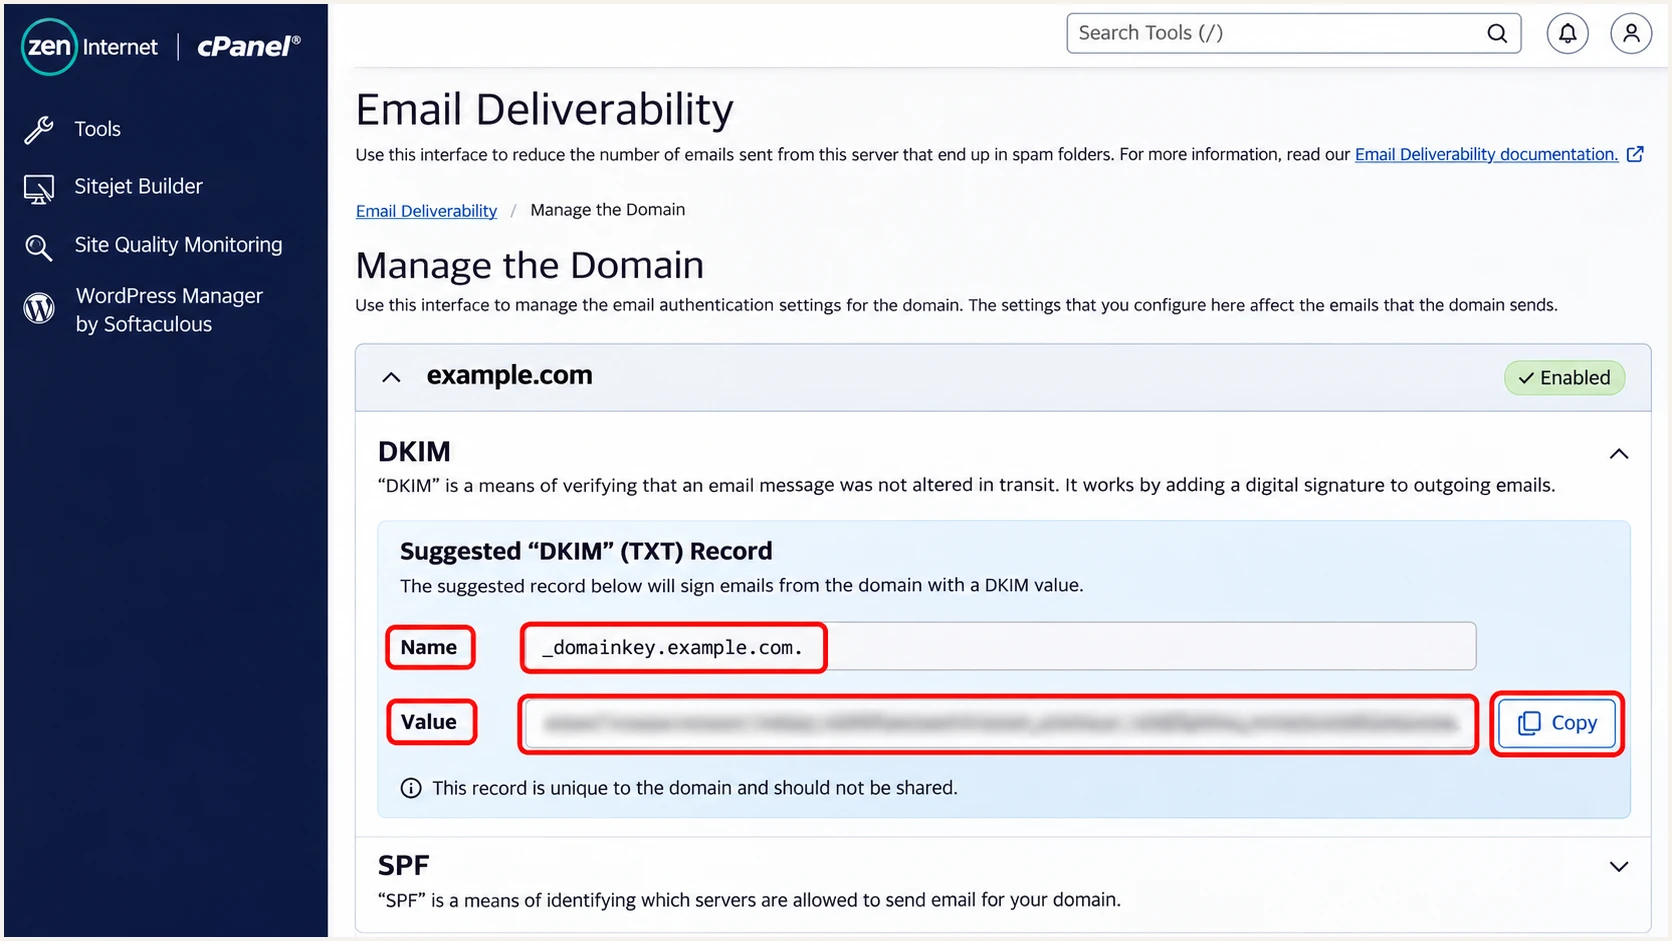
Illustrative Zen cPanel DKIM panel showing where to copy the public record.
When cPanel does not control authoritative DNS, its Repair action cannot publish the public record there. Add the record through Zen's DNS portal or the actual DNS host, then recheck.
If DKIM remains absent from new messages after DNS is correct, ask Zen to confirm signing for that domain. Include a fresh message's headers and the selector you published.
Publish only the public key
Copy Suggested DKIM Value, never View the Private Key. The private key stays on the signing server. Replacing the public key with an independently generated key breaks verification unless the signer also changes.
Set up DMARC
I start a new DMARC deployment with p=none so reporting exposes legitimate authentication failures before enforcement. If the domain already uses p=quarantine or p=reject, retain that policy while adding Zen.
- Inspect the existing policy. Query _dmarc.example.com for TXT records. Update the existing DMARC policy if present; do not publish a second DMARC record at the same name.
- Prepare reporting. Create a working report mailbox or use a report processor's assigned address. Replace dmarc@example.com in the example with your real destination.
- Publish the TXT record. At the authoritative DNS host, add TXT with Hostname/Subdomain _dmarc. Paste the policy value below into Text and save; use the equivalent fields if DNS is hosted elsewhere.
- Confirm the result. Check the exact visible From domain below. Verify that the policy and reporting address are correct and that there is one valid DMARC record.
Initial DMARC value for _dmarc.example.comtext
v=DMARC1; p=none; rua=mailto:dmarc@example.com
The address above is an example, not a live reporting destination. Aggregate reports contain sending IPs and authentication results; most reporting receivers send them daily.
Use the DMARC record generator to build the policy with your actual reporting address. Leave relaxed alignment at its defaults unless you have a specific requirement for exact domain matching.
DMARC checker
Look up a domain's DMARC record and catch policy issues.
?/7tests passed
A valid p=none record collects evidence without requesting quarantine or rejection for DMARC failures. DMARC passes when either SPF passes with a matching envelope domain or DKIM passes with a matching signing domain.
When rua points outside your domain, the destination domain needs to authorize receiving your reports. Follow the reporting service's DNS instructions and preserve working report destinations when editing an existing policy.
Verify and troubleshoot
I verify public DNS first, then send through each real sending path. A dashboard's DNS status cannot establish how a website form or a different SMTP client sends mail.
- Check authoritative DNS. Use the commands below, replacing example.com and default with your actual domain and selector. Confirm the nameservers are the ones whose records you edited.
- Test each sender. Send a new message through Zen Webmail, your configured SMTP client, and any website form using the domain. Use the email tester below for a full diagnosis of each path.
- Read receiver results. Inspect the receiving system's Authentication-Results for spf=pass, dkim=pass, and dmarc=pass. Compare smtp.mailfrom and header.d with header.from; isolated pass results do not establish DMARC alignment.
- Trace delivery errors. Use cPanel Email > Track Delivery to investigate mail handled by that server. Give Zen support the timestamp, recipient, error response, and message ID when a server-side issue persists.
Read public DNS recordsbash
dig +short NS example.com
dig +short TXT example.com
dig +short TXT default._domainkey.example.com
dig +short TXT _dmarc.example.com
The email tester gives you a destination address. Send it a message through the actual Zen mailbox, then open the result for authentication checks and configuration issues.
Zen advises allowing up to 24 hours for its DNS changes to take effect. Cache timing depends on the previous TTL; query the authoritative nameserver directly when public resolvers still show the old value.
Email tester
Send a real email to this address. Suped shows a results button when the test is ready.
?/43tests passed
If SPF fails after forwarding but DKIM still passes with a matching signing domain, DMARC can still pass. If both methods fail or neither domain matches, fix that path before tightening the policy.
For a DKIM failure, check the selector and complete public key, then test whether the message was modified after signing. For mailhost.zen.co.uk authentication errors on a custom domain, use the cPanel SMTP settings rather than changing SPF.
Get alerted when it breaks
Suped is our DMARC platform for ongoing DMARC monitoring. It processes reports for the domain and identifies authentication issues after the initial Zen setup. I recommend keeping that visibility through DNS changes and new sending services.
- Route aggregate reports. Use the Suped reporting address supplied for the domain in rua. Keep your current enforcement policy and any required existing report destinations.
- Verify sending sources. Review the Sources table. Mark Zen as verified only after matching its reported IPs and authentication domains to your legitimate mail; investigate unfamiliar sources separately.
- Enable notifications. Open Suped's notification settings. Enable Issues detected and Sending sources need verification notifications, and configure DMARC summary emails for the people responsible for DNS and email.
- Investigate changes. Open the affected source and its detail view to inspect SPF, DKIM, DMARC, and rDNS results. Use DNS history to compare record changes with the start of failures, then follow the issue's steps to fix.
Suped combines issue detection with report-level diagnostics, so the action is tied to the failing source. Keep Zen's cPanel settings as the reference for the SPF policy and DKIM key that its servers require.
Aggregate report delivery usually follows a daily cycle. Suped's issue notifications depend on new evidence arriving; a single test message is the faster check immediately after a change.
Secure your domain with p=reject
I move to p=reject after reports cover normal business activity and every legitimate sending path has a working DMARC pass route. Suped's source verification and failure diagnostics provide the evidence for each policy change.
- Inventory all mail. Confirm Zen mailboxes and website forms, then review other sources using the same From domain. Include low-volume or periodic systems before declaring the domain ready.
- Fix legitimate failures. Use Suped to inspect each authorized source's failures. Correct DNS and sender settings, then send fresh tests. A high overall pass rate is insufficient if a legitimate low-volume source still fails.
- Stage enforcement. Change p=none to p=quarantine after legitimate traffic passes. Review fresh reports and delivery errors before moving to p=reject; use observed traffic rather than a fixed waiting period.
- Manage the policy. Edit the existing DMARC TXT record at your DNS host. If you use Suped's Hosted DMARC, apply the policy through its dashboard after its DNS delegation is verified. Retain rua reporting.
- Review subdomains. Check sending subdomains and any explicit child DMARC policies before enforcement. Review sp where used, and continue monitoring after the final change.
A passing DKIM signature with the correct domain keeps forwarded mail eligible for DMARC pass when SPF fails. Investigate remaining legitimate forwarding failures before enforcing rejection.
Keep each policy stage tied to an operational check. The policy requests handling for DMARC failures; recipients retain their own filtering and delivery decisions.
|
|
|
|---|---|---|
p=none | Monitor | Sources verified |
p=quarantine | Treat as suspicious | Delivery reviewed |
p=reject | Reject failures | Keep monitoring |
DMARC policy stages and the check before advancing.
Keep the reporting address unchanged when changing p. In Suped, compare source-level results before and after enforcement and act on new failures before they affect more legitimate mail.
After the final change, repeat the real-message tests and confirm the published policy. Keep the DNS owner and the person receiving authentication alerts responsible for the same domain.
Frequency asked questions
Use the complete Suggested "SPF" (TXT) Record for your domain in cPanel Email Deliverability. Zen documents copying this generated value rather than a universal include. Merge its required mechanisms into your existing SPF policy if you use other senders.
Zen's cPanel setup instructions use default._domainkey. Confirm the Name shown for your own domain and the s= value on a newly sent DKIM signature. Publish the complete public key for that selector in authoritative DNS.
Zen controls DNS for those domains and manages their email authentication. You can configure SPF, DKIM, and DMARC for a custom domain whose DNS you control. Use that domain's supported sending service and SMTP settings.
Yes. Passing DKIM with a signing domain that matches the From domain under the configured alignment mode is sufficient. For a sender without custom Return-Path support, changing your own SPF record cannot fix its SPF alignment. Zen cPanel supports custom-domain sending, so verify its Return-Path as well.
The .zen.co.uk suffix is associated with Zen Internet infrastructure. It does not identify a particular customer or prove authorization for your domain. Check the connecting IP, received headers, and SPF or DKIM domains together. Zen also provides connectivity for customer-operated mail servers, so rDNS alone is insufficient to identify the sending service.
Check that rua has the correct working destination, that any external reporting authorization exists, and that mail reached receivers that send aggregate reports. Allow for daily reporting and DNS cache expiry. The email tester checks a fresh message while report data accumulates.




