
How to set up DMARC/DKIM/SPF for Yandex Mail

Published 22 Nov 2026
Updated 22 Nov 2026
12 min read
Summarize with
To set up email authentication for a custom domain on Yandex Mail, verify the domain in Yandex 360 for Business, publish Yandex's SPF record, add its domain-specific DKIM key at mail._domainkey, and publish a DMARC record at _dmarc. Start a new DMARC policy at p=none, test actual messages, then move to enforcement after checking every legitimate sender.
For a personal address such as name@yandex.com, Yandex manages the domain's authentication records. You cannot edit them. I make this distinction first because the DNS steps below require a domain you own and administer in Yandex 360 for Business.
Add your domain
I verify ownership before changing mail routing. Use an organization administrator account and edit records at the provider hosting your authoritative DNS, which is not always your registrar.
- Add the domain: Open the Yandex 360 for Business administration account. Select General settings > Domains, enter your domain, and click Add domain.
- Prove ownership: Choose DNS verification and publish the exact record Yandex displays. Copy the supplied name and value, including the domain-specific verification token.
- Run verification: Return to Domains and follow the verification prompt. Use Verify your domain > Check to refresh the domain's checks after DNS changes become visible.
- Connect incoming mail: If Yandex will receive your domain's mail, prepare the mailboxes before replacing existing MX records. Set the root MX destination to mx.yandex.net. with priority 10 and TTL 21600.
Changing nameservers is optional. Keeping your current DNS hosting lets you add Yandex's records without moving your website's DNS. The MX change controls incoming delivery; SPF and DKIM configure authentication for outgoing messages.
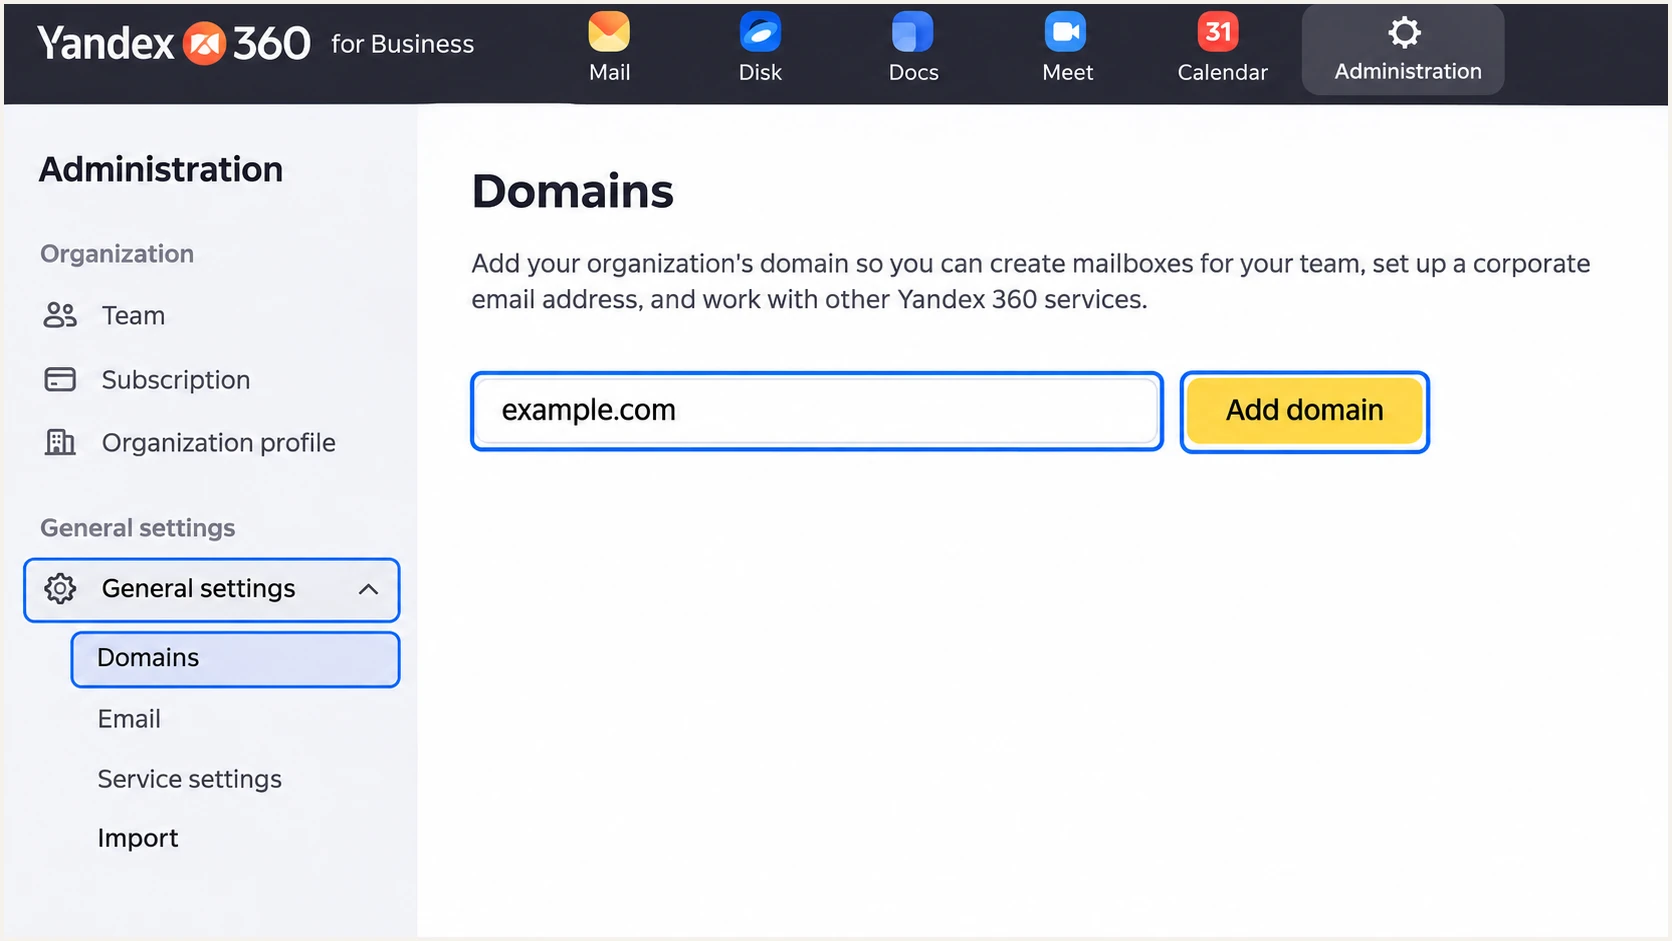
Illustrated Yandex 360 Domains screen showing where to add a custom domain.
If the domain is already delegated to Yandex, its documentation says MX, SPF, and DKIM records are created automatically. Inspect the existing records instead of adding duplicates, then check DMARC separately.
Replace example.com in every example with your own domain. Yandex specifies a six-hour TTL, 21600 seconds, for these mail records and allows up to 72 hours for DNS updates to become visible.
Set up SPF
For a domain that sends only through Yandex, its documented SPF value is v=spf1 redirect=_spf.yandex.net. Publish it as a TXT record at the domain root, usually entered as @.
I inspect the existing root TXT records first. There must be exactly one SPF policy beginning with v=spf1 at a given name, even when several services send mail for the domain.
- Choose the policy: Use the Yandex-only record below if Yandex is your only sender. If other senders already exist, merge Yandex's documented include:_spf.yandex.net mechanism into the existing policy.
- Save one TXT record: Use host @ and TTL 21600. In a merged policy, replace the Yandex redirect with the include mechanism and retain the other authorized senders and the appropriate final all mechanism.
- Refresh Yandex: Open General settings > Domains, select Verify your domain, and click Check after the updated TXT record resolves.
- Check the return path: Send a custom-domain message and compare the receiver's smtp.mailfrom domain with the visible From domain. A matching domain, or the same organizational domain under relaxed rules, establishes SPF alignment when SPF passes.
Yandex-only SPF TXT value at @text
v=spf1 redirect=_spf.yandex.net
Merged SPF example with an additional servertext
v=spf1 ip4:192.0.2.10 include:_spf.yandex.net ~all
The merged example uses a documentation-only IP address. Replace it with your authorized server's real address or retain your existing sender mechanisms. Keep an existing -all policy if it is already correct for your senders.
Do not append ~all or -all to the redirect-only record. SPF ignores redirect whenever an all mechanism exists. Run the checker against your domain after saving the selected policy.
SPF checker
Find SPF syntax issues, lookup limits, and weak records.
?/16tests passed
The checker validates the published policy and its lookup budget. SPF permits at most 10 DNS-querying mechanisms and modifiers during evaluation, including nested includes and redirects; exceeding that limit produces permerror.
Yandex supports custom-domain return-path alignment. Confirm the actual return path in a received message rather than assuming that publishing SPF changes it. If a particular route uses a shared Yandex return-path domain, SPF can pass without satisfying DMARC's domain matching requirement.
Avoid duplicate SPF policies
Merge sender authorizations into one SPF TXT record. Two separate v=spf1 records at the same name produce permerror. Unrelated TXT records, including domain verification records, can remain.
Set up DKIM
Yandex signs custom-domain messages with a domain-specific key. Its documented selector is mail, so receivers look up the public key at mail._domainkey.example.com.
I copy the complete value supplied by Yandex. A key generated elsewhere will not match the private key Yandex uses to sign your messages.
- Open DKIM setup: Go to General settings > Domains and click Add DKIM next to your verified domain. If it is missing, finish connecting and verifying the domain first.
- Copy the key: Under Configure DKIM signature, copy the entire public record value, including its tags and complete p= key.
- Publish the record: Create a TXT record with host mail._domainkey and TTL 21600. Paste Yandex's full value without truncating the key. Use the complete hostname only if your DNS provider requires it.
- Recheck the domain: Return to Domains > Verify your domain > Check after publication. Send a new message and confirm dkim=pass with header.d equal to your sending domain.
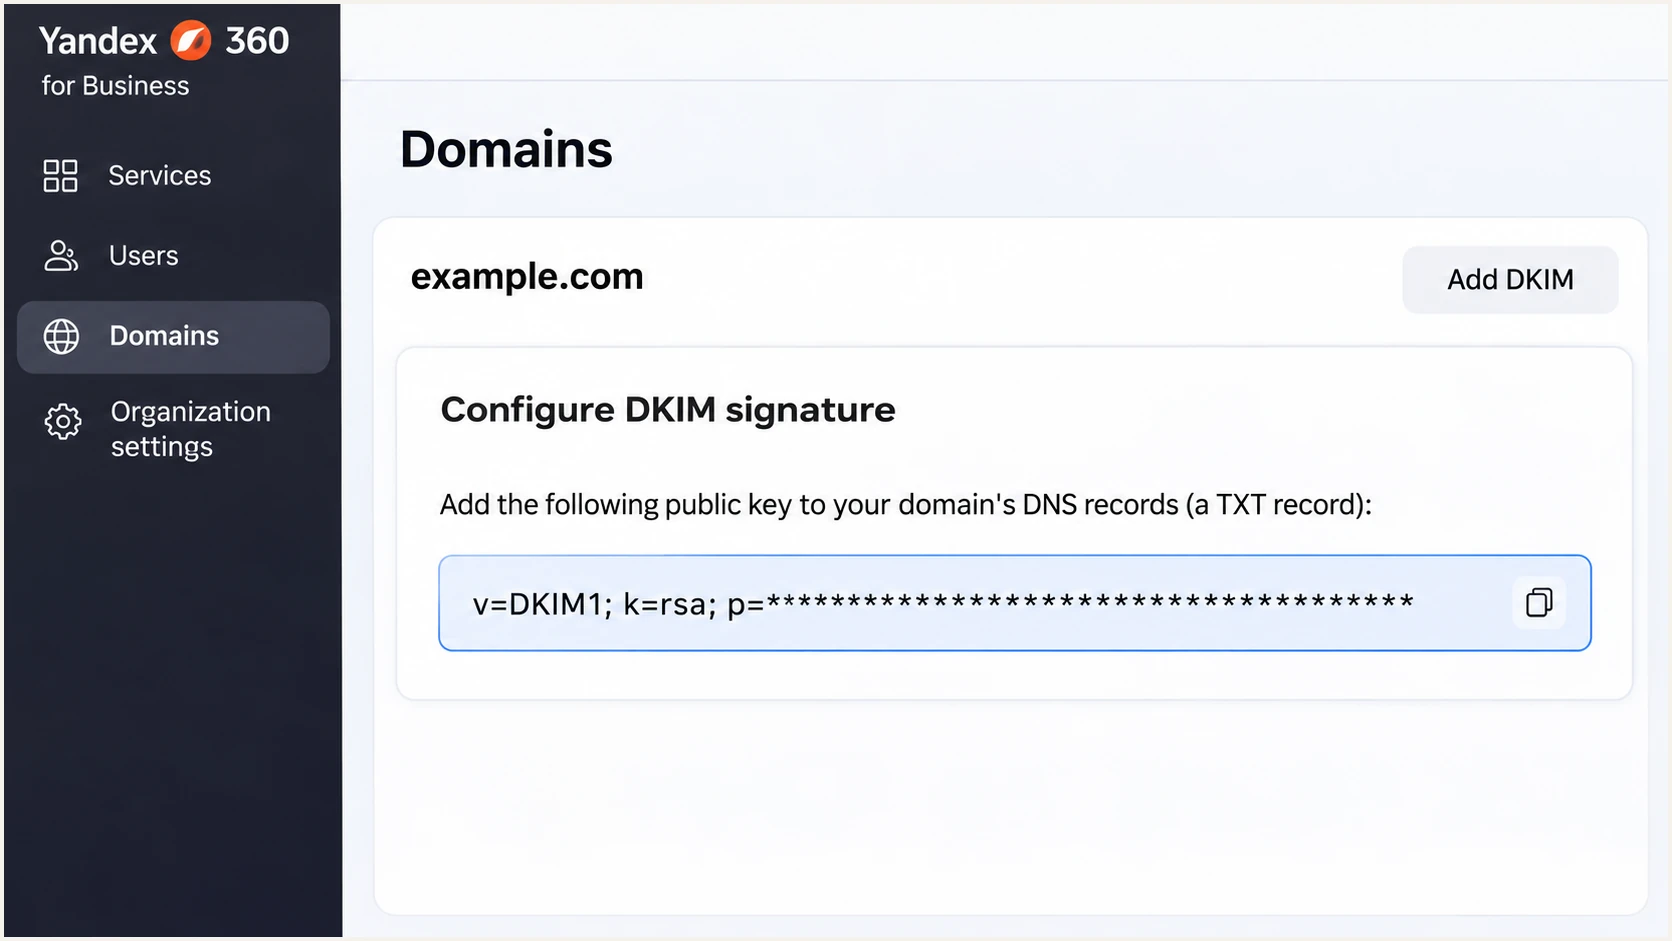
Illustrated Yandex 360 DKIM setup showing the public key to copy into DNS.
Check that the final DNS name contains your domain once. A panel that automatically appends example.com needs mail._domainkey, not a hostname that becomes mail._domainkey.example.com.example.com.
Keep Yandex's supplied tags intact. Publish only the public record; Yandex retains the signing key. A visible DNS key alone does not prove signing works, so verify the signature on a newly received message.
Set up DMARC
For a domain without an existing enforcement policy, start with p=none. If your domain already uses p=quarantine or p=reject, keep that policy while adding Yandex and fix any Yandex authentication failures.
Publish one DMARC TXT record at _dmarc.example.com, usually entered as host _dmarc. You can use the DMARC record generator to build the record with your reporting destination.
- Inspect existing DMARC: Look up _dmarc before editing. Update the existing record rather than creating a second DMARC policy at the same name.
- Create the policy: For a new setup, add a TXT record at _dmarc using the exact example below, replacing its report address with your real destination.
- Prepare reporting: If receiving reports yourself, create the reporting mailbox. If using a reporting service, use its supplied address and complete any required external reporting authorization.
- Save and validate: Save the record, wait for DNS caches to expire, and check your domain below. Keep existing enforcement and reporting tags that are already required.
Initial DMARC TXT value at _dmarctext
v=DMARC1; p=none; rua=mailto:dmarc@example.com
The address dmarc@example.com is a placeholder, not a destination to publish unchanged. Use a working address under your control or the address assigned by your reporting provider. The rua tag requests aggregate reports.
DMARC passes when either SPF passes with the required domain matching or a passing DKIM signature has the required domain matching. The default relaxed rules allow the same organizational domain. Both mechanisms do not have to pass for DMARC to pass.
DMARC checker
Look up a domain's DMARC record and catch policy issues.
?/7tests passed
A valid DNS policy confirms that receivers can discover your instructions. It does not prove that Yandex messages satisfy those instructions. Test actual messages before increasing the policy.
With p=none, you request reporting without asking receivers to quarantine or reject messages because of DMARC failure. Receivers still apply their own filtering. Aggregate reports typically arrive daily, and some receivers do not send them.
Verify and troubleshoot
I test a fresh message sent through Yandex to an external recipient. Checking a message in Sent does not show the recipient's authentication decision, and old messages do not change after DNS edits.
The email tester below gives you a destination address. Send a message to it using your custom-domain Yandex mailbox, then inspect its authentication diagnosis. Repeat through each application or SMTP route that sends for the domain.
Email tester
Send a real email to this address. Suped shows a results button when the test is ready.
?/43tests passed
Look for spf=pass, dkim=pass, and dmarc=pass in the receiving system's Authentication-Results. Compare smtp.mailfrom and the DKIM signing domain with header.from; a pass for an unrelated domain does not establish DMARC compliance.
For a message received in Yandex Mail, open the message and choose Message properties in its message menu to inspect the headers. For the strongest check of your outgoing configuration, use the tester's received copy and its results.
- Check authoritative data: Run the DNS commands below with your domain. Confirm one SPF policy, the complete DKIM key, and one DMARC policy at their correct names.
- Inspect signing: Check DKIM-Signature for s=mail and d=your sending domain. A passing signature for a shared provider domain alone does not satisfy DMARC for your custom domain.
- Confirm the route: Make sure the message actually leaves through Yandex. A website sending directly through its web server needs that route's own authentication configuration.
- Retest after fixes: Refresh Yandex's domain checks and send another message after DNS changes resolve. Allow for cached answers; Yandex documents propagation taking up to 72 hours.
Inspect the published recordsbash
dig +short MX example.com
dig +short TXT example.com
dig +short TXT mail._domainkey.example.com
dig +short TXT _dmarc.example.com
|
|
|---|---|
SPF permerror | Duplicates; lookup budget |
SPF fail | Sending IP; return path |
DKIM fail | Key; selector; message changes |
DMARC fail | From domain matching |
No reports | rua address; report delay |
Use the received message's result to choose the next check.
Forwarding often breaks SPF because the connecting server changes. DKIM remains useful if the forwarded message is not modified in a way that invalidates its signature.
An SPF alignment failure is acceptable for DMARC when DKIM passes with the required domain matching. For direct Yandex sending, investigate unexpected SPF failures anyway, since they can expose an incorrect route or return path.
SPF passes alone
The sending IP is authorized for the envelope sender's domain. If that domain is a shared Yandex domain, this result alone does not authenticate your visible custom-domain From address for DMARC.
DKIM satisfies DMARC
A passing DKIM signature uses your From domain or the same organizational domain under relaxed rules. DMARC can pass through that signature even when SPF alignment fails.
Get alerted when it breaks
A successful test covers one message. Our DMARC platform, Suped, monitors aggregate reports and detects authentication issues after setup. It is our recommended workflow for catching Yandex failures that a one-time DNS check misses.
- Keep reports flowing: Use the reporting destination supplied by Suped in your existing rua configuration. Preserve the domain's current policy and any other required reporting destinations.
- Enable notifications: In Suped, enable Issues detected and Sending sources need verification notifications. Use DMARC summary emails for routine reviews.
- Investigate the source: Open a detected issue, review the affected Yandex traffic, and inspect its SPF and DKIM results. Check DNS history when failures start after a record change.
- Verify the fix: Follow the issue's steps to fix, update the relevant DNS record or Yandex setting, and send another test. Confirm improvement in subsequent aggregate reports.
Suped's DMARC monitoring connects source-level failures with steps to fix them. I review legitimate-source failures separately from unauthorized traffic so that an attempted impersonation does not trigger unnecessary changes to working Yandex records.
Reports have a delivery delay
Suped can notify you when an issue is detected, but DMARC aggregate data depends on receivers sending reports. Use a fresh test message to check an urgent repair while waiting for the next reporting period.
Secure your domain with p=reject
I move to p=reject after every known legitimate sender has a reliable DMARC pass path. Use enough report history to cover your real sending cycle, including infrequent billing or operational messages, rather than relying on one successful Yandex test.
- Inventory senders: Review Suped's source table and verify the services your organization authorizes. Confirm ownership internally before approving a source; a Yandex hostname alone is insufficient.
- Fix legitimate failures: Resolve missing Yandex DKIM keys and incorrect SPF policies. Check other legitimate services too, since the domain's DMARC policy covers more than Yandex traffic.
- Stage quarantine: Change a new monitoring policy to p=quarantine once legitimate traffic passes. Review subsequent reports and delivery complaints through a representative sending cycle.
- Apply reject: Change the same record to p=reject when legitimate failures are resolved. Confirm that sending subdomains are covered by the intended policy and retain the reporting destination.
- Continue monitoring: Keep Suped notifications active and review new sources before they send. Recheck authentication after DNS changes or a move to another sending route.
Staged DMARC values, publish only one policy at a timetext
# Quarantine stage
v=DMARC1; p=quarantine; rua=mailto:dmarc@example.com

# Reject stage
v=DMARC1; p=reject; rua=mailto:dmarc@example.com
Replace the example reporting address in both records. Keep relaxed domain matching unless you have a tested reason for strict settings. For subdomains without their own DMARC record, review inherited policy before enforcement.
Suped's hosted DMARC lets you manage policy changes in the dashboard after its initial DNS configuration. Use source verification and issue diagnostics alongside policy staging to make each enforcement change reviewable.
Keep a working authentication path
With p=reject, a message that passes DKIM with the required domain matching still passes DMARC even if SPF fails after forwarding. Keep Yandex DKIM working and monitor real delivery before and after each policy change.
Frequency asked questions
Yandex manages authentication for yandex.com and its personal-mail domain aliases. You cannot change those DNS records. To publish your own policies, use a domain you control with Yandex 360 for Business.
The mail.yandex.net suffix is associated with Yandex Mail infrastructure. Confirm the actual connecting IP's reverse DNS and the recipient's authentication results. The hostname does not establish which customer sent a message or whether your organization authorized it.
Yandex Mail and Yandex 360 for Business use _spf.yandex.net for SPF authorization. Yandex documents v=spf1 redirect=_spf.yandex.net for Yandex-only sending and include:_spf.yandex.net within a combined policy. Authorize Yandex only if your domain actually sends through it.
SPF can pass for an envelope sender domain that does not match your visible From domain under DMARC's rules. If there is also no passing DKIM signature with the required domain matching, DMARC fails. Check smtp.mailfrom, header.from, and the DKIM d= domain on the received message.
No. You can keep your current DNS provider and publish the required records there. If your domain is already delegated to Yandex, its MX, SPF, and DKIM records are configured automatically according to Yandex's documentation. Check existing values before adding anything.
Yandex allows up to 72 hours for DNS changes to propagate, although individual resolvers update sooner according to their caches. Refresh the domain check once your records resolve. Test a new message immediately after that; aggregate DMARC reports typically arrive daily and depend on the receiving provider.




