
How to set up DMARC/DKIM/SPF for Yandex Cloud Postbox

To authenticate Yandex Cloud Postbox, verify your sending domain with its DKIM records, add include:spf.postbox.yandexcloud.net to your SPF record, and publish a DMARC TXT record at your sending domain's _dmarc hostname. I start a new DMARC deployment with p=none and confirm a test message passes before increasing enforcement. Keep an existing quarantine or reject policy.
Easy DKIM uses two CNAME records. DMARC passes when either SPF or DKIM passes with domain alignment to the visible From address. Adding Postbox to SPF does not, by itself, change your message's Return-Path.
Add your domain
I register the exact domain used in the visible From address. A Postbox 'address' is a domain identity, not a mailbox.
- Select the folder: Open the Yandex Cloud management console, choose your cloud and folder, and open Cloud Postbox. Use an active billing account and retain access to your domain's authoritative DNS.
- Create the address: Open Addresses, click Create address, and enter example.com in Domain. Register mail.example.com separately if that is the domain your From addresses use.
- Choose signing: Under Email signature configuration (DKIM), choose Easy DKIM, also called Simple in the quickstart, and click Create address.
- Publish verification: Open the created address and copy both displayed CNAME records into your authoritative DNS zone. Use the generated names and targets exactly.
- Confirm ownership: Return to the address page and wait for verification status Success. If it has not changed within 24 hours, check DNS and click Run verification.
When a DNS provider appends your zone name automatically, enter only the relative record name. Avoid accidentally creating a name ending in example.com.example.com.
Keep both CNAME records after verification. Postbox uses them for automatic DKIM key rotation; removing either one breaks that setup.
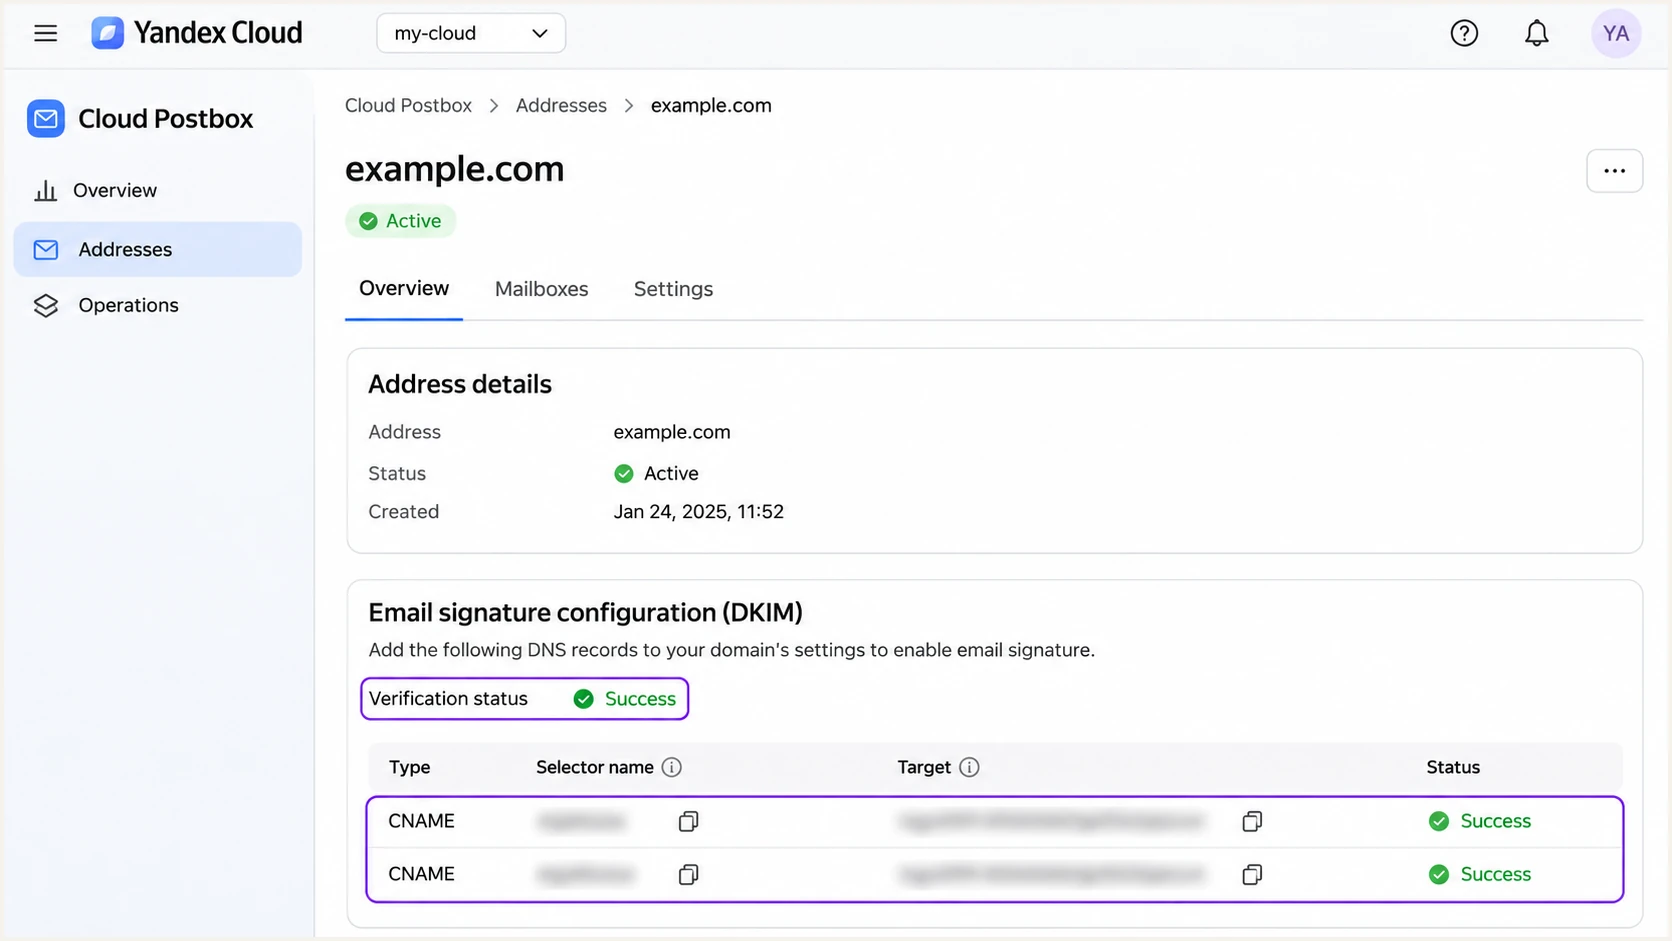
Postbox address details with both Easy DKIM CNAME records and successful verification.
For sending, create a service account in the same folder as the address and assign postbox.sender. Folder or permission errors require an account configuration fix rather than another DNS record.
Set up SPF
I inspect the existing SPF record before changing it. Yandex documents this Postbox include separately from the include used by Yandex's mailbox service.
- Find the record: Read TXT records at your sending domain, such as example.com. Locate the single value beginning with v=spf1.
- Authorize Postbox: Add include:spf.postbox.yandexcloud.net before the final all mechanism. Preserve your other authorized senders and existing all qualifier.
- Avoid duplicates: Edit the existing SPF record instead of publishing a second one. If Postbox is your only sender and no SPF exists, use the example below.
- Check the limit: Keep SPF within the limit of 10 DNS lookup terms during evaluation, including nested includes. Do not replace Postbox's maintained include with a copied list of current IP addresses.
SPF TXT value for a domain sending only through Postboxdns
v=spf1 include:spf.postbox.yandexcloud.net ~all
Publish that value at example.com, usually entered as @ in a DNS editor. For a custom envelope subdomain, publish SPF at that subdomain too; the receiver checks the SMTP MAIL FROM domain.
Use the SPF checker to validate the domain you actually published. A valid DNS result confirms syntax and lookup handling, but a received message is still necessary to establish SPF alignment.
SPF checker
Find SPF syntax issues, lookup limits, and weak records.
?/16tests passed
For From noreply@example.com, an SPF-authenticated envelope domain of example.com matches exactly. A domain such as bounces.example.com matches under relaxed SPF alignment, but not strict alignment.
Yandex says custom-domain SPF is optional for default Postbox sending because its technical domain already has SPF. If the receiver reports smtp.mailfrom under postbox.yandexcloud.net, an SPF alignment error against example.com is expected. DMARC still passes when your example.com DKIM signature passes. A Return-Path notification address or Reply-To setting alone is not proof of a custom envelope domain.
Set up DKIM
I use Easy DKIM unless there is a specific requirement to manage the signing key. Domain verification and DKIM setup use the same generated DNS records.
- Open the records: Go to Cloud Postbox, Addresses, select your domain, and expand Email signature configuration (DKIM).
- Check both aliases: For Easy DKIM, confirm both generated names exist as CNAME records with the exact displayed targets. Do not replace them with an unrelated TXT key.
- Allow rotation: Keep both aliases even when only one currently resolves to a public key TXT record. Yandex documents that both keys resolve together during rotation.
- Test your domain: Inspect a delivered message for dkim=pass using your domain. Postbox also adds a signature using its technical domain; that signature alone does not establish DMARC alignment with your From domain.
For From noreply@example.com, I expect a passing DKIM signature with d=example.com. Check the s= selector in that signature against the record names shown in Postbox.
Advanced setup uses a selector you choose and a public key TXT record. Supply the private key only to Postbox's Private key field, never to public DNS.
Easy DKIM
Publish the two generated CNAME records. Postbox manages the signing keys and rotates them automatically.
Keep both CNAME records published permanently, including after status changes to Success.
Advanced DKIM
Generate a 2048-bit RSA key, enter a unique selector and the private key when creating the address, then publish Postbox's generated public TXT value.
Use this route when you need control of key material and can maintain the key rotation process.
A CNAME cannot share its hostname with other record types. If an old selector already occupies a generated name, resolve that conflict before retrying verification.
Use the full generated public key without truncation. DNS editors that split a long TXT value into quoted strings must preserve it as one TXT resource record.
Set up DMARC
I publish DMARC for the domain in the visible From address. It is your domain's policy, and it covers all services sending with that domain.
- Check the current policy: Query _dmarc.example.com first. If it already has p=quarantine or p=reject, retain that policy and repair Postbox authentication without weakening enforcement.
- Create or edit TXT: For a new deployment, open your DNS zone and create a TXT record named _dmarc. In Yandex Cloud DNS, select the zone, click Create record, choose TXT, and enter the value below.
- Set reporting: Replace dmarc@example.com with a real reporting destination. Keep one DMARC record at the hostname. If the reporting destination uses another domain, its operator must authorize external reporting.
- Generate and save: Use the DMARC record generator to prepare the value, save the record, and wait for the DNS TTL before checking again.
Initial DMARC TXT value at _dmarc.example.comdns
v=DMARC1; p=none; rua=mailto:dmarc@example.com
The example reporting address is a placeholder. Use the record's exact syntax with your actual destination; Postbox does not create or read that reporting mailbox for you.
The p=none policy requests monitoring without DMARC enforcement. It does not guarantee delivery or override a recipient's other filtering decisions.
DMARC checker
Look up a domain's DMARC record and catch policy issues.
?/7tests passed
The checker confirms whether the published DMARC record is valid. It does not prove that messages sent through Postbox pass authentication.
I test a newly sent message after DNS changes and then review aggregate reports as they arrive. Reports commonly arrive the following day rather than immediately after a send.
Verify and troubleshoot
I verify a message sent through the same Postbox integration used in production. The email tester below gives you a destination address and diagnoses the message you send to it.
- Send a console test: Open Cloud Postbox, Addresses, select the verified domain, and click Test email. Enter the sender's mailbox name, choose an arbitrary recipient, and paste the tester's destination address.
- Choose the account: Enter a subject and body, select a service account with postbox.sender in the same folder, and send. Repeat through your production API or SMTP integration afterward.
- Check the envelope: The test form's Additional parameters includes a Return-Path notification address. After using it, inspect the received Return-Path and smtp.mailfrom result; do not assume the notification setting changes the authenticated envelope domain.
- Check DMARC: Require dmarc=pass for your From domain and a passing signature using your domain. Investigate SPF separately if the receiver uses a Postbox technical envelope domain.
A console test isolates the domain configuration. A production test also checks the application's selected From domain and whether it uses the intended Postbox folder.
For SMTP, use postbox.cloud.yandex.net on port 587 with STARTTLS or port 465 with TLS. With API-key authentication, the username is the key ID and the password is its secret; the key needs the yc.postbox.send scope.
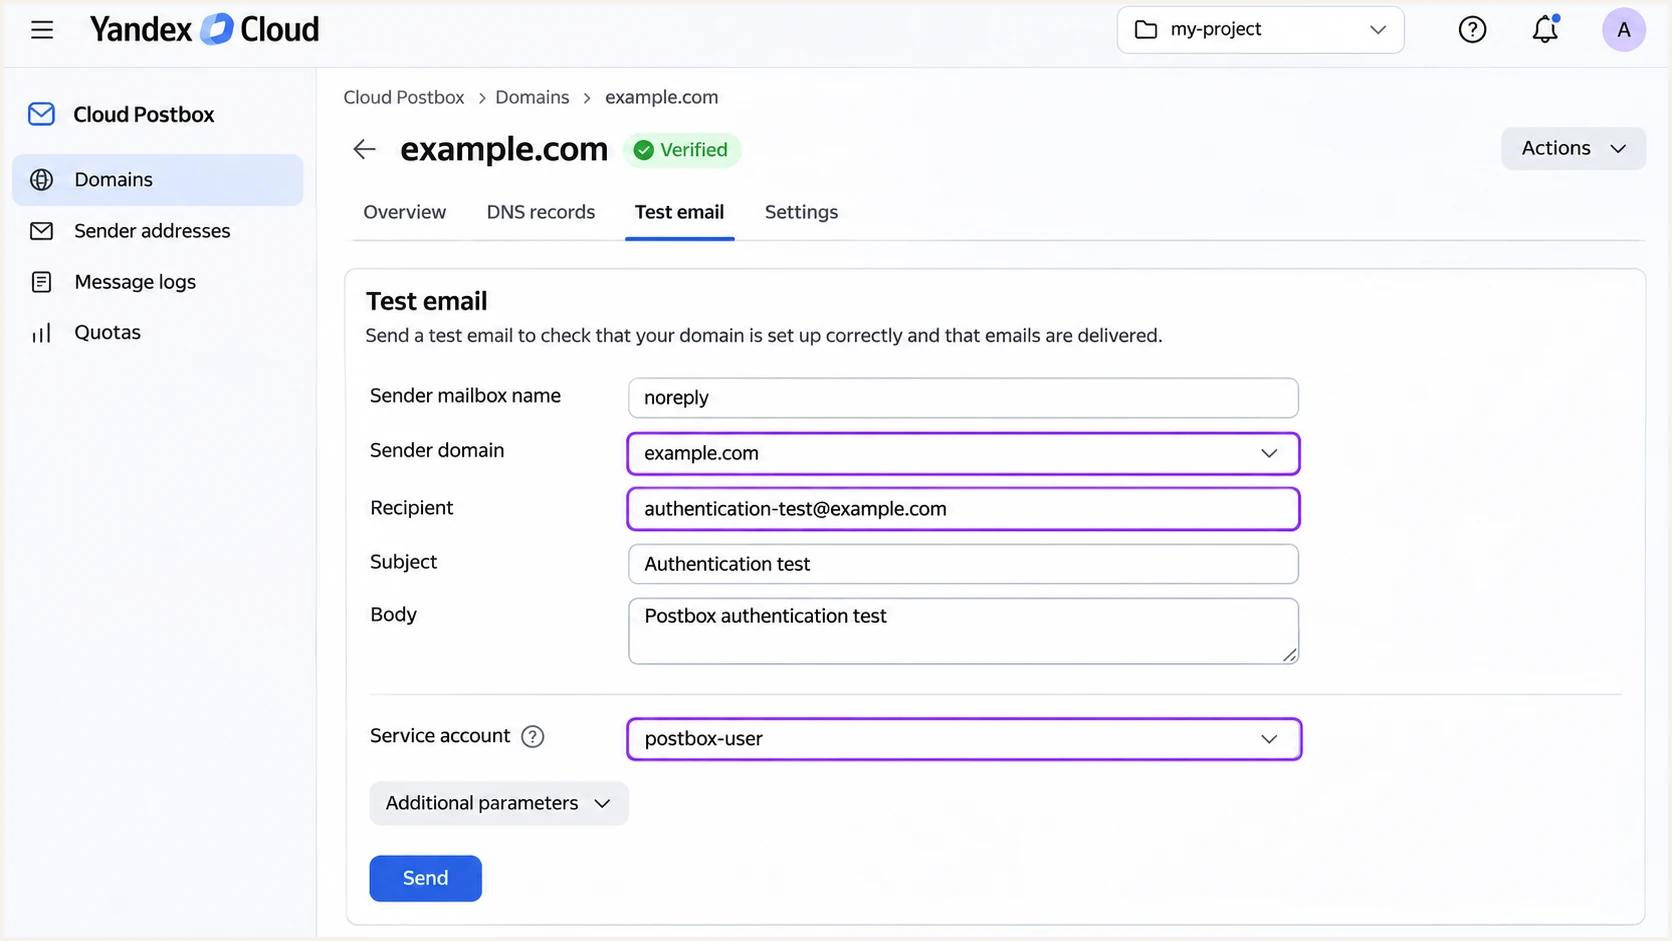
Postbox test email form with the verified sender domain and selected service account.
Replace the illustrated recipient with the address generated by the tester. Sending to a delivery simulator checks Postbox behavior but does not provide an independently received message for this authentication test.
Keep the recipient's authentication results for comparison after each DNS change. A MessageId or successful SMTP submission confirms acceptance by Postbox, not DMARC success at the receiving server.
Email tester
Send a real email to this address. Suped shows a results button when the test is ready.
?/43tests passed
Use the tester's DKIM domain and SPF envelope domain to explain the DMARC result. Two authentication passes on unrelated domains do not establish a pass for your visible From domain.
For DNS failures, inspect the authoritative zone, remove duplicate SPF or DMARC records, and check selector spelling. Use this checklist to distinguish DNS configuration failures from sending-account errors.
|
|
|
|---|---|---|
Domain status | Success | DKIM DNS |
DKIM | Pass, your domain | Selector and key |
SPF | Envelope-domain pass | MAIL FROM and SPF |
DMARC | Pass, From domain | Domain alignment |
Send rejection | No account error | Folder and role |
Expected results and the first place to investigate.
If verification remains pending after 24 hours, use Run verification on the address page. If authentication passes but delivery fails, inspect the delivery error and suppression status instead of repeatedly editing DNS.
Get alerted when it breaks
Suped is our DMARC platform. Its DMARC monitoring connects authentication failures to sending sources and specific repair steps, so a Postbox signing failure has a clear investigation path.
- Verify the source: In Suped's Sources view, confirm that Postbox traffic belongs to an authorized integration before marking it verified. A recognizable rDNS name alone is insufficient.
- Enable notifications: Open Notifications and enable Issues detected and Sending sources need verification. Keep DMARC summary emails enabled to review changes in authentication volume.
- Investigate failures: Open the detected issue, filter Data view to the Postbox source and affected dates, and inspect Detail view for the failing SPF or DKIM checks. Follow the issue's repair steps and verify the fix after DNS updates.
- Retain delivery logs: In Postbox, open your address's Logging settings, enable Write logs and Email statuses, choose a destination, and save. Cloud Logging has usage charges; correlate delivery failures with the authentication evidence in Suped.
I watch for new failures on legitimate sending traffic rather than reacting to every failed message using the domain. Unauthorized traffic failing DMARC is expected once a domain is protected.
A Postbox delivery log and a recipient's DMARC report answer different questions. Keep both when diagnosing messages accepted by Postbox but rejected later.
Account for report delay
Suped notifications depend on when issues are detected and when receivers send aggregate reports. Use a fresh email test for immediate validation after changing a record; use report-based monitoring to catch failures across real traffic.
After repairing a selector or SPF record, send another production test and check the following reports. Keep the alert enabled so the same failure is visible if it returns.
Secure your domain with p=reject
I increase enforcement after every legitimate sending source passes DMARC, including infrequent transactional mail. A high overall pass percentage alone is not enough to establish that readiness.
- Inventory senders: Use Suped's source table to identify Postbox and every other legitimate sender. Observe a full sending cycle, including billing or scheduled messages, before deciding the inventory is complete.
- Fix legitimate failures: Use Suped's issue details to repair missing DKIM records and domain mismatches. Confirm Postbox has a passing signature using your From domain even when SPF alignment is unavailable on the active sending path.
- Stage the policy: For a new deployment, change the existing policy to p=quarantine, inspect legitimate traffic, then change it to p=reject. Retain your real rua reporting destination at each stage.
- Manage changes: Suped's Hosted DMARC supports dashboard policy management after its DNS delegation is configured. Use its reports and issue detection to check the effects of each policy change.
- Check subdomains: Review explicit subdomain DMARC records and any sp policy. A root-domain reject policy does not override a separate, weaker policy published for a sending subdomain.
Publish one policy value at a time at the existing DMARC hostname. The record below is the final-stage example; replace the reporting address before using it.
With p=reject, the domain requests rejection of messages that fail DMARC. Receivers retain local discretion, so keep reporting and production message tests active after enforcement.
Final DMARC TXT value at _dmarc.example.comdns
v=DMARC1; p=reject; rua=mailto:dmarc@example.com
For a domain already using quarantine or reject, preserve that protection while adding Postbox. Verify its DKIM identity before sending production traffic under the enforced policy.
Keep monitoring in Suped after each application release or DNS migration. New senders and missing rotation records need attention even after the initial Postbox setup passes.
Frequency asked questions
Use include:spf.postbox.yandexcloud.net in the existing SPF record, before its final all mechanism. Do not publish a second SPF record. The include authorizes sending IP addresses; it does not change the SMTP MAIL FROM domain.
Postbox uses both records for automatic key rotation. Outside rotation, only one alias normally resolves to a public key TXT record. Keep both CNAME records published after domain verification succeeds.
Yes. A passing DKIM signature with domain alignment to the visible From address is sufficient for DMARC. I check the signature using my sending domain, because a passing Postbox technical-domain signature does not establish that alignment.
Yandex Cloud Postbox is associated with .yandexcloud.net rDNS, but that broad suffix also covers other Yandex Cloud infrastructure. Check the actual sending IP against Postbox's current SPF authorization and inspect the authenticated DKIM domain before treating a source as authorized. rDNS does not identify the customer or prove DMARC alignment.
No MX change is required for the standard Postbox DKIM verification and SPF/DMARC setup described here. Keep the MX records used by your existing incoming mailbox service. Postbox is the outgoing sending service in this configuration.




