
How to set up DMARC/DKIM/SPF for Whidbey Telecom

For a custom domain sending through Whidbey Telecom, obtain its SPF authorization and domain-specific DKIM settings from support, publish the supplied DNS records, and add a DMARC TXT record at _dmarc. I test a real outgoing message before moving the policy to p=reject.
If your address ends in @whidbey.com or @whidbey.net, Whidbey controls those domains and their authentication records. Custom-domain DNS changes require a domain you own. Whidbey publishes domain hosting and SMTP instructions, but I found no public customer SPF include or custom-domain DKIM activation procedure.
Add your domain
I start with Whidbey support, rather than assuming that webmail has an Add domain button. Ask support to provision your custom email domain and confirm which authentication settings your account supports.
Identify the authoritative DNS host before making changes. Domain registration, website hosting and email hosting are separate services; the records belong wherever your domain's authoritative nameservers are managed.
- Confirm ownership: Use your Whidbey account contact to request email service for example.com. Ask which ownership verification is required, and complete only the verification they supply.
- Request provisioning: Contact support@whidbey.net or 360-321-8324. Supply your account details, domain and intended sender address. Request mailbox provisioning and the exact MX records for incoming mail.
- Request authentication: Ask for the supported Return-Path domain, outbound SPF include or IP ranges, and whether DKIM can sign with your custom domain. Request the DKIM selector and TXT value or CNAME target.
- Confirm readiness: Have support confirm the domain and mailbox are active. Test sending and receiving before replacing existing mail routing.
Whidbey's domain setup instructions list ns.whidbey.com and ns.whidbey.net. Confirm these with support for your hosting arrangement before changing delegation.
If DNS is hosted elsewhere, ask whether it can stay there. If Whidbey manages the zone, request the authentication changes through support. Preserve existing website and mail records during any migration.
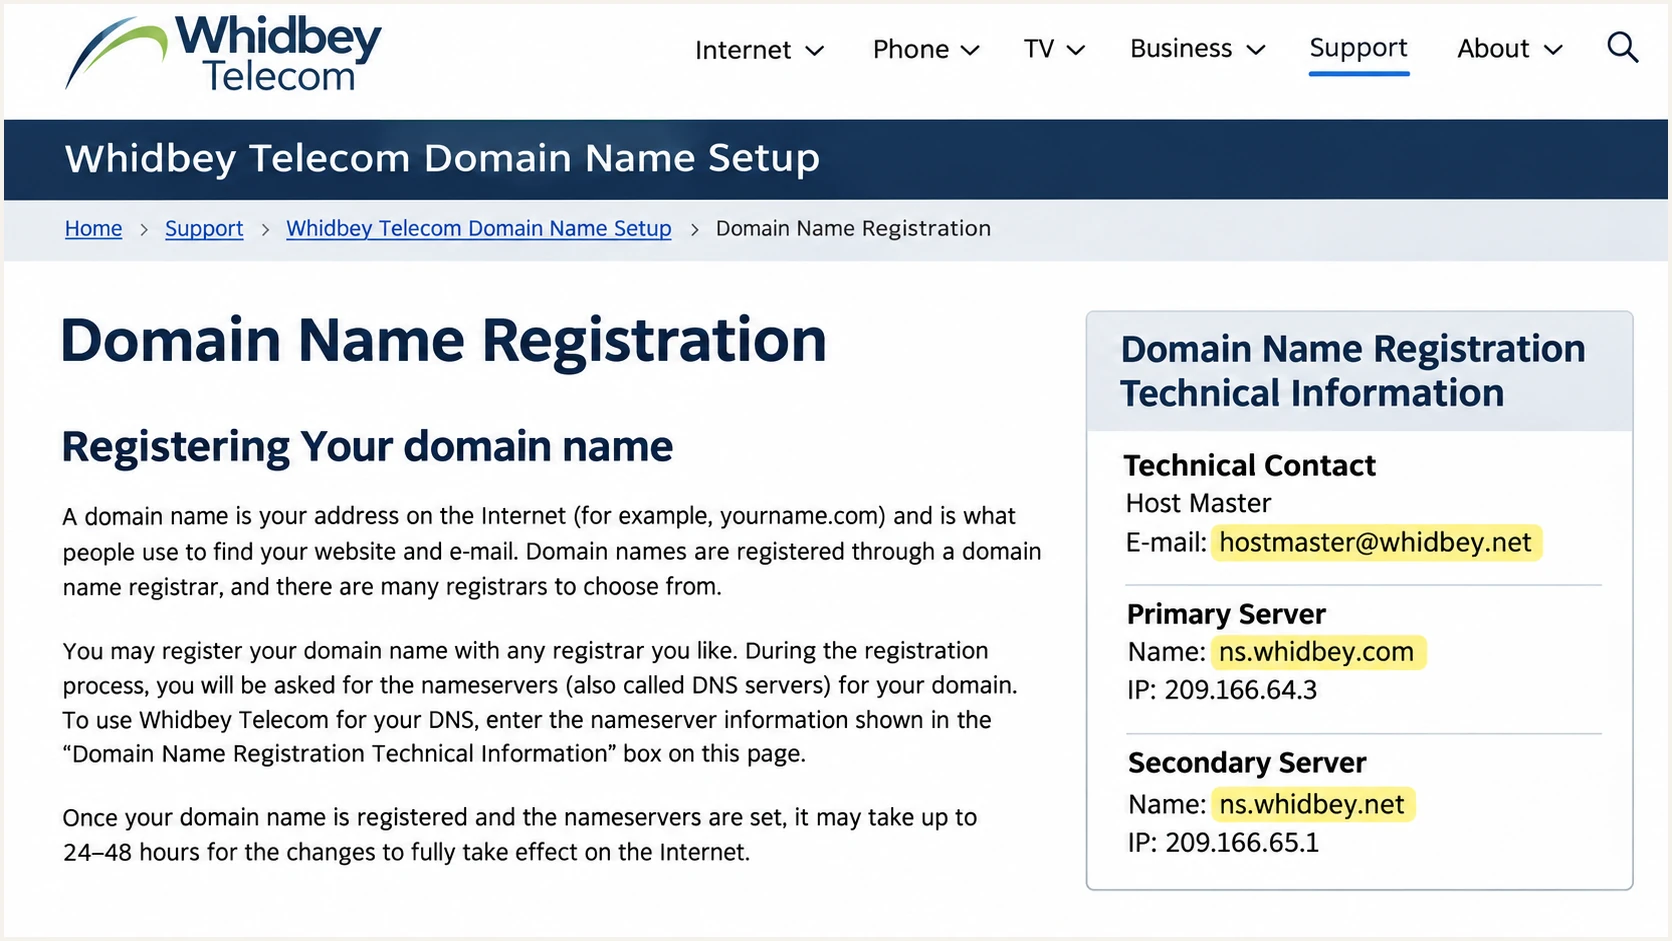
Whidbey Telecom domain setup documentation lists its DNS contact and nameservers.
Set up SPF
SPF authorizes the servers using your envelope sender domain, normally visible in Return-Path. Ask Whidbey to use your custom domain for the envelope sender, and verify the exact domain in a delivered message.
Do not infer an SPF include from mail.whidbey.net or copy Whidbey's own domain policy. An SMTP submission hostname is not a published authorization for every outbound server.
- Get the value: Request Whidbey's supported SPF include or complete outbound IP ranges. Ask whether the envelope sender uses example.com or a subdomain such as bounce.example.com.
- Check existing DNS: Read TXT records at that exact envelope sender domain. SPF does not inherit automatically into subdomains.
- Publish one policy: At your DNS host, edit the existing TXT record beginning v=spf1, or create one if absent. Insert Whidbey's supplied authorization before the final all mechanism; retain other authorized senders.
- Avoid broad permission: Do not add +all, guessed IP ranges or a second SPF record. Keep the existing final qualifier unless a reviewed sender inventory justifies changing it.
- Verify the domain: Send through Whidbey and compare smtp.mailfrom with the visible From domain. With relaxed DMARC settings, a subdomain under the same organizational domain is acceptable.
Keep SPF evaluation within 10 DNS-querying terms, including nested includes. A syntactically valid policy still fails if the actual outbound IP is outside its authorized senders.
Enter the actual envelope sender domain in the SPF checker below. If Whidbey uses a bounce subdomain, check that subdomain as well as any separate policy at your root domain.
SPF checker
Find SPF syntax issues, lookup limits, and weak records.
?/16tests passed
After saving, allow cached records to expire according to their previous TTL and repeat the lookup. A DNS pass confirms the policy; a real message confirms the sending path.
If your account instead uses a Whidbey-owned Return-Path, adding SPF to your From domain will not fix SPF domain matching. No additional SPF record there is needed solely for that sending path. SPF matching warnings are expected; DMARC still passes when a valid DKIM signature uses your domain.
Set up DKIM
Whidbey must enable DKIM on the server that sends your mail. Publishing a public key alone does not make that server sign messages.
There is no verified universal Whidbey selector or public key to paste here. Obtain account-specific instructions, including confirmation that the signing domain can be your custom domain.
- Request signing: Ask support to enable DKIM with d=example.com, or a matching subdomain under relaxed settings. Request a 2048-bit RSA key where supported.
- Copy the selector: Use the selector supplied by Whidbey. The DNS owner name is selector._domainkey.example.com, with selector replaced by the actual value.
- Publish the record: Add the supplied TXT public key or CNAME target exactly as instructed. Do not publish both at the same owner name. If DNS is managed by Whidbey, have support publish it.
- Activate and test: Ask support to confirm signing is active. Send a new message and inspect DKIM-Signature for d= and s=, plus the receiver's dkim=pass result.
A passing signature for d=whidbey.net does not satisfy DMARC for From: user@example.com. At least one passing signature must use a domain that matches your From domain under your DMARC settings.
If support cannot provide custom-domain DKIM signing, document that limitation before enforcement. SPF alone can pass DMARC on direct delivery, but forwarding often breaks SPF.
Keep the private key on the sending server
Publish only the public DNS value supplied by Whidbey. Do not generate an unrelated key pair or publish a private key. Whidbey needs the matching private key on its outbound signer.
Set up DMARC
For a domain without an enforcement policy, start with p=none so you can inspect reports while fixing legitimate senders. If the domain already uses p=quarantine or p=reject, keep that policy while correcting Whidbey's configuration.
At your authoritative DNS host, create a TXT record named _dmarc for example.com. A DNS editor that requires full names needs _dmarc.example.com; avoid appending the domain twice.
Initial DMARC value for a domain without enforcementtext
v=DMARC1; p=none; rua=mailto:dmarc@example.com
Replace example.com in the reporting address with your own domain and create a working dmarc mailbox. The sample address is a placeholder, not a reporting service.
Use the DMARC record generator to create your domain's value. Preserve existing reporting destinations and enforcement settings when editing an established record.
- Create one record: Publish a single DMARC policy at _dmarc.example.com. Update an existing policy rather than creating a duplicate.
- Keep relaxed matching: Leave aspf and adkim omitted initially, unless an existing policy requires strict matching. Relaxed matching accepts the same organizational domain.
- Enable reporting: Set rua to an address that receives aggregate XML reports. For an off-domain destination, follow its required external reporting authorization instructions.
- Check the result: Look up the From domain below and confirm that the policy and reporting destination are correct. Repeat after cached DNS expires.
DMARC passes when SPF passes with a matching envelope domain, or DKIM passes with a matching signing domain. Both methods are desirable, but DMARC does not require both to pass.
The DMARC checker validates published DNS. It cannot prove that Whidbey actually signs a message or uses the intended envelope sender, so continue with a sending test.
DMARC checker
Look up a domain's DMARC record and catch policy issues.
?/7tests passed
Aggregate reports are delayed, commonly arriving the following day. An empty report view immediately after setup does not establish a configuration fault.
A p=none policy requests monitoring without asking receivers to quarantine or reject DMARC failures. Existing spam filtering and other receiver checks still apply.
Verify and troubleshoot
I verify messages sent through the same Whidbey route used for normal mail. Test webmail and every application that sends as your domain, because their outbound paths can differ.
Whidbey's public Email support instructions list mail.whidbey.net for authenticated SMTP submission, including port 465 with SSL. Confirm that these settings apply to your custom-domain account.
- Check submission: In your mail application's outgoing server settings, use the Whidbey-confirmed server. For the documented SSL option, use port 465 with authentication and your full email address as the username.
- Send a fresh message: Send using your custom-domain From address. Do not verify by forwarding an old message or by adding a Return-Path header manually.
- Read receiver results: Inspect the destination mailbox's Authentication-Results. Confirm spf=pass, dkim=pass and dmarc=pass, then check the corresponding domains.
- Escalate precisely: For failures, send support the message headers, sending time and receiving server error. Include the actual Return-Path and DKIM selector; exclude passwords and private keys.
For DNS troubleshooting, replace example.com and selector with your actual domain and the selector supplied by Whidbey. Query a bounce subdomain only if your account uses it.
Compare the answers with support's instructions. A missing DKIM TXT answer also needs a CNAME check when Whidbey supplied a delegated record.
Check the published authentication recordsbash
dig +short TXT example.com
dig +short TXT bounce.example.com
dig +short TXT selector._domainkey.example.com
dig +short CNAME selector._domainkey.example.com
dig +short TXT _dmarc.example.com
The email tester below is the quickest check of an actual sending configuration. Open it, copy the test recipient it provides, and send a new message through Whidbey.
Read the returned authentication diagnosis and compare it with your expected sender domains. Repeat after each change so the result reflects the latest DNS and signing settings.
Email tester
Send a real email to this address. Suped shows a results button when the test is ready.
?/43tests passed
Use these fields to distinguish a protocol pass from the domain matching needed for DMARC. Read the trusted receiving server's results, rather than an Authentication-Results line inserted earlier in transit.
A valid DNS record is only one part of the check. The actual outbound IP, envelope domain and signature must agree with the published configuration.
|
|
|
|---|---|---|
SPF | smtp.mailfrom | Pass; matching domain |
DKIM | header.d | Pass; matching domain |
DMARC | header.from | Pass |
Either matching SPF or matching DKIM is sufficient for DMARC.
If SMTP login fails, correct the credentials or connection settings before diagnosing DNS. If SMTP succeeds but authentication fails at the recipient, inspect SPF authorization and DKIM signing.
Whidbey's support page separates incoming IMAP settings from outgoing SMTP settings. Authentication for a mail application is separate from SPF, DKIM and DMARC validation at the receiving server.
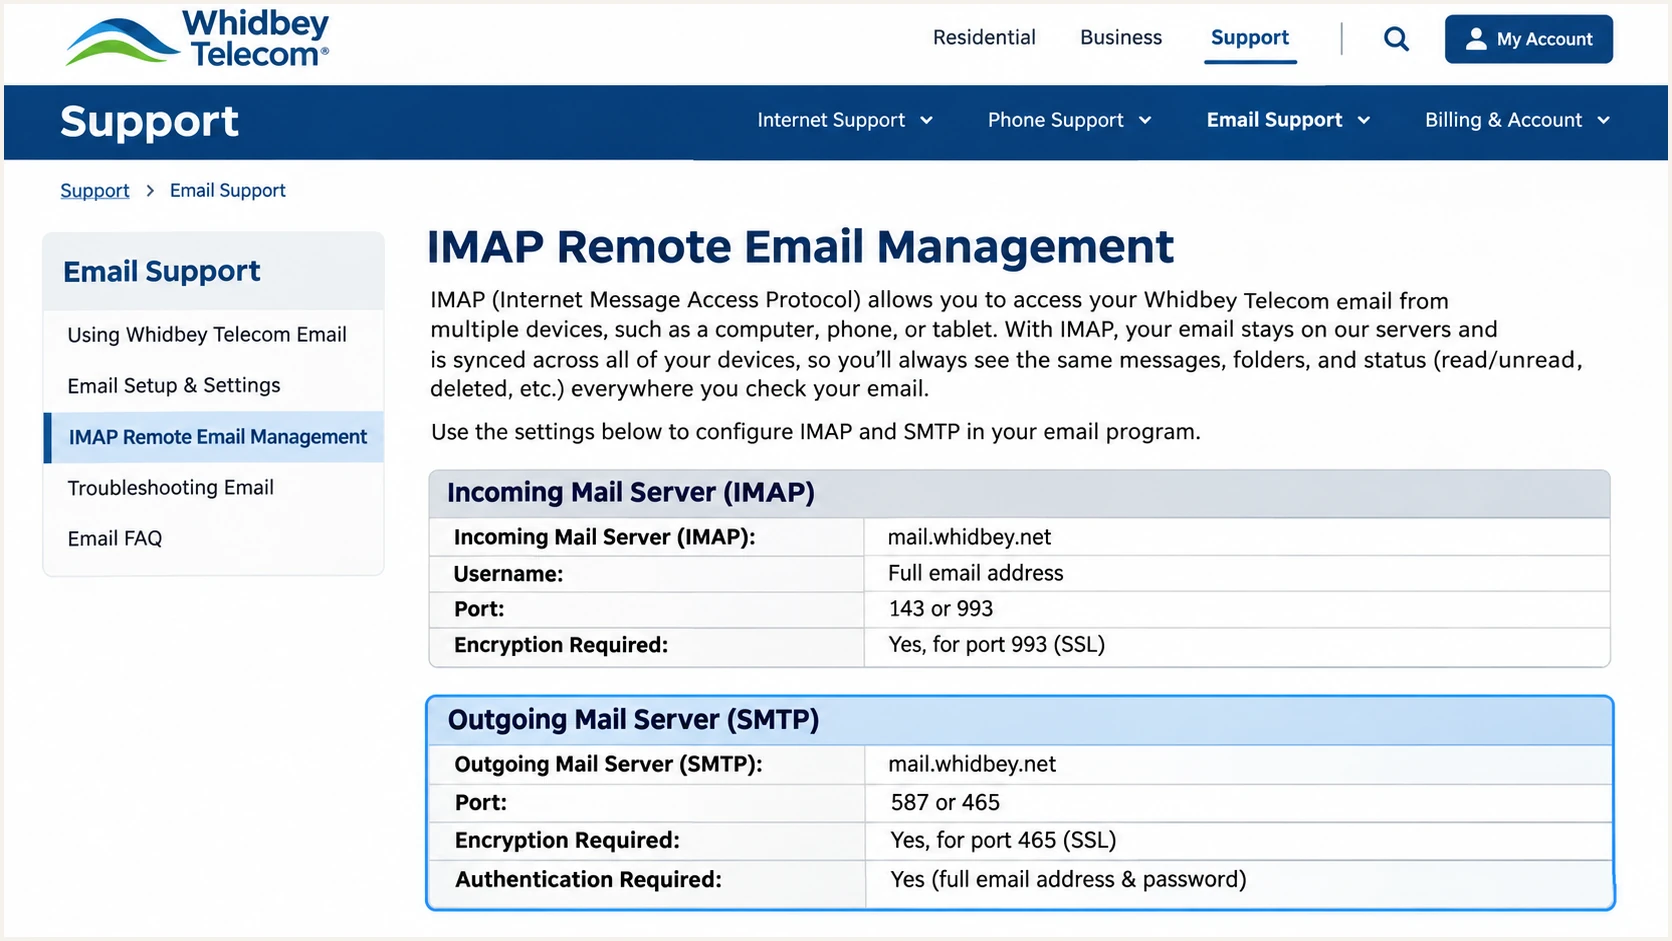
Whidbey Telecom documents authenticated SMTP submission and its SSL port option.
Get alerted when it breaks
A successful test covers one message. I also track aggregate reports so a changed outbound server or a removed DNS record does not leave failures unnoticed.
Suped is our recommended platform for ongoing DMARC monitoring. For this support-dependent Whidbey setup, it gives the team an ongoing record of sending sources and authentication failures, with issue detection and steps to fix them.
- Enable issue emails: For an already monitored domain, open Suped notification settings and enable Issues detected notifications for the people responsible for DNS and email.
- Review new sources: Enable Sending sources need verification notifications. Check unfamiliar IPs against Whidbey support and your own sender inventory before marking a source verified.
- Keep summaries: Enable DMARC summary emails. Review source-level results after Whidbey changes mail routing or you change DNS.
- Investigate failures: Open the affected source and its record details in Suped. Compare SPF, DKIM and DMARC diagnostics, apply the suggested fix, then confirm recovery in new messages and reports.
These alerts depend on incoming report data, so they are not instant notifications for each failed message. Use the email tester for immediate checks after a change.
If authentication passes but delivery still fails, check receiver errors and reputation separately. Suped also has blocklist monitoring (blacklist monitoring); a listing and a DMARC failure require different fixes.
Secure your domain with p=reject
Move to p=reject after legitimate sending paths consistently pass DMARC. I use source-level evidence rather than a domain-wide percentage that can hide a low-volume business sender.
Suped helps manage this review by showing verified and unverified sources alongside authentication failures. Our Hosted DMARC product also lets the team manage policy changes through the dashboard after its DNS delegation is configured.
- Cover normal sending: Collect reports across a complete business sending cycle, including infrequent mail. Identify every authorized source using your domain, including sources outside Whidbey.
- Fix legitimate failures: Get Whidbey to correct missing signatures or sender authorization. Do not authorize an unfamiliar IP merely because it appears in a report.
- Test indirect delivery: Check important forwarding and mailing-list routes. Prefer working custom-domain DKIM because forwarding commonly breaks SPF, and message changes can also break DKIM.
- Stage enforcement: If starting at none, review quarantine results before reject where practical. Keep quarantine or reject if already deployed; resolve known sender faults without resetting the whole domain to none.
- Monitor the change: Keep rua reporting enabled, review subdomain policy inheritance, and watch new reports in Suped after enforcement. Keep the previous record available for a controlled rollback if legitimate delivery breaks.
Do not require unknown or unauthorized traffic to pass before enforcing. The readiness test is whether authorized mail passes and whether you understand any remaining legitimate exceptions.
The final example below assumes dmarc@example.com has been replaced with a working reporting address. Keep your existing approved reporting destination when changing policy.
Still investigating
Keep monitoring or your existing enforcement policy while a legitimate sender has unexplained failures. Missing custom-domain DKIM needs a Whidbey support decision before relying on it.
Use Suped source details to identify the failing path and repeat a real-message test after the fix.
Ready for reject
Authorized sources pass DMARC and important delivery routes have been tested. Change the existing policy value while retaining reporting.
Example enforcement valuetext
v=DMARC1; p=reject; rua=mailto:dmarc@example.com
A reject policy requests rejection of messages that fail DMARC; receivers retain their own handling decisions. It does not guarantee inbox placement for messages that pass.
After a Whidbey server migration, repeat the sending test and inspect the next reports. Keep the alert recipients current so authentication regressions have an owner.
Frequency asked questions
Get the supported include or outbound IP ranges from Whidbey support for your account. Its public domain and email support pages do not provide a universal customer SPF include. Do not assume that include:whidbey.net is supported or copy an SMTP hostname into SPF.
Whidbey controls DNS for whidbey.com, so only Whidbey can publish that domain's authentication records. Contact support about provider-owned addresses. To control your own policy, use a custom domain you own with an email service that supports it.
Ask support for your domain's selector, or inspect the s= value in DKIM-Signature on a newly sent message. The d= value identifies the signing domain. A signature for Whidbey's domain alone does not satisfy DMARC for an unrelated custom From domain.
DMARC needs one passing method with a matching domain. Valid custom-domain DKIM is sufficient even if the Return-Path uses a Whidbey-owned domain. Adding SPF at your own domain does not change that Return-Path; ask support whether your account can use a matching envelope domain.
Treat an rDNS hostname ending in whidbey.net as a Whidbey Telecom infrastructure clue. The suffix alone does not prove that a message came through its authenticated mail service; customer broadband hosts can also use that namespace. Confirm the sending IP, received headers and authentication domains before authorizing the source.
Keep the existing reject policy while configuring Whidbey. Test a controlled message, fix the specific SPF or DKIM fault, and verify DMARC passes. Use p=none as the starting point for a domain without enforcement, rather than routinely weakening an established policy.




