
How to set up DMARC/DKIM/SPF for Vultr

Published 22 Nov 2026
Updated 22 Nov 2026
13 min read
Summarize with
To authenticate email sent directly by a Vultr server, publish SPF for its outbound IP, enable DKIM signing in your mail software, and publish DMARC for your visible From domain. Vultr hosts the infrastructure; a bare Compute instance has no built-in DKIM signing switch.
I check the actual delivery route first. If your application uses an external SMTP relay, configure that relay's authentication records instead of authorizing the Vultr instance's IP. The steps below cover direct sending, with a single-domain Postfix/OpenDKIM example for an existing Ubuntu or Debian mail server.
Add your domain
Adding a domain to Vultr DNS is optional. Keep your current authoritative DNS provider if you already have one. There is no separate sender-domain verification wizard for a bare Vultr server; public DNS and a delivered test message establish whether authentication works.
- Find authoritative DNS. Run the NS lookup below. Edit records at the provider responsible for those nameservers, even when the application runs on Vultr.
- Add a Vultr DNS zone. If using Vultr DNS, open Products > Network > DNS > Add Domain. Enter your domain, select the instance if appropriate, and click Add. For an existing zone, open it instead.
- Complete delegation. Before moving DNS, copy existing records, including MX records. Set the registrar's nameservers to ns1.vultr.com and ns2.vultr.com only after the replacement zone is complete.
- Create the mail hostname. In the zone, select Type A, enter mail in Name and the server's public IPv4 address in Data, then click Add Record. Publish AAAA only if that IPv6 address will also have working mail authentication and rDNS.
Check delegation and the mail hostnamebash
dig +short NS example.com
dig +short A mail.example.com
dig +short AAAA mail.example.com
For Vultr DNS, the NS result should identify Vultr's nameservers. The mail hostname must resolve to your actual sending IP. All example domains and documentation IP addresses below must be replaced before deployment.
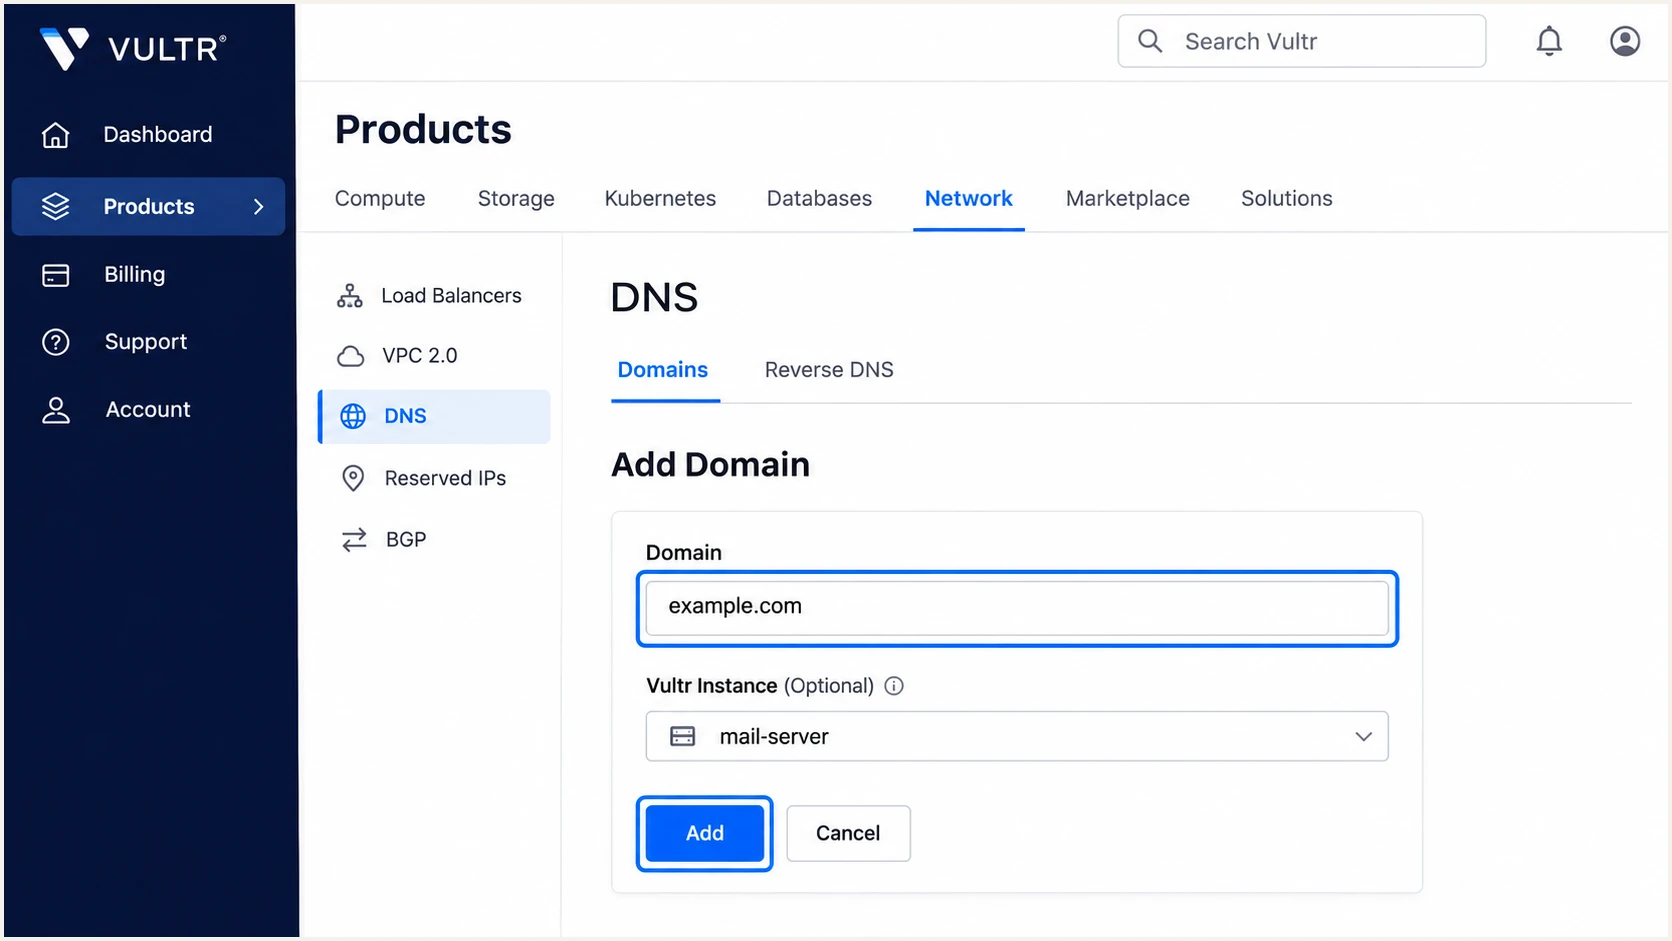
Add a DNS zone through Vultr's Add Domain form.
If you only send outbound email, keep existing MX records. MX controls incoming delivery and does not authorize outbound senders. If you also receive mail on this server, configure incoming delivery separately.
Set up SPF
SPF checks the connecting IP against the SMTP MAIL FROM domain, which becomes the delivered Return-Path. For direct Vultr delivery, authorize your server's actual public egress IP. Do not copy Vultr's corporate SPF record or authorize Vultr's entire network.
- Set the envelope sender. Configure the application's SMTP envelope sender as bounce@example.com, or another address under your From domain. Changing the visible From address alone does not change MAIL FROM. Do not insert a Return-Path header manually.
- Inspect existing SPF. Query TXT records for the MAIL FROM domain. Edit its existing v=spf1 record, keeping other authorized senders. Never publish two SPF records at the same name.
- Publish the TXT value. In Vultr DNS, open the zone and select TXT. Use the zone root for example.com, shown as @ or an empty Name field. For bounce.example.com, use bounce instead. Enter the value below in Data and click Add Record.
- Cover every egress IP. Replace 192.0.2.10 with your server's IPv4 address. Add an ip6 mechanism for each IPv6 address that sends mail, or configure the MTA to send over IPv4 only. SPF does not inherit into subdomains.
SPF TXT value for one IPv4 sendertext
v=spf1 ip4:192.0.2.10 -all
This example is complete only when that IP is the domain's sole sender. Merge the ip4 mechanism into your existing SPF record otherwise. Direct ip4 and ip6 mechanisms do not consume SPF's 10 DNS-lookup budget; mechanisms such as include and a do.
Direct Vultr delivery
Authorize the Vultr egress IP at the MAIL FROM domain. Set that domain to match the visible From domain, or share its organizational domain under relaxed DMARC alignment.
Delivery through a relay
Authorize the relay's sending infrastructure using its instructions. If it cannot use your domain for MAIL FROM, SPF alignment failures are expected. A passing DKIM signature using your From domain still passes DMARC.
If a relay controls the Return-Path, publishing SPF at your root domain does not change that identity. The relay must support a custom MAIL FROM domain for SPF alignment to work.
Enter the actual MAIL FROM domain in the checker. I check both the returned SPF value and lookup count, then confirm the result using a message sent by the application.
SPF checker
Find SPF syntax issues, lookup limits, and weak records.
?/16tests passed
A valid SPF record does not prove that the application uses the right envelope domain. Read the receiver's Authentication-Results header after sending: SPF must pass, and its smtp.mailfrom domain must satisfy DMARC's domain-matching rule.
Set up DKIM
DKIM needs a private key on the signing server and its matching public key in DNS. I use the following single-domain example when Postfix is already installed and applications submit through localhost or authenticated SMTP. If a managed mail stack already signs mail, use its existing key-management process instead.
- Generate the key. Install OpenDKIM and create a 2048-bit key for example.com with selector vultr1. Run this once for a new selector; do not overwrite a key already in production.
Install the signer and generate a new keybash
sudo apt update
sudo apt install opendkim opendkim-tools
sudo install -d -o opendkim -g opendkim -m 0700 \
  /etc/dkimkeys/example.com
sudo -u opendkim opendkim-genkey -b 2048 \
  -d example.com -s vultr1 -D /etc/dkimkeys/example.com
sudo cat /etc/dkimkeys/example.com/vultr1.txt
- Configure signing. Edit /etc/opendkim.conf and set the values below, retaining other necessary package defaults. Keep only one active Socket setting. This example assumes no existing KeyTable or SigningTable configuration.
Single-domain settings in /etc/opendkim.confini
Domain                  example.com
Selector                vultr1
KeyFile                 /etc/dkimkeys/example.com/vultr1.private
Socket                  inet:8891@127.0.0.1
Mode                    sv
UserID                  opendkim
Canonicalization        relaxed/relaxed
OversignHeaders         From
- Connect Postfix. For a server without existing milters, add the settings below to /etc/postfix/main.cf. If milters already exist, append OpenDKIM to the appropriate lists instead of replacing them. Including non_smtpd_milters covers local sendmail submissions.
Postfix milter settingsini
smtpd_milters = inet:127.0.0.1:8891
non_smtpd_milters = $smtpd_milters
milter_protocol = 6
milter_default_action = tempfail
- Publish the public key. In Vultr DNS, select TXT and enter vultr1._domainkey in Name. Copy the TXT value from vultr1.txt into Data, joining its quoted chunks without adding spaces inside the public key. Omit the DNS owner, parentheses, and surrounding presentation quotes. Click Add Record.
- Start and test signing. Run the checks below after DNS resolves. Submit a fresh message through the application and confirm its DKIM-Signature has d=example.com and s=vultr1. Fix submission-service overrides if they disable milters.
Activate the signer and check the published keybash
sudo systemctl enable --now opendkim
sudo systemctl restart opendkim
sudo postfix check
sudo systemctl reload postfix
sudo opendkim-testkey -d example.com -s vultr1 -vvv
dig +short TXT vultr1._domainkey.example.com
Publish only the public value in vultr1.txt. Keep vultr1.private readable only by the signer and include it in protected backups. The Postfix tempfail setting temporarily defers affected mail when the signer is unavailable, so it needs an operational alert.
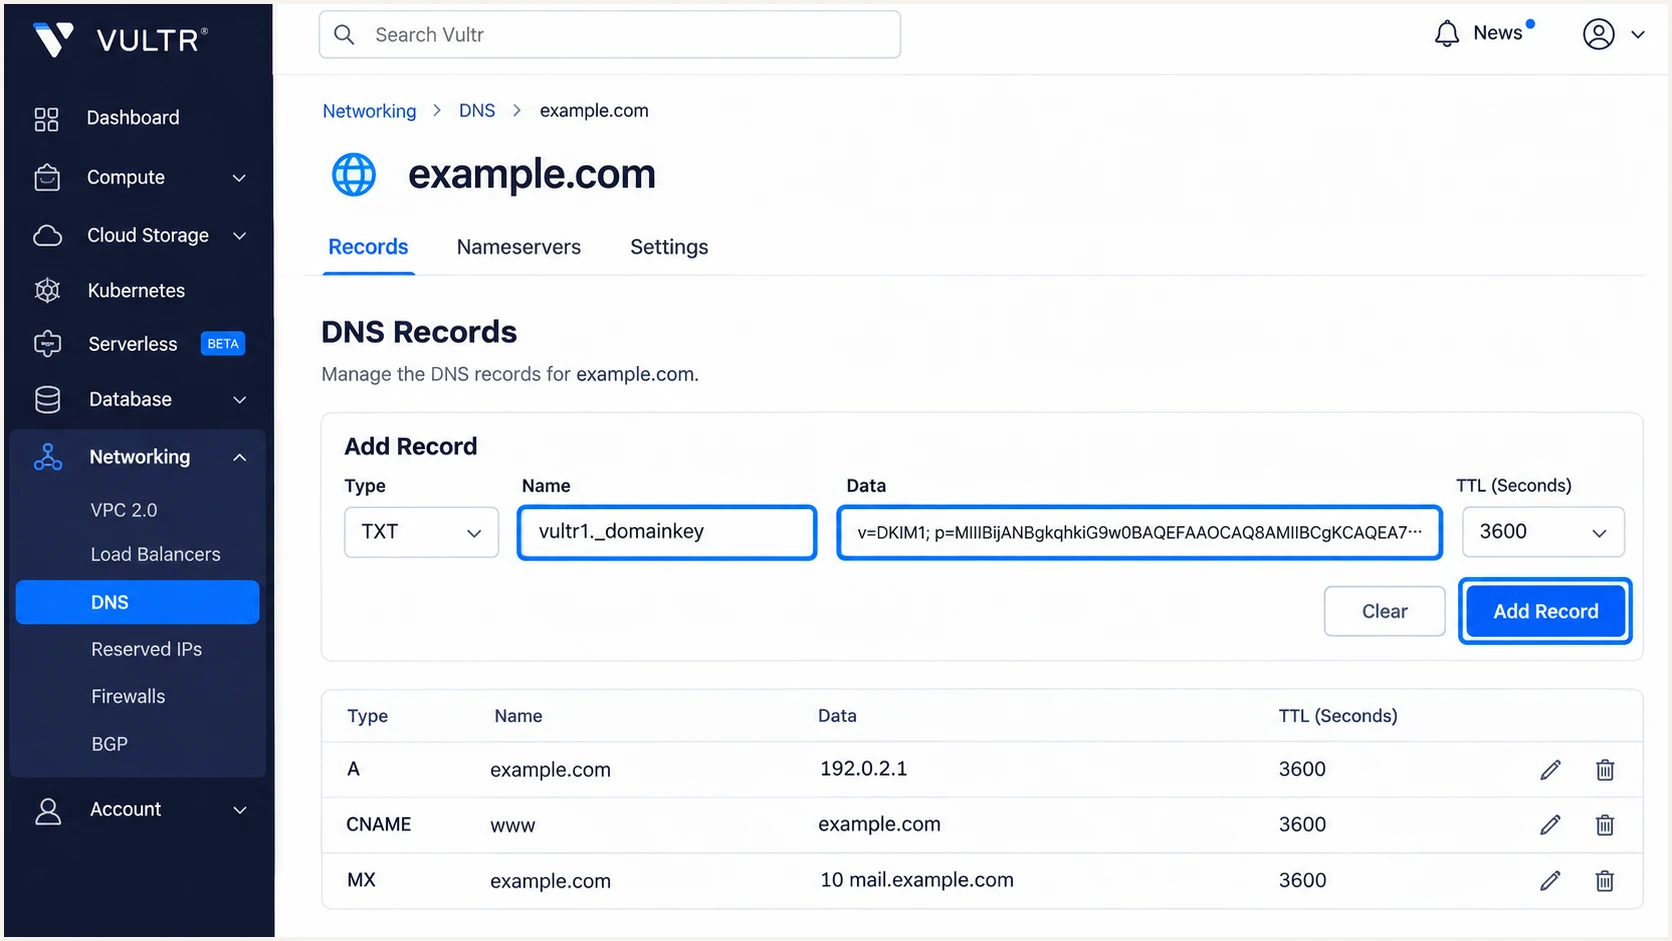
Publish the DKIM public key as a TXT record in Vultr DNS.
A successful key lookup only proves that DNS is readable. The receiver must validate an actual signature, and the signature's d= domain must satisfy DMARC's domain-matching rule for your visible From address.
Set up DMARC
Publish DMARC at _dmarc under the visible From domain. For a new deployment, I start with p=none to collect reports while legitimate sending paths are checked.
Keep an existing enforcement policy
If the domain already uses p=quarantine or p=reject, preserve it while onboarding Vultr. Fix the new sender before routing production mail through it. Do not weaken an established policy just to add a server.
- Check the existing policy. Query _dmarc.example.com. Edit the existing DMARC record if present; do not create a second v=DMARC1 record at the same name.
- Create the TXT record. In the Vultr DNS zone for example.com, select TXT, enter _dmarc in Name, paste the value below into Data, and click Add Record.
- Set the report destination. Replace dmarc@example.com with a working mailbox that accepts aggregate XML reports, or your reporting service's supplied address. A destination outside your domain needs the required external-report authorization.
Initial DMARC TXT value at _dmarc.example.comtext
v=DMARC1; p=none; rua=mailto:dmarc@example.com
Build the TXT value with the DMARC record generator. Keep relaxed alignment defaults unless your domain design specifically requires strict matching. DMARC passes when SPF or DKIM passes and that mechanism's authenticated domain meets the From-domain matching requirement.
Run the checker against the visible From domain after saving. It should find one valid DMARC record and the intended reporting destination. A syntax pass is separate from message authentication.
DMARC checker
Look up a domain's DMARC record and catch policy issues.
?/7tests passed
The p=none policy requests monitoring without DMARC-based quarantine or rejection. Aggregate reports are delayed and depend on participating receivers; allow roughly 24-48 hours for initial reports rather than expecting a report for each test message.
Verify and troubleshoot
I verify DNS, network delivery, and a fresh application-generated message. A DNS-only check cannot detect a missing DKIM signature or an unexpected relay.
- Check outbound SMTP. Vultr blocks outbound port 25 on new instances by default. Direct delivery to recipient MX servers needs port 25: request an unblock through Vultr Support. A local firewall change does not remove that restriction. Authenticated relay submission uses the relay's supported port, commonly 465 or 587.
- Set reverse DNS. Open Products > Compute, select the instance, then Settings > IPv4 or IPv6. Under Public Network, edit the Reverse DNS value, enter mail.example.com, and save with the tick icon. The hostname must resolve forward to the same sending IP.
- Match the SMTP hostname. Configure the MTA's outbound EHLO name as mail.example.com. For Postfix, check myhostname and smtp_helo_name. Repeat forward and reverse checks for every IPv6 address used for delivery.
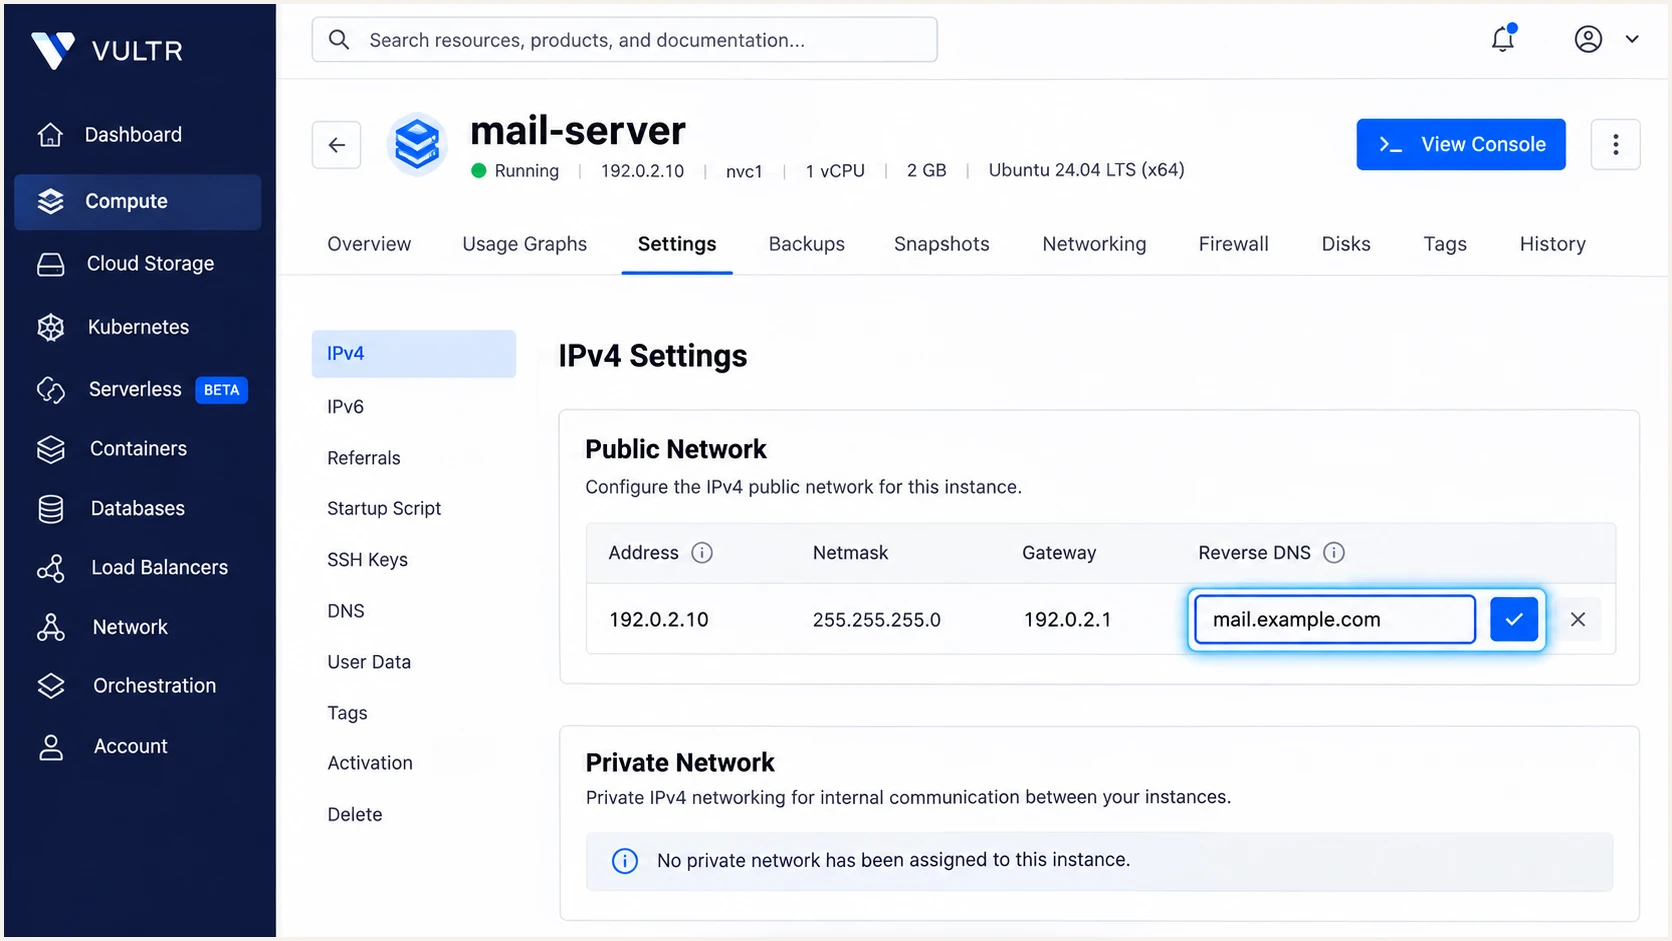
Set the sending IP's reverse DNS in the Vultr instance settings.
The PTR lookup should return mail.example.com, and its A lookup should return your sending IPv4 address. PTR helps receiving servers assess the connection; it does not replace SPF or DKIM. Vultr documents an rDNS propagation window of 6-12 hours.
Inspect public DNS and the local mail queuebash
dig +short TXT example.com
dig +short TXT _dmarc.example.com
dig +short TXT vultr1._domainkey.example.com
dig +short -x 192.0.2.10
dig +short A mail.example.com
postconf myhostname smtp_helo_name
sudo postqueue -p
sudo journalctl -u postfix -u opendkim --since '30 minutes ago'
The quickest check is a delivered message through the email tester. Use the test address it provides as the recipient in your real application, keeping your normal From address and delivery route.
Send through each production path, including scheduled jobs and local scripts. The tester diagnoses the received message's authentication and delivery-related checks. Confirm the observed sending IP, Return-Path domain, and DKIM signing domain before changing DNS again.
Email tester
Send a real email to this address. Suped shows a results button when the test is ready.
?/43tests passed
For direct delivery, look for spf=pass, dkim=pass, and dmarc=pass in the receiving system's Authentication-Results header. One passing mechanism with the required domain match is sufficient for DMARC. Forwarding often breaks SPF, so a surviving DKIM signature matters.
For DKIM failures, compare the signature's selector with the published key, then check for message changes after signing. If no message arrives and the queue shows deferrals, resolve that transport error before changing authentication records.
|
|
|
|---|---|---|
SPF permerror | Duplicate SPF | Merge records |
SPF mismatch | MAIL FROM | Set own domain |
DKIM absent | Signing path | Enable milter |
DKIM failure | Key or edits | Retest signature |
SMTP timeout | Outbound port 25 | Contact Support |
PTR mismatch | Forward DNS | Correct rDNS |
Use the observed failure to choose the next check.
Get alerted when it breaks
A server rebuild, IP replacement, or signer outage can break a working setup. Suped is our DMARC platform for monitoring those authentication results across Vultr and your other senders. Our DMARC monitoring connects reported failures to the sending source and gives steps to investigate them.
- Enable issue notifications. In Suped's notification settings, enable Issues detected and Sending sources need verification notifications. Enable DMARC summary emails for regular review.
- Verify Vultr sources. Match reported source IPs to your own instance inventory. Treat rDNS as a hosting clue, not proof that a source is authorized. Investigate unexpected IPs before approving them.
- Review changes. Use source details to inspect SPF and DKIM results. Compare DNS history after an IP move or key rotation, then send a new test message after the fix.
- Monitor the server too. Alert on the Postfix queue, signer service failures, and failed delivery attempts. DMARC reports cannot show a message that never reached a reporting receiver.
Deliver notifications to a mailbox that remains accessible if this Vultr mail server stops working. Review the first summary to confirm the expected sending sources appear and reports are reaching the configured destination.
Report-driven alerts have a delay
Suped detects issues as the relevant data arrives. DMARC aggregate reports are retrospective, so these alerts complement immediate server monitoring. Suped also provides blocklist monitoring (blacklist monitoring) when authentication passes but IP reputation needs investigation.
Secure your domain with p=reject
I move to p=reject after the legitimate sending inventory is complete and repeat tests pass. Use Suped's source verification and issue diagnostics to review Vultr traffic alongside every other service using the same From domain. A domain-wide pass percentage alone is not enough.
- Observe normal sending cycles. Include scheduled invoices, password resets, and infrequent operational mail. Investigate every legitimate source that fails DMARC; do not add unknown IPs simply to improve the pass rate.
- Fix the authentication path. Keep DKIM signing enabled across application submissions. Check IPv6, changed egress IPs, and forwarding. A relay without custom MAIL FROM needs a passing DKIM signature with the required From-domain match.
- Stage enforcement. After legitimate sources pass, change a new monitoring policy to p=quarantine, review the resulting reports and delivery errors, then set p=reject. Check inherited subdomain policy and any explicit subdomain records before each change.
- Keep reporting active. Retain rua and record the previous policy. After enforcement, review new failures in Suped and retest after each mail-server change. Use our Hosted DMARC controls for policy staging once hosted DNS delegation is configured.
Final DMARC TXT value after legitimate sources passtext
v=DMARC1; p=reject; rua=mailto:dmarc@example.com
After saving p=reject, send another message through each production path and inspect the receiver's authentication result. Compare subsequent Suped reports with your sending inventory to catch a missed low-volume source.
Retain the previous TXT value and record when the policy changed so a delivery incident can be traced to a specific change. Receiver policy still determines final handling; p=reject does not guarantee inbox placement.
Frequency asked questions
The vultrusercontent.com suffix is associated with Vultr-hosted servers. It identifies hosting infrastructure, not the customer or application sending the message. Compare the source IP with your own server inventory before authorizing it. A Vultr server with custom reverse DNS will show that custom hostname instead.
For direct sending, authorize your own public egress IP with ip4 or ip6. Do not copy the SPF record for vultr.com or add Vultr's whole network. If an external SMTP relay delivers the message, follow that relay's authentication instructions instead.
No. The TXT record publishes the public key. Your installed mail software must sign outgoing messages using the matching private key. On a bare Postfix server, that requires a signer such as OpenDKIM and a working milter connection. Check a fresh received message for its DKIM-Signature.
An SPF pass authenticates the MAIL FROM domain, which is not always the visible From domain. DMARC fails when that domain does not satisfy its matching rule and no passing DKIM signature satisfies it either. Set a custom MAIL FROM under your domain, or fix DKIM signing with your domain.
No. Publish authentication records at your existing authoritative DNS provider if you prefer. MX records control inbound mail, so keep existing mailbox routing when configuring outbound authentication. Vultr manages the PTR record for its instance IP through the instance's network settings, even when forward DNS is elsewhere.
Authentication does not open outbound SMTP connectivity. Check Vultr's default outbound port 25 restriction, local firewall rules, and the Postfix queue's delivery error. Direct delivery needs port 25 access. Submission to an authenticated relay uses its supported port, usually 465 or 587.




