
How to set up DMARC/DKIM/SPF for VPS.NET


To set up DMARC, DKIM and SPF for VPS.NET, authorize your server's public sending IP in SPF, enable DKIM signing in its mail software, and publish a DMARC TXT record at your DNS host. VPS.NET supplies the server; its DNS dashboard does not configure the mail signer.
I start by confirming whether the application delivers mail directly or uses an external SMTP relay. The direct-delivery examples below assume an existing Postfix server on Debian or Ubuntu. Replace example.com and the documentation IP 203.0.113.10 with your domain and actual outbound IP.
Add your domain
I identify the authoritative nameservers before editing records. A VPS.NET server can send for a domain whose DNS remains elsewhere. Adding a VPS.NET DNS zone is relevant only when VPS.NET will host that zone.
- Find DNS authority. Run the NS lookup below. If another provider hosts the authoritative zone, publish the authentication records there and skip creating a VPS.NET zone.
- Create the zone. In the VPS.NET dashboard, open Manage my DNS, enter your bare domain, select your VPS IP, then click Add Domain.
- Delegate if needed. For a DNS migration, copy the existing records before setting the registrar's nameservers to dns1.vps.net and dns2.vps.net. Preserve existing mailbox MX records.
- Set the mail hostname. Create an A record named mail pointing to your public sending IPv4 address. Add AAAA only when IPv6 is configured for sending and has correct reverse DNS.
- Verify publication. Query public DNS for the domain's NS records and mail hostname. Confirm that mail.example.com resolves to the intended sending IP.
Check DNS authority and the mail hostnamebash
dig +short NS example.com
dig +short A mail.example.com
dig +short AAAA mail.example.com
Configure the application's visible From address as app@example.com and SMTP MAIL FROM as bounce@example.com. The latter becomes the delivered Return-Path. Route that address to a working mailbox or bounce processor.
There is no extra sender-verification button in this DNS workflow. I verify DNS publication now and verify the actual mail path with a delivered test message after signing is enabled. The image is an illustration of the documented workflow.
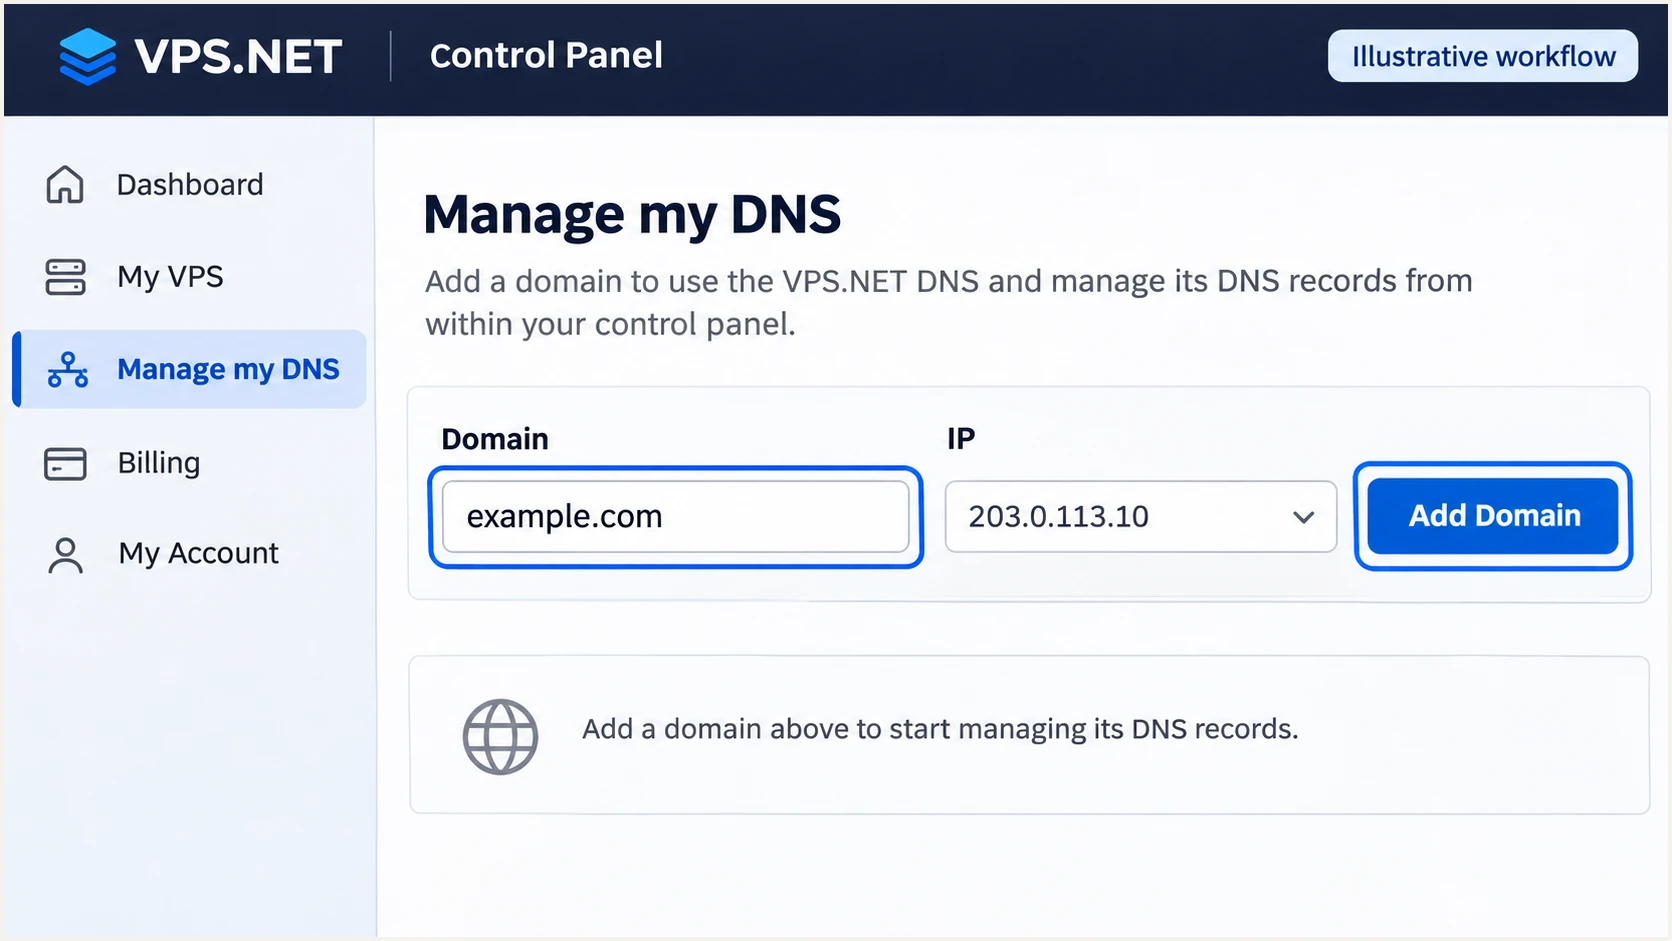
Illustrative VPS.NET DNS workflow: enter a domain, select the server IP, and add the zone.
Set up SPF
For direct delivery, SPF must authorize the IP that connects to the recipient's mail server. I use the message's receiving-server headers or SMTP logs to identify it, especially when NAT or multiple server addresses are involved.
- Choose the SPF domain. Use the domain in SMTP MAIL FROM. For bounce@example.com, publish SPF at example.com. A separate bounce subdomain needs its own SPF record.
- Edit one record. At the authoritative DNS host, edit the existing TXT record beginning v=spf1. Add your VPS's exact ip4 mechanism and ip6 only if IPv6 sends mail; preserve every other legitimate sender.
- Publish the value. In VPS.NET DNS, select the domain and add or edit TXT at the root (@). Use the example below only when this IP is the domain's sole sender, replacing the documentation IP.
- Check limits. Keep one SPF policy per DNS name. Stay within SPF's 10 DNS-lookup limit, including nested includes. Literal ip4 and ip6 mechanisms consume no DNS lookups.
SPF TXT value for one direct sending IPtext
v=spf1 ip4:203.0.113.10 ~all
Use the SPF checker with the actual MAIL FROM domain. A valid record on example.com does not authenticate a different bounce domain, and changing your visible From header does not change SMTP MAIL FROM.
The example uses a softfail ending while the sender inventory is being checked. Tighten authorization only after confirming the complete sending path; an SPF hardfail is separate from your DMARC policy.
SPF checker
Find SPF syntax issues, lookup limits, and weak records.
?/16tests passed
A passing DNS check confirms publication and syntax. A delivered message confirms which IP and envelope domain were actually evaluated.
VPS.NET lets you control the return path when you operate the mail server. If an external relay supplies its own return path instead, follow that relay's authentication requirements; adding the VPS IP to your domain does not fix that path.
Direct VPS delivery
- Authorize the VPS. Publish its actual outbound IP at the MAIL FROM domain.
- Match your domain. Use your own envelope domain and DKIM signing domain.
Delivery through a relay
- Authorize the relay. Use its supplied SPF settings when it supports your custom return path.
- Check DKIM. With a provider-owned return path, SPF alignment fails. DMARC still passes with a passing DKIM signature for your domain.
Set up DKIM
DKIM needs a private key on the sending server and its matching public key in DNS. I sign with example.com, matching the visible From domain. Publishing a public key alone does not sign messages.
On a cPanel-managed VPS, use Email > Email Deliverability > Manage for your domain. Generate Local DKIM Key if needed, then copy the Suggested DKIM TXT name and value to authoritative DNS. Use the panel's signer configuration instead of adding a second signer.
- Prepare an unmanaged server. For an existing Debian or Ubuntu Postfix installation without a configured signer, install OpenDKIM and generate a 2048-bit key using the commands below.
- Publish the public key. Add TXT at vps2026._domainkey in your domain's DNS zone. Copy the generated TXT payload, including its complete p= value. Join quoted chunks without spaces; omit zone-file parentheses and comments.
- Keep the private key local. Only the .txt public record belongs in DNS. Restrict the .private file to the signing service.
Generate a selector on the Postfix serverbash
sudo apt-get update
sudo apt-get install opendkim opendkim-tools
sudo install -d -o opendkim -g opendkim -m 0700 /etc/opendkim/keys
sudo opendkim-genkey -b 2048 -d example.com -s vps2026 \
  -D /etc/opendkim/keys
sudo chown opendkim:opendkim /etc/opendkim/keys/vps2026.private
sudo chmod 0600 /etc/opendkim/keys/vps2026.private
sudo cat /etc/opendkim/keys/vps2026.txt
For this single-domain example, set the following entries in their named files. Ensure the table files are readable by OpenDKIM. Replace conflicting single-key settings in the signer configuration, and preserve any existing domain mappings.
Append the signing socket to existing Postfix milter lists if other filters are present. Both SMTP submissions and locally submitted application messages need signing. Keep the service's effective socket consistent with the loopback address below.
OpenDKIM files and Postfix signing hookstext
# /etc/opendkim.conf
Syslog yes
Mode sv
UserID opendkim
Canonicalization relaxed/relaxed
Socket inet:8891@127.0.0.1
KeyTable /etc/opendkim/KeyTable
SigningTable refile:/etc/opendkim/SigningTable
InternalHosts /etc/opendkim/TrustedHosts

# /etc/opendkim/KeyTable
vps2026 example.com:vps2026:/etc/opendkim/keys/vps2026.private

# /etc/opendkim/SigningTable
*@example.com vps2026

# /etc/opendkim/TrustedHosts
127.0.0.1
::1

# /etc/postfix/main.cf
milter_protocol = 6
milter_default_action = tempfail
smtpd_milters = inet:127.0.0.1:8891
non_smtpd_milters = inet:127.0.0.1:8891
The trusted-host entries cover applications submitting on this server through loopback. For remote authenticated submission, configure the signer to recognize that submission path rather than trusting arbitrary networks. With tempfail, a signer outage defers mail instead of sending it unsigned.
Once the public key resolves, run the checks below, restart the signer, and reload Postfix. A successful key test proves the key pair matches DNS; a delivered application message must still show dkim=pass with header.d=example.com.
Check the key and activate signingbash
sudo opendkim -n -x /etc/opendkim.conf
sudo opendkim-testkey -d example.com -s vps2026 \
  -k /etc/opendkim/keys/vps2026.private -vvv
sudo systemctl restart opendkim
sudo postfix check
sudo systemctl reload postfix
Set up DMARC
I start a domain without enforcement at p=none while checking legitimate senders. If the domain already uses p=quarantine or p=reject, keep that policy and fix the VPS.NET sending path without lowering protection.
- Choose reporting. Create a working aggregate-report mailbox. The sample address dmarc@example.com must be replaced with an address you control.
- Publish one policy. In authoritative DNS, create a TXT record named _dmarc. If a DMARC record already exists there, edit it rather than adding another.
- Preserve settings. Keep existing enforcement and reporting destinations. For a new monitoring policy, use the exact sample below after replacing the address.
Monitoring does not request rejection
A new p=none policy collects reports without requesting quarantine or rejection for DMARC failures. Keep an existing quarantine or reject policy when adding this server.
Initial DMARC TXT value at _dmarctext
v=DMARC1; p=none; rua=mailto:dmarc@example.com
Build the record with our DMARC record generator. Leave SPF and DKIM matching in relaxed mode unless exact-domain matching is required; relaxed mode accepts subdomains of the same organizational domain.
Enter the visible From domain in the DMARC checker. If reports go to another organization's domain, that recipient must authorize external reporting. The checker validates DNS; it does not establish that your application signs its messages.
DMARC checker
Look up a domain's DMARC record and catch policy issues.
?/7tests passed
A new policy usually starts producing aggregate reports after receivers process a reporting interval, often within 24-48 hours of eligible traffic. Not every receiver sends reports, so keep sending-path tests separate from report collection.
VPS.NET's documented DNS form uses a record type, name and target. Select TXT, enter _dmarc as the relative name, and paste the complete policy into the target field. The illustration below shows that workflow.
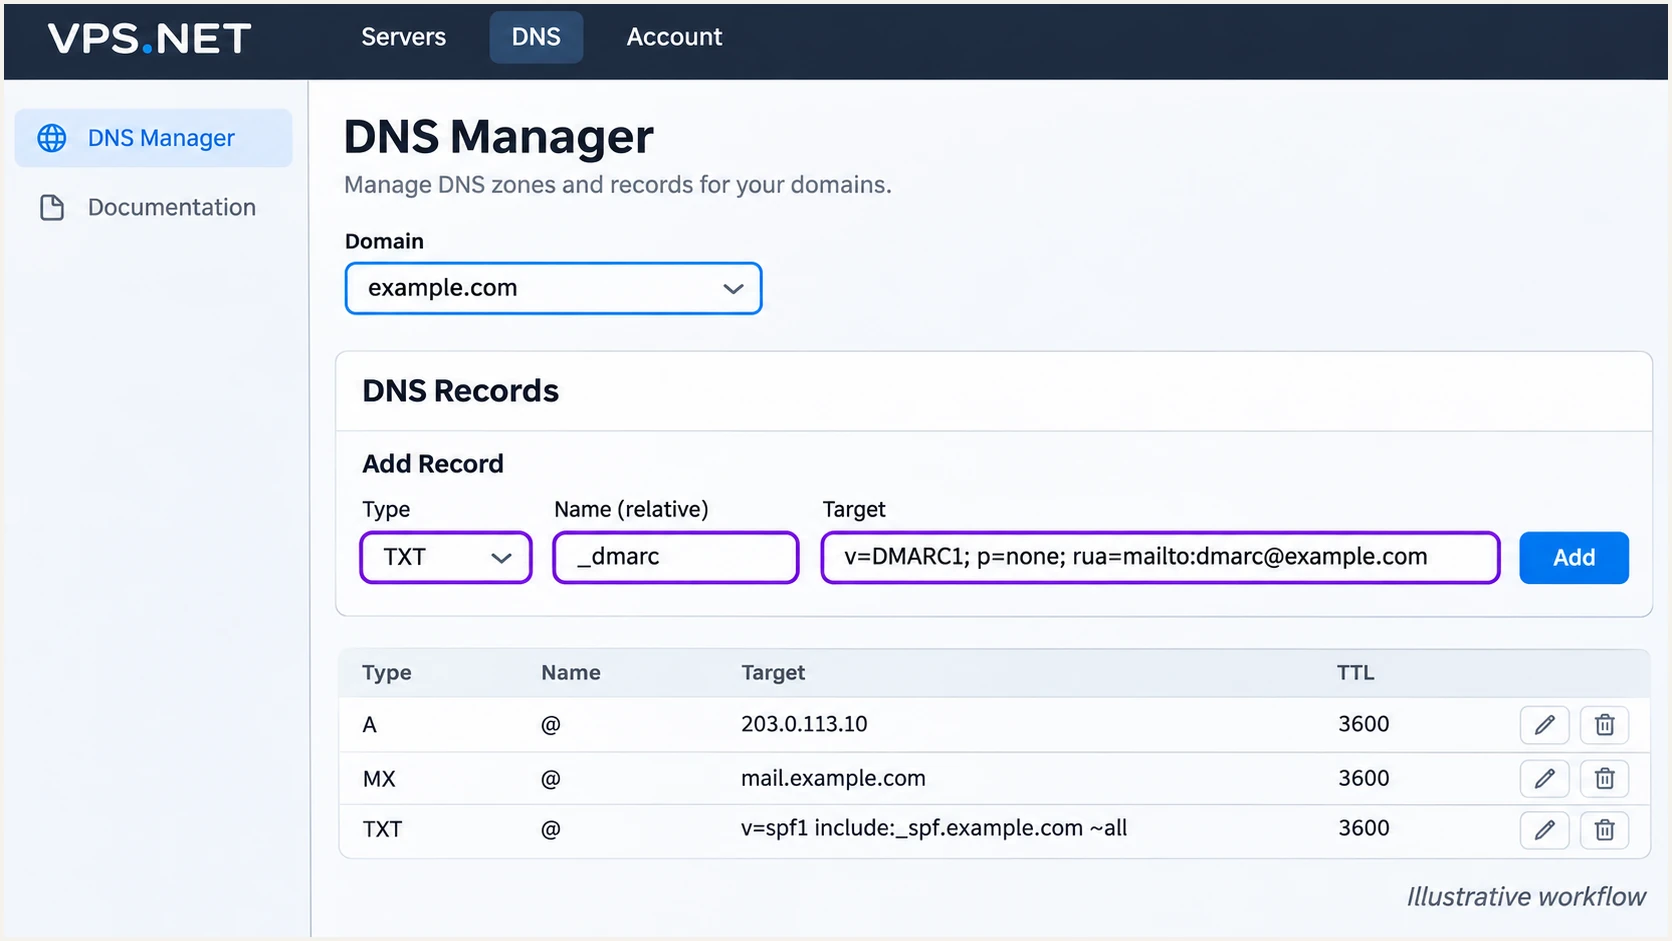
Illustrative VPS.NET DNS editor with the _dmarc TXT record ready to add.
Verify and troubleshoot
I test the same application and SMTP route that sends production mail. A message composed in another mailbox does not verify the VPS.NET server's configuration.
- Verify DNS. Run the lookups below. Confirm one SPF policy, one DMARC policy, and the full public key at the selector actually used by the signer.
- Verify reverse DNS. Ask VPS.NET support to set the sending IP's PTR to mail.example.com, with matching forward A or AAAA records. Use that hostname for SMTP HELO/EHLO. A PTR added to your ordinary domain zone does not configure provider-owned reverse DNS.
- Verify delivery. Inspect SMTP logs and the queue. For direct delivery, confirm outbound TCP 25 is available; ask VPS.NET about restrictions if connections fail. Authentication records do not open SMTP ports.
- Verify the real message. Use the email tester below, send to its generated address through your application, and inspect its authentication diagnosis.
Query the published recordsbash
dig +short TXT example.com
dig +short TXT vps2026._domainkey.example.com
dig +short TXT _dmarc.example.com
dig +short -x 203.0.113.10
The email tester is the quickest end-to-end check here: it prompts you to send a test email and returns a diagnosis of the received message. Send through every application path, including scheduled jobs and local PHP mail if those are used.
For the direct-delivery configuration above, expect SPF and DKIM passes for your domain and a DMARC pass. An SPF pass for a provider-owned domain does not satisfy SPF alignment with your From domain.
Email tester
Send a real email to this address. Suped shows a results button when the test is ready.
?/43tests passed
Read the receiving system's Authentication-Results header, not a header supplied by the sender. The expected fields for this example are shown below; the receiver's own hostname will differ.
DMARC passes when at least one passing mechanism has the required domain match. I still configure both mechanisms on a server I control and require working DKIM before enforcing rejection, since forwarding commonly breaks SPF.
Expected receiving-server authentication resultstext
Authentication-Results: receiver.example;
  spf=pass smtp.mailfrom=example.com;
  dkim=pass header.d=example.com header.s=vps2026;
  dmarc=pass header.from=example.com
I use the failed result to choose the next check. If a key was recently changed, compare authoritative DNS with cached answers before regenerating it again.
|
|
|
|---|---|---|
SPF fail | Outbound IP | Correct SPF |
SPF mismatch | MAIL FROM | Use own domain |
DKIM none | Submission path | Enable signing |
DKIM fail | Key and body | Match key pair |
DMARC fail | From domain | Fix domain match |
SMTP timeout | Outbound port | Check connectivity |
Match the failure to the next configuration check.
Get alerted when it breaks
Our DMARC platform, Suped, turns receiver reports into source-level checks and steps to fix. Its DMARC monitoring helps catch a replaced VPS IP, a stopped DKIM signer, or an application that starts using an unexpected sender domain.
I pair report-based authentication checks with DNS change checks. Aggregate reports arrive after delivery, so their alerts are not an immediate notification for every message. Server logs remain the first check for a live SMTP outage.
- Verify the source. In Suped's Sources view, compare the detected IP with your VPS inventory before marking the sending source as verified. A familiar rDNS name alone is insufficient.
- Enable notifications. Turn on Issues detected and Sending sources need verification in Notifications. Enable DMARC summary emails for routine review.
- Investigate failures. Filter Data view by source and IP, then open Detail view to inspect SPF, DKIM and DMARC results. Compare DNS history when a previously working path changes.
- Retest changes. After replacing an IP or rotating a selector, send another application test and confirm the next reports contain passing legitimate traffic. Investigate blocklist (blacklist) alerts separately from authentication failures.
Suped keeps this workflow in one place: identify the affected source, follow the detected issue's fix steps, then verify the result. The server still needs a functioning signer and SMTP service; monitoring identifies the configuration work to do.
Secure your domain with p=reject
I move to p=reject after every legitimate sending path is accounted for and produces passing DKIM with the required domain match. Review report data across complete business sending cycles, including low-volume scheduled mail, rather than relying on one successful test.
Our Hosted DMARC lets teams manage the policy in Suped after the initial DNS configuration. Combine that policy control with source verification and issue notifications to check each enforcement change.
Keep DKIM working at enforcement
Retain old selector records while queued messages signed with those keys can still arrive. Publish a new public key before switching the signer, test delivery, and retire the old selector after the relevant queue and DNS-cache windows have passed.
- Review legitimate sources. In Suped, verify expected sources and resolve their SPF or DKIM issues. Evaluate legitimate traffic separately from unauthorized traffic so spoofed messages do not distort readiness checks.
- Stage enforcement. If starting at p=none, move to p=quarantine after fixing legitimate failures. Review subsequent reports and delivery problems before moving to p=reject. Keep existing stronger policies in place.
- Check policy scope. Review sending subdomains and any explicit subdomain policies. A parent policy also affects subdomains without an overriding policy; do not overlook a separate application domain.
- Enforce and observe. Keep the working rua destination, change p to reject, and leave matching modes relaxed unless stricter matching is intentional. Use Suped notifications and source details to catch regressions after deployment.
Policy stages after legitimate senders passtext
# Intermediate TXT value at _dmarc.example.com
v=DMARC1; p=quarantine; rua=mailto:dmarc@example.com

# Final TXT value at _dmarc.example.com
v=DMARC1; p=reject; rua=mailto:dmarc@example.com
Each stage replaces the existing TXT value. Publish only the selected value, omit the comments, and keep your actual reporting address. Suped's source data lets you check whether a rejection-policy change exposed an overlooked legitimate sender.
A reject policy asks receivers to reject messages that fail DMARC. It does not guarantee inbox placement or stop lookalike-domain messages; continue checking the server's sending behavior and reputation.
Frequency asked questions
For mail delivered directly by a customer VPS, authorize that server's actual outbound IP using ip4 and, when used, ip6. Do not invent an include for vps.net or authorize an entire hosting network. If you use a relay, use its documented settings instead.
SPF authenticates SMTP MAIL FROM, which is separate from the visible From header. A pass for a provider-owned bounce domain does not satisfy DMARC's domain-matching requirement. Configure your own return path when supported, or ensure DKIM passes with your domain as the signing domain.
A hostname ending in vps.net is not enough to identify the sending application or prove authorization. VPS.NET hosts customer-operated servers, and a server's PTR can use a customer's own hostname. Compare the report's source IP with your server inventory and confirm network ownership before treating it as an expected VPS.NET source.
No. MX records control incoming delivery. Your existing mailbox provider can keep receiving mail while your VPS sends it. Keep the envelope sender's bounce address reachable and configure outbound authentication for the actual sending path.
DNS visibility depends on record TTLs and negative caching. Check the authoritative nameserver first, then public resolvers. Initial DMARC aggregate reports commonly arrive within 24-48 hours of eligible traffic, but reporting depends on the receiver. Verify a delivered test message before waiting for reports.




