
How to set up DMARC/DKIM/SPF for Up There Cloud

To authenticate Up There Cloud email, authorize the outgoing mail server in the envelope sender domain's SPF record, enable DKIM signing for your sending domain, and publish a DMARC TXT record at _dmarc.yourdomain. DMARC passes when SPF or DKIM passes with a domain that matches the visible From domain under your DMARC alignment settings.
I first check whether the application sends through the hosting mail server or a separate SMTP relay. Authentication belongs on the system that actually sends the message. For a new DMARC deployment, start with p=none; keep an existing quarantine or reject policy.
Up There Cloud now redirects to Conetix's transition notice, which identifies Plesk hosting and the current account portal. The Plesk steps below apply to that hosting setup; for a custom server, obtain the signing and outbound IP details from its administrator.
Add your domain
I open the existing hosting subscription before changing DNS. Migrated Up There Cloud domains should already be present; add a domain only when it is absent and your subscription permits it.
- Open hosting. Use the account access in your migration or welcome email. In the current control panel, open Services > My Services, select the subscription, and choose Manage Product, then Plesk One Click.
- Select the domain. In Plesk, open Websites & Domains and select your sending domain. For a new domain, choose Add Domain, enter the domain you control, and complete the hosting form.
- Find public DNS. Check the domain's authoritative nameservers. If Plesk manages that public zone, open Websites & Domains > Hosting & DNS > DNS Settings. Otherwise make DNS changes at the authoritative DNS host.
- Verify the setup. Confirm the domain appears in the correct subscription and that public DNS returns the records you publish. Keep existing MX records unless you are deliberately moving inbound email.
A domain appearing in Plesk confirms the hosting configuration. Public DNS verification is separate: saving a record in an inactive local zone has no effect on receiving mail servers.
For an application using a separate relay, complete sender-domain verification at that relay. Adding the website to Plesk does not configure authentication on another sending system.
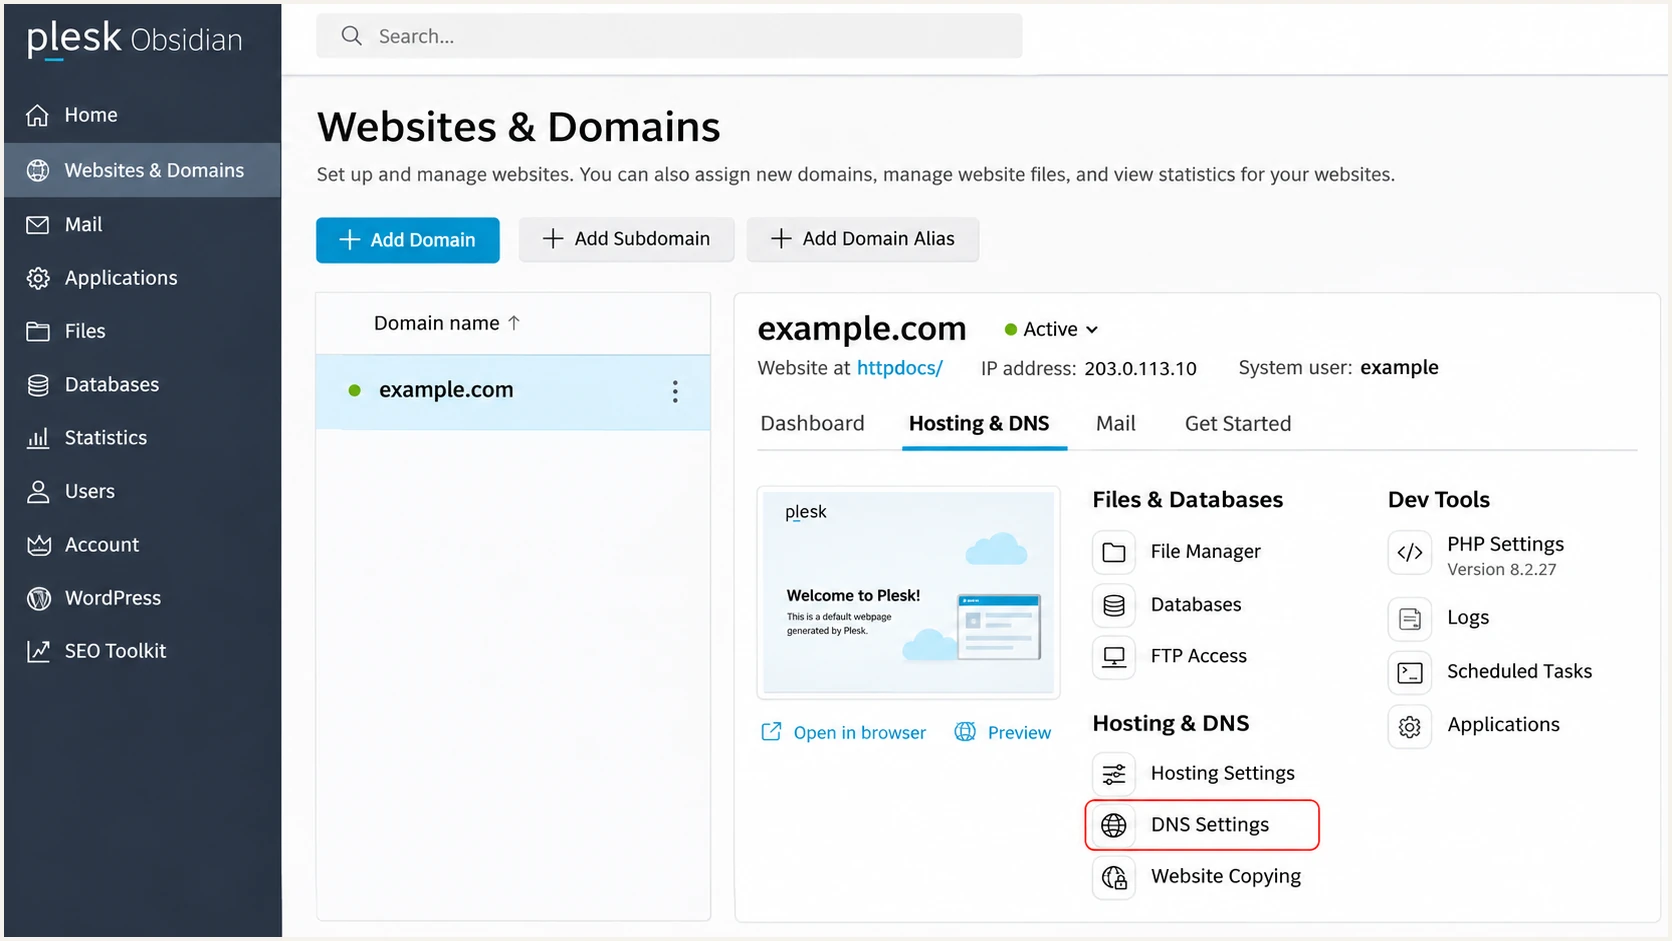
Illustrative Plesk view showing the domain and its DNS Settings action.
Set up SPF
Up There Cloud supports return-path alignment. I configure the application's SMTP envelope sender under the same organizational domain as its visible From address, then authorize the actual outgoing server.
- Inspect the sender. Send a message and read its Return-Path and the receiving server's SPF result. Find the SPF TXT record for that envelope sender domain, which is not always the website's domain.
- Confirm outbound IPs. Ask hosting support for the approved SPF value or outbound IPv4 and IPv6 addresses for your service. A website IP or an inbound MX server is not automatically the outgoing server.
- Edit one record. Keep one SPF record per envelope sender domain. Merge the hosting authorization with existing legitimate senders before the final all mechanism, and keep DNS lookup terms within the limit of 10, including nested includes.
- Set the envelope sender. Configure MAIL FROM in the application or SMTP mailer using your own domain and the hosting-provided connection settings. Check the delivered Return-Path; manually adding a Return-Path header does not set the SMTP envelope.
Illustrative SPF TXT value for one approved IPv4 sendertext
v=spf1 ip4:192.0.2.10 -all
This example belongs at the envelope sender domain and uses a documentation-only IP. Replace it with your approved outgoing IP, include IPv6 authorization when used, and retain other legitimate senders. Do not paste it unchanged.
Conetix's SPF support guidance says its system creates the correct record when it hosts both email and DNS. Inspect that existing record before editing it. Use the checker on the domain in the delivered Return-Path.
SPF checker
Find SPF syntax issues, lookup limits, and weak records.
?/16tests passed
An SPF DNS check validates the published policy. Confirming SPF alignment also requires a real message: the authenticated envelope domain must match the visible From domain under the configured relaxed or strict mode.
If a separate relay fixes the envelope sender to its own domain, adding that relay to your From domain's SPF record does not repair alignment. Use passing DKIM with a matching signing domain for DMARC on that route.
Use the record for your service
Do not assume include:upthere.com.au is a valid SPF instruction. Obtain the approved value for your hosting service. Publishing two SPF records at the same name causes a permanent SPF error.
Set up DKIM
I enable DKIM on the mail server used by the application. For the current Plesk hosting setup, Conetix documents this under Mail > Mail Settings.
- Enable signing. Open Mail > Mail Settings for the sending domain. Tick the DKIM option for signing outgoing email, then click OK.
- Publish the public key. If Conetix hosts your DNS, Plesk creates the required records. For external DNS, reopen Mail Settings, select How to configure external DNS, and copy every displayed record to the authoritative zone.
- Check the selector. The documented setup uses the default selector. Look up default._domainkey.example.com, replacing example.com with your domain. If the actual signature uses another s= value, check that selector instead.
- Test the signature. Send through the real application. In the recipient's headers, confirm dkim=pass and a signing d= domain that matches your From domain under DMARC's alignment mode. DNS publication alone does not enable signing.
The public key is unique to your domain and mail server. Copy the full TXT value supplied by Plesk; a key generated elsewhere will not match the private key used by the hosting server.
For website forms, keep the From address on your own domain and put the visitor's address in Reply-To. Test that path separately from mailbox email because applications can use different mail routes.
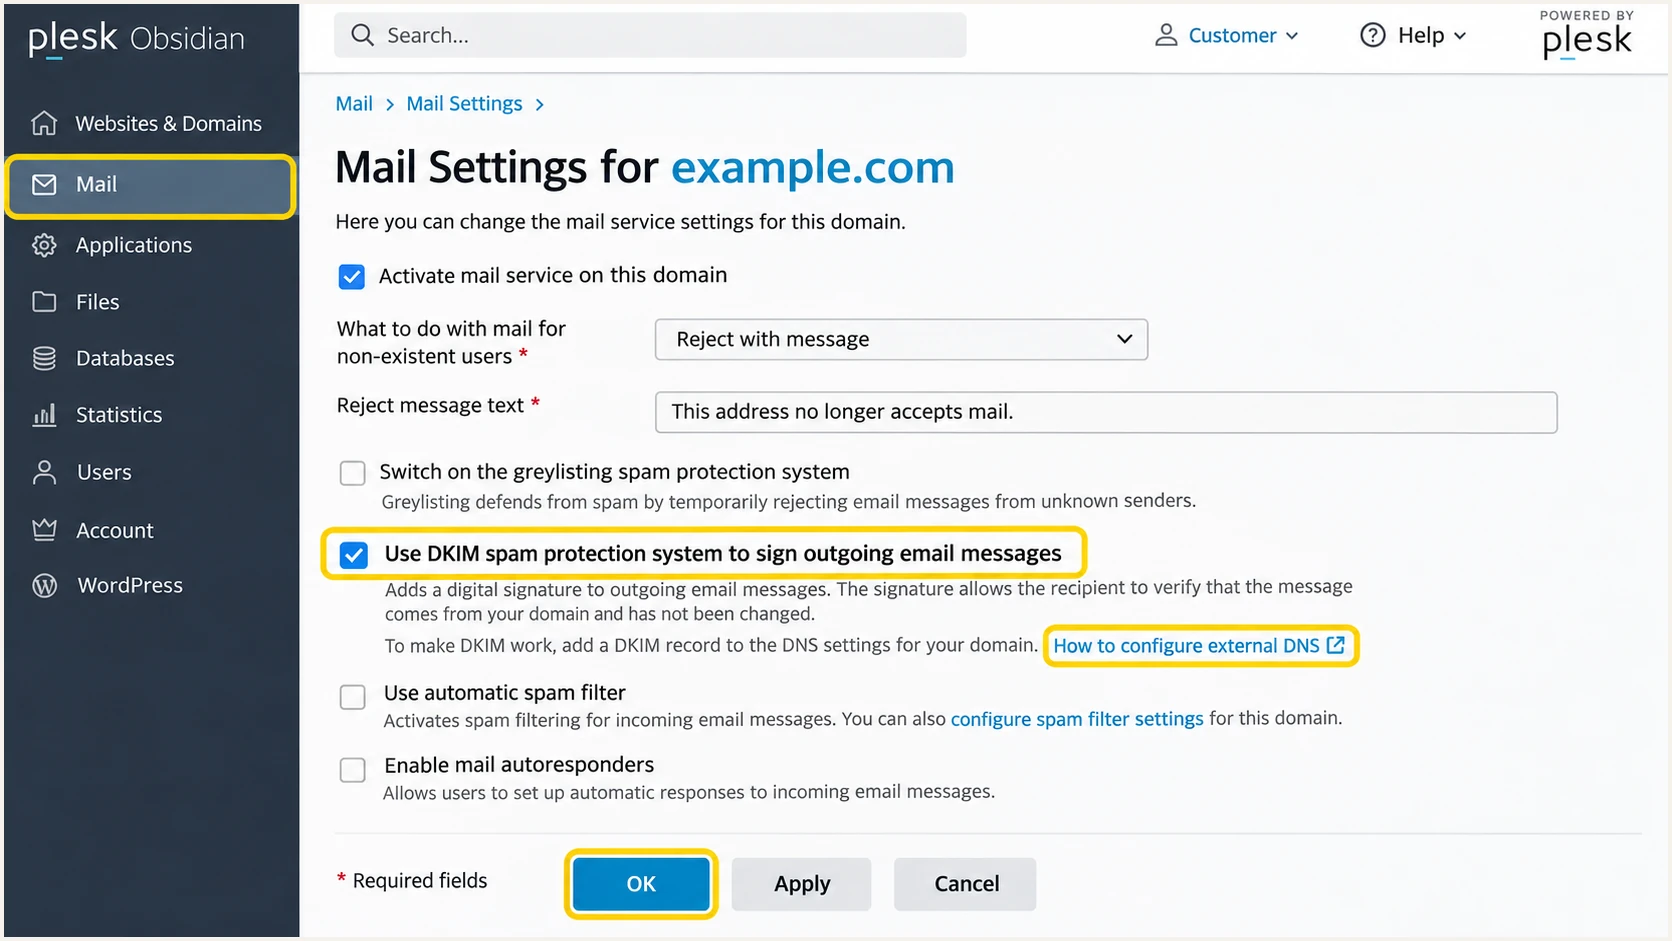
Illustrative Plesk Mail Settings view with outbound DKIM signing enabled.
Set up DMARC
I publish DMARC for the domain in the visible From address. Start a new deployment in monitoring mode; do not weaken an existing quarantine or reject policy to connect this sending source.
- Read the current policy. Look up _dmarc.example.com first. Edit an existing DMARC record rather than adding a second record at the same name.
- Create the report mailbox. Use a working address that accepts aggregate report attachments. Replace dmarc@example.com in the example with your real report destination.
- Add the TXT record. At the authoritative DNS host, create a TXT record with host _dmarc. In Plesk, use DNS Settings > Add Record, choose TXT, enter _dmarc in the domain field, paste the value below, and save. Apply pending zone changes if prompted.
- Check public DNS. Query your sending domain in the checker below after DNS caches expire. Confirm that one valid policy and the intended reporting address are returned.
New DMARC policy, TXT at _dmarc.example.comtext
v=DMARC1; p=none; rua=mailto:dmarc@example.com
Use the DMARC record generator to prepare your own value. Keep default relaxed alignment unless you have a specific requirement for exact domain matching. p=none requests monitoring without DMARC enforcement; it does not guarantee inbox delivery.
If the report destination uses another organization's domain, its operator must authorize external reporting in DNS. Follow that operator's instructions, and keep your existing reporting destination while testing any change.
DMARC checker
Look up a domain's DMARC record and catch policy issues.
?/7tests passed
Check the visible From domain, including a sending subdomain when applicable. A Return-Path subdomain is an SPF identity and does not automatically determine where your DMARC record belongs.
Aggregate reports usually arrive daily, with timing controlled by receivers. A successful DNS lookup confirms publication; a real message confirms authentication, and subsequent reports show the wider sending activity.
Verify and troubleshoot
I test through the production application after each change. A message sent from webmail does not prove that a website form uses the same server or signing configuration.
- Send real mail. Trigger a form submission and each transactional mail path. Use the same From address and SMTP settings as production.
- Read receiver results. Inspect the receiving server's Authentication-Results for spf=pass, dkim=pass, and dmarc=pass. If DMARC fails despite an SPF or DKIM pass, compare the authenticated domain with the visible From domain.
- Trace delivery. In Plesk, open Websites & Domains > your domain > Mail > Track Email Delivery. Refresh, find the sender or recipient, then open Show details. An outbound handoff confirms acceptance by the next server, not inbox placement.
- Check reverse DNS. Ask hosting support to correct missing or inconsistent PTR records on the actual outgoing IP. The PTR hostname should resolve back to that IP; it does not need to equal your From domain.
|
|
|
|---|---|---|
SPF fail | Missing outgoing IP | Envelope SPF policy |
SPF permerror | Duplicate or excessive lookups | Single SPF record |
DKIM fail | Wrong key or altered message | Selector and signing route |
Pass, DMARC fail | Authenticated domain mismatch | From domain matching |
DNS record absent | Wrong zone or cached answer | Authoritative DNS |
Common failures and the next configuration check.
For the quickest message-level check, use our email tester. It supplies a test address; send to it through your Up There Cloud application to receive an authentication diagnosis.
Use the resulting report to confirm the actual source IP, envelope sender, and DKIM signing domain. Test each distinct route again after correcting a failure.
Email tester
Send a real email to this address. Suped shows a results button when the test is ready.
?/43tests passed
An SPF alignment warning does not mean DMARC failed when a valid DKIM signature has the required domain match. For this hosting setup, investigate both mechanisms because return-path alignment is supported.
If authentication passes but delivery still fails, inspect the SMTP rejection and application logs. Authentication does not override recipient filtering or a blocklist (blacklist) listing on a shared outgoing IP.
Get alerted when it breaks
I keep report-based alerts running after the initial test. Our platform, Suped, combines DMARC monitoring with authentication issue detection, so changes in Up There Cloud sending activity can be investigated by source.
- Enable issue notifications. For an existing Suped reporting setup, enable Issues detected and Sending sources need verification notifications. Keep DMARC summary emails enabled for regular review.
- Investigate the source. Open the affected source and inspect its sending IP, rDNS, SPF result, and DKIM domain. Verify the activity against your hosting subscription and application logs before approving a new source.
- Repair the hosting configuration. Use Suped's issue details and steps to fix to identify the failing record, then make the correction in Plesk or your authoritative DNS host. Retest through the application.
- Confirm recovery. Check subsequent reports for the affected source. Review DNS history when a migration, record deletion, or selector change coincides with the failure.
Suped's notifications make aggregate reporting useful for ongoing maintenance. A mailbox full of XML attachments does not provide the same source review and guided issue workflow.
DMARC alerts depend on report arrival and are not instant feedback for every message. Keep application error alerts and Plesk delivery logs available for immediate sending failures.
Plesk delivery logs
Check individual sending attempts, queue status, and the next server's SMTP response.
Use these when a message fails to leave the hosting server or receives a delivery error.
Suped DMARC reports
Review receiver-reported authentication by sending source and investigate detected issues.
Use these to catch recurring failures and unexpected sources across reporting periods.
Secure your domain with p=reject
I move to p=reject after legitimate sending sources pass DMARC across a complete sending cycle. A successful Up There Cloud test is one checkpoint; the domain policy also affects other systems using the same From domain.
- Inventory every sender. In Suped, review recognized and unverified sources against your mailbox service, hosted applications, business systems, and scheduled jobs. Do not approve a source solely because its rDNS looks familiar.
- Resolve legitimate failures. Use the source diagnostics to correct SPF authorization and DKIM signing. Confirm matching authentication for each legitimate stream, including infrequent sends and forwarding scenarios.
- Stage enforcement. For a new deployment, review reports under p=none, move to p=quarantine, and then use p=reject after legitimate failures are resolved. If enforcement is already active, keep it while fixing this source.
- Review subdomains. Check whether subdomains need their own policies. The parent policy normally applies to subdomains without a separate policy unless an sp tag changes that behavior.
- Keep watching. Retain aggregate reporting and Suped alerts after enforcement. Treat a hosting move or new SMTP route as a configuration change that needs another live-message test.
Enforce after sender verification
The readiness check is passing, domain-matched authentication for every legitimate sending stream. Keep Suped reporting and issue notifications active so a later hosting change does not silently break that setup.
Our hosted DMARC controls support policy changes through Suped when your domain already uses that setup. Otherwise edit the existing DMARC TXT record at the authoritative DNS host. Keep one policy at the record name.
Use the following final policy only after those checks pass, replacing the example reporting address with your active destination. Keep that destination working throughout enforcement.
Enforcement policy, TXT at _dmarc.example.comtext
v=DMARC1; p=reject; rua=mailto:dmarc@example.com
p=reject asks receiving servers to reject mail that fails DMARC. Receivers retain their own handling policies, so this is not a guarantee that every unauthorized message will be blocked.
Continue reviewing legitimate failures rather than targeting a perfect overall pass rate: reports can contain unauthorized mail. Suped's source verification helps distinguish that traffic from a broken business sender.
Frequency asked questions
Suped identifies rDNS hostnames ending in .upthere.com.au as Up There Cloud infrastructure. That identifies a hosting source, not an authorized sender. Compare the sending IP and authentication results with your hosting service before verifying the source.
Use the SPF value supplied for your specific hosting service or its confirmed outbound IP addresses. Do not assume include:upthere.com.au is valid. For current Conetix hosting with both email and DNS managed there, inspect the automatically generated SPF record and preserve other legitimate senders.
DMARC needs at least one passing mechanism with the required match to the visible From domain. Configure both where supported. If a separate relay uses its own fixed Return-Path, SPF alignment can fail while domain-matched DKIM still passes DMARC; adding SPF to your From domain does not change that relay's envelope sender.
Check that the application's actual mail server signs the message and that the complete public key is published in authoritative DNS. For external DNS, copy the records from Plesk's external DNS instructions. Use the selector in the delivered signature, often default in the documented setup, and allow old DNS answers to expire.
Keep your existing enforcement policy. Correct this source's SPF authorization and DKIM domain matching, then test through the application. The p=none starting record is for a new DMARC deployment, not a reason to remove protection from a domain already using quarantine or reject.




