
How to set up DMARC/DKIM/SPF for Trend Micro

Published 21 Nov 2026
Updated 21 Nov 2026
13 min read
Summarize with

To set up DMARC/DKIM/SPF for Trend Micro, verify your domain, authorize its outbound gateway in SPF, enable DKIM signing for your domain, and publish a DMARC TXT record. I check a message delivered through the gateway before tightening the DMARC policy.
The steps below apply to Trend Micro Email Security's cloud gateway, now named TrendAI Email Security in current documentation. If Trend Micro only filters incoming email, configure outbound authentication at your actual sending service instead.
Add your domain
I start with DNS access and the destination mail server details. Outbound protection requires a full license or activation through Trend Micro support.
- Create the domain: Open Domains > Add. Enter the email domain under General, such as example.com.
- Set delivery: Under Inbound Servers, enter the destination IP address or FQDN, recipient scope, port, and preference. Use your actual mail server settings.
- Authorize outbound mail: Select Enable outbound protection. Choose Microsoft 365, Google Workspace, or User-defined mail servers, then configure the authorized sending servers. Click Add Domain.
- Prove ownership: Open Domains > your domain > General. Publish the exact verification TXT name and value shown, then click Verify. Confirm Domain verified.
- Verify routing: Test and verify the inbound server. Under Outbound Servers, open detailed configurations and copy your tenant's regional relay hostname into the upstream mail server's outbound connector or smart host.
An MX change routes incoming mail through Trend Micro; it does not route outgoing mail. Schedule that inbound cutover separately after testing delivery.
The ownership TXT record is separate from SPF and DMARC. Keep its existing DNS value intact when adding authentication records.
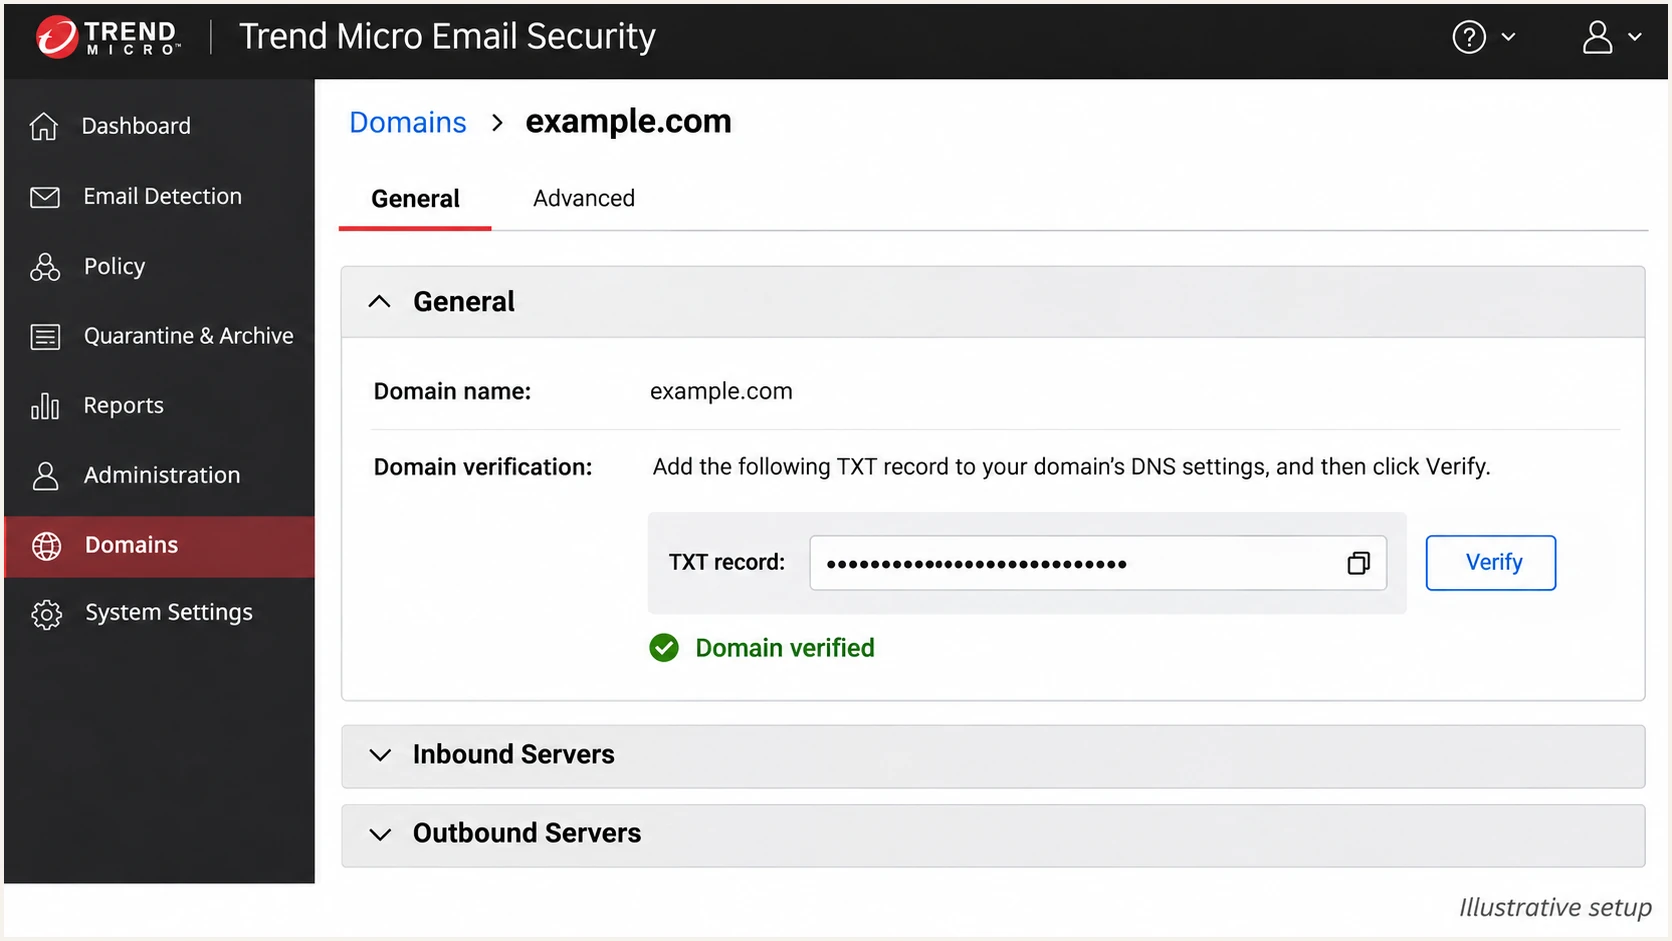
Illustrated Trend Micro domain settings showing ownership verification under General.
Confirm the Domains list reaches Completed after the required checks. Hover over any red exclamation mark to identify the remaining configuration.
Do not enable outbound protection with an empty authorized-server configuration. Trend Micro warns that this prevents delivery of outbound traffic routed through the service.
Set up SPF
Trend Micro supports SPF alignment when the envelope sender uses your domain. I check the delivered Return-Path and authorize the gateway on that domain's SPF record.
- Copy the tenant value: Open Domains > your domain > Outbound Servers. Copy the SPF include domain displayed for your serving site.
- Edit one record: At the envelope sender domain, edit the existing TXT value beginning v=spf1. Insert include: followed by the regional domain before the final all mechanism.
- Preserve other senders: Keep authorization for every active mail source and retain the intended -all or ~all ending. Publish one SPF record per DNS name.
- Check the budget: Count nested includes and other DNS-querying SPF terms. Evaluation permits at most 10 such terms, including those reached recursively.
Use the tenant's serving site, rather than the recipient's location. Trend Micro's 'Add SPF records' documentation lists these regional include domains.
Add only the region or regions actually used by your outbound route. The values below are SPF include targets, not MX destinations.
|
|
|---|---|
United States | spf-us.tmes.trendmicro.com |
Germany | spf.tmes.trendmicro.eu |
Australia | spf.tmes-anz.trendmicro.com |
Japan | spf.tmems-jp.trendmicro.com |
Singapore | spf.tmes-sg.trendmicro.com |
India | spf.tmes-in.trendmicro.com |
UAE | spf.tmes-uae.trendmicro.com |
United Kingdom | spf.tmes-uk.trendmicro.com |
Canada | spf.tmes-ca.trendmicro.com |
South Africa | spf.tmes-za.trendmicro.com |
Indonesia | spf.tmes-id.trendmicro.com |
Regional SPF values for Trend Micro Email Security; confirm your console's value.
For a United States tenant whose only outbound path is Trend Micro, the TXT value below is a complete example.
If other services also send using the same envelope domain, merge this include into their existing SPF record instead of replacing their authorization.
Example SPF TXT value at example.com, United States onlytext
v=spf1 include:spf-us.tmes.trendmicro.com -all
For an Australian tenant, substitute spf.tmes-anz.trendmicro.com. Avoid the older broad include when the console supplies a regional value.
Check the actual envelope sender domain below. A syntactically valid SPF record still requires a test message to confirm the gateway IP is authorized.
SPF checker
Find SPF syntax issues, lookup limits, and weak records.
?/16tests passed
After publishing DNS, return to Outbound Servers and click Verify. Send through the configured relay to check the resulting SPF status.
Adding Trend Micro to the visible From domain cannot fix SPF alignment if the Return-Path uses an unrelated domain. Correct the envelope sender at the originating system, then retest.
Set up DKIM
I enable DKIM on the outbound gateway so the signature covers the message after Trend Micro's processing. Use your own domain as the signing domain.
- Open signing: Go to Outbound Protection > Domain-based Authentication > DomainKeys Identified Mail (DKIM) Signing. Click Add.
- Choose the identity: Select your Managed domain and Enable DKIM signing. Set SDID to the domain used in the visible From address, keeping the generated selector.
- Generate the key: Select a 2048-bit key and click Generate. Copy the generated DNS TXT record name and public value into your DNS host.
- Set signing options: Keep From among the signed headers. Use Relaxed header and body canonicalization, and Unlimited body length to cover the complete message.
- Save and inspect: Click Add, then check DNS Record Status and the configured Wait time. Test only after DNS validation and signing activation.
Use the selector shown in your own configuration. There is no universal Trend Micro selector to paste into every domain.
A long DKIM public key can use adjacent strings of up to 255 bytes within one TXT record. Preserve the entire key without inserting spaces into its value.
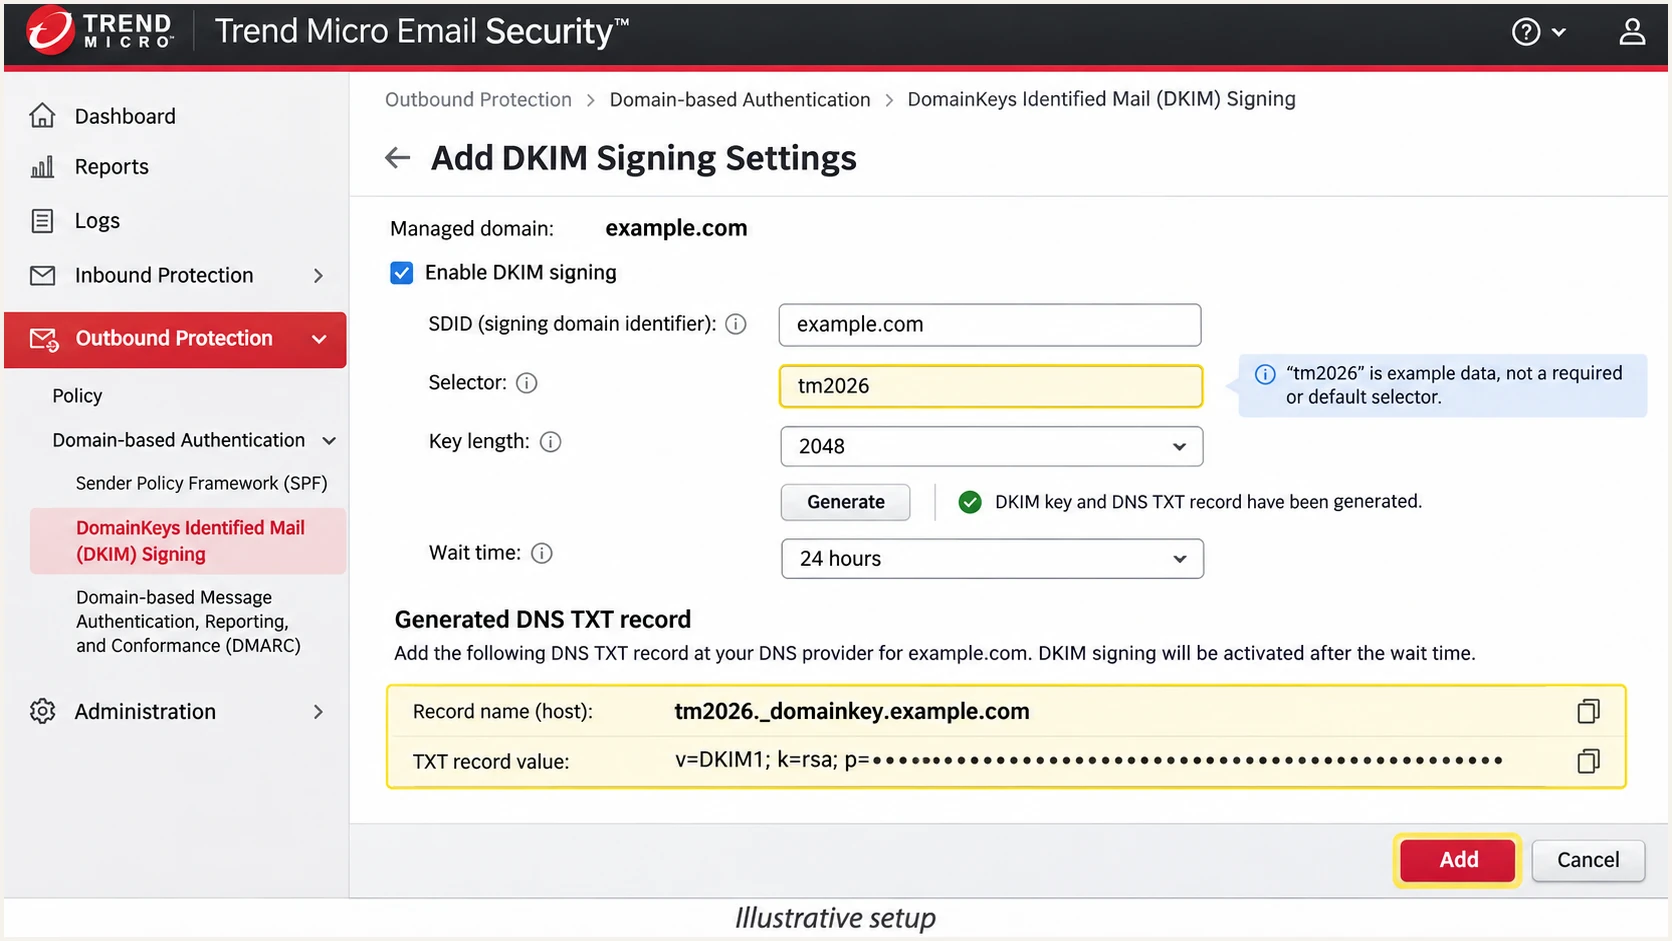
Illustrated Trend Micro DKIM signing form with domain, key generation, and DNS fields.
Trend Micro's support article KA-0020473 documents a configurable 24-96 hour signing wait after successful DNS validation. DNS visibility alone does not mean signing is active.
For differing envelope and header domains that both belong to your account, review Sign email messages with header sender addresses. Separately review the option for messages with no envelope sender, including bounce messages.
Keep the active key during rotation
When regenerating a key pair, retain the old public key record until the replacement is active. Trend Micro continues signing with the old key during the transition; removing it early breaks verification.
Inspect the delivered DKIM-Signature for its d= domain and s= selector. Query the TXT record at that selector under _domainkey.
A passing signature with an unrelated d= domain does not provide DKIM alignment for your visible From domain. Correct SDID and send another test.
Set up DMARC
Publish DMARC in your domain's DNS. Trend Micro's inbound DMARC filtering controls how incoming messages are checked; it does not publish your outbound domain policy.
- Inspect the policy: Look up the TXT record at _dmarc.example.com, replacing example.com with your visible From domain. Edit the existing record if one is present.
- Start monitoring: If no enforcement policy exists, publish the p=none value below. If you already use p=quarantine or p=reject, keep that policy.
- Set the destination: Replace dmarc@example.com with a real mailbox that accepts aggregate reports, or the reporting address supplied by your chosen reporting setup.
- Validate DNS: Save one DMARC TXT record at the correct name. Confirm the policy and reporting destination with the checker below.
Use the DMARC record generator to build the record. Leave SPF and DKIM alignment in their default relaxed mode during initial setup unless your domain design requires strict matching.
Set the DNS host to _dmarc if your DNS editor appends the domain automatically. The complete record name is _dmarc.example.com; its TXT value is below.
Initial DMARC TXT value at _dmarc.example.comtext
v=DMARC1; p=none; rua=mailto:dmarc@example.com
DMARC passes when SPF or DKIM passes with the required domain relationship to the visible From address. With relaxed alignment, those domains share the same organizational domain.
I validate DNS before waiting for aggregate reports. Reports commonly arrive over the next 24-48 hours after receivers process real traffic.
DMARC checker
Look up a domain's DMARC record and catch policy issues.
?/7tests passed
This lookup checks the published record. It does not prove that a message passes DMARC or that the reporting mailbox accepts incoming reports.
If rua points to another organization's domain, follow its instructions for external reporting authorization. Otherwise receivers can omit reports to that destination.
Preserve an existing enforcement policy
Do not replace a working p=quarantine or p=reject policy with the example p=none record. Keep existing reporting addresses and other intentional settings when updating DNS.
A p=none policy requests monitoring without asking receivers to quarantine or reject mail because of that policy. It is the starting point for collecting evidence.
Only one DMARC record belongs at each policy name. Multiple DMARC records at the same name prevent reliable policy discovery.
Verify and troubleshoot
I test the complete outbound route, including any disclaimer or content modification. The recipient's authentication results are the check that matters.
- Send a real test: Use the email tester below and send to its generated address through your normal Trend Micro outbound route.
- Confirm the gateway hop: Open Logs > Mail tracking in Trend Micro. Find the message by sender, recipient, and time, then confirm outbound processing and delivery status.
- Read trusted results: Inspect Authentication-Results added by the receiving service. Check spf=pass, dkim=pass, and dmarc=pass, plus smtp.mailfrom, header.d, and header.from.
- Exercise each source: Repeat with user mail, automated mail, and every distinct outbound connector. Include forwarded delivery and messages that receive a footer.
The email tester prompts you to send a message and returns a diagnosis of the received email. This is quicker than comparing DNS records alone.
Keep the original message headers available so you can compare the test's findings with the exact sender domains and selector.
Email tester
Send a real email to this address. Suped shows a results button when the test is ready.
?/43tests passed
If SPF passes but DMARC fails, compare the envelope sender domain with the visible From domain. SPF authorization and SPF alignment are separate checks.
If DKIM fails, compare the signature's selector and signing domain with DNS, then inspect gateway modifications and signing activation status.
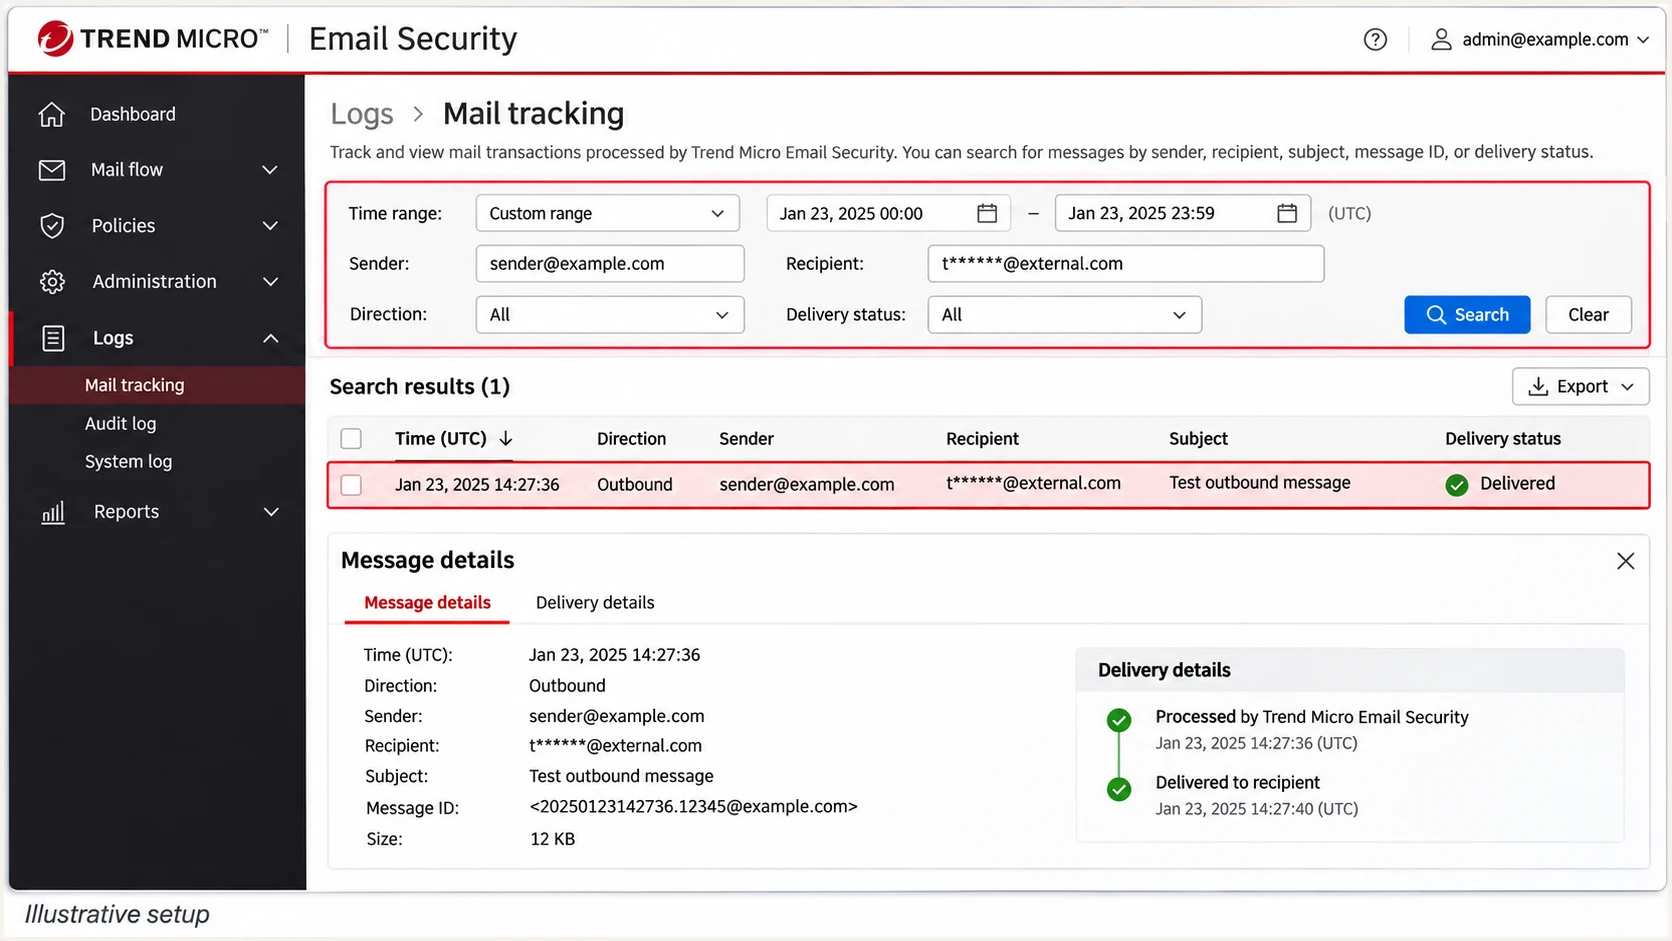
Illustrated Trend Micro Mail tracking search for an outbound test message.
Mail tracking confirms what the gateway processed. The receiving server evaluates the final message and records its own authentication results.
Use the failure below to select the next check. Avoid regenerating keys or replacing DNS records before identifying the cause.
|
|
|
|---|---|---|
SPF permerror | Duplicates or budget | Merge SPF; count lookups |
SPF fail | Region or final IP | Check include and routing |
DKIM absent | Activation or bypass | Check wait and gateway hop |
DKIM fail | Key or changed content | Check selector and footer |
DMARC fail | Domain relationship | Check From and d= domain |
Relay denied | Authorized servers | Check outbound settings |
Troubleshooting checks for mail sent through Trend Micro.
A DNS editor that appends the domain twice creates a record at the wrong name. Query the full expected name to catch that mistake.
Passing authentication does not guarantee inbox placement. For rejected mail that passes DMARC, inspect the receiving server's SMTP response and message content.
Get alerted when it breaks
A test checks one message. Suped, our DMARC platform, monitors aggregate reports and detected authentication issues so changes to Trend Micro's route do not go unnoticed.
- Identify the source: In Suped's source table, inspect Trend Micro traffic by sending IP and authentication domains. Verify it only after confirming it belongs to your outbound route.
- Inspect failures: Open Data view and Detail view to separate SPF failures, DKIM failures, and domain mismatches. Filter by source and reporter.
- Enable notifications: Configure Issues detected and Sending sources need verification notifications. Enable DMARC summary emails for ongoing review.
- Trace changes: Use DNS history to compare the old and new record values when a change coincides with failures. Retest through Trend Micro after correcting the issue.
Suped's DMARC monitoring connects the failing source with authentication details and steps to fix. That makes it practical to investigate a broken selector or a bypassed outbound connector.
I keep an owner assigned to each authorized sender and review new sources before changing SPF. A familiar gateway hostname alone is insufficient authorization.
Account for report timing
DMARC aggregate reports usually arrive on a daily schedule. Suped alerts on received data and detected issues; they are not live notifications for every SMTP transaction.
After a repair, send another test immediately, then check the following report windows for the same failure. Old reports still contain failures recorded before the change.
Keep Trend Micro's mail tracking alongside the report investigation. It supplies message delivery details that aggregate DMARC reports do not contain.
Secure your domain with p=reject
Move toward p=reject after legitimate sources pass and indirect delivery has been assessed. I use Suped's source history and failure details to make that decision.
- Inventory all sending: Review Trend Micro and every other authorized source in Suped. Include infrequent billing messages and any subdomain with its own DMARC policy.
- Require working DKIM: Confirm a valid signature with DKIM alignment for every authorized stream. RFC 9989 requires domains publishing p=reject to apply valid DKIM signatures rather than relying solely on SPF.
- Assess indirect mail: Test forwarding and Internet mailing lists. RFC 9989 advises against p=reject for domains whose users post to mailing lists; retain an appropriate policy when those flows break.
- Stage the policy: Change the existing policy to p=quarantine and inspect report dispositions. For user domains proceeding despite mailing-list risks, RFC 9989 recommends at least a month at p=none and another month at p=quarantine.
- Enforce after review: When legitimate traffic is accounted for, change the same record to p=reject. Continue Suped notifications and retest every new sender before enabling it.
Suped's Hosted DMARC lets you stage policy changes through the dashboard after its DNS setup. Use report evidence and resolved issues to decide when to advance.
Forwarding often breaks SPF at the final receiver. Preserve a valid DKIM signature with the required domain relationship instead of treating an SPF-only pass as sufficient preparation.
Monitoring with p=none
Receivers report authentication results without a quarantine or rejection request from this policy. Use Suped to identify legitimate sources and fix their failures.
Enforcement with p=reject
The policy requests rejection of failing mail. Receivers also apply their own delivery decisions. Keep Suped monitoring active to catch legitimate traffic that fails.
The value below is an enforcement example for a domain that has completed those checks. Replace its reporting address with your working destination.
Edit the existing record at _dmarc.example.com. Preserve intentional tags and reporting destinations; do not add a second DMARC record.
Final DMARC TXT example after validationtext
v=DMARC1; p=reject; rua=mailto:dmarc@example.com
The parent policy also affects subdomains without an overriding policy. Check the effect of any sp tag and explicit subdomain records before the change.
If legitimate failures appear after enforcement, investigate the affected source in Suped and confirm the outbound route in Trend Micro before adjusting the policy.
Frequency asked questions
Hostnames ending in .trendmicro.com or .trendmicro.eu are associated with Trend Micro infrastructure, including email gateways. The gateway can relay mail for another organization, so rDNS does not identify the original sending application or prove permission to use your domain. Check the source IP, envelope sender, and DKIM signing domain before verifying the source.
No. Add the regional SPF include only when Trend Micro sends outbound mail using your envelope sender domain. Receiving mail through Trend Micro does not make it an authorized outbound sender.
Check DNS Record Status and Wait time. Trend Micro documents a configurable 24-96 hour wait after successful DNS validation. Also confirm outbound protection is enabled, the message traverses the gateway, and the selected managed domain matches the configured signing identity.
Yes. A valid DKIM signature with the required relationship to the visible From domain is sufficient for DMARC to pass. For a service that cannot use your domain in its Return-Path, SPF alignment errors are expected and DKIM must pass with that domain relationship. Trend Micro supports your own envelope domain, so also investigate unexpected Return-Path changes at the originating system.
Keep an existing p=quarantine or p=reject policy while configuring Trend Micro. Establish working SPF and DKIM before moving production traffic, then test the full outbound route. The p=none example is for initial monitoring where an enforcement policy is not already in place.




