
How to set up DMARC/DKIM/SPF for TransIP

To set up DMARC, DKIM and SPF for TransIP hosted email, publish an SPF TXT record containing include:_spf.transip.email, add the three TransIP DKIM CNAME records, and publish one DMARC TXT record at _dmarc. Start with p=none if you have no enforcement policy, then verify actual messages before moving to rejection.
I check the sending route first. E-mail Only, web hosting and the VPS Mailservice send through TransIP infrastructure. A VPS delivering directly needs its own IP authorization and DKIM signer. Registering a domain with TransIP alone does not configure authentication for every application using it.
Add your domain
I start with an active mail service for the sending domain and access to its authoritative DNS. TransIP hosted mail uses the domain attached to your package; there is no separate DMARC verification wizard.
- Activate the service: For hosted mail, attach an E-mail Only or web hosting package to your domain. If the package is already active, use that domain.
- Find authoritative DNS: Open 'Domein', select the domain name rather than its checkbox, and inspect 'DNS instellingen'. If another provider operates the nameservers, publish the records there.
- Create a mailbox: Open 'E-mailhosting', select your domain under 'Producten', then choose '+ Mailbox toevoegen' beside 'E-mailboxen'. Enter the address and password, click 'Opslaan', and confirm the mailbox appears.
- Copy service authentication: For the newer web hosting platform, copy both account-specific x-transip-mail-auth TXT values from the 'DNS settings' email supplied with your package. Publish both at the exact names provided; do not substitute example values.
- Authorize a VPS relay: For VPS Mailservice, open 'VPS', select the VPS, then the gear beside 'VPS Mailservice' and 'Domeinnamen beheren'. Select the domain and continue. Use 'Nu toevoegen' only with TransIP nameservers, otherwise copy the displayed records to your DNS host. Complete 'VPS Configureren' to route outgoing mail through the service.
For hosted mailbox SMTP, use smtp.transip.email, port 465 with SSL/TLS, the full mailbox address as the username, and its password. The VPS Mailservice has separate credentials and relay configuration; mailbox SMTP settings do not replace that setup.
I verify service activation by signing in to the mailbox and sending a message. DNS publication and a successful login are separate checks: neither proves that the received message passes DMARC.
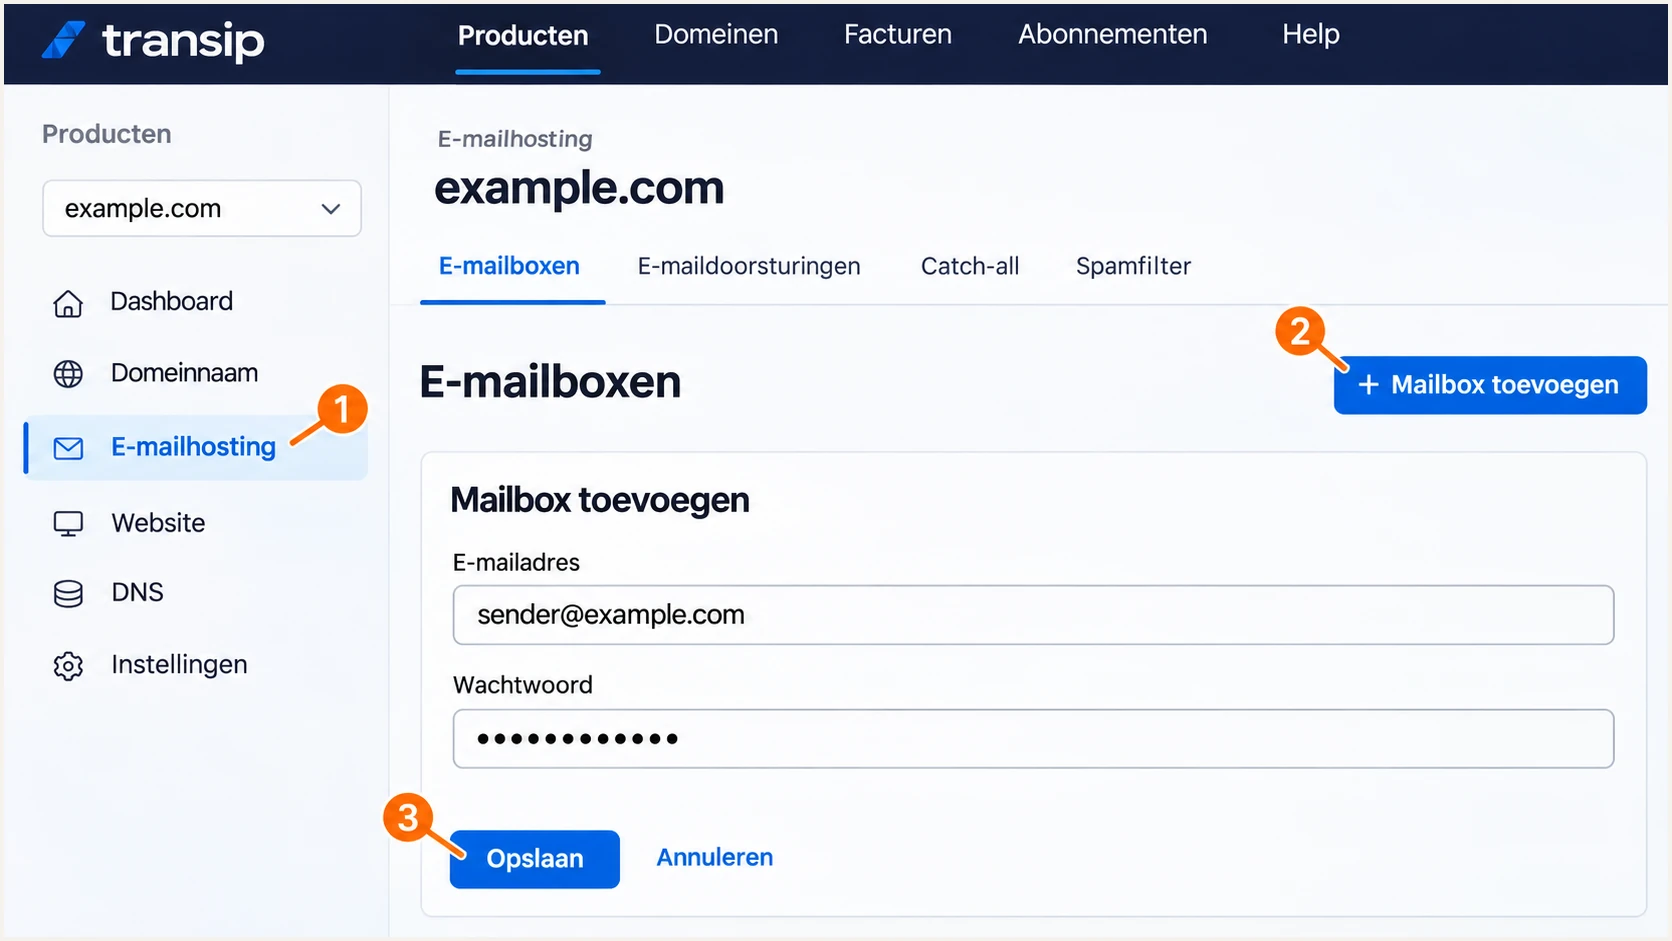
Illustrative TransIP mailbox creation screen for the sending domain.
If 'TransIP instellingen' is enabled, TransIP manages the package's default DNS records automatically. Check those records before changing anything. For manual editing, turn that switch off and work with the existing zone; preserve records needed by other services.
Set up SPF
TransIP documents _spf.transip.email as the SPF include for its hosted outbound servers. I add it only when those servers actually send mail for the domain being checked.
- Open the DNS editor: Go to 'Domein' > your domain > 'DNS instellingen' > 'DNS'. For the root domain, use '@' in 'Naam', choose 'TXT', and use a 5-minute TTL while configuring.
- Edit one SPF record: Find the TXT value beginning v=spf1. Add include:_spf.transip.email to that value before its final all mechanism. If no SPF record exists and only TransIP sends for this domain, use the example below.
- Preserve existing senders: Keep other legitimate sender mechanisms and the current final policy. Do not replace an established -all with ~all just to match the example. Publish only one SPF record per DNS name.
- Check the envelope domain: Inspect the actual Return-Path or smtp.mailfrom domain. Configure the application or MTA envelope sender under your sending domain, and authorize TransIP at that exact DNS name. SPF records do not inherit into subdomains.
- Check lookup limits: Keep the complete SPF evaluation within the 10 DNS-lookup limit, including nested includes. Count the resolved lookup chain rather than just the visible include statements.
SPF TXT value at @ for TransIP-only hosted sendingtext
v=spf1 include:_spf.transip.email ~all
Replace example.com in any tests with your real sending domain. If the envelope sender is under a subdomain such as bounce.example.com, check that subdomain separately; a correct root record does not authenticate it.
Use the SPF checker to validate the published record and its lookup chain. I also inspect a received message because DNS validation cannot confirm which envelope sender an application uses.
SPF checker
Find SPF syntax issues, lookup limits, and weak records.
?/16tests passed
A successful check establishes that the DNS record is valid. For DMARC, the SPF-authenticated envelope domain must also match the visible From domain under the selected alignment mode.
Choose the SPF authorization according to the delivery route. The TransIP include does not automatically authorize the public IP of an independently operated VPS.
TransIP hosted delivery
Send through the hosted mail service or configured VPS Mailservice. Authorize its servers with include:_spf.transip.email, preserving other senders in the existing SPF record.
Direct VPS delivery
Authorize the actual outbound IPv4 and IPv6 addresses with ip4 and ip6 mechanisms. Configure a DKIM signer on the VPS and valid reverse DNS for each sending IP.
Set up DKIM
TransIP hosted mail uses three CNAME records so its signing keys can rotate. I publish all three, even when a test message currently uses only one selector.
- Add the selectors: In the authoritative DNS editor, create CNAME records named transip-A._domainkey, transip-B._domainkey and transip-C._domainkey.
- Set the targets: Point each selector to its corresponding _dkim-A.transip.email., _dkim-B.transip.email. or _dkim-C.transip.email. target. Keep the final dot in the TransIP value field.
- Save the records: Use 'Opslaan'. TransIP appends your root domain to relative names, so do not enter the root domain twice. A CNAME owner name must not also have a TXT record.
- Verify a signature: Send through the configured TransIP service. In the received message, require dkim=pass with a signing d= domain matching your From domain under DMARC alignment rules. Inspect the s= selector used by that message.
TransIP DKIM CNAME records, using relative owner namestext
transip-A._domainkey  CNAME  _dkim-A.transip.email.
transip-B._domainkey  CNAME  _dkim-B.transip.email.
transip-C._domainkey  CNAME  _dkim-C.transip.email.
With TransIP-managed package settings, these CNAME records are normally added automatically. If you manage DNS manually or elsewhere, compare your published values with the package settings and add any missing selectors.
These records support TransIP signing. If your VPS sends directly without the VPS Mailservice, configure your own signer and publish its corresponding public key; adding TransIP CNAMEs alone does not sign those messages.
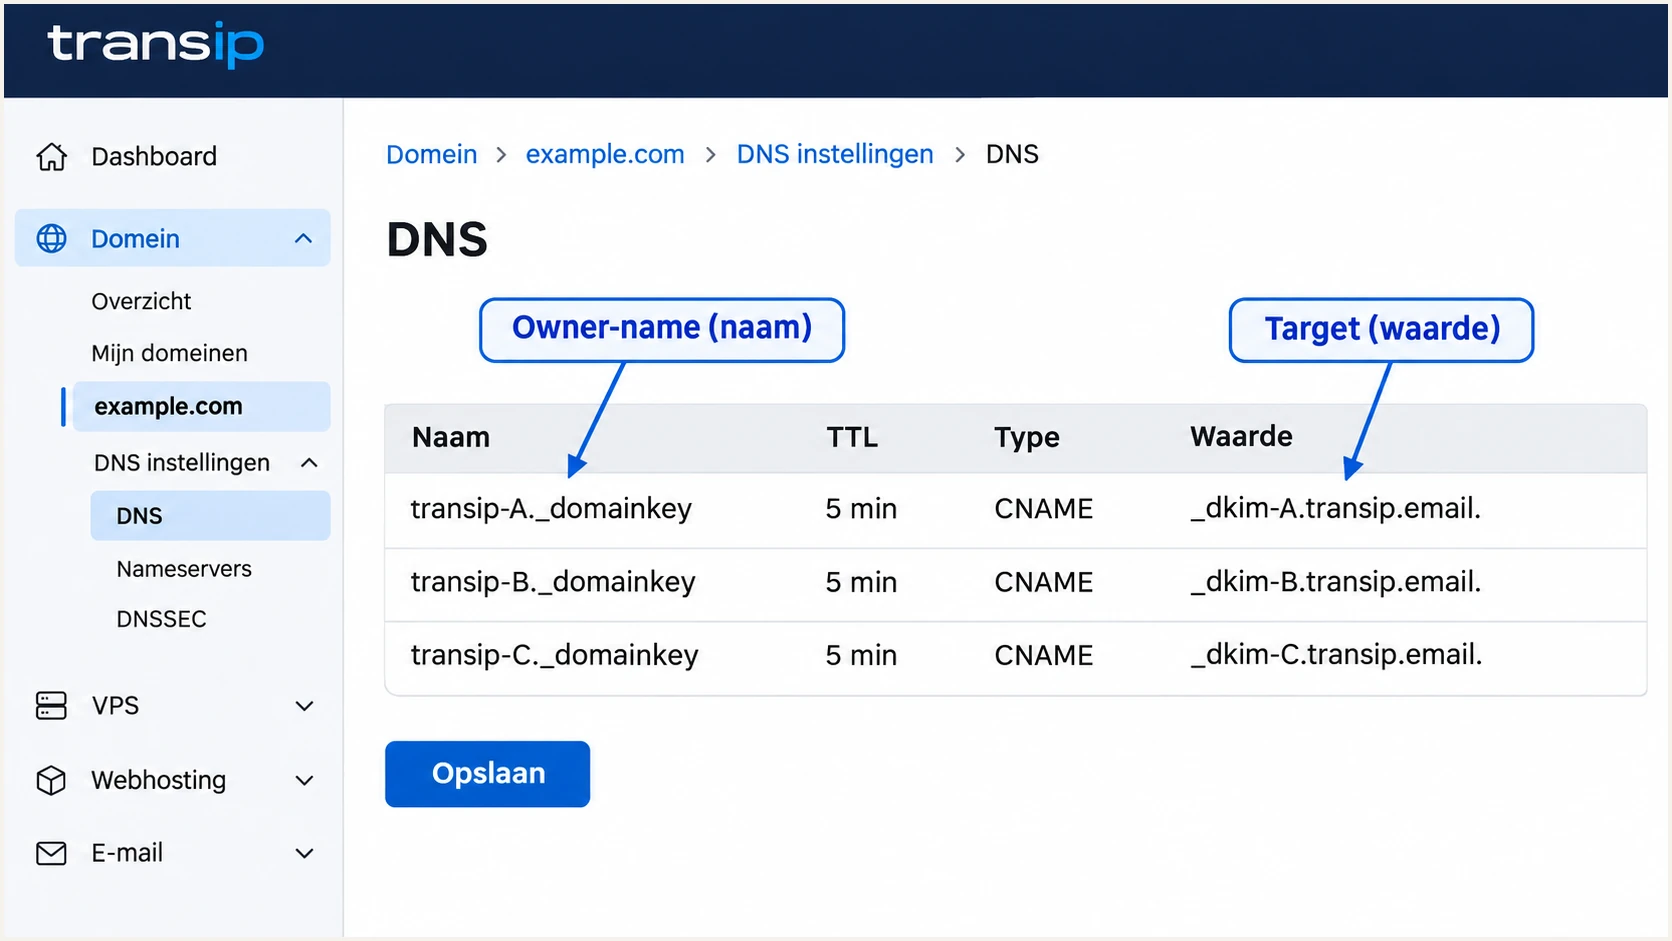
Illustrative TransIP DNS editor showing all three DKIM CNAME records.
I confirm DKIM on a newly received message after saving. A DNS record that resolves correctly still needs a valid signature generated by the service that sent the message.
Set up DMARC
For a domain without an enforcement policy, start with p=none and aggregate reporting. If you already publish p=quarantine or p=reject, keep that policy and repair the sending configuration without weakening it.
- Edit the existing record: In the DNS editor, find the TXT record named _dmarc. Update it rather than creating a second DMARC record. If none exists, add that relative name with type TXT.
- Set a reporting mailbox: Use the example below as the starting policy, replacing dmarc@example.com with a working mailbox or reporting destination you control before publishing.
- Generate the value: Use the DMARC record generator to prepare the TXT value, then paste it into the TransIP DNS editor and save.
- Keep domain matching relaxed: The default aspf=r and adkim=r modes allow organizational-domain matching. Do not add strict modes unless every sending route supports the exact-domain match they require.
Initial DMARC TXT value at _dmarctext
v=DMARC1; p=none; rua=mailto:dmarc@example.com
The example mailbox is a placeholder. A rua destination on another domain also requires external reporting authorization at that destination. Keep existing working reporting addresses when updating a deployed policy.
A monitoring policy requests reports without asking receivers to quarantine or reject DMARC failures. Check that one valid DMARC record is visible publicly before expecting report data.
DMARC checker
Look up a domain's DMARC record and catch policy issues.
?/7tests passed
A passing DNS check confirms the policy record, not authentication of an individual email. DMARC passes when at least one of SPF or DKIM passes authentication and satisfies domain alignment with the visible From address.
I allow for reporting delay after publication. Aggregate reports commonly arrive after 24-48 hours, and not every receiver supplies them. A missing report immediately after a DNS change is not evidence that the record is broken.
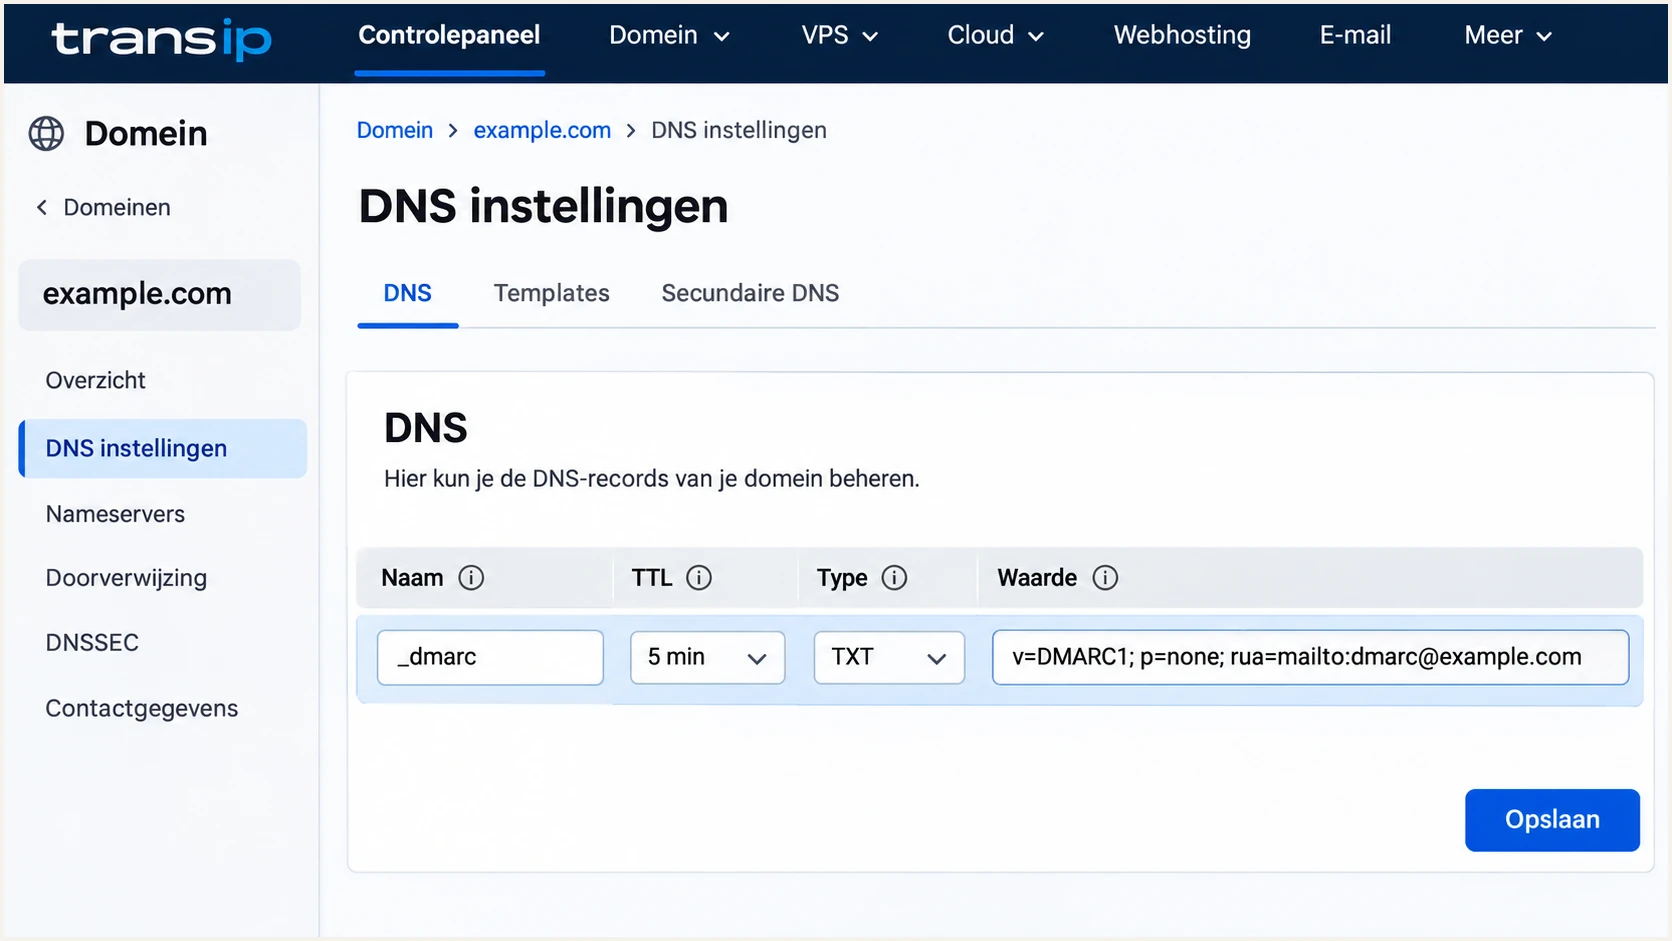
Illustrative TransIP DNS editor with a monitoring DMARC TXT record.
Verify and troubleshoot
I verify public DNS first, then test each actual sending route. TransIP notes that DNS changes can take up to 24 hours to reach resolvers, although records often update sooner.
- Query the active zone: Check the domain nameservers, SPF TXT record, all DKIM CNAMEs and the DMARC TXT record. If a change is absent, confirm that you edited the authoritative DNS provider.
- Test each application: Send separately through the mailbox, contact form and any VPS application. Use your own domain in From; put a contact-form visitor address in Reply-To.
- Repair service authorization: If TransIP reports a missing x-transip-mail-auth record, check the exact hostname in the error and publish the account-specific TXT values for that sending domain or subdomain.
- Inspect the result: Read the receiving server's Authentication-Results. Check spf=pass and smtp.mailfrom, dkim=pass and header.d, then dmarc=pass and header.from. Authentication under an unrelated domain is insufficient.
Read-only DNS checks, replacing example.combash
dig +short NS example.com
dig +short TXT example.com
dig +short CNAME transip-A._domainkey.example.com
dig +short CNAME transip-B._domainkey.example.com
dig +short CNAME transip-C._domainkey.example.com
dig +short TXT _dmarc.example.com
The email tester is the quicker check of an actual message. It prompts you to send an email to a test address and returns a full diagnosis, including authentication results and domain matching.
Send that test through the exact application you are configuring. A successful mailbox test does not verify a website form that uses a different envelope sender or a VPS that bypasses the hosted relay.
Email tester
Send a real email to this address. Suped shows a results button when the test is ready.
?/43tests passed
If SPF passes but SPF alignment fails, compare the Return-Path domain with the visible From domain. Configure the envelope sender under your domain when the route supports it. Changing Reply-To does not change SPF alignment.
Some other sending routes do not support a custom Return-Path. For those routes, SPF alignment failures are expected and DMARC still passes with fully passing DKIM under your From domain. Adding an SPF include to your From domain cannot fix an unrelated provider-owned Return-Path.
|
|
|
|---|---|---|
SPF permerror | Duplicate SPF | Merge TXT values |
DKIM none | Sending route | Enable signing |
DKIM fail | Active selector | Repair DNS or signer |
DMARC fail | Domain matching | Fix From matching |
Use received-message results to choose the next fix.
Two x-transip-mail-auth TXT values at the same name are different from two SPF records. Keep the service authentication values TransIP supplies; the single-record restriction applies to multiple v=spf1 policies at one name.
Get alerted when it breaks
I recommend ongoing DMARC monitoring with Suped, our email authentication platform, after the TransIP configuration passes. Suped processes aggregate reports so authentication failures can be traced to a sending source instead of investigated only after a delivery complaint.
- Enable issue notifications: In Suped notification settings, enable 'Issues detected' and send alerts to a monitored operational inbox. Review the reported issue and its steps to fix.
- Review unfamiliar sources: Enable 'Sending sources need verification'. Confirm whether each source belongs to a legitimate application before treating it as authorized.
- Keep summary emails: Enable DMARC summaries to review pass rates and source changes over time, including low-volume TransIP applications.
- Investigate the failure: Use the source and record detail views to inspect SPF, DKIM and DMARC results. Apply the correction in TransIP or the sending application, then send a new test and check subsequent reports.
Suped combines source verification, authentication diagnostics and notification workflows. This is useful when a DNS edit removes a selector, an application changes its sender domain, or a new server starts sending without the expected records.
I keep ownership of each sending application recorded with its source. An alert then has a clear next action: restore the DNS value, correct the envelope sender, or repair signing on that application.
Report timing determines alert timing
Suped can notify you when an issue is detected in incoming data. DMARC aggregate reports are delayed and do not provide a live SMTP event stream. Use a fresh email test for immediate verification after a change.
Secure your domain with p=reject
I move to rejection after legitimate sending routes pass consistently. Suped provides the report history and per-source diagnostics for that decision; the policy itself remains a DNS setting unless you use Hosted DMARC.
- Observe a complete cycle: Review normal business activity and infrequent jobs, including invoices and scheduled application email. Include those jobs in testing before increasing enforcement.
- Resolve legitimate failures: Use Suped to inspect failures by source and fix authorized TransIP traffic. Do not authorize every unfamiliar IP just to increase the overall pass rate.
- Preserve reliable DKIM: Keep all TransIP rotation CNAMEs published. Prefer a working DKIM path because forwarding commonly breaks SPF, while an unchanged signed message can retain a valid DKIM signature.
- Stage the policy: Update the existing record to p=quarantine, inspect subsequent reports and delivery outcomes, then move to p=reject when remaining legitimate failures are resolved. Keep rua reporting active.
- Review subdomains: Check sending subdomains and any explicit subdomain DMARC policies before enforcement. A parent policy can affect subdomains without their own policy.
For a manually managed record, return to the TransIP DNS editor and change only the policy after reviewing the other tags. The following is the final example, with the reporting mailbox replaced by your real destination.
Final DMARC TXT value at _dmarc after verificationtext
v=DMARC1; p=reject; rua=mailto:dmarc@example.com
Use Suped to review authentication after each policy change and investigate new source failures. Its Hosted DMARC option also supports dashboard policy management after the required DNS setup, which helps teams that cannot edit DNS for every policy adjustment.
A reject policy asks receivers to reject messages that fail DMARC; receiver handling remains their decision. It protects use of the domain in the visible From address and does not guarantee inbox placement or stop lookalike domains.
Frequency asked questions
For hosted packages using TransIP-managed settings, the DKIM CNAME records are normally installed automatically. With manual or external DNS, publish all three selectors yourself. I still verify dkim=pass on a received message, because published records alone do not establish that signing works.
Yes. DMARC needs a passing SPF result with domain alignment or a passing DKIM signature with domain alignment. Fully passing DKIM under the From domain is enough when SPF alignment fails. Configure both paths where the sending service supports them.
It authorizes the servers covered by TransIP's include, not every customer VPS address. For direct delivery, authorize the actual outbound IP addresses and configure your own DKIM signer and reverse DNS. For VPS Mailservice delivery, complete its domain authorization and relay configuration.
These account-specific TXT records authorize sending through the relevant TransIP service. They are separate from SPF, DKIM and DMARC. Copy the exact values supplied for your package or VPS Mailservice, including both values when provided, and check the hostname mentioned in any authorization error.
That suffix suggests TransIP mail infrastructure, but rDNS alone does not identify the application or prove that a message is authorized. TransIP also hosts customer-operated servers. I confirm the sending IP, its forward-confirmed PTR, the DKIM signing domain and the application inventory before attributing a DMARC source.
Check authoritative DNS immediately after saving, then test a new message once the receiving resolver sees the records. TransIP advises allowing up to 24 hours for DNS changes. Aggregate DMARC reports commonly take 24-48 hours, so use an email test to verify a change without waiting for the next report.




