
How to set up DMARC/DKIM/SPF for TIM

Published 22 Nov 2026
Updated 22 Nov 2026
12 min read
Summarize with
For a TIM-hosted custom domain, publish the SPF authorization for your exact TIM service, ask TIM to enable DKIM signing with your domain, and publish a DMARC TXT record under _dmarc. For a standard @tim.it, @alice.it, or @tin.it mailbox, TIM manages the authentication records. You cannot edit those domains' DNS yourself.
I first check the service name in the activation email. TIM Mail and TIM Business custom-domain services have different configuration paths. A TIM internet connection or SMTP hostname alone does not identify the SPF record your own domain needs.
Add your domain
Use these steps only for a domain you own. Standard TIM Mail users can skip domain activation and use the sending and verification steps below.
- Identify the account: Check whether your contract is for Sito Semplice, Hostkit, or Smart Mail TIM. Obtain the activation email and administrator credentials for that service.
- Activate Sito Semplice: For a new Professional subscription with an existing domain, sign in, choose "Salva" or "Attiva Pro", enter the domain, select "sono proprietario di questo dominio", and choose "Servizio DNS". Complete activation. Existing customers should use their current subscription.
- Confirm provisioning: Complete the ownership or transfer checks requested for your order. Confirm that TIM has activated the domain and that a mailbox on that domain can send and receive. Importing another mailbox into TIM Mail does not verify its domain.
- Arrange DNS access: Find the authoritative DNS host before editing records. Sito Semplice's DNS-service instructions use your existing provider's DNS panel. Hostkit documentation says TIM technical staff manage DNS changes, so submit the required changes to that team.
TIM's Sito Semplice support article "Gestione DNS" documents the existing-domain activation sequence. It says the configuration records arrive by email after purchase; use those account-specific instructions.
I confirm the active mailbox and DNS administrator before changing authentication. This avoids editing a DNS zone that is no longer authoritative or applying settings for a different TIM service.
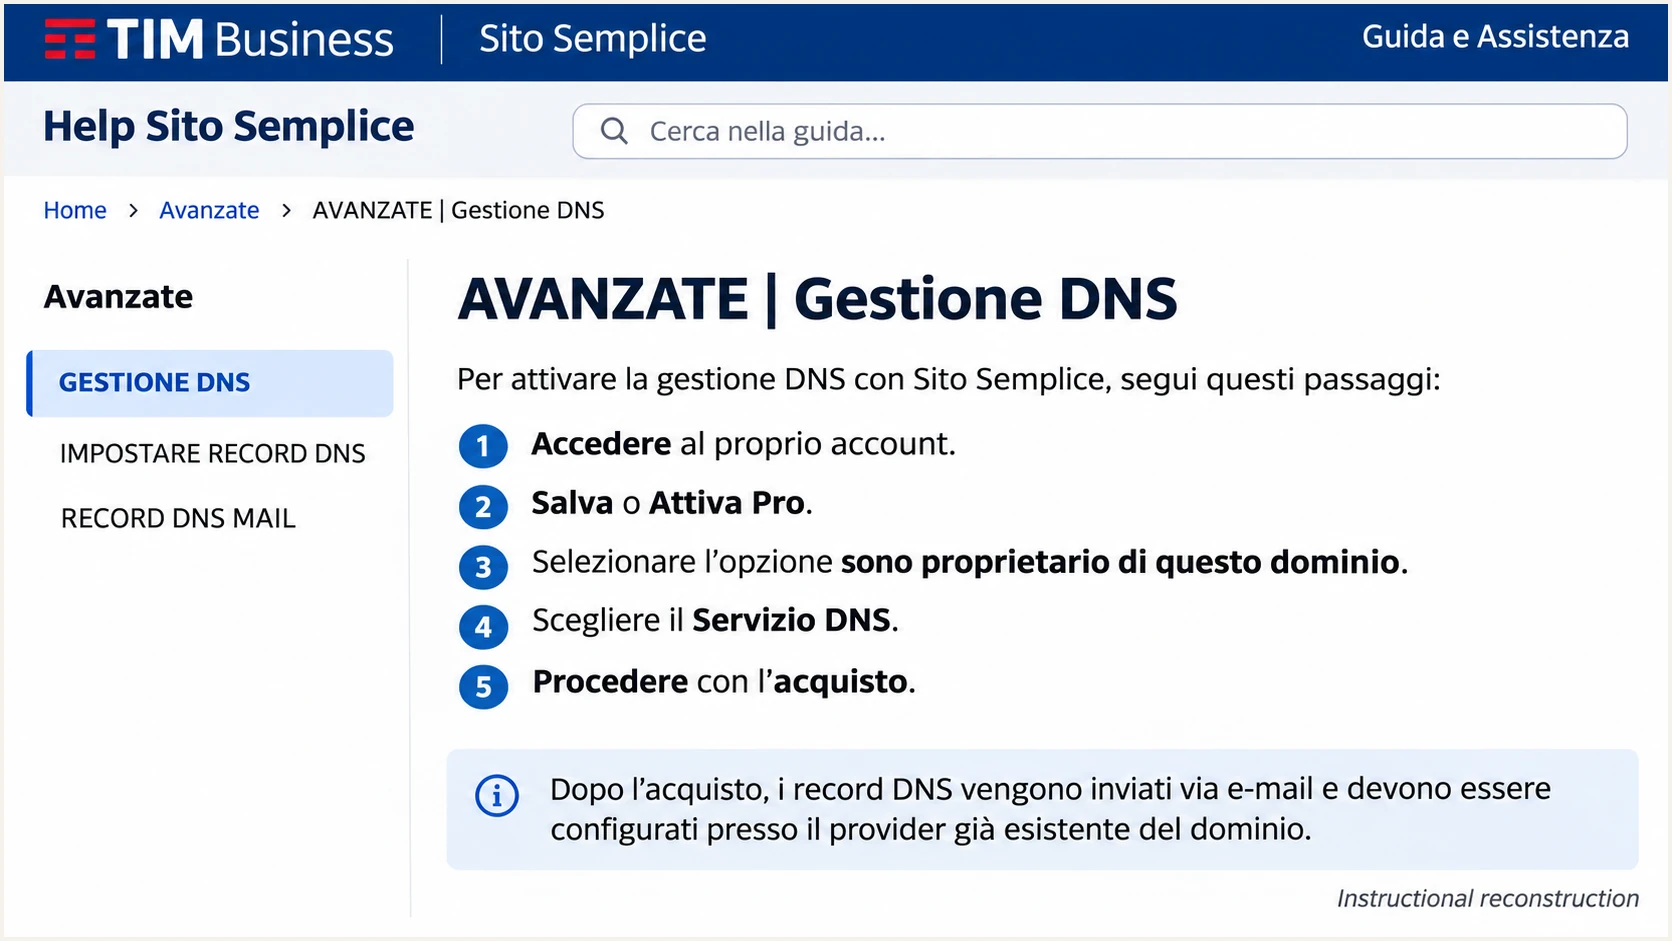
Illustrated TIM Sito Semplice instructions for activating an existing domain.
For other TIM Business plans, request the domain activation and DNS instructions for the exact contract. TIM's consumer mailbox settings are not a custom-domain onboarding panel.
Set up SPF
There is no single SPF value to copy across every TIM service. The Sito Semplice "Record DNS Mail" guide and the OT-MAIL administrator manual publish different authorizations.
- Choose the correct value: Confirm the SPF include in your activation instructions. The examples below apply only to the named services; do not publish both simply because TIM supplies your email.
- Edit one record: At the domain used by the SMTP envelope sender, merge the confirmed authorization into the existing SPF TXT record. Keep every legitimate sender and only one SPF record at that name.
- Configure the Return-Path: Ask TIM to use your own domain or its bounce subdomain for the SMTP envelope sender. Publish SPF at that name, then inspect a fresh message. For DMARC, the envelope domain must match the visible From domain under your alignment settings.
- Check lookup limits: Keep SPF evaluation within the limit of 10 DNS-querying terms, including nested includes. Do not add your home connection IP or copy TIM's entire consumer-domain SPF record.
Service-specific SPF examples, choose only the confirmed servicetext
# Sito Semplice mail: TXT at the envelope-sender domain
v=spf1 include:_spf.hostedemail.com ~all

# OT-MAIL: TXT at the envelope-sender domain
v=spf1 include:_spf.ot-mail.it ~all
These examples assume the named service is the only sender authorized at that DNS name. If an SPF record already exists, add the confirmed include before its final all mechanism instead of replacing the record.
I run the SPF check against the actual envelope domain. If TIM uses a custom bounce subdomain, its SPF belongs there. Checking only the visible From domain can miss that distinction.
SPF checker
Find SPF syntax issues, lookup limits, and weak records.
?/16tests passed
A successful DNS check confirms the published SPF configuration. Send another message to confirm that the receiving server actually returns spf=pass for the IP and envelope domain used by TIM.
If a particular TIM sending route retains a provider-owned Return-Path, SPF alignment can fail even when SPF passes. Editing your own domain cannot change that Return-Path. DMARC still passes when DKIM passes with a matching signing domain.
Set up DKIM
For @tim.it, @alice.it, and @tin.it mailboxes, signing is controlled by TIM. For your own domain, request the DKIM configuration for your specific business service; the reviewed public instructions do not establish a universal TIM selector.
- Request signing details: Ask TIM for the signing domain, selector, record type, and complete public DNS value. Also ask whether DKIM signing is enabled automatically or requires a support action.
- Publish the supplied record: Create the exact TXT or CNAME entry TIM supplies at the selector name under _domainkey. For managed Hostkit DNS, have TIM technical staff publish it.
- Enable signing: Have TIM confirm that its outgoing servers sign messages for your domain. Publishing a public key alone does not make the sending server use the matching private key.
- Verify a message: Send a fresh message. Read the DKIM-Signature d= and s= values, then check the receiving server's dkim=pass result. The signing domain must match your From domain under the active DMARC settings.
I take the selector and signing domain from TIM's supplied configuration or an actual message. Replace TIM_SELECTOR and example.com below with those values, including the signing domain if it differs from the From domain.
Look up the actual DKIM selectorbash
dig +short TXT TIM_SELECTOR._domainkey.example.com
dig +short CNAME TIM_SELECTOR._domainkey.example.com
A passing signature for a provider-owned domain does not authenticate your own From domain for DMARC. Request signing with your domain if those domains do not match.
Keep the private key with the signer
Do not generate an unrelated DKIM key and publish it for TIM. TIM must sign with the corresponding private key. If your plan cannot sign with your domain, resolve that limitation before relying on DKIM for enforcement.
Set up DMARC
For a new deployment on your own domain, start with p=none and aggregate reporting. If the domain already has p=quarantine or p=reject, keep that policy while configuring TIM.
- Choose reporting: Create a real reporting mailbox or use the reporting address supplied by your reporting service. Replace dmarc@example.com in the example with that destination.
- Generate the record: Use the DMARC record generator to build the TXT value. Keep the existing enforcement policy if one is already active.
- Publish one policy: For example.com, add a TXT record at _dmarc.example.com, usually entered as _dmarc in the DNS panel. Edit an existing DMARC record instead of creating a duplicate.
- Verify reporting permission: If reports go to another domain, follow the reporting receiver's external-destination authorization instructions. Confirm that the destination accepts aggregate reports.
Initial DMARC value: TXT at _dmarc.example.comtext
v=DMARC1; p=none; rua=mailto:dmarc@example.com
The example requests reports without requesting quarantine or rejection for failures. It is a template: use your own domain and reporting address before publishing it.
I check the saved DNS name carefully. Some panels append the domain automatically, so entering the complete name in a relative-name field creates the wrong record. Existing stronger policies should remain intact.
DMARC checker
Look up a domain's DMARC record and catch policy issues.
?/7tests passed
Check your actual From domain after saving. Confirm that the intended record is visible and that its policy and reporting address are correct. DNS caches can retain the previous answer until its TTL expires.
The checker validates DNS, while message tests establish authentication. Aggregate reports then show production traffic across reporting receivers. Sending a test message does not guarantee every receiver will send a report.
Verify and troubleshoot
I test the same sending route used in production. TIM's "Configurazione avanzata per client di posta" and "Smart Mail TIM" support pages publish these SMTP settings.
|
|
|
|
|---|---|---|---|
@tim.it | smtp.tim.it | 587 | STARTTLS |
@alice.it | out.alice.it | 587 | STARTTLS |
@tin.it | smtps.tin.it | 587 | STARTTLS |
Smart Mail TIM | mail.smartmailtim.it | 587 | TLS |
Use the settings for your actual service, plus its account credentials.
- Send through TIM: Use the normal mailbox and configured TIM SMTP service, or TIM webmail. Keep the real From address. A test through another relay does not verify the TIM configuration.
- Inspect receiver results: Read the destination server's Authentication-Results header. Check SPF and DKIM results and the domains they authenticated, then confirm dmarc=pass.
- Repeat each route: Test webmail and any application that sends separately. Forwarded copies need their own check because forwarding changes SPF evaluation and message changes can break DKIM.
- Escalate precisely: Give TIM a timestamp, message ID, recipient domain, and redacted full headers for a failing message. Keep account passwords and private keys out of the support request.
The email tester below is the quickest configuration check. It prompts you to send a message to a generated test address and returns a diagnosis of that message's authentication and delivery checks.
Send the test directly through the TIM route you are configuring. A forwarded old message measures the forwarding route too. Repeat the test after changing DNS or enabling signing.
Email tester
Send a real email to this address. Suped shows a results button when the test is ready.
?/43tests passed
For a custom domain, look for a valid DKIM signature with a matching signing domain and an SPF pass with a matching envelope domain. DMARC needs at least one of those authenticated domains to match.
If DNS passes but the message fails, use the receiver's reported domains and source IP to locate the mismatch. An SMTP login success confirms access to the server, not DMARC authentication.
|
|
|
|---|---|---|
SPF permerror | Duplicates or lookups | Merge or reduce |
SPF mismatch | Envelope domain | Fix path or DKIM |
DKIM none | Missing signature | Ask TIM to sign |
DKIM fail | Selector and key | Correct signing |
DMARC fail | Authenticated domains | Fix domain match |
Diagnose the message results before changing the DMARC policy.
Passing authentication does not guarantee inbox placement. If authentication passes but delivery still fails, preserve the SMTP rejection code and ask TIM to investigate that separate delivery error.
Get alerted when it breaks
Our platform, Suped, provides ongoing DMARC monitoring so TIM configuration failures become visible after the initial test. Its source-level reports and issue diagnostics show which traffic needs attention.
- Keep reports flowing: Use the actual reporting destination configured for Suped in your rua value. The sample dmarc@example.com address does not send data to Suped.
- Enable notifications: In Suped's notification settings, enable Issues detected and Sending sources need verification. Enable DMARC summary emails for regular review.
- Verify the TIM source: Review the source's sending IPs and authenticated domains against your TIM service. Mark expected sources as verified after that review; a familiar rDNS suffix alone is insufficient.
- Resolve detected issues: Open the affected source and record details, follow the issue's fix steps, and compare DNS history when a record changed. Retest the TIM route and check later reports.
I use the source view to distinguish a broken authorized sender from unexpected traffic. A domain-wide pass rate can hide a low-volume mailbox or application that has stopped authenticating.
Suped connects those failures to SPF, DKIM, and DMARC diagnostics. The fix still belongs with the relevant operator: your DNS administrator for DNS records, or TIM for server-side signing and envelope settings.
Alerts depend on incoming evidence
Suped notifies you when it detects an issue. DMARC aggregate reports usually arrive daily, so report-based alerts are not an instant record of every message. Use a fresh email test when validating an urgent change.
Secure your domain with p=reject
For a controlled custom-domain sending stream, move toward p=reject only after the reports show that legitimate traffic authenticates reliably. TIM controls this decision for standard TIM Mail domains.
- Require working DKIM: Confirm valid signatures with a matching signing domain across TIM sending routes. Do not rely solely on SPF for p=reject; forwarding commonly breaks SPF.
- Review every sender: In Suped, verify legitimate sources and resolve their failures. Include occasional business messages in the observation period, rather than relying on one successful test.
- Stage the policy: For a new deployment, observe p=none, then assess p=quarantine before choosing p=reject. Use Suped reports to compare failures between stages. Preserve existing stronger policies while troubleshooting.
- Check subdomains: Review inherited policy and any explicit subdomain policies before tightening the parent domain. Use a dedicated sending subdomain when it needs a different policy from routine user mail.
- Plan recovery: Save the previous policy and identify who can change it. After enforcement changes, check legitimate delivery failures and Suped alerts, then fix or roll back the affected change if needed.
For general-user domains that participate in Internet mailing lists, RFC 9989 advises against p=reject because indirect mail can fail authentication. A new deployment that still pursues rejection should assess at least a month at p=none and a month at p=quarantine, comparing the impact first.
Suped supplies the production evidence for that decision. Our Hosted DMARC also lets you manage policy stages from the dashboard after DNS delegation, which is useful when TIM or another administrator controls DNS.
Policy managed in DNS
Ask the authoritative DNS administrator to update the existing DMARC TXT record. For managed Hostkit DNS, coordinate the change with TIM technical staff.
- Verify publication: Check the public policy and retain the previous value for recovery.
Policy managed with Suped
After Hosted DMARC delegation is active, change the policy in Suped and use the same platform's source reports to assess the result.
- Verify behavior: Confirm the published policy and review legitimate failures after the change.
For a domain ready for rejection, the value below changes the requested handling of DMARC failures. Keep your real reporting address and any deliberate existing tags when updating the record.
Enforcement example: update the existing DMARC policytext
v=DMARC1; p=reject; rua=mailto:dmarc@example.com
Receiving servers retain control of delivery decisions. A published reject policy requests stricter handling of failures; it does not guarantee rejection at every receiver.
Keep monitoring after the change. A TIM migration, DKIM key rotation, or new application sender needs another message test and a review of its production authentication results.
Frequency asked questions
No. TIM owns those domains and manages their authentication DNS. You can test messages and report failures to TIM, but publishing a record for a separate domain does not change your TIM Mail address's authentication.
Use the value for your exact service. Sito Semplice documents include:_spf.hostedemail.com, while the OT-MAIL manual documents include:_spf.ot-mail.it. These are service-specific examples, not a universal TIM record. Confirm the active instructions before changing your existing SPF record.
Ask TIM for your service's selector, or inspect the s= value in a real DKIM-Signature header. The d= value identifies the signing domain. I use those values together rather than guessing a selector name.
Yes. DKIM must pass with a signing domain that matches the visible From domain under your DMARC settings. A provider-owned Return-Path can prevent SPF alignment even when SPF passes. That does not prevent a DMARC pass through DKIM.
Those domain namespaces are associated with TIM. I treat a matching reverse DNS name as an investigation clue, then verify the actual sending IP and authenticated domains against the TIM service. An rDNS suffix alone does not prove the message is authorized or passes DMARC.
A fresh message test shows the receiver's results once it uses the updated DNS or signing configuration. Cached DNS answers last until their TTL expires. DMARC aggregate reports usually arrive daily and only cover receivers that report, so use message tests for immediate validation.




