
How to set up DMARC/DKIM/SPF for Telstra

Published 21 Nov 2026
Updated 21 Nov 2026
12 min read
Summarize with
For Telstra-connected email using your own domain, publish SPF for the actual outbound server, enable DKIM in the sending mail system, and publish DMARC at your domain's _dmarc DNS name. I test a delivered message before enforcing rejection. A telstra.net reverse DNS hostname identifies network infrastructure; it does not supply your domain's authentication settings.
If your address ends in bigpond.com or telstra.com, Telstra controls those domains' DNS records. You cannot change their SPF, DKIM or DMARC policies. The steps below apply to a domain you own, with separate instructions for your own mail server and Microsoft 365 purchased through Telstra.
Add your domain
A self-managed mail server on a Telstra connection has no Telstra "Add domain" requirement. Configure your domain in that server and its authoritative DNS. For Microsoft 365 purchased through Telstra Apps Marketplace, I complete Telstra's documented ownership verification first.
- Add: In Telstra Apps Marketplace, open MyApps, select the Office 365 service settings cog, then Manage App > Domains > Add Domain. Enter your domain.
- Copy: Copy the generated domain verification code. This token proves ownership; it is separate from an SPF record.
- Publish: Open My Apps > Domain Names for your domain. Under TXT Records, enter @ in Hostname and the verification code in TXT Value, then select Add.
- Verify: Once the record is public, return to the Office 365 service > Manage App > Domains. Use the domain settings cog > Verify Domain and confirm the status is Verified.
These menu names follow Telstra's "How do I set up a domain name for Microsoft Office 365?" support article. If DNS is hosted elsewhere, publish the token there. Ownership verification does not require transferring your domain to Telstra.
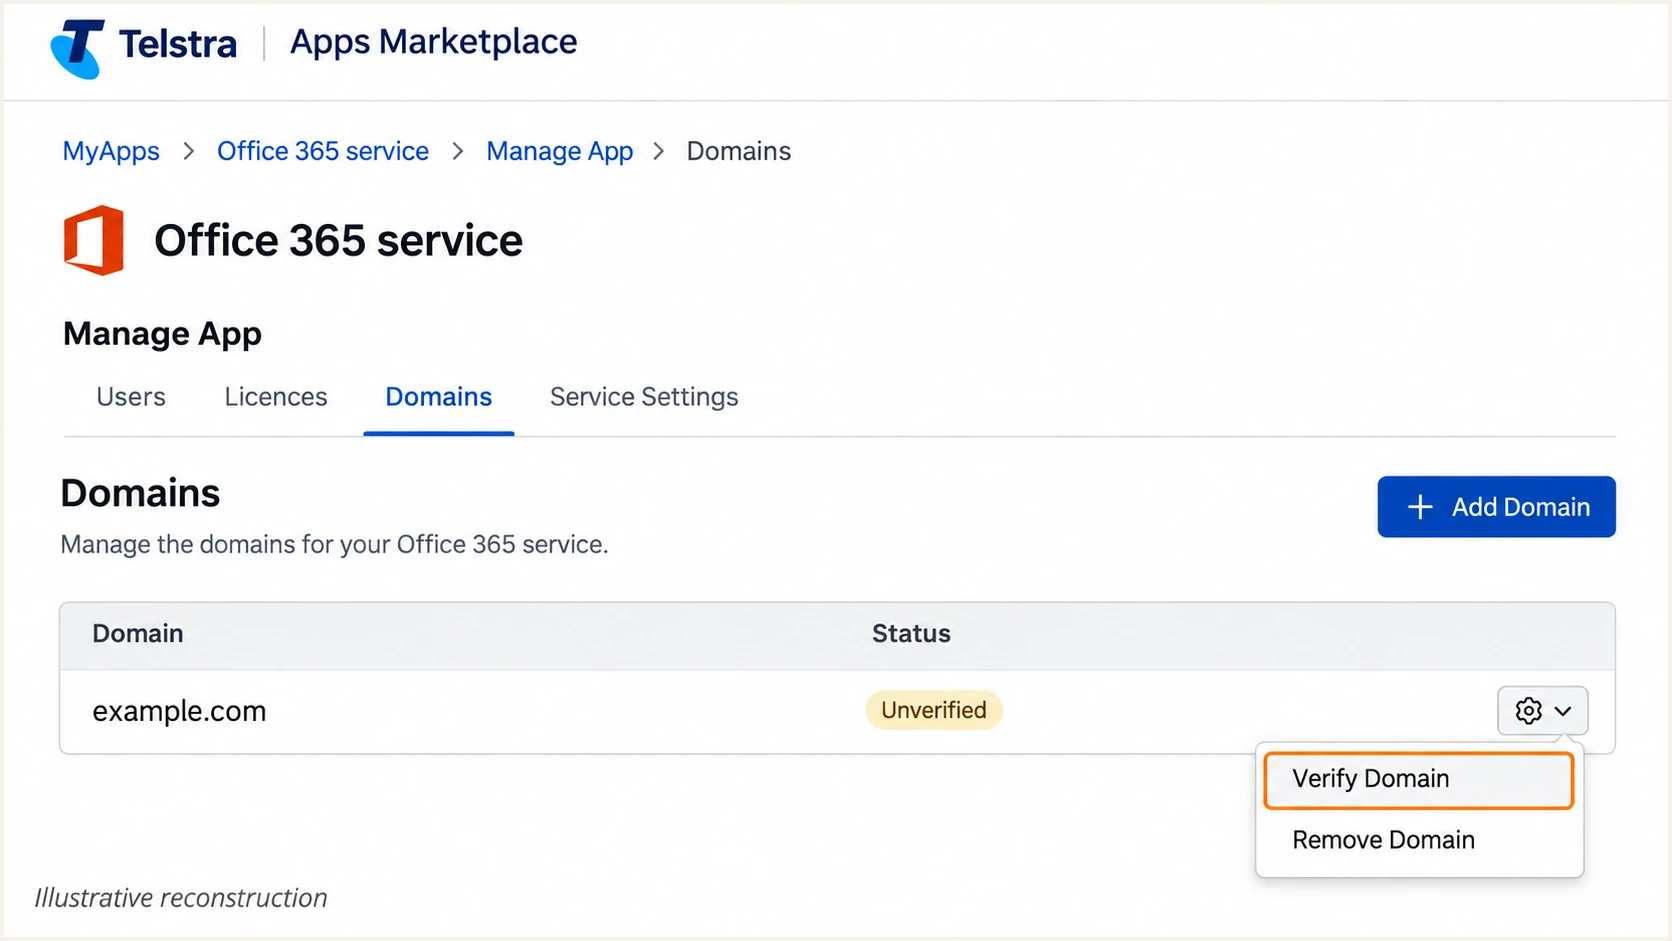
Illustrative Telstra Apps Marketplace domain verification workflow.
After verification, complete the mail service's domain setup using its supplied records. Keep existing MX records unless you are also moving inbound email; changing MX is not required just to publish SPF or DMARC.
Set up SPF
I authorise the public IP that connects to the recipient, which is the relay's IP when a relay is used. SPF checks the SMTP MAIL FROM domain, normally visible in the delivered Return-Path. Your broadband connection's IP is irrelevant when another service delivers the message.
- Identify: Send a message through the intended route. Read the recipient's Authentication-Results and Return-Path to identify the sending IP and envelope domain.
- Match: For a mail server you control, configure MAIL FROM to use your domain or a subdomain. With default relaxed SPF alignment, it must share the visible From domain's organisational domain.
- Publish: For Telstra-hosted DNS, open My Apps > Account > Domain Name > Zone Manager. Choose TXT under Add Zone Record, then Create new record. Set Name to the envelope domain's relative label, or the root setting for the apex.
- Merge: Edit the existing SPF policy rather than adding another. Keep one v=spf1 record per envelope domain, preserve approved senders, and keep DNS-lookup mechanisms within the 10-term limit, including nested includes.
For a fixed-IP server, authorise only its actual outbound IP. For a commercial Microsoft 365 tenant purchased through Telstra, use Microsoft's SPF include. These are alternative starting values, not two records to publish together.
SPF TXT values: choose the matching sending routetext
# Own mail server: replace the documentation IP below
v=spf1 ip4:192.0.2.25 -all

# Commercial Microsoft 365 tenant
v=spf1 include:spf.protection.outlook.com -all
The IP 192.0.2.25 is an example, not a Telstra sending IP. Add any other approved sources before the final all mechanism in your existing policy. Each envelope subdomain needs its own SPF policy; SPF does not inherit the apex record.
Enter the actual envelope domain in the SPF checker below. Check the published value, duplicate-record errors and lookup count before sending another message.
SPF checker
Find SPF syntax issues, lookup limits, and weak records.
?/16tests passed
Allow the previous DNS TTL to expire, then repeat the lookup and message test. Telstra's Zone Manager instructions use a default TTL of 3600 seconds and describe quoted TXT input; check the final public record after saving.
Custom Return-Path support depends on the sending service, not the Telstra network connection. If the service retains its own envelope domain, changing your apex SPF cannot fix SPF alignment. DMARC still passes when DKIM verifies with a matching signing domain.
Do not authorise the whole network
Do not guess an include:telstra.net mechanism, add every Telstra IP range, or use the SPF ptr mechanism. Obtain the exact relay authorisation from the operator of your sending service. A network hostname is insufficient evidence to authorise a sender.
Set up DKIM
DKIM signing must be enabled in the system that sends your mail. I obtain the selector and public DNS value from that system; publishing a key alone does not add signatures to messages.
Use the branch that matches your sending route. Microsoft 365 domain verification in Telstra Apps Marketplace does not automatically enable custom-domain DKIM.
Your own mail server
- Generate: Create a DKIM key in the sending server. Use 2048-bit RSA and SHA-256 where supported; retain the private key on the signer.
- Publish: Publish the supplied public key as TXT at the exact selector._domainkey name for your signing domain.
- Enable: Configure the signer with that selector and your domain as d=. Sign after any gateway that rewrites signed message content.
- Test: Send a fresh message and confirm dkim=pass with the expected signing domain and selector.
Microsoft 365 through Telstra
- Open: In the Microsoft 365 security portal, go to Email & collaboration > Policies & rules > Threat policies > Email authentication settings > DKIM.
- Get records: Select your domain. Create DKIM keys if offered, or attempt to enable signing to expose the required Publish CNAMEs values.
- Publish: Create both selector1._domainkey and selector2._domainkey CNAME records using the exact targets supplied for your tenant.
- Enable: After DNS detection, enable Sign messages for this domain with DKIM signatures. Confirm the status shows signing is active.
In Telstra Zone Manager, select CNAME when the sending service supplies CNAMEs, or TXT when it supplies a public key. Do not publish both types at the same selector name. Copy complete CNAME targets, including a final dot where the DNS editor requires one.
For another Telstra-managed mail service, ask its support team for custom-domain outbound DKIM instructions. There is no universal selector to infer from telstra.net. If the service cannot sign for your domain, use a sending system that supports it.
Inspect the actual selector supplied by your senderbash
# Replace mail2026 with the s= selector in the message
dig +short TXT mail2026._domainkey.example.com

# Microsoft 365 uses the two supplied CNAME selectors
dig +short CNAME selector1._domainkey.example.com
dig +short CNAME selector2._domainkey.example.com
A successful DNS lookup confirms publication, not message authentication. Check a delivered message for a valid DKIM signature whose d= domain matches the visible From domain under your DMARC alignment mode.
Set up DMARC
I publish DMARC at _dmarc.example.com for messages using example.com in the visible From address. Start with p=none only when introducing DMARC. If the domain already uses p=quarantine or p=reject, keep that policy while repairing authentication.
- Inspect: Query the existing _dmarc TXT record and save its value before editing. Keep a single DMARC record at that name.
- Generate: Use the DMARC record generator to prepare the policy and reporting destination.
- Publish: In Telstra Zone Manager, create a TXT record with Name _dmarc in the example.com zone. Use the value below for a new monitoring policy.
- Route reports: Replace dmarc@example.com with a mailbox or reporting address you control. An external reporting domain needs the destination operator's DMARC reporting authorisation.
Initial DMARC TXT value at _dmarc.example.comtext
v=DMARC1; p=none; rua=mailto:dmarc@example.com
The address above is an example, not an active reporting inbox. A normal mailbox receives aggregate XML files; it does not interpret them. Keep the reporting destination accurate when changing policy.
For the Telstra DNS editor, enter the policy in the TXT field and use its required quoting format. Confirm the saved owner name is _dmarc.example.com, with no repeated domain suffix.
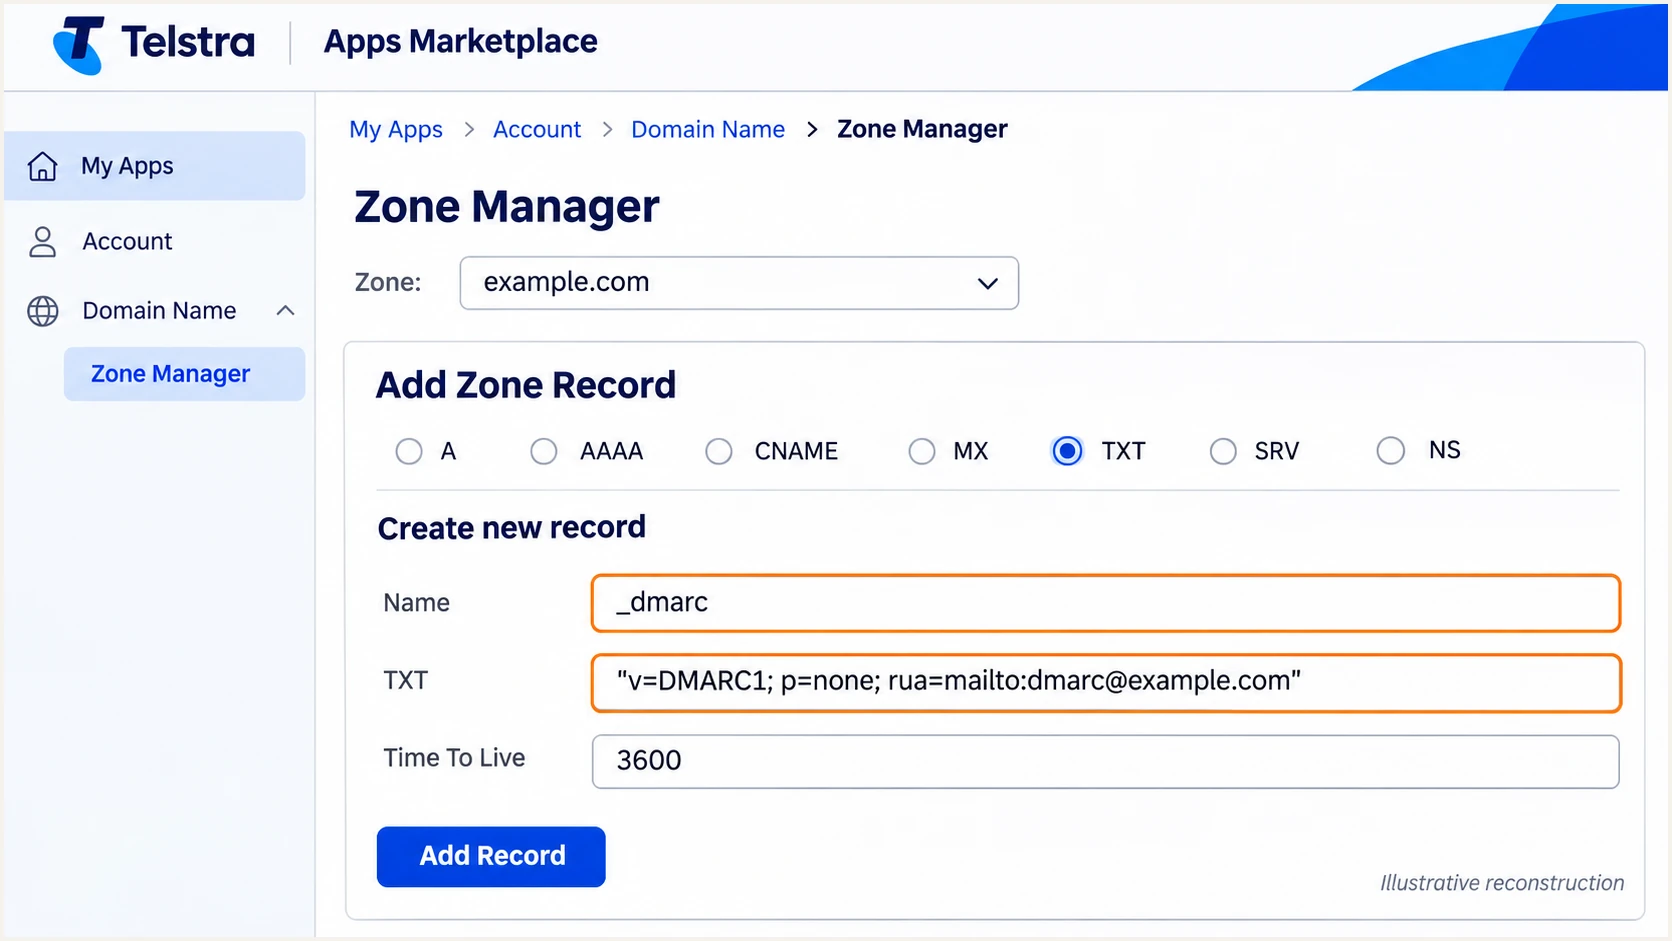
Illustrative Telstra Zone Manager entry for the DMARC TXT record.
Select Add Record and allow cached DNS answers to expire. A p=none policy requests reporting without asking receivers to quarantine or reject mail because of DMARC failure.
Use the DMARC checker below with your visible From domain. Check syntax, the policy and the reporting address. A valid policy record does not prove your messages pass authentication.
DMARC checker
Look up a domain's DMARC record and catch policy issues.
?/7tests passed
DMARC passes when at least one mechanism succeeds with a matching domain: SPF using MAIL FROM, or DKIM using d=. Under relaxed alignment, a subdomain and its organisational domain match; strict alignment requires an exact domain match.
Aggregate reports usually arrive on a daily schedule, with additional processing delays. Not every receiver sends reports, so use a live message test as well as report data.
Verify and troubleshoot
I test the same path that production messages use. A test sent through a different mailbox does not verify a website form, scanner or separately hosted mail server.
- Send: Copy the address generated by the email tester below and send a new message through your Telstra-connected sending route.
- Read: Open the diagnosis and inspect SPF, DKIM and DMARC individually. Require a matching authenticated domain, not just an SPF pass.
- Repeat: Test each sending application and any backup outbound server. Record the sending IP, MAIL FROM domain, DKIM d= domain and selector.
The email tester is the quickest check of an actual delivered message. It returns authentication results and a wider diagnosis, including encryption and reputation checks.
Send after DNS changes have become visible, and keep the result for comparison. DNS publication and message signing are separate checks, so use both.
Email tester
Send a real email to this address. Suped shows a results button when the test is ready.
?/43tests passed
Inspect Authentication-Results added by the receiving system. Headers supplied by the sender are not reliable proof of a pass. SPF failure after forwarding is compatible with a DMARC pass when a matching DKIM signature survives.
Use the failure result to choose the next action. Fix the affected sending route before changing the domain's DMARC enforcement policy.
|
|
|
|---|---|---|
SPF permerror | Duplicate policies | Merge SPF records |
SPF mismatch | Foreign MAIL FROM | Set custom MAIL FROM |
DKIM absent | Signing disabled | Enable signing |
DKIM fail | Key or content change | Check key and route |
DMARC fail | No matching pass | Fix domain match |
- DNS: Compare authoritative DNS with public resolver answers. Check the prior TTL, duplicated domain suffixes and the exact selector copied from the message.
- SMTP: For Telstra Mail, use smtp.telstra.com with authentication enabled: port 465 with TLS, or 587 with STARTTLS. SMTP login errors such as OB315 are separate from DMARC failures.
- Reverse DNS: For your own outbound Telstra IP, arrange a PTR hostname that resolves back to that IP. Eligible CustData accounts expose Manage > DNS > Reverse DNS; otherwise ask Telstra support.
A correct PTR helps delivery but does not make SPF or DKIM pass. If delivery errors cite a blocklist (blacklist), investigate the exact IP and rejection reason separately from authentication.
Get alerted when it breaks
Suped, our DMARC platform, turns receiver reports into source-level authentication issues and notifications. I use that evidence to identify which Telstra-connected sender changed, rather than treating every telstra.net address as an approved source.
- Enable: In Suped Notifications, enable Issues detected and Sending sources need verification. Enable DMARC summary emails for ongoing review.
- Confirm: Verify a sending source only after matching its IP and authenticated domains to a service your organisation actually uses.
- Investigate: Open the affected source and its detail view. Compare SPF, DKIM and DMARC results, then inspect DNS history for a record change.
- Repair: Follow the issue's steps to fix, correct the sending service or DNS, and send a fresh test. Confirm recovery in subsequent aggregate reports.
Suped's DMARC monitoring provides this workflow across your sending sources. Report-based alerts depend on receivers submitting data; they are not an immediate notification for every failed message.
Keep live message tests in your DNS change process. Use Suped's issue notifications to catch failures across the reporting traffic, including infrequent senders that a single test misses.
Check authentication and reputation separately
Suped also has blocklist monitoring and deliverability insights. A blacklist listing and a DKIM failure require different fixes; use the actual delivery error and authentication result to decide where to investigate.
Secure your domain with p=reject
I move to p=reject after every approved sending route has a reliable DMARC pass. Suped's source verification and authentication diagnostics provide the evidence for that decision, including low-volume Telstra-connected servers.
- Inventory: Review reports across a complete sending cycle, including monthly jobs. Resolve every approved source's failures; an overall pass rate alone hides broken low-volume senders.
- Validate: Require passing SPF with a matching MAIL FROM domain, passing DKIM with a matching d= domain, or both. Test forwarding and content-changing gateways separately.
- Stage: Change p=none to p=quarantine once approved traffic passes. Watch reports and delivery errors through another representative sending cycle before moving to p=reject.
- Enforce: Update the existing DMARC record to p=reject and retain its working rua destination. If already at reject, keep it and correct the failing source.
Suped's Hosted DMARC manages policy changes through the dashboard after its DNS setup. Use source diagnostics to check readiness before each change, and keep issue notifications active after enforcement.
The example below assumes the same reporting destination as the initial record. Replace that address, and preserve any intentional reporting or alignment settings already in use.
Enforcement DMARC TXT value at _dmarc.example.comtext
v=DMARC1; p=reject; rua=mailto:dmarc@example.com
Check subdomains before enforcement: the parent policy normally applies when a subdomain has no separate DMARC policy or applicable override. Keep approved subdomain senders in the review.
A reject policy requests rejection of messages that fail DMARC. Receivers make the final handling decision; authentication does not guarantee inbox placement or prevent impersonation using a different domain.
Frequency asked questions
A telstra.net reverse DNS hostname points to Telstra network infrastructure. The sender can be a business mail server on that connection, rather than a Telstra-hosted email application. Check the recipient-observed sending IP and message authentication domains before identifying or approving the source.
There is no universal include for every Telstra-connected sender. Authorise your own outbound server IP, or use the exact instruction supplied by your SMTP relay operator. A commercial Microsoft 365 tenant uses include:spf.protection.outlook.com; using Telstra connectivity alone does not require it.
No. Telstra controls bigpond.com DNS and its authentication policy. Use the authenticated Telstra Mail service for that address. To control SPF, DKIM and DMARC yourself, send using a domain you own and a service that supports it.
Yes. A valid DKIM signature with a matching d= domain is enough for DMARC. If a service retains its own Return-Path domain, expect an SPF alignment failure even when SPF itself passes. Adding that service to your apex SPF does not change its envelope domain.
Check that signing is enabled, the message uses the published selector, and the DNS record has the required type and value. Microsoft 365 requires both supplied selector CNAMEs. Content changes after signing also break DKIM. Test a newly sent message after cached DNS expires.
Check the live rua value, delivery to the reporting address and any required external-destination authorisation. Send to receivers that generate aggregate reports and allow for their reporting schedule. A report is not generated for every message, and p=none does not guarantee that every receiver reports.




