
How to set up DMARC/DKIM/SPF for SparkPost

Published 4 Nov 2026
Updated 4 Nov 2026
11 min read
Summarize with
To set up DMARC/DKIM/SPF for SparkPost, verify your sending domain with its DKIM TXT record, configure and activate a custom bounce domain for SPF alignment, and publish a DMARC TXT record for your visible From domain.
I use a dedicated bounce subdomain such as bounces.example.com while keeping the From domain as example.com. SparkPost handles SPF through the bounce CNAME, so its standard setup does not require an extra include in your root domain's SPF record.
Add your domain
Use the SparkPost account and region that sends your production messages. Have access to your authoritative DNS settings before starting.
- Open Domains: Open the Domains page, start adding a domain, and select Sending Domain. Enter the domain used after the @ in your From address, such as example.com.
- Copy DNS values: Save the domain and open DNS Verification. Copy the generated DKIM TXT hostname and complete value.
- Publish and verify: Add that TXT record at your DNS host, then return to SparkPost and run domain verification. Follow the DKIM checks in 'Set up DKIM' before treating authentication as complete.
- Confirm readiness: Wait for ownership verification and compliance review to finish. Confirm the domain is verified and ready to send.
I use DNS verification because the DKIM record proves ownership and enables signing. Verifying ownership through a mailbox alone does not enable DKIM signing for your domain.
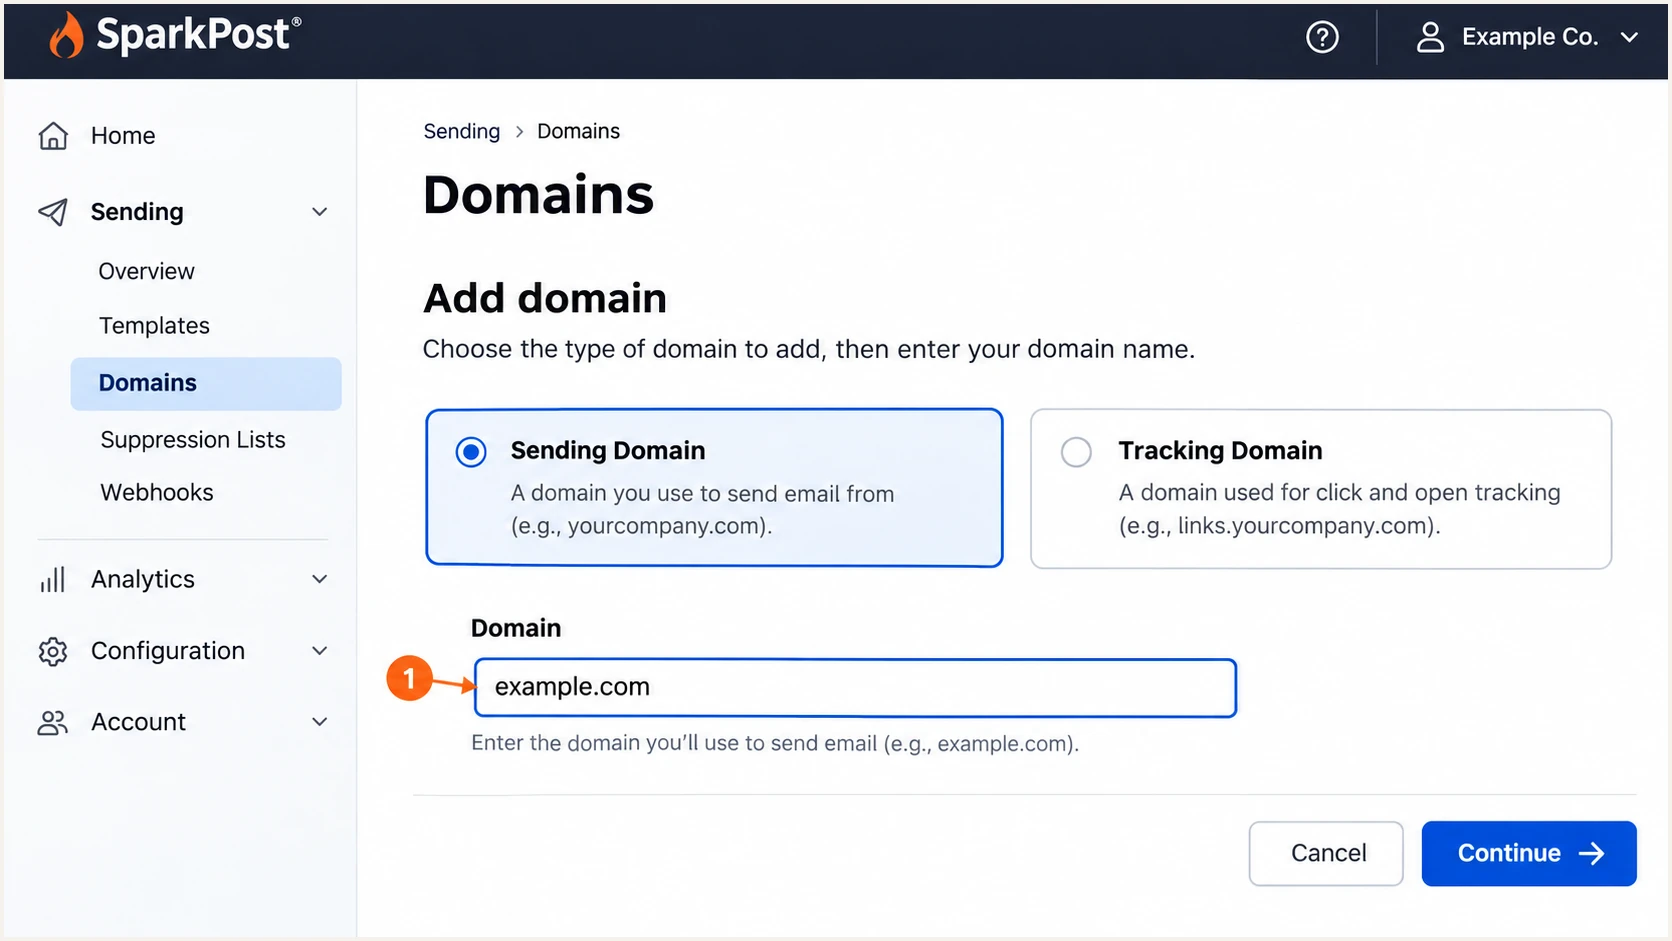
Illustrative SparkPost screen for adding example.com as a sending domain.
A 'Pending' domain can be awaiting compliance review after DNS verification succeeds. SparkPost's published requirements allow up to an hour for that review.
If the status is 'Blocked', check for a working website, the required A or MX record, and use of the organizational domain in another SparkPost account. Repeated DNS edits will not fix an account restriction.
Set up SPF
SPF checks the envelope sender domain, which appears in the delivered message's Return-Path. For SparkPost, configure a custom bounce domain to give that domain SPF alignment with your From domain.
- Create the bounce domain: In Domains, add bounces.example.com and select Bounce Domain. Use an unused subdomain rather than your root domain.
- Publish its CNAME: Copy the CNAME hostname and target shown under Bounce into DNS. Keep the record DNS-only if your DNS host offers an HTTP proxy option.
- Verify the CNAME: Return to SparkPost and run verification until the bounce domain's CNAME check succeeds. A domain used only for bounces does not need a separate DKIM TXT record.
- Activate the domain: Set it as the default bounce domain for the relevant account or subaccount where available. Otherwise, specify the domain in the API's top-level return_path field or the SMTP MAIL FROM address. Enterprise accounts should use their supported per-message configuration.
US bounce-domain example, use your account's displayed targetdns
bounces.example.com. 3600 IN CNAME sparkpostmail.com.
EU accounts use eu.sparkpostmail.com. Enterprise accounts use the tenant-specific target shown in SparkPost. Copy your account's value rather than assuming the US target applies.
A CNAME cannot share its hostname with a TXT or MX record. Keep existing root-domain mail records intact and reserve bounces.example.com for SparkPost.
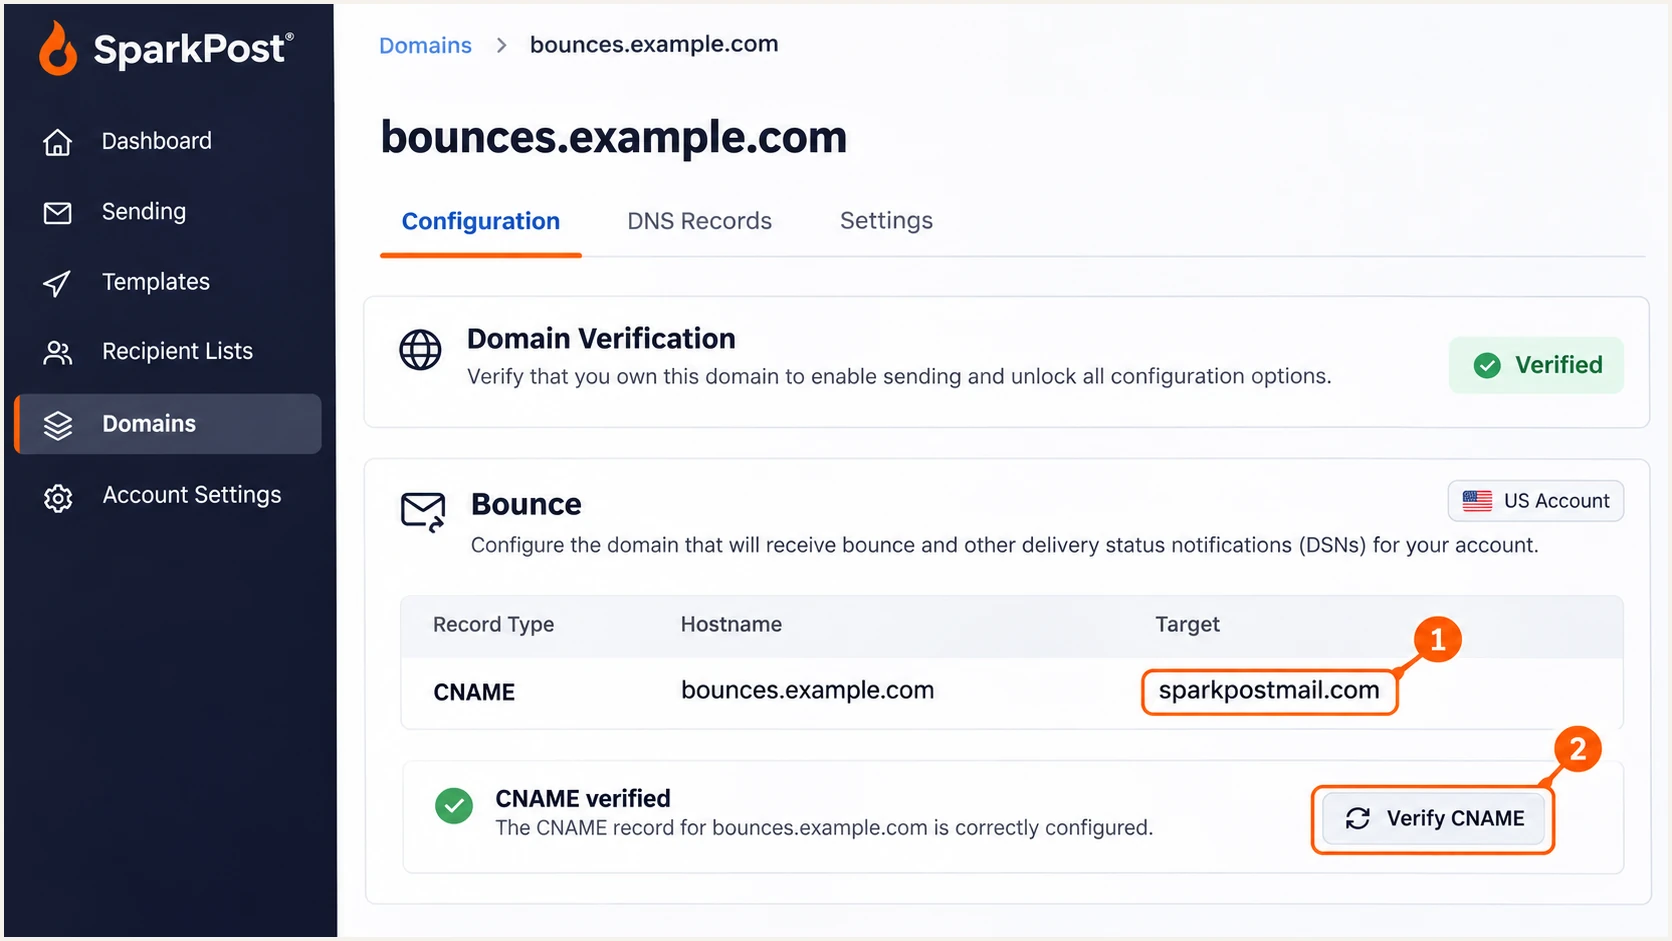
Illustrative SparkPost bounce-domain CNAME and verification screen.
The bounce CNAME lets SPF queries resolve through SparkPost's managed DNS. I leave the root SPF record for the other services that actually use that domain as their envelope sender.
With From example.com and Return-Path bounces.example.com, SPF alignment uses relaxed mode. If your existing DMARC record has aspf=s, those different domain names do not satisfy strict SPF alignment.
SPF checker
Find SPF syntax issues, lookup limits, and weak records.
?/16tests passed
Enter bounces.example.com in the SPF checker and inspect its resolved policy. Checking only example.com misses the identity SparkPost uses for this setup.
For API sends, set return_path to bounce@bounces.example.com. For SMTP, use that address in MAIL FROM. Editing a Return-Path message header alone does not set the envelope sender. Confirm the delivered message uses bounces.example.com.
Set up DKIM
Use the selector and public key generated for your SparkPost sending domain. I do not substitute a selector copied from another account or an old setup example.
- Open DNS Verification: Select example.com in SparkPost's Domains page and copy its DKIM TXT hostname and full public key value.
- Check the hostname: Publish the record at the exact selector._domainkey hostname SparkPost supplies. If your DNS editor appends example.com automatically, enter only the relative hostname.
- Keep one logical record: Paste the complete key. If the DNS host requires shorter TXT strings, split the value inside one TXT record, preserving every character and inserting no spaces into the key.
- Verify signing: Run SparkPost's DNS verification, then send a message with From notify@example.com. Confirm the receiving server reports dkim=pass with header.d=example.com.
SparkPost's Sending Domains API documentation specifies 2048-bit keys by default for new domains. Long public keys require multiple DNS character strings, which many DNS hosts handle automatically.
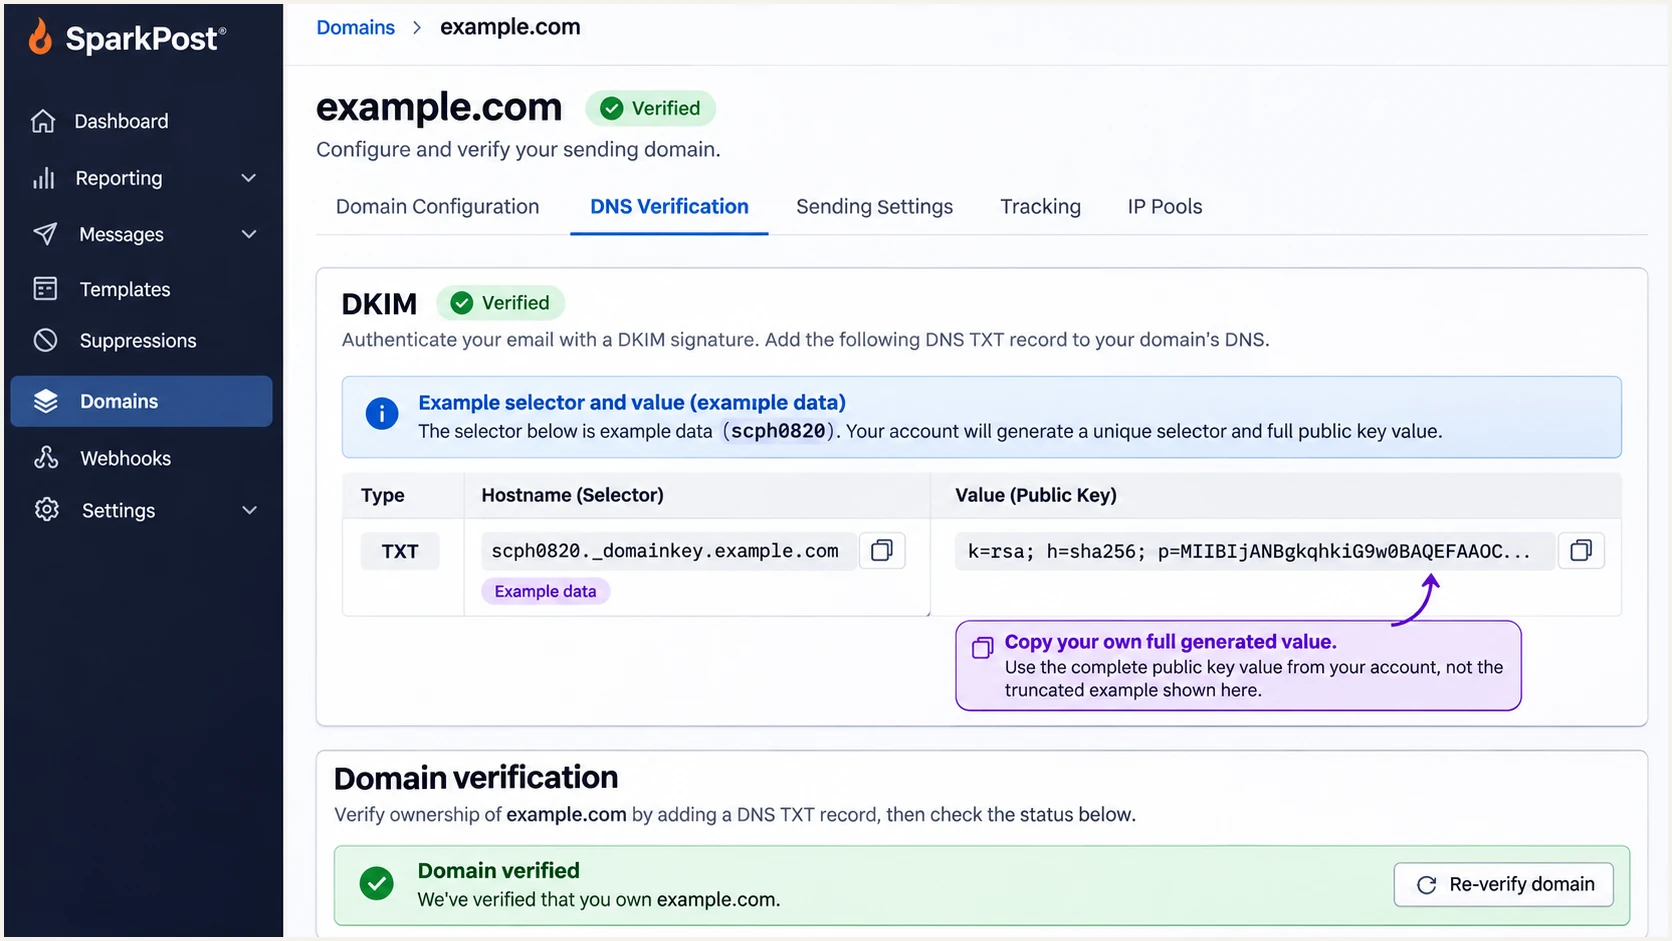
Illustrative SparkPost DKIM TXT details; copy your own selector and full value.
DNS verification confirms that SparkPost can find the public key. The received message confirms that the actual sending integration signs with the corresponding key.
If the message has several DKIM signatures, inspect the one whose signing domain matches your From domain under the configured DMARC mode. A valid signature for an unrelated domain does not satisfy that requirement.
Set up DMARC
Publish DMARC at your DNS host for the visible From domain. SparkPost does not replace your domain-wide DMARC policy with a sending-domain verification setting.
- Inspect the existing policy: Look up _dmarc.example.com before making changes. Edit the existing DMARC record rather than publishing a second one.
- Start with monitoring: If no policy exists, use p=none while you identify and authenticate legitimate sending sources. If quarantine or reject is already active, keep that policy.
- Publish the TXT record: For From example.com, use DNS name _dmarc.example.com, or _dmarc in an editor that appends the domain.
- Set report delivery: Replace dmarc@example.com with a working aggregate-report mailbox or your assigned reporting destination. Complete any required external-destination authorization.
Initial DMARC TXT value at _dmarc.example.comtext
v=DMARC1; p=none; rua=mailto:dmarc@example.com
The example is a monitoring policy. It requests aggregate reports without asking receivers to quarantine or reject messages because they fail DMARC.
The policy affects every sending source using that From domain, including services outside SparkPost. Review those sources before strengthening enforcement.
Keep an existing enforcement policy
Do not replace an existing p=quarantine or p=reject policy with the monitoring example. Preserve its enforcement and reporting settings while fixing SparkPost's authentication.
Use the DMARC record generator to build the value with your actual reporting destination. Publish one resulting DMARC policy record.
I retain the default relaxed authentication modes unless the domain already requires strict matching. An enforcement policy such as p=reject does not require strict SPF or DKIM matching.
DMARC checker
Look up a domain's DMARC record and catch policy issues.
?/7tests passed
Check the actual From domain and confirm the policy and reporting address are parsed correctly. For a dedicated subdomain policy, check that subdomain rather than only the organizational domain.
DMARC passes when SPF or DKIM passes and the successful identity matches the From domain under the configured mode. Passing authentication alone does not guarantee inbox placement.
Verify and troubleshoot
I test through the same application, API key, and subaccount used in production. A separately configured dashboard test does not prove that production messages use the same identities.
- Inspect the From domain: Confirm the message uses the exact sending domain configured in SparkPost, rather than an application default.
- Inspect the Return-Path: Confirm your custom bounce domain is active. If it still uses sparkpostmail.com, check the default bounce domain and per-message overrides.
- Read recipient results: Inspect Authentication-Results added by the receiving server. Check SPF's smtp.mailfrom, DKIM's header.d, and the DMARC result against the visible From domain.
- Retest each route: Send representative transactional messages through every application and subaccount. Repeat after changing DNS, selectors, or sending configuration.
Illustrative successful recipient-side resultstext
From: Notifications <notify@example.com>
Return-Path: <bounce-token@bounces.example.com>
Authentication-Results: recipient.example;
  spf=pass smtp.mailfrom=bounces.example.com;
  dkim=pass header.d=example.com;
  dmarc=pass header.from=example.com
These example results assume relaxed SPF alignment. The actual bounce token varies because SparkPost controls the Return-Path local part.
If SPF passes on SparkPost's generic bounce domain, DMARC can still pass through matching DKIM. That is different from having SPF alignment for your own domain.
|
|
|
|---|---|---|
SPF mismatch | Generic bounce | Bounce selection |
DKIM missing | Mailbox-only verification | DKIM TXT verification |
DKIM failure | Key or message change | Selector and message |
DMARC failure | No matching identity | From and auth domains |
Domain pending | Compliance review | SparkPost status |
Common SparkPost authentication failures and the next check.
For a missing DKIM record, query the hostname built with the message's actual s= selector and d= signing domain. Check for a duplicated DNS suffix or an incomplete public key.
For the quickest end-to-end check, send a real SparkPost message to the email tester's generated address. It diagnoses the received message rather than only inspecting published DNS.
Email tester
Send a real email to this address. Suped shows a results button when the test is ready.
?/43tests passed
Use the temporary recipient address provided by the tester in your normal application send. Keep the production From address and custom bounce configuration so the diagnosis covers the real path.
Fix the reported identity or DNS problem, then send a fresh message. Earlier messages retain their original authentication results after DNS changes.
Get alerted when it breaks
SparkPost verification is a setup check. Suped, our DMARC reporting platform, provides the receiver-side monitoring I use to spot authentication failures after deployment.
- Enable failure alerts: Enable DMARC failure alerts and summary emails in Suped's Notifications settings. Route alerts to the team responsible for sending configuration.
- Inspect affected records: Filter Suped's Data view by SparkPost source, reporting receiver, and sending IP. Open Detail view to compare the failed SPF and DKIM identities with the From domain.
- Check DNS changes: Use Suped's DNS history to compare previous and current values after a domain migration or key change. Check the detected issue's steps to fix.
- Verify recovery: Correct the SparkPost or DNS setting, run a fresh message test, and confirm later aggregate reports show the affected legitimate traffic passing.
Suped's DMARC monitoring connects report analysis with authentication issue detection. That makes ongoing failures easier to investigate than relying on a domain's verified badge.
DMARC aggregate reports arrive on the reporting receiver's schedule, commonly daily. Alerts based on those reports follow report arrival; they are not immediate notifications for each failed message.
Secure your domain with p=reject
I move to p=reject only after legitimate mail has dependable DMARC authentication. A successful SparkPost test is necessary, but every other service using the domain needs the same review.
- Inventory real senders: Use Suped's source table to identify authorized traffic. Investigate unfamiliar sources before marking them verified; do not authorize a source just to increase the pass rate.
- Fix legitimate failures: Check SparkPost's DKIM signing and selected bounce domain, then resolve failures in other authorized services. Separate direct delivery problems from forwarding-related SPF failures.
- Observe normal traffic: Review enough reports to include infrequent sends, such as monthly invoices. Judge readiness by legitimate source coverage rather than an arbitrary waiting period.
- Stage enforcement: Move through p=quarantine where appropriate, review the effects, then set p=reject. Preserve working reporting destinations and review subdomain policies or exceptions.
- Keep monitoring: Use Suped's issue detection and failure alerts during rollout. If already at p=reject, fix an affected sender's authentication instead of lowering the domain-wide policy by default.
Suped's Hosted DMARC supports managing policy changes through the dashboard after its DNS configuration is in place. That makes staged policy changes easier to coordinate with report review.
Keep SPF and DKIM matching rules consistent during the rollout. Changing policy and authentication modes together makes new failures harder to diagnose.
Monitoring with p=none
Collect reports and fix legitimate senders. Receivers are not asked to quarantine or reject mail because it fails DMARC.
Enforcement with p=reject
Request rejection of messages that fail DMARC. Keep reports flowing to detect newly introduced legitimate authentication failures.
A reject policy requests protection against unauthorized use of the exact From domain. Receiving systems retain their own handling rules.
After each policy change, verify the published DNS result and send representative SparkPost messages again. Keep an owner assigned to the alerts so future configuration changes get investigated.
FAQ
SparkPost documents hostnames such as mta-215-24.sparkpostmail.com for its sending infrastructure. The suffix identifies infrastructure, not a particular customer or permission to send for your domain. Check the sending IP, forward-confirmed reverse DNS, and authentication results before trusting the source.
These include domains are associated with SparkPost and appear in its older Sender-ID guidance. They are not instructions to modify your root SPF record. Standard custom-bounce configuration uses SparkPost's supplied CNAME, which provides SPF authentication for the bounce domain.
Yes. DMARC passes if a valid DKIM signature has the required domain match with the visible From address. A generic SparkPost Return-Path can pass SPF without SPF alignment for your domain. Custom DKIM must then provide the required match.
A dedicated policy for mail.example.com is a TXT record at _dmarc.mail.example.com. Check the existing effective policy before adding a subdomain exception. Publishing DMARC only for bounces.example.com does not establish the policy for a message whose visible From domain is mail.example.com.
Ownership verification does not prove that a particular message passes DMARC. Inspect that received message for missing DKIM, an incorrect signing domain, or a generic Return-Path. Also check per-message bounce overrides and whether the sending application uses the configured From domain.
No. Keep your existing root SPF policy for authorized services using that envelope domain. SparkPost's standard custom bounce setup uses a CNAME on a separate subdomain. Do not publish a second SPF record or add a TXT record at the bounce CNAME's hostname.