
How to set up DMARC/DKIM/SPF for SonicWall

Published 21 Nov 2026
Updated 21 Nov 2026
12 min read
Summarize with
Set up SonicWall email authentication by authorizing the final outbound servers in SPF, enabling domain-specific DKIM signing in Anti-Spoofing > Outbound, and publishing a DMARC TXT record at _dmarc.example.com. DMARC passes when at least one authentication method passes with domain alignment to the visible From address.
I first check whether SonicWall actually relays outbound email. An inbound-only filter does not need authorization in your outbound SPF record. SonicWall Email Security appliances and Hosted Email Security (HES) support outbound DKIM signing; their mail routing and SPF authorization depend on the deployment.
The menu names below follow SonicWall Email Security 10.0 and its public support documentation. Older interfaces shorten Security Services > Anti-Spoofing to Anti-Spoofing. Screenshot illustrations show the documented SonicWall screens.
Add your domain
I establish the outbound route before editing authentication records. A domain registered in HES still needs permission to relay through the outbound path.
Keep the SMTP envelope sender, also called MAIL FROM or Return-Path, under your own domain when your sending application supports it. SonicWall can relay that identity; the DKIM Identity of Signer field does not configure the Return-Path.
- Activate HES: For a new service, register the activation key in MySonicWall. Enter the data center, primary domain, and inbound mail server details, then confirm activation. Open the HES console. Skip registration for an existing deployment.
- Allow the domain: Open Manage > Network > Server Configuration > Outbound, under System Setup in the 10.0 navigation. Add your sending domain under Settings and restrict connecting clients to your upstream mail server or the documented ISP option. Click Apply Changes.
- Route outbound mail: Set your mailbox server or sending application to use the outbound smart host supplied for your HES tenant. For an appliance, route through its configured outbound listener. Use the assigned hostname rather than constructing one from an example.
- Confirm delivery: Send a message to an external mailbox. Confirm that its Received headers show the intended SonicWall route and that Return-Path contains the expected domain. Repeat for each sending domain.
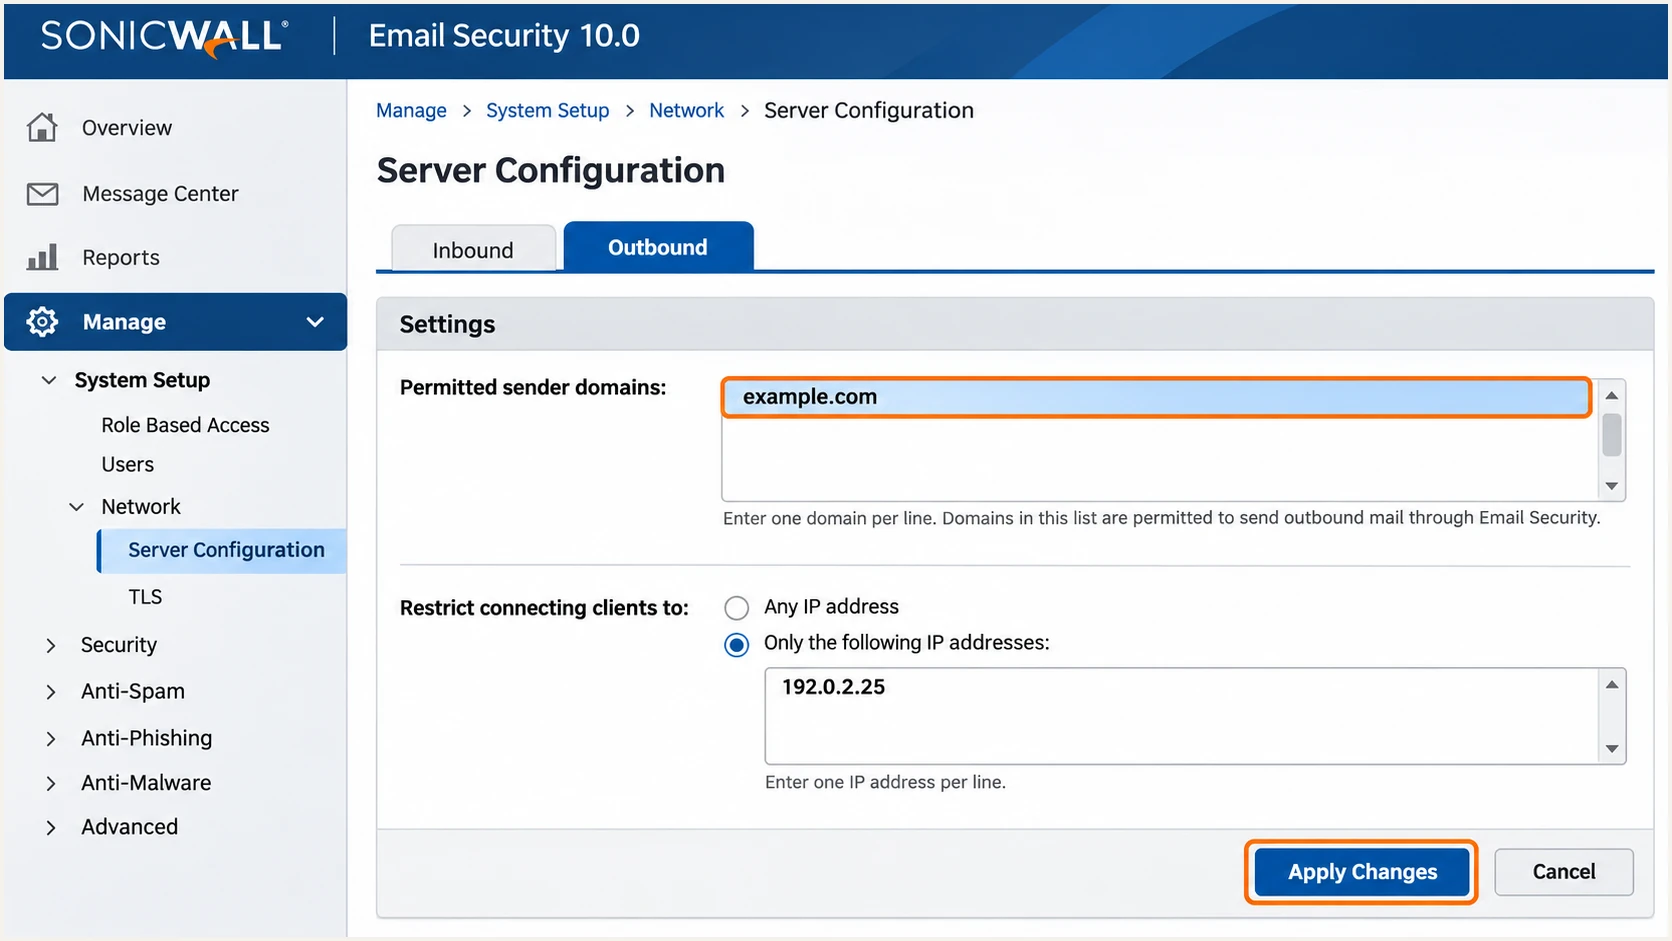
Illustrative SonicWall outbound path with the permitted sender domain.
HES activation confirms service provisioning. The external message test confirms that the configured domain actually uses the outbound gateway; it is separate from SPF and DKIM verification.
Changing MX records affects inbound delivery. Follow the HES provisioning instructions when deploying inbound filtering, but do not change working MX records solely to enable outbound DKIM or publish DMARC.
Set up SPF
I build SPF around the public server IP that the final recipient sees. An appliance behind NAT uses its public egress IP, and a gateway that hands mail to another relay uses that relay's authorization.
SPF checks the envelope sender domain, not the visible From address. For example, a Return-Path under bounce.example.com needs SPF at bounce.example.com. With relaxed DMARC alignment, that domain and a From address under example.com share the same organizational domain.
- Identify the sender: Inspect a delivered message for its envelope sender domain and final outbound IP. Record every active egress address, including failover addresses.
- Choose authorization: For an appliance delivering directly, add its actual public IPv4 or IPv6 addresses. For HES, obtain the current SPF include for your provisioned region from SonicWall or your service administrator. Do not derive it from an inbound MX hostname.
- Edit one record: At the envelope sender domain, update the existing TXT value beginning v=spf1. Insert the authorized mechanism before the final all mechanism. Preserve other legitimate senders and the existing ending; do not publish a second SPF record.
- Check limits: Keep the total DNS-querying SPF terms within the limit of 10, including nested includes. Look for permerror as well as a missing authorization.
Appliance example only, replace the documentation IPtext
Name: example.com
Type: TXT
Value: v=spf1 ip4:192.0.2.25 -all
The example assumes that the appliance is the domain's only sender and delivers directly. Merge its mechanism into your existing record for a domain with other senders.
SPF checker
Find SPF syntax issues, lookup limits, and weak records.
?/16tests passed
Check the domain in the actual Return-Path, then send another message through SonicWall. A valid DNS record alone does not prove that your production mail uses an authorized server.
If Return-Path uses a provider-owned domain, SPF can pass without SPF alignment. Editing SPF on your visible From domain will not change that result. A passing DKIM signature using your domain is sufficient for DMARC.
Encryption has a separate sending path
SonicWall's HES administration guide specifies include:_spf.sonicsecuremail.com for the North America Encryption Service and include:_spf.sonicsecuremail.eu for Europe. Add the applicable mechanism only if that service sends mail for your domain. Test encrypted mail separately; these are not general HES relay includes.
Set up DKIM
I configure SonicWall to sign with the visible From domain. For mail sent as user@example.com, use example.com as the signing domain and a new selector, such as sw2026. Keep existing selectors used by other senders.
SonicWall's support article "How To Generate DKIM Record" separates key creation from generating the DNS value. Clicking Generate does not publish the TXT record to your DNS provider.
- Create configuration: Open Manage > Security Services > Anti-Spoofing > Outbound. Under DKIM Signature Configurations, click Add Configuration. Enter your domain and selector, and select Same as domain for Identity of Signer.
- Generate keys: Choose Generate key pair. Use a 2048-bit key when available on your installed version. Select Sign all standard headers and save the configuration with outbound signing disabled until DNS is ready.
- Generate DNS value: In the domain row, click Generate under DNS Record, then Generate DNS Record in the dialog. Copy the generated public TXT value. Keep the private key on SonicWall and leave Domain is testing DKIM unchecked for production.
- Publish and enable: Publish the generated value as TXT at sw2026._domainkey.example.com, substituting your selector and domain. Verify public DNS, edit the configuration, enable signature on outbound email, and save. Confirm that its status is enabled.
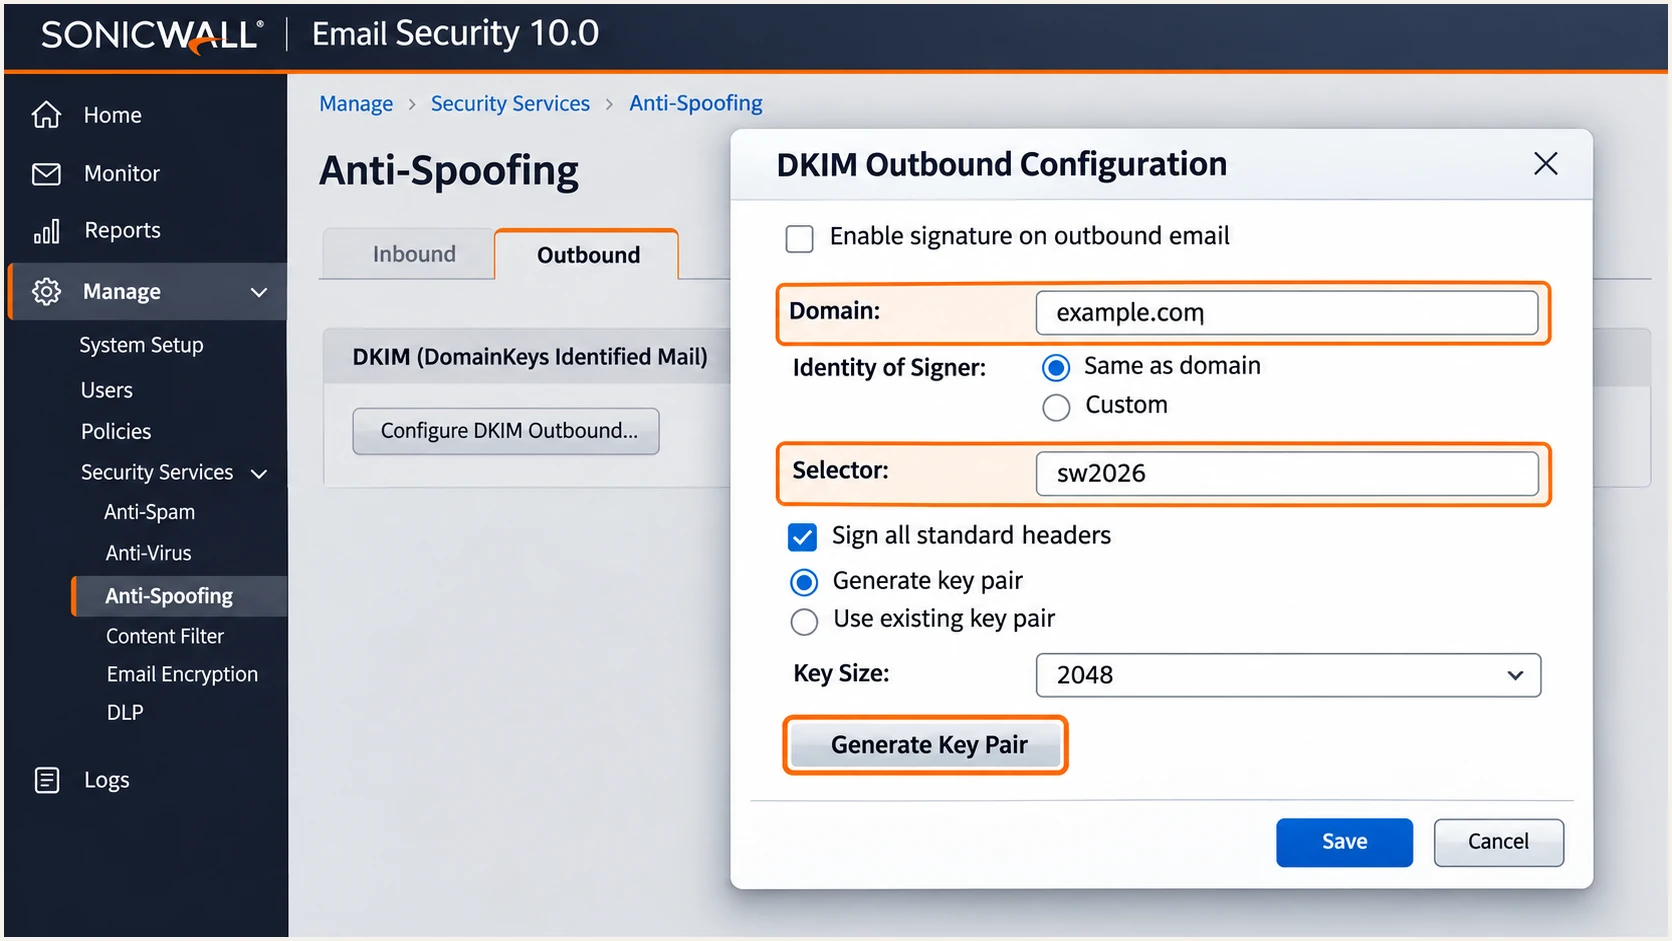
Illustrative SonicWall DKIM configuration before DNS publication.
A DNS host that appends example.com automatically needs only sw2026._domainkey in its Name field. Use SonicWall's full generated TXT value, including the public key. Do not publish a private key or a shortened example key.
I verify the public key first and enable signing second, as SonicWall's administration guide requires. Then I send through every outbound path and confirm a passing signature with d=example.com and s=sw2026 at the recipient.
Check the published selectorbash
dig +short TXT sw2026._domainkey.example.com
Sign after message changes
A downstream disclaimer or body rewrite can invalidate a signature. Complete content changes before the final DKIM signature, or configure the last modifying gateway to add a valid signature using your domain. Test the complete delivery route.
Set up DMARC
I start a domain without enforcement at p=none so reports expose legitimate sending paths before rejection is requested. Keep an existing p=quarantine or p=reject policy in place while adding SonicWall; do not weaken it for onboarding.
Publish DMARC in your authoritative DNS. SonicWall's inbound DMARC enforcement checkbox controls how the gateway handles incoming messages; it does not publish a policy for your sending domain.
- Inspect DNS: Look up _dmarc.example.com and edit an existing DMARC record rather than creating another. For a sending subdomain, inspect its own DMARC record and the organizational-domain policy.
- Set reporting: Create a working aggregate-report mailbox or use your reporting service's assigned address. Replace dmarc@example.com in the example below with that real destination.
- Publish the policy: Create a TXT record with Name _dmarc in the example.com zone. Use p=none only when there is no existing enforcement policy. Leave relaxed alignment defaults unless your deployment requires strict matching.
- Verify receipt: Confirm the public TXT value and check that aggregate reports reach the configured destination. For an external reporting domain, follow its authorization instructions. Reporting depends on participating receivers and usually arrives daily.
Initial DMARC record for a domain without enforcementtext
Name: _dmarc.example.com
Type: TXT
Value: v=DMARC1; p=none; rua=mailto:dmarc@example.com
Use the DMARC record generator to build the TXT value with your real reporting address. Publish one complete value, without copying the Name or Type labels into it.
DMARC checker
Look up a domain's DMARC record and catch policy issues.
?/7tests passed
A checker confirms the DNS policy, while a delivered message confirms authentication. DMARC needs a passing SPF result with matching domain identity or a passing DKIM signature with matching domain identity; it does not require both paths to pass.
The p=none policy requests monitoring without a DMARC quarantine or rejection action. Receivers still apply their own filtering rules, so it does not guarantee inbox delivery.
Verify and troubleshoot
I test using the same application, connector, and SonicWall route as production mail. A message sent directly through another server proves nothing about the gateway configuration.
Read Authentication-Results added by the final receiving system. Compare smtp.mailfrom with Return-Path, header.d with the DKIM signing domain, and header.from with the visible sender domain.
- Check the route: In SonicWall, open Investigate > Tools > Audit Trail. Under Settings, enable auditing if needed and click Apply. Find the external test message by sender and time; confirm that it traversed the expected gateway.
- Check public DNS: Query the envelope sender SPF record, the selector TXT record, and _dmarc at the sending domain. Compare authoritative results with your recursive resolver after the previous TTL expires.
- Check receiver results: Require dmarc=pass. For DKIM, confirm dkim=pass for your own domain. For SPF, verify both authorization of the final IP and the envelope domain's relationship to the From domain.
- Repeat coverage: Test ordinary mail and encrypted mail separately. Include failover routes and automated messages before deciding that the domain is ready for enforcement.
DNS verification commands, substitute your real identitiesbash
dig +short TXT example.com
dig +short TXT sw2026._domainkey.example.com
dig +short TXT _dmarc.example.com
The email tester below supplies a destination address. Send a new message to it through SonicWall to obtain a diagnosis of the actual message, including authentication results.
I use this message test before waiting for aggregate reports. Repeat it after a DNS edit or a gateway routing change so the result reflects the configuration currently in use.
Email tester
Send a real email to this address. Suped shows a results button when the test is ready.
?/43tests passed
If DKIM fails with a body-hash mismatch, inspect downstream content changes. If the public key is missing, check the selector in the received signature rather than assuming it is sw2026.
If SPF passes but DMARC fails, check domain alignment. A green SPF result for a provider-owned Return-Path does not authenticate your visible From domain for DMARC.
|
|
|
|---|---|---|
No DKIM | Signing off or bypassed | Check outbound route |
Key missing | Wrong selector name | Compare DNS with s= |
Body hash fails | Content changed | Sign after changes |
SPF permerror | Duplicates or lookups | Fix single SPF record |
DMARC fails | No matching pass | Check domain identities |
Use recipient results to choose the next check.
Get alerted when it breaks
For ongoing alerts, Suped is our DMARC platform. It combines source-level authentication results with detected issues and repair steps, so a broken SonicWall selector or a new outbound route has a concrete investigation path.
I pair DMARC monitoring with message tests after changes. Suped processes receiver reports as they arrive; aggregate-report alerts follow that reporting schedule and are not immediate notifications for every failed message.
- Enable alerts: In Suped notification settings, enable Issues detected and Sending sources need verification. Enable DMARC summary emails for periodic review.
- Confirm the source: Compare SonicWall traffic with known outbound IPs and signing domains before marking it verified. A familiar rDNS suffix alone does not establish that a sender is authorized.
- Investigate failures: Open the affected records and inspect the SPF result, DKIM domain, source IP, and report period. Use the detected issue's repair steps to identify the DNS or gateway change required.
- Verify recovery: Correct the SonicWall or DNS configuration, send another test message, and confirm improvement in subsequent receiver reports. Review DNS history when the failure follows a record change.
Keep monitoring after a passing test
One passing message covers one route at one time. Suped's source table and issue notifications help detect changes across the domain's reported traffic, including previously unseen senders.
Secure your domain with p=reject
I move to p=reject after every legitimate sending workflow has a reliable DMARC pass. Evaluate each source separately; a high overall pass rate can conceal a low-volume system that still sends important mail.
Suped's verified sources and record-level diagnostics support that review. Our Hosted DMARC product manages policy changes through the dashboard after its DNS delegation is configured. It does not repair SonicWall authentication automatically.
- Complete the inventory: Review enough reporting history to cover your normal sending cycle, including infrequent jobs. Identify every legitimate source and resolve unexplained failures before enforcing.
- Require a matching pass: Confirm that SonicWall signs with your domain and that signatures survive delivery. Keep SPF correct wherever you control the envelope sender, including backup egress routes.
- Stage the policy: Change p=none to p=quarantine, monitor receiver reports and delivery failures, then change to p=reject when legitimate traffic remains healthy. If enforcement already exists, retain it while fixing individual sources.
- Check subdomains: Review inherited policy and any explicit subdomain DMARC records. Keep report collection and Suped issue notifications enabled after rejection is active.
Final DMARC record after sender verificationtext
Name: _dmarc.example.com
Type: TXT
Value: v=DMARC1; p=reject; rua=mailto:dmarc@example.com
Ready for enforcement
Known senders pass DMARC, SonicWall signs with your domain, and production routes have been tested. Reporting covers the normal sending cycle.
Resolve before enforcement
Legitimate senders remain unidentified, failover mail lacks a matching pass, or encrypted messages have not been tested. Investigate those workflows in Suped before increasing the policy.
The reject policy asks receivers to reject messages that fail DMARC for your domain, subject to their local handling. It does not prevent lookalike-domain impersonation or abuse of a compromised authorized account.
Frequency asked questions
Yes. SonicWall Email Security and Hosted Email Security document outbound DKIM signing under Anti-Spoofing > Outbound. Create a domain configuration, generate the key pair and DNS value, publish the public TXT record, then enable signing. Inbound DKIM checking is a separate setting.
These domain suffixes are associated with SonicWall Hosted Email Security infrastructure in North America and Europe. An rDNS suffix is a clue, not proof of sender authorization or a DMARC pass. Confirm the sending IP against your SonicWall deployment and inspect the received authentication results. Appliance deployments use their own configured hostnames.
These include domains are associated with SonicWall Hosted Email Security. Their presence does not establish which include your tenant should publish. Confirm the current regional authorization with SonicWall before editing DNS. An appliance delivering directly needs its own public egress IP authorization instead.
SPF alignment fails when the authenticated envelope sender domain does not match the visible From domain under your DMARC alignment mode. A passing DKIM signature with a matching signing domain is enough for DMARC. Check the actual Return-Path before changing SPF; changing a DKIM signer identity does not change it.
It applies DMARC checks to incoming mail. Your outbound domain needs a DMARC policy in public DNS, plus passing SPF or DKIM with the required domain relationship. SonicWall reporting controls and outbound DKIM signing do not publish that DNS policy for you.
Keep p=reject in place. Configure and test the SonicWall route with your domain-specific DKIM signature before putting production mail through it. Investigate legitimate failures and correct the affected sender rather than weakening the domain-wide policy.




