
How to set up DMARC/DKIM/SPF for Smarsh

To authenticate Smarsh hosted email, add include:spf.smarsh.com to your domain's single SPF record, enable customer-domain DKIM signing through the Intermedia-powered hosting control panel, and publish a DMARC TXT record at _dmarc.yourdomain.com. Verify a real outbound message before tightening your DMARC policy.
I start by confirming that Smarsh hosts the sending mailbox. An archive-only connection does not make Smarsh your outbound email provider. For archive-only accounts, configure authentication at the service that actually sends your messages.
Add your domain
Use the administrative control panel supplied with your Smarsh hosting account. The following navigation applies to accounts with Intermedia HostPilot access; reseller-managed accounts need their hosting administrator to perform these actions.
- Open domain management: Sign in as an administrator and open Services > Domains. If your sending domain is already listed, open it.
- Add a missing domain: Enter your customer domain and click Add. If the control is unavailable, ask Smarsh hosting support to provision it.
- Retrieve assigned DNS: Select the domain, then DNS Records > Display DNS Records. Use Show system records when needed to see assigned values.
- Verify provisioning: Confirm a hosted mailbox uses the domain. Complete any account-specific ownership checks requested by the hosting administrator, then test sending and receiving externally.
I compare the assigned records with public DNS before making changes. A mailbox that sends successfully proves routing works; it does not prove SPF or DKIM passes.
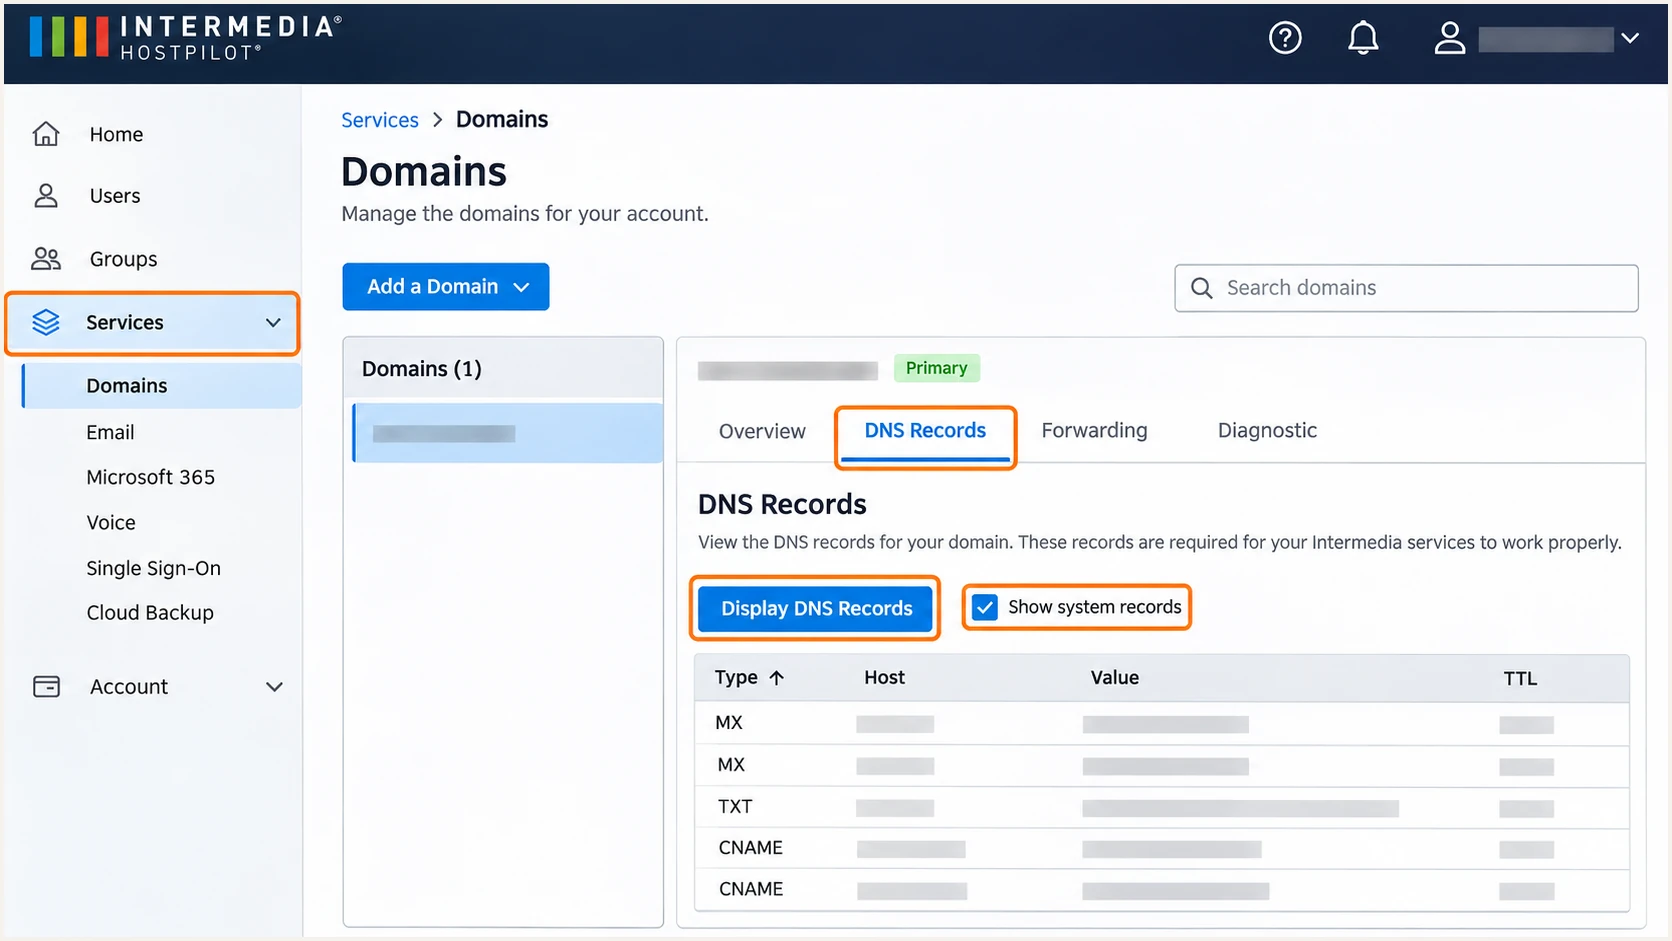
Locate assigned domain DNS records in the hosting control panel.
Smarsh's initial DNS setup instructions also cover mailbox migration. For an existing working domain, keep MX and Autodiscover unchanged while configuring authentication. Preserve unrelated TXT records and authorizations for other active senders.
Set up SPF
Smarsh's support article 'DNS settings to complete setup for Smarsh Email Hosting' specifies include:spf.smarsh.com. I use that Smarsh-specific instruction rather than automatically adding the generic Intermedia include as well.
- Find the existing record: At your authoritative DNS provider, locate the TXT record beginning v=spf1 at your sending domain, usually host @.
- Merge the authorization: Insert include:spf.smarsh.com before the final all mechanism. Keep other required senders. Publish one SPF record per hostname, not a separate record for Smarsh.
- Check the envelope sender: Send through the hosted mailbox and inspect Return-Path and the receiver's smtp.mailfrom value. Customer-domain SPF authentication must use that envelope domain.
- Check lookup limits: Keep SPF evaluation within 10 DNS-querying terms, including nested includes. Remove obsolete authorizations before adding unnecessary mechanisms.
SPF TXT value at @ when Smarsh is the only sendertext
v=spf1 include:spf.smarsh.com -all
This complete record is for a Smarsh-only sending setup. If your domain also sends through another service, merge its required authorization into the same record and retain your existing ending until you have reviewed every sender.
Run the SPF checker against the actual envelope domain. It checks the published policy and lookup budget; the later message test confirms whether Smarsh's outbound IP passes it.
SPF checker
Find SPF syntax issues, lookup limits, and weak records.
?/16tests passed
Smarsh supports customer-domain Return-Path alignment. With DMARC's default relaxed SPF alignment, the envelope domain and visible From domain must share an organizational domain. Strict SPF alignment requires an exact domain match.
If a particular route instead uses a provider-owned Return-Path, adding SPF at your visible From domain will not repair that mismatch. Ask hosting support to confirm the route. A passing DKIM signature with matching domain identity still gives that message a DMARC pass.
Set up DKIM
I generate the signing key in the hosting control panel so the sending service retains the private key. Intermedia's DKIM instructions require an eligible Email Protection package. Missing controls need hosting support or an account administrator.
- Generate the key: Open HostPilot > Services > Email Protection > Settings > DKIM. Select your domain, then Configure > Generate keys.
- Publish the TXT record: Copy the generated hostname and complete public-key value into authoritative DNS. Use the selector generated for your account, not a documentation example.
- Verify public DNS: Confirm the exact selector hostname resolves to the complete key. If Intermedia hosts authoritative DNS, contact hosting support to confirm publication.
- Activate signing: Return to the DKIM settings and click Enable digital signing only after the record resolves correctly.
A DNS editor that appends your domain needs only the relative selector hostname. Check that the saved name does not repeat your domain. Keep all public-key characters intact.
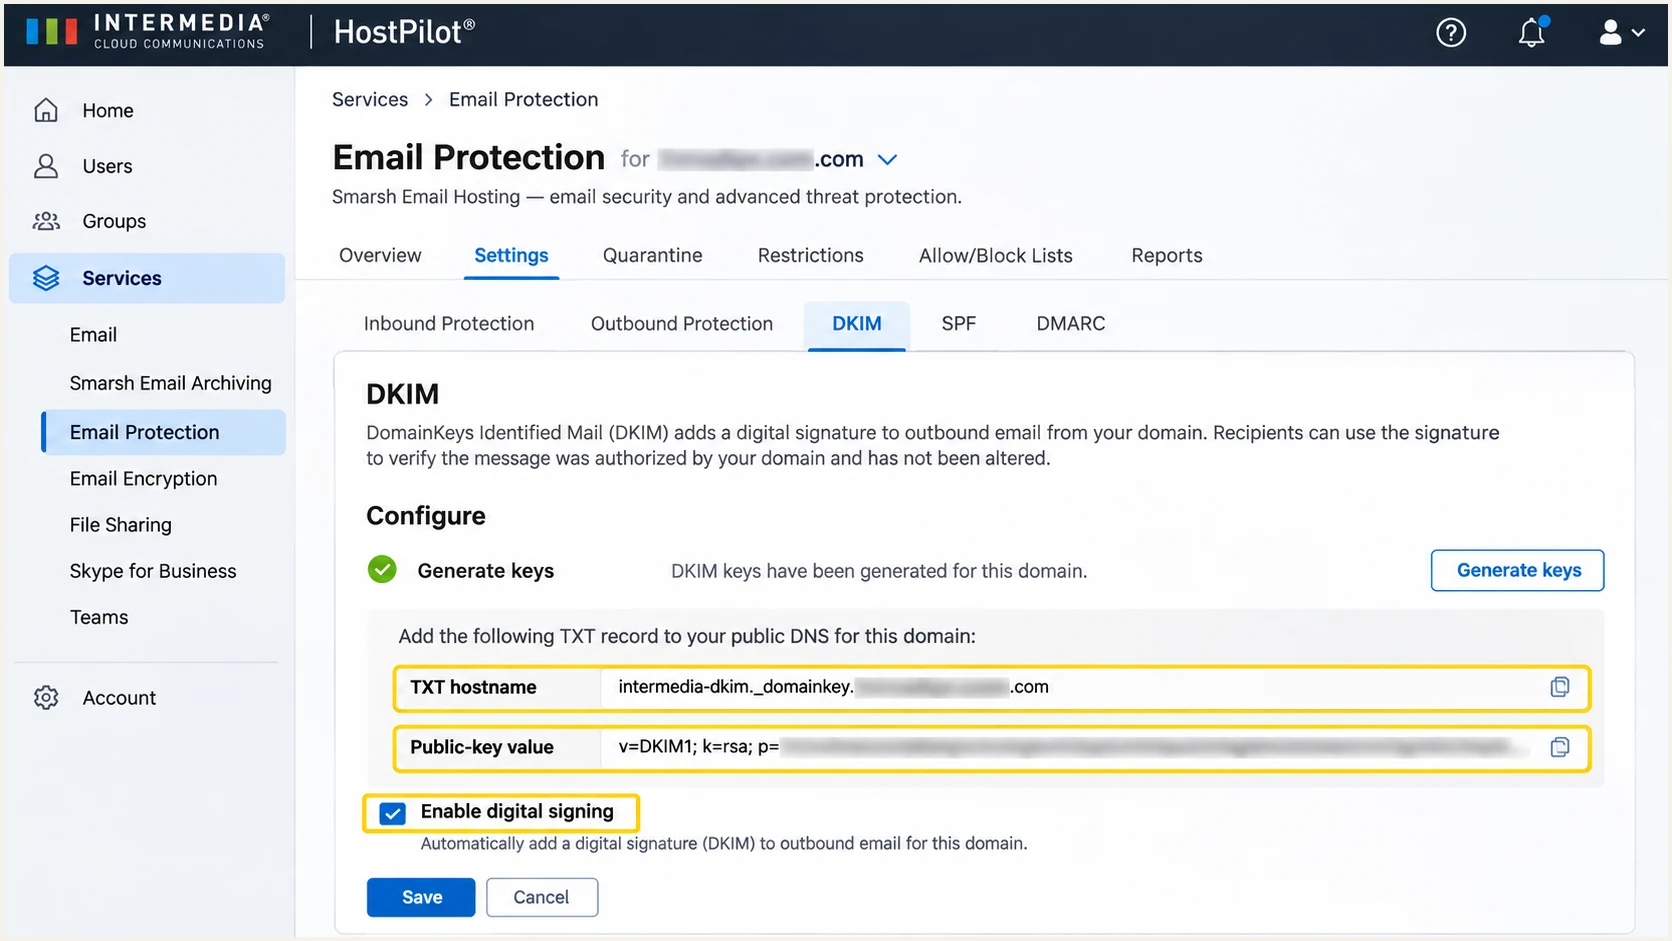
Generate the domain's DKIM TXT record before enabling digital signing.
DNS providers split long TXT values differently. Multiple quoted strings within one TXT record are valid when they concatenate to the original public key. Separate competing TXT records at one selector are not a substitute.
After activation, send a fresh message externally. Read the DKIM-Signature d= signing domain and s= selector. The receiver must report dkim=pass for a signing domain that satisfies your DMARC alignment setting.
Publish before enabling signing
Generating a key is not activation. Enabling signing before the public key is available breaks verification. During rotation, publish the replacement selector before switching keys.
Set up DMARC
I start a new DMARC deployment with p=none so reports reveal legitimate sending routes before enforcement. If the domain already uses p=quarantine or p=reject, keep that policy and verify Smarsh under it.
- Locate the policy: Look up TXT at _dmarc.yourdomain.com. Edit an existing DMARC record instead of publishing a second one.
- Publish a monitoring record: For a domain without an existing DMARC policy, create TXT at host _dmarc using the example below.
- Set the reporting destination: Replace dmarc@example.com with a working mailbox or your assigned aggregate-report address. Complete external reporting authorization when the destination requires it.
- Keep relaxed defaults: Do not add strict SPF or DKIM alignment settings unless you have verified every authorized sender supports them.
The DNS change belongs at your authoritative DNS provider. Smarsh's outbound authentication does not require a separate DMARC activation button in the hosting control panel.
Initial DMARC TXT value at _dmarctext
v=DMARC1; p=none; rua=mailto:dmarc@example.com
The example address is a placeholder. Publishing it unchanged will not send reports to your team. Keep a single policy record and preserve any working reporting destinations when editing it.
Use the DMARC record generator to build the value, then check the published record below. A DNS check verifies publication; message testing verifies authentication.
DMARC checker
Look up a domain's DMARC record and catch policy issues.
?/7tests passed
p=none requests monitoring without DMARC-based quarantine or rejection. It does not improve a failing SPF or DKIM result, and it does not guarantee inbox placement.
Aggregate reports arrive on receivers' reporting schedules, usually daily. Send real traffic and allow reporting time before treating an empty report view as a configuration failure.
Verify and troubleshoot
I test the exact sending route users depend on, including aliases and any applications that submit through Smarsh. An internal mailbox-to-mailbox test does not prove internet receivers will authenticate the message.
- Send an external test: Use the email tester below to obtain a destination, then send to it through your normal Smarsh-hosted mailbox.
- Inspect the diagnosis: Check SPF, DKIM, and DMARC results. Confirm the visible From domain, envelope domain, and DKIM signing domain belong to the intended sending setup.
- Read receiver results: In a delivered message, inspect Authentication-Results added by the receiving service. Find spf=pass, dkim=pass, and dmarc=pass with their associated identities.
- Retest each route: Repeat after DNS changes, key activation, or a change to outbound routing. Test forwarded delivery separately because forwarding often breaks SPF.
The tester prompts you to send a real message and returns a full diagnosis. I use that before waiting for aggregate reports because it exposes the current message's authentication results.
Email tester
Send a real email to this address. Suped shows a results button when the test is ready.
?/43tests passed
A valid DNS record alone does not show that the sending server used it. For DKIM, compare the actual s= selector with the published hostname and check that signing is enabled.
For DMARC, a raw SPF or DKIM pass is insufficient when its authenticated domain has no matching identity with the visible From domain. One passing method with valid domain alignment is enough for a DMARC pass.
SPF passes, DMARC fails
SPF authenticates an unrelated provider domain, and no passing customer-domain DKIM signature exists.
Fix the envelope identity where supported, or enable valid DKIM signing for your From domain.
DKIM passes, DMARC passes
A valid DKIM signature has the required domain alignment with your visible From address.
DMARC passes even when SPF alignment fails. Keep the passing DKIM route working during forwarding.
Use DNS queries to distinguish a missing record from a message signing problem. Query the actual envelope domain for SPF and the actual signing domain for DKIM.
Replace example.com and selector with your message's values. The final query is useful only when example.com is also the DKIM d= domain.
Inspect public DNSbash
dig +short NS example.com
dig +short TXT example.com
dig +short TXT _dmarc.example.com
dig +short TXT selector._domainkey.example.com
For SPF permerror, check duplicate policies and the recursive lookup budget. For a DKIM key error, check the selector, the complete public key, and any accidental repeated domain suffix.
If DNS is correct but DKIM verification still fails, check whether an outbound gateway changes signed content after signing. Give hosting support the full received headers and the time of a fresh test.
Get alerted when it breaks
Our DMARC monitoring in Suped turns receiver reports into source-level diagnostics and issue notifications. I recommend that workflow for ongoing Smarsh checks because a one-time DNS test will not expose a later signing or routing change.
- Enable issue notifications: In Suped notification settings, enable Issues detected and Sending sources need verification. Add DMARC summaries for routine review.
- Verify the sending source: Confirm Smarsh is authorized before marking its source verified. Match report evidence with a known test message; do not trust rDNS alone.
- Inspect failures: Filter the data view by source and IP, then open a record's detail view to inspect SPF, DKIM, and DMARC diagnostics.
- Check changes and retest: Compare DNS history with the failure period, follow the issue's fix steps, and send another message through the affected Smarsh route.
Suped is our product, and these alerts depend on incoming authentication data. Report-driven detection follows receiver report delivery, so I use an immediate message test after each planned configuration change.
Keep a verified baseline
Record the expected DKIM signing domain, active selector, and envelope domain after a successful test. Compare new failures with that baseline before authorizing a new source or changing DNS.
When the change is inside Smarsh's sending infrastructure, send hosting support the failing headers and affected IPs. Avoid adding an unfamiliar sender to SPF simply because it appears in a report.
Secure your domain with p=reject
I move to enforcement after legitimate senders pass across a representative sending cycle, including infrequent business mail. Suped's source verification and authentication detail views help separate broken authorized mail from unauthorized attempts before changing policy.
- Inventory every sender: Review all services using the same From domain. A successful Smarsh test does not validate other applications or subdomains.
- Fix legitimate failures: Require working customer-domain DKIM for Smarsh and verify SPF alignment on direct delivery. Resolve forwarding and gateway exceptions before enforcement.
- Stage the policy: Use p=quarantine as an intermediate step for a new deployment. Review source-specific failures and user delivery reports before switching to p=reject.
- Keep monitoring: Retain rua reporting and issue notifications after enforcement. Review new sending sources before their first production campaign or application rollout.
I review failures by authorized source rather than demanding a perfect domain-wide pass rate. Unauthorized messages are expected to fail; legitimate low-volume senders still need investigation even when the overall rate looks healthy.
|
|
|
|---|---|---|
p=none | Monitor | Sender inventory |
p=quarantine | Quarantine | Legitimate failures |
p=reject | Reject | Ongoing alerts |
Policy changes follow verified sending behavior.
Our Hosted DMARC in Suped lets you manage the policy from the dashboard after the initial DNS setup. That keeps policy changes and report review in one workflow while Smarsh continues handling mailbox authentication.
Before changing the parent domain policy, review subdomains that inherit it and any explicit sp setting. Keep relaxed alignment unless you have a specific reason to require exact domain matches.
Final DMARC TXT value after legitimate routes are verifiedtext
v=DMARC1; p=reject; rua=mailto:dmarc@example.com
Use your real reporting address and update the existing record. Requesting rejection applies to messages that fail DMARC; recipient servers retain their own handling policies. It does not prevent abuse through an authenticated compromised mailbox.
After the policy change, confirm the published value, send another Smarsh test, and check subsequent receiver reports for failures affecting verified senders.
Frequency asked questions
An archive-only connection does not authorize Smarsh to send mail for your domain. Configure authentication for the actual outbound provider. Use Smarsh's hosted-email SPF instructions when Smarsh hosts or sends your outbound mail.
include:spf.smarsh.com is documented for Smarsh Email Hosting. include:spf.intermedia.net is documented for Intermedia's own hosted email. These related systems do not make both includes necessary. Follow your account's hosting instructions and preserve other active sender authorizations.
These suffixes are associated with Intermedia infrastructure. Smarsh's Intermedia-powered hosting is consistent with that infrastructure, but shared rDNS does not uniquely identify Smarsh or prove authorization. Confirm the source using a known message, its sending IP, and its authentication identities.
SPF authenticates the envelope domain, not the visible From address. A provider-domain SPF pass does not satisfy DMARC alignment for your customer domain. A passing customer-domain DKIM signature satisfies DMARC independently, including on routes where SPF alignment fails.
The documented Intermedia signing controls depend on the Email Protection package and administrator access. Ask your hosting administrator or Smarsh hosting support to confirm availability and enable signing for your domain. Publishing a public key without configuring the sending service does not enable DKIM.
Yes. Keep an existing p=reject or p=quarantine policy. Configure Smarsh's authentication before production sending, verify a real message passes DMARC, and monitor the new source. A new sending service is not a reason to automatically weaken an established policy.




