
How to set up DMARC/DKIM/SPF for Purelymail

Published 22 Nov 2026
Updated 22 Nov 2026
10 min read
Summarize with
To set up DMARC/DKIM/SPF for Purelymail, verify your custom domain, add Purelymail's SPF include, publish its three DKIM CNAME records, and create a DMARC TXT record. Then run Purelymail's DNS check and click Save to activate the verified configuration.
I start new DMARC deployments with p=none and reporting enabled. If your domain already uses p=quarantine or p=reject, keep that policy while configuring Purelymail. Replace example.com and the example reporting address below with your own values.
Add your domain
Make DNS changes at the provider hosting your authoritative DNS zone. Purelymail supplies the ownership token and checks the records; it does not publish them for you.
- Open Domains. Sign in to Purelymail Account Admin, select Domains, click Add new domain, and enter your domain without an email address or URL prefix.
- Prove ownership. Copy the account-specific Ownership Record into a TXT record at the domain root. Use @ or a blank Host field, according to your DNS provider.
- Choose delivery. For incoming Purelymail hosting, use the MX record below. For sending only, retain your existing MX and set Purelymail's Deliver Mail To option to External Server.
- Check the domain. Return to Purelymail and click Check DNS records. Complete SPF and DKIM below, recheck the records, then click Save once the required checks pass.
Ownership TXT example and incoming-mail MXdns
example.com. TXT purelymail_ownership_proof=YOUR_ACCOUNT_TOKEN
example.com. MX 50 mailserver.purelymail.com.
Copy the real ownership value from your account. The ownership TXT and SPF TXT are separate records at the same name, which is valid.
Change MX only when you are ready to receive mail at Purelymail. Authentication setup alone does not require moving incoming mail.
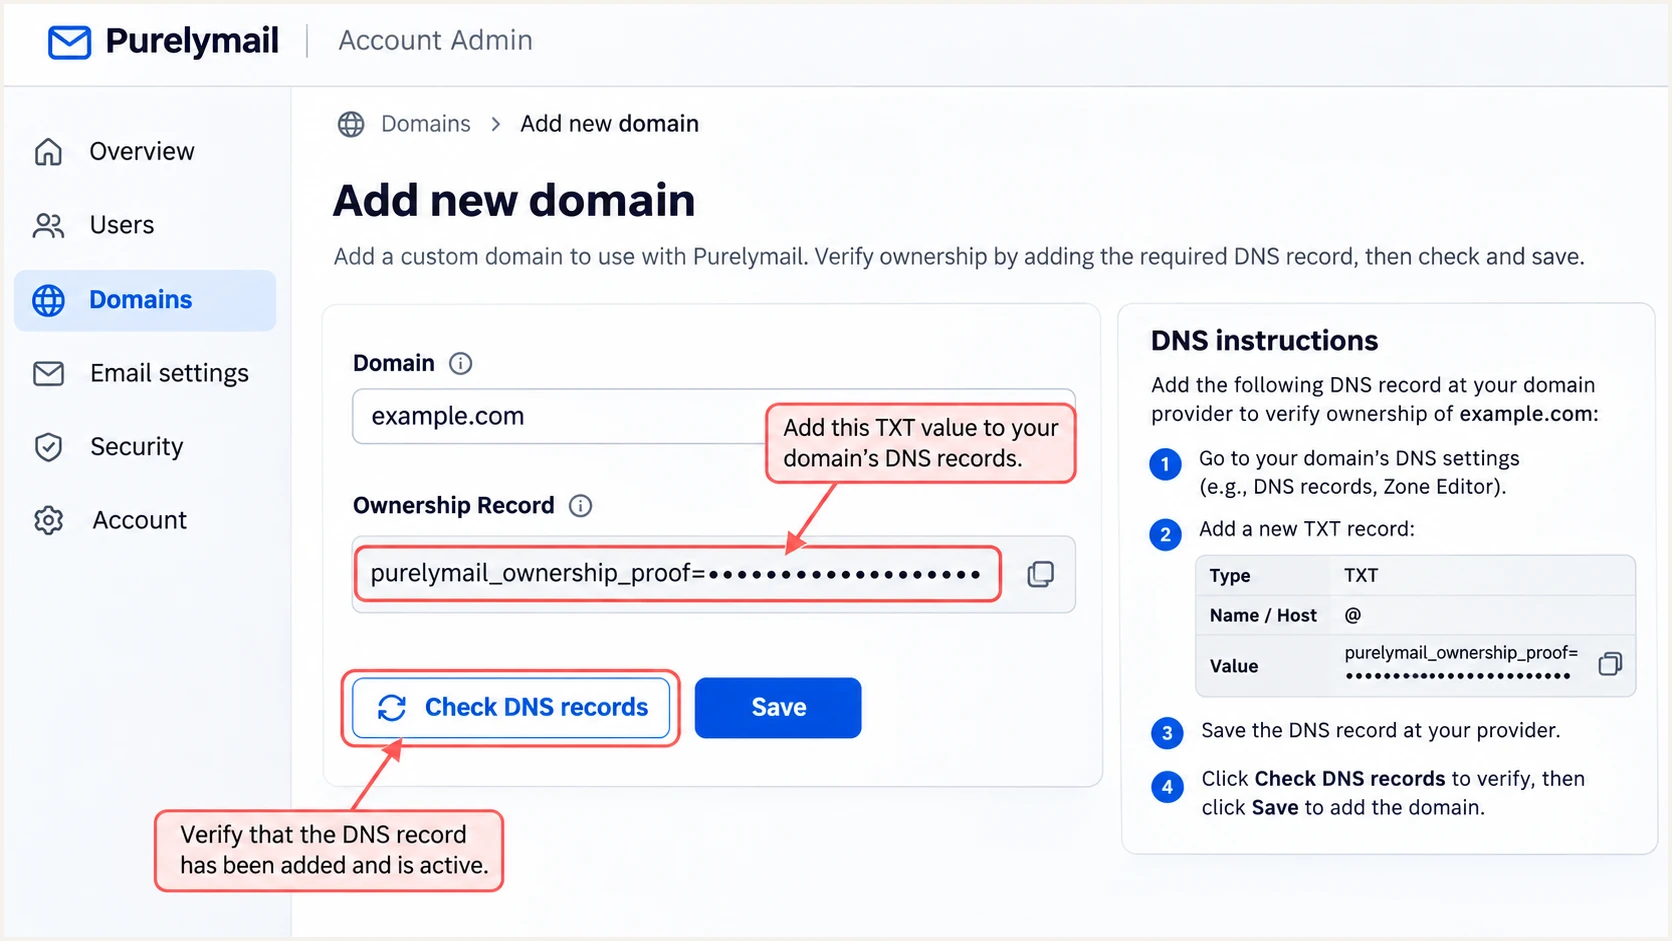
Illustrated Purelymail domain setup showing the ownership TXT and DNS check.
Keep the token unchanged when copying it. An extra domain suffix in the Host field puts the TXT record at the wrong name.
After verification, create a mailbox for the domain under Users if you need one. Use that mailbox for the external delivery test later.
Set up SPF
Purelymail supports Return-Path alignment with your sending domain, so configure SPF for that domain. I keep all authorized senders in one SPF TXT record.
- Read the current record. Look for an existing TXT value beginning v=spf1 at the sending domain.
- Authorize Purelymail. If there is no SPF record, publish the value below. Otherwise, insert include:_spf.purelymail.com before the existing all mechanism, preserving other authorized senders.
- Keep one policy. Publish exactly one SPF record per hostname. Keep Purelymail's ~all for a new record; preserve an existing valid ending when merging.
- Check DNS lookups. Keep SPF evaluation within the 10 DNS-querying-term limit, including nested includes. Do not replace the include with a copied list of current IP addresses.
SPF TXT at example.com, Host @ or blankdns
v=spf1 include:_spf.purelymail.com ~all
An SPF pass authenticates the envelope sender, exposed as smtp.mailfrom in the receiving server's results. For DMARC, its domain must also match the visible From domain under your policy's alignment mode.
Enter your sending domain below to check the published SPF record and lookup count. This validates DNS before you test an actual Purelymail message.
SPF checker
Find SPF syntax issues, lookup limits, and weak records.
?/16tests passed
A successful DNS check does not prove that a particular message used your domain in its Return-Path. Confirm that separately in the received message headers.
If SPF fails after forwarding, inspect DKIM too. A valid DKIM signature with a matching signing domain is sufficient for DMARC to pass.
Set up DKIM
Publish all three Purelymail DKIM CNAMEs. Purelymail rotates its signing keys, so a working signature today does not justify leaving out another selector.
- Create the aliases. Add the three CNAME records below. In a DNS editor that appends example.com, enter only purelymail1._domainkey, purelymail2._domainkey, and purelymail3._domainkey as the respective names.
- Use DNS-only mode. Disable HTTP proxying for these CNAMEs if your DNS provider offers it. Remove conflicting records only at these exact selector names.
- Recheck DNS. Open the domain in Purelymail and click Recheck DNS records, or Check DNS records during initial setup.
- Commit the configuration. Click Save after the required checks pass. This commits the verified configuration and DKIM signing settings to Purelymail's mail cluster.
Purelymail DKIM CNAME records for example.comdns
purelymail1._domainkey.example.com. CNAME key1.dkimroot.purelymail.com.
purelymail2._domainkey.example.com. CNAME key2.dkimroot.purelymail.com.
purelymail3._domainkey.example.com. CNAME key3.dkimroot.purelymail.com.
These aliases delegate public-key hosting to Purelymail. You do not need to generate a private key or paste a DKIM public key into a TXT record.
Keep all three aliases published during key rotation. If the DNS editor rejects a trailing period in a target, omit that final period.
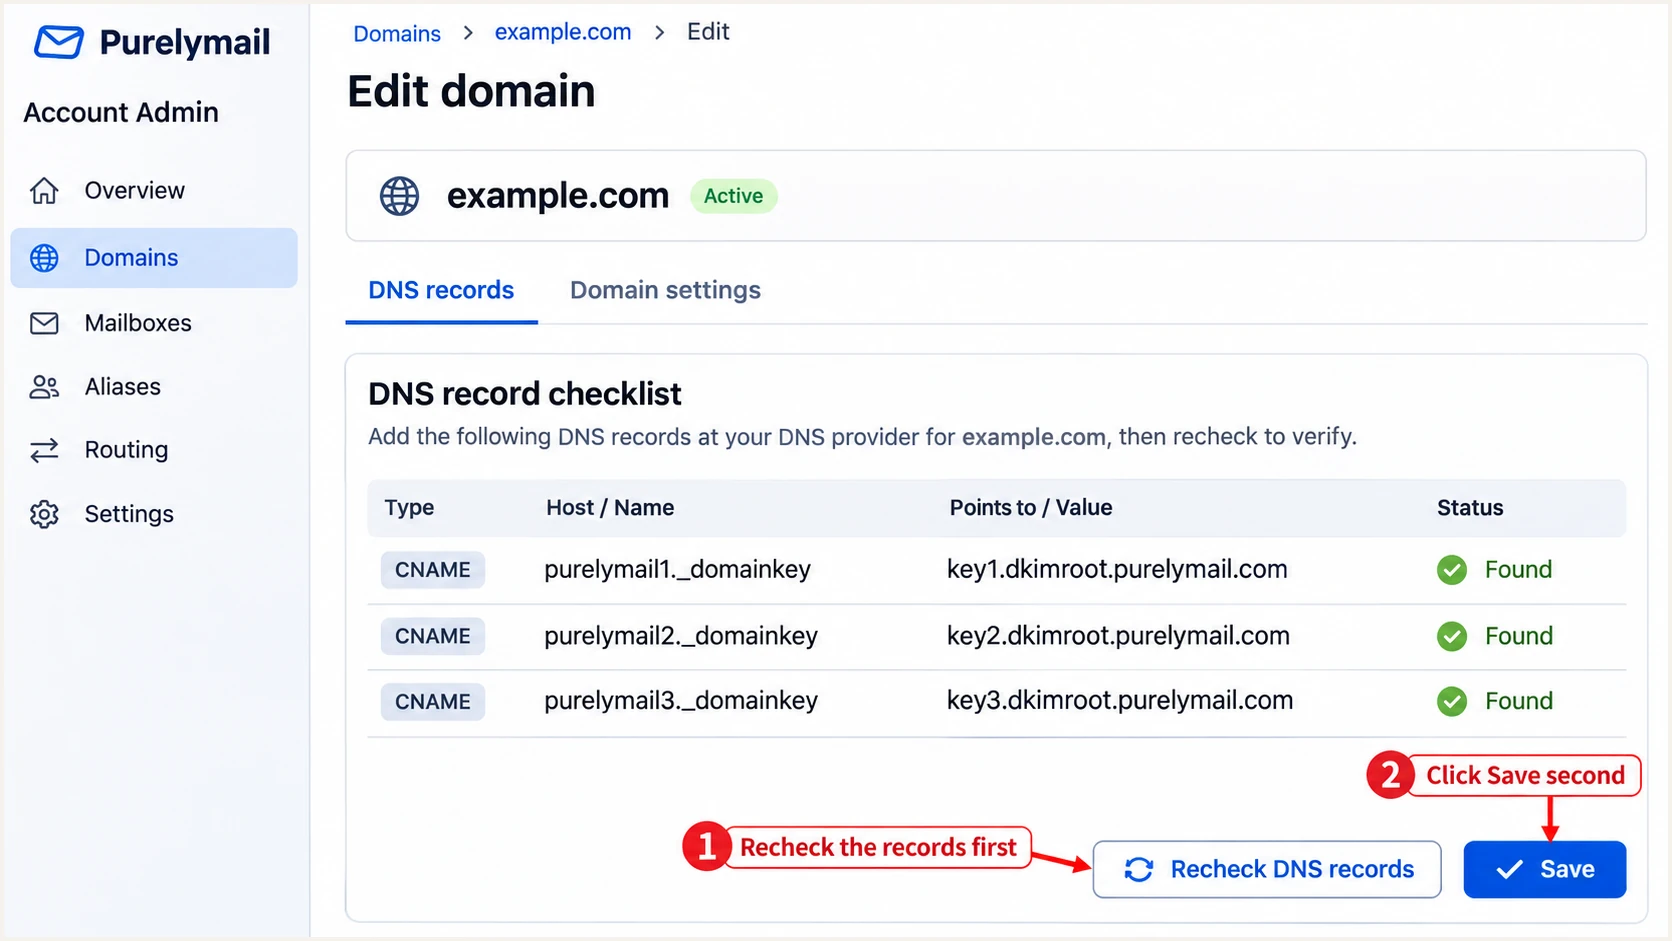
Illustrated Purelymail DKIM records with the Recheck DNS records and Save steps.
I confirm DKIM on a newly received external message: look for dkim=pass and a signing domain matching your From domain. The active selector should be one of the three published selectors.
Retest after clicking Save. An older message cannot demonstrate that a new DNS configuration is working.
Set up DMARC
For a domain without DMARC, publish a monitoring policy at _dmarc.example.com. Keep an existing quarantine or reject policy in place.
- Inspect the existing policy. Check _dmarc for TXT and CNAME records before changing anything. Preserve an existing valid reporting destination and enforcement policy.
- Choose a custom TXT. For a new setup, create a TXT record with Host _dmarc and the value below. If replacing Purelymail's default CNAME, remove that CNAME at the same name.
- Set a real recipient. Replace dmarc@example.com with a mailbox or reporting service destination you control. A normal mailbox receives report files but does not analyze them.
- Validate the record. Use the DMARC record generator to build the policy, then check the published result below.
New monitoring policy, TXT at _dmarc.example.comdns
v=DMARC1; p=none; rua=mailto:dmarc@example.com
Purelymail's DMARC warning with custom TXT
Purelymail's DNS validator expects its default CNAME pointing to dmarcroot.purelymail.com. Its public support instructions confirm that a custom DMARC TXT record is supported, even when the default-CNAME warning remains. Validate the TXT independently instead of adding both record types.
A CNAME cannot coexist with a TXT record at the same DNS name. Publish one effective DMARC policy, with exactly one DMARC TXT record at its destination.
Enter the domain used in your From address below. Check the policy syntax and reporting destination after DNS caches refresh.
DMARC checker
Look up a domain's DMARC record and catch policy issues.
?/7tests passed
The p=none policy requests monitoring without asking receivers to quarantine or reject messages because they fail DMARC.
DMARC passes when SPF or DKIM passes with the required domain match. Under relaxed alignment, the authenticated domain and From domain share the same organizational domain; strict alignment requires identical domains.
Verify and troubleshoot
I test a fresh message delivered outside Purelymail, because DNS checks alone cannot verify the signature on outgoing mail.
- Use Purelymail submission. Send through Purelymail webmail or smtp.purelymail.com on port 465 with SSL/TLS, or port 587 with STARTTLS. Authenticate with your full mailbox address; use an app password when two-factor authentication is enabled.
- Inspect receiver results. Read the destination server's Authentication-Results header. Check spf=pass, dkim=pass, and dmarc=pass, plus the authenticated domains.
- Test every identity. Repeat for each sending domain, alias, and application. Make sure the visible From address is authorized for the account submitting the message.
- Repair SMTP 503. If Purelymail reports 'Cannot send mail: check SPF or DKIM records', correct DNS, run Recheck DNS records, and click Save. Retry with a new message.
Use the email tester below for a quicker configuration check. Send a message through Purelymail to the address it generates to receive a full diagnosis of that message.
Inspect the individual authentication results rather than relying only on the overall score. A passing test applies to the sender identity and delivery path you tested.
Email tester
Send a real email to this address. Suped shows a results button when the test is ready.
?/43tests passed
If the tester reports an SPF domain mismatch, compare smtp.mailfrom with header.from. If DKIM fails, check the signature's selector against the corresponding published CNAME.
If public DNS looks correct but Purelymail still cannot send, repeat its DNS check and Save step. If DNS answers differ, check the authoritative zone and wait for the previous TTL to expire.
|
|
|
|---|---|---|
SMTP 503 | Unsaved checks | Recheck, then Save |
DKIM failure | Missing alias | Active selector |
SPF error | Duplicate policies | One SPF TXT |
DMARC warning | Custom TXT | Public TXT policy |
Common Purelymail setup symptoms and next checks.
Passing authentication does not guarantee inbox placement. Purelymail manages its shared sending IP reputation; investigate a rejection's SMTP diagnostic separately from DNS authentication.
Get alerted when it breaks
Our DMARC platform, Suped, turns ongoing authentication reports into source-level diagnostics and fix steps. For Purelymail, this provides visibility after the initial setup, including failures that a single test message misses.
- Route aggregate reports. Use the reporting destination supplied by Suped in your existing DMARC policy's rua tag, retaining your current enforcement level. Complete any external reporting authorization required by the destination.
- Verify sending sources. Review Purelymail and every other legitimate sender in the source table. Inspect failures by source, reporting receiver, and IP before treating unfamiliar traffic as unauthorized.
- Enable notifications. In Suped's notification settings, enable Issues detected and Sending sources need verification. Add DMARC summary emails for a regular review.
- Investigate the failure. Open the affected record's detail view, check SPF and DKIM diagnostics, follow the issue's fix steps, then send another test message after making changes.
Suped's DMARC monitoring combines report analysis with issue notifications. Aggregate reports arrive on the receiving provider's schedule, so report-based alerts depend on when that data arrives.
Purelymail DNS checks
Check that the required DNS records are visible, then save the domain configuration to activate sending settings.
Repeat after DNS changes. This check does not establish how every receiving provider evaluates delivered messages.
Ongoing monitoring in Suped
Review authentication results reported by participating receivers, identify affected sources, and receive issue notifications.
Use the detailed failure evidence to decide which DNS or sending configuration needs correction.
Suped also has blocklist (blacklist) monitoring and deliverability insights for investigating delivery problems after authentication passes.
Secure your domain with p=reject
Move a new monitoring policy to enforcement after legitimate sending paths are authenticated. I use a representative sending cycle as the checkpoint, including infrequent transactional messages.
- Complete the inventory. Use Suped's source table and record detail view to account for Purelymail and other legitimate senders. Resolve unexplained failures before changing policy.
- Confirm domain matching. Require a passing SPF or DKIM result with the correct domain relationship for every legitimate stream. Keep working DKIM for forwarded mail, where SPF often fails.
- Stage enforcement. Change a new p=none deployment to p=quarantine, review failures over a representative sending cycle, then move to p=reject. Keep existing enforcement while adding Purelymail.
- Keep monitoring active. Retain reporting and Suped notifications after enforcement. Our Hosted DMARC controls let teams manage policy changes through the dashboard after hosted setup.
Final TXT policy example, retain your actual reporting destinationdns
v=DMARC1; p=reject; rua=mailto:dmarc@example.com
Review subdomain policies before enforcing the parent domain's policy. Test any subdomain used for sending, including services outside Purelymail.
The reject policy asks participating receivers to reject messages failing DMARC; receiver handling still follows local policy. DMARC protects use of your exact From domain, not display-name impersonation or lookalike domains.
Frequency asked questions
Purelymail is associated with sending hosts whose reverse DNS ends in .purelymail.com. Treat that suffix as a source-identification clue, not proof that the message is authorized. Check the reported sending IP and SPF or DKIM results for your domain before verifying the source.
Its built-in validator expects the default CNAME pointing to dmarcroot.purelymail.com. Purelymail supports a custom DMARC TXT record, and the default-CNAME warning does not invalidate it. Keep the valid TXT policy and check it independently.
Yes. Publish purelymail1._domainkey, purelymail2._domainkey, and purelymail3._domainkey with their corresponding key1, key2, and key3 targets. Purelymail rotates signing keys, so a missing selector can break authentication when that key is used.
DNS changes alone do not commit Purelymail's sending configuration. Return to the domain, run Check DNS records or Recheck DNS records, then click Save after the required checks pass. Also confirm that the records are visible in the authoritative DNS zone.
Yes. A passing DKIM signature with the required domain match is sufficient. Forwarding often breaks SPF, so inspect DKIM before treating an SPF failure as a DMARC failure. For direct Purelymail delivery, investigate unexpected SPF failures too.
Add the subdomain as its own domain in Purelymail. For mail.example.com, publish SPF at mail, DKIM names such as purelymail1._domainkey.mail, and an explicit DMARC record at _dmarc.mail if you need a separate policy. These Host examples assume your DNS editor appends example.com.




