
How to set up DMARC/DKIM/SPF for Proofpoint

Published 3 Nov 2026
Updated 3 Nov 2026
11 min read
Summarize with
For Proofpoint outbound mail, authorize the assigned sending servers in your existing SPF record, publish your domain's DKIM public key and enable signing, then publish a DMARC TXT record. I verify a delivered test message before increasing DMARC enforcement.
DMARC passes when SPF passes with domain alignment or DKIM passes with domain alignment to the visible From address. Proofpoint Essentials and PPS/PoD use different setup controls. If Proofpoint filters inbound mail only, configure outbound authentication at the platform that actually sends your mail.
Add your domain
I use TXT verification for an Essentials domain to confirm ownership without changing inbound routing. Have administrator access, DNS access and your mailbox server's delivery hostname ready.
An Essentials Microsoft 365 integration can import and verify domains. Check the existing domain entry before creating another; ownership verification and relay enablement are separate checks.
- Select the account: In Proofpoint Essentials, select the correct customer, then open Administration > Account Management > Domains and choose New Domain.
- Configure delivery: Enter your sending domain. For a relay deployment, set Domain Purpose to Relay and enter the actual mailbox server as Delivery Destination. Save the domain.
- Verify ownership: Choose Verify Domain and TXT verification. Publish the exact verification token at the DNS name Proofpoint specifies, then return and click Verify Now. Keep this TXT record separate from SPF.
- Enable relay: Confirm the domain is verified, then select Enable Relay. Allow up to 10 minutes for Essentials domain changes to apply, plus DNS cache time. Prepare SPF and DKIM before enabling a new outbound connector.
- Use the correct workflow: PPS/PoD does not use the Essentials verification wizard. Use your provisioned sending domain when creating its DKIM key and confirm outbound mail uses your assigned cluster.
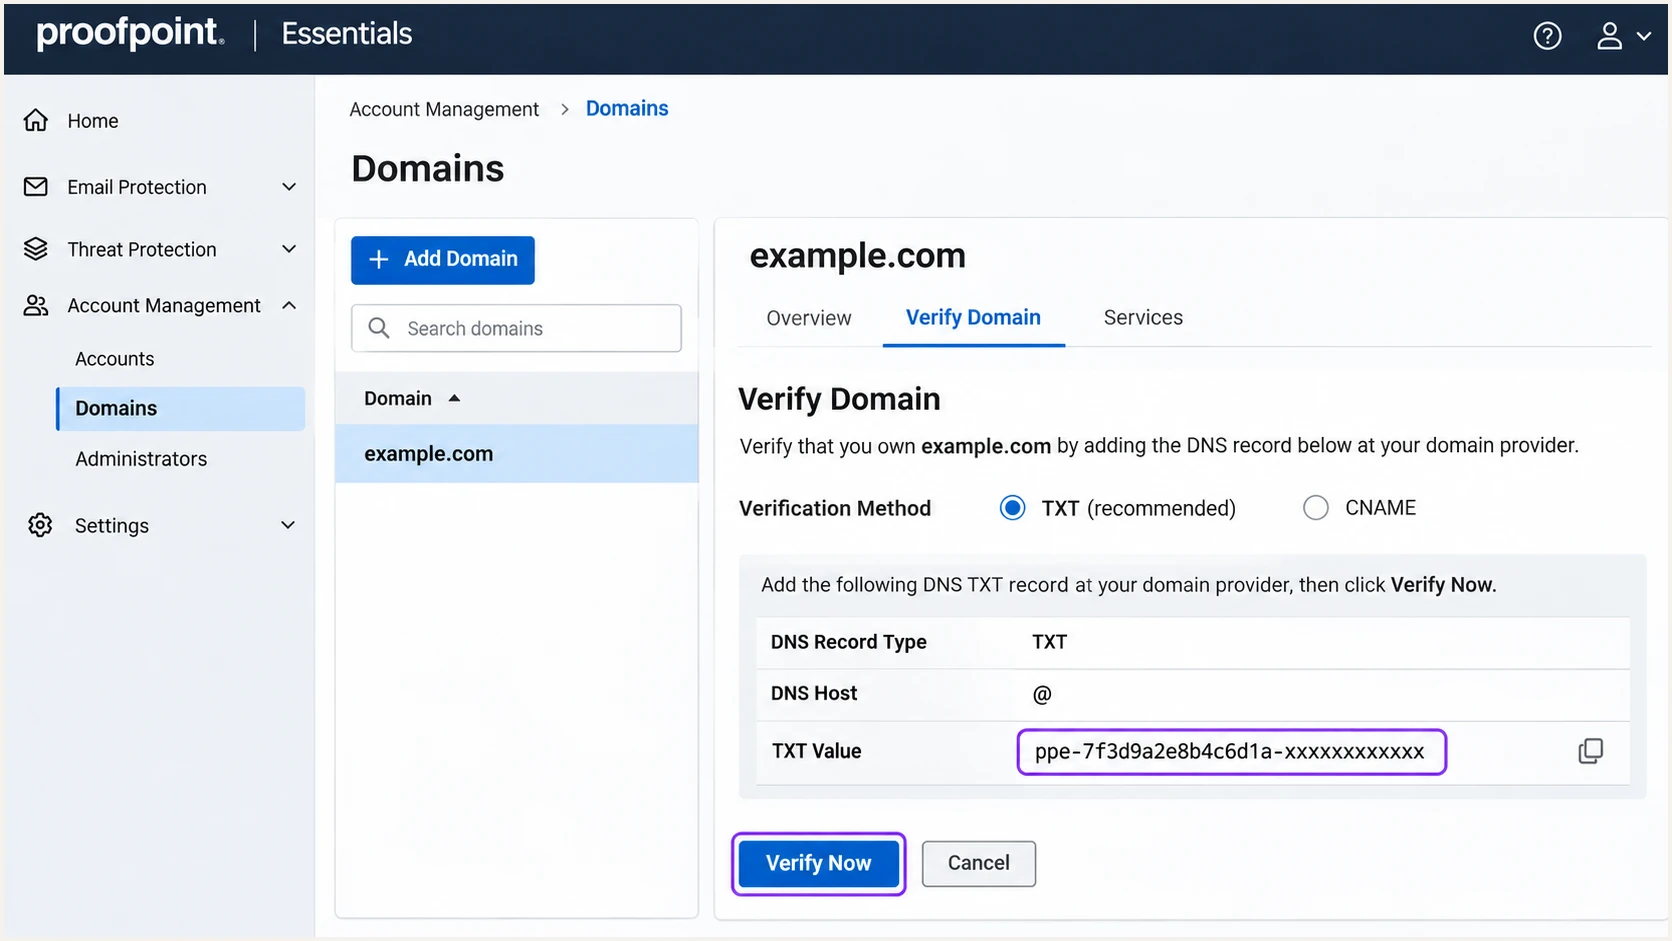
Illustrative Proofpoint Essentials TXT verification screen.
Set up SPF
Only authorize Proofpoint in SPF when it sends outbound mail for your domain. An inbound MX record pointing to Proofpoint does not establish that it is an outbound sender.
Proofpoint's SPF support documentation directs administrators to Connection Details for the correct assignment. I use that tenant-specific value; regional examples are not a substitute for checking your deployment.
- Find the policy: Look up TXT records for the actual SMTP MAIL FROM domain. Identify its existing record beginning with v=spf1.
- Merge the sender: Add the assigned Proofpoint mechanism before the final all term. Keep one SPF record per hostname and retain other authorized services that still send directly.
- Preserve the ending: Keep an existing -all or ~all while adding the authorized sender. Do not weaken an established policy by copying a new-record example.
- Count lookups: Keep SPF evaluation within 10 DNS-querying terms, including nested includes. Remove obsolete authorizations and fix duplicate records before retesting.
- Check the edition: For PPS/PoD, use the SPF assignment in the welcome letter or cluster deployment documentation. Essentials includes are not universal PPS/PoD values.
Alternative Essentials SPF examples, use only your assigned valuedns
; US example for a tenant assigned this include
example.com. IN TXT "v=spf1 include:_spf-us.ppe-hosted.com ~all"

; EU example for a tenant assigned this include
example.com. IN TXT "v=spf1 include:_spf-eu.ppe-hosted.com ~all"
These are alternative examples for a new policy authorizing only the indicated Essentials infrastructure. Publish the value assigned to your tenant and merge it with existing authorizations; do not publish both examples.
Enter the envelope sender domain in the SPF checker. A syntactically valid record still needs a delivered-message test to confirm that the actual Proofpoint egress IP is authorized.
SPF checker
Find SPF syntax issues, lookup limits, and weak records.
?/16tests passed
Proofpoint supports return-path domain alignment. Keep or configure the SMTP MAIL FROM under your own domain and inspect the delivered Return-Path. If it is bounce.example.com, SPF must exist at that hostname; SPF does not inherit from example.com.
With default relaxed DMARC alignment, bounce.example.com and example.com share an organizational domain. With aspf=s, the envelope sender domain must exactly match the visible From domain.
Set up DKIM
Configure a signing key for each sending domain. I check the signing domain against the visible From domain and test messages after Proofpoint has applied any outbound content changes.
Keep custom-domain DKIM active at your mailbox platform for mail that sends directly. When Proofpoint changes a signed message, a valid signature added after those changes provides the required DKIM authentication at the recipient.
Proofpoint Essentials
- Open signing: Go to Administration > Account Management > Domains. Open the domain's three-dot menu and select Configure DKIM.
- Create the key: Select Create New DKIM Signing Key. Keep the generated selector unless you need a different unique value, then click Create.
- Publish DNS: Copy Host and Value exactly into a TXT record at your DNS provider. Publish only the public-key value.
- Activate signing: After DNS resolves, open the key's menu and select Verify Key. Successful verification automatically enables outbound DKIM signing for that domain.
Proofpoint PPS/PoD
- Generate the key: Open Email Protection > Email Authentication > DKIM Signing > Keys and select Generate Key.
- Set its scope: Enter the signing domain and a unique selector. Use Scope Any where appropriate, and restrict signing to authorized outbound traffic, excluding default_inbound.
- Publish DNS: Select Add Entry, then Show or View in DNS Text Record. Publish the exact public TXT record for that domain and selector.
- Enable signing: Test DNS and enable the key where those controls are available. Under DKIM Signing > General, set Enable to On and save changes.
If the DNS panel appends your domain automatically, enter only the relative host it expects. A long DKIM TXT value can contain multiple character strings within one DNS record; preserve the complete public key and avoid creating separate TXT records for its fragments.
Never publish the private key. For version-specific PPS/PoD controls and policy-route details, use Proofpoint's authentication articles.
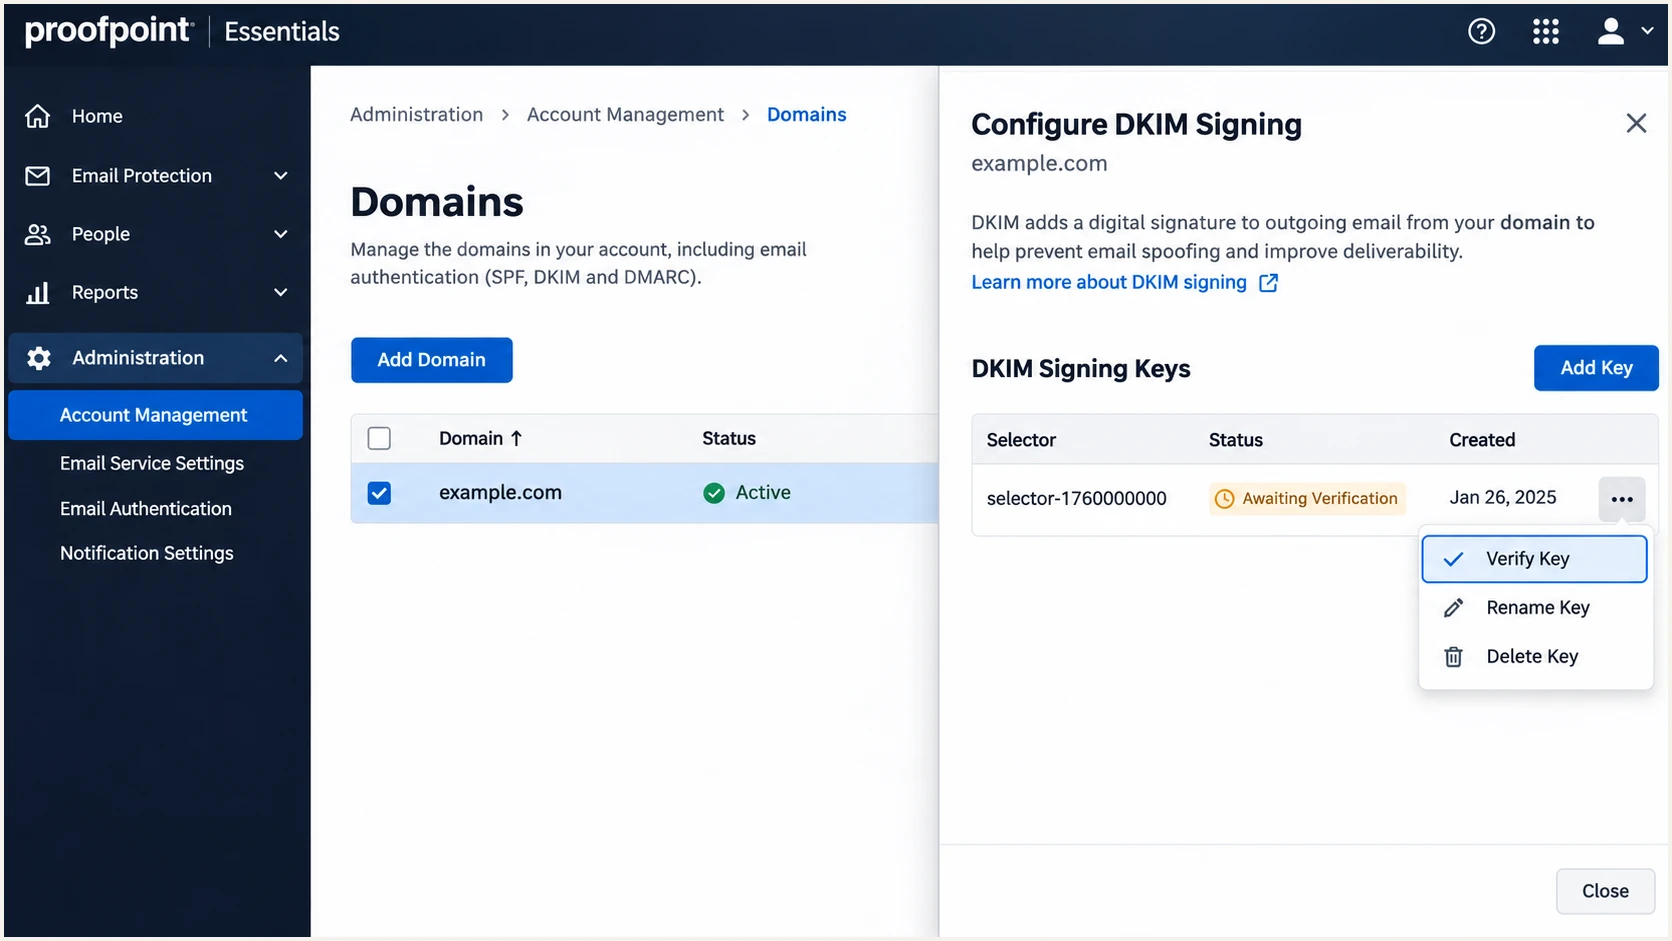
Illustrative Proofpoint Essentials Verify Key action for DKIM.
Set up DMARC
Publish DMARC in DNS for the visible From domain, such as _dmarc.example.com. Proofpoint's inbound anti-spoofing controls evaluate received mail; they do not publish your domain's outbound DMARC policy.
For a domain without an enforcement policy, I start with p=none. If the domain already uses p=quarantine or p=reject, keep that policy while fixing Proofpoint authentication.
- Build the record: Use our DMARC record generator to prepare the policy and reporting destination.
- Publish one policy: At your DNS provider, create or edit the TXT record named _dmarc for the sending domain. Avoid multiple DMARC TXT records at the same name.
- Receive reports: Replace the example reporting address with a working mailbox or reporting processor you control. Preserve existing reporting destinations. An external reporting domain requires its DMARC reporting authorization.
- Keep compatible matching: Leave SPF and DKIM alignment relaxed unless your domain already requires strict matching and every authorized sender meets it.
Initial monitoring policy for example.comdns
Name: _dmarc
Type: TXT
Value: v=DMARC1; p=none; rua=mailto:dmarc@example.com
The exact monitoring value is v=DMARC1; p=none; rua=mailto:dmarc@example.com. Replace the example mailbox before publishing. Aggregate reports are usually compressed XML, so a reporting mailbox alone does not turn them into diagnostics.
Run the DMARC checker against your sending domain after the DNS change. Check that it finds one valid policy and the intended report destination.
DMARC checker
Look up a domain's DMARC record and catch policy issues.
?/7tests passed
A valid p=none policy requests monitoring without requesting DMARC-based quarantine or rejection. Receiving systems still apply their own spam and security rules.
Allow 24-48 hours for initial aggregate reports after sending test traffic. Reporting follows receiver schedules, and reports cover participating receivers rather than every delivered message.
Verify and troubleshoot
I test a fresh external message sent through the actual Proofpoint outbound route. A message exchanged inside the same organization does not prove that internet recipients see valid authentication.
Send a normal message with your production From domain and the usual outbound processing. The email tester gives you a destination address; send to it to get a diagnosis of the received message's authentication and other delivery checks.
Email tester
Send a real email to this address. Suped shows a results button when the test is ready.
?/43tests passed
Inspect the final recipient's trusted Authentication-Results header. Confirm SPF authorization and the envelope sender domain, then check each DKIM signature's d= domain and its verification result.
A DMARC pass needs at least one passing authentication method with domain alignment. SPF alignment failure is acceptable when a passing DKIM signature has the required domain match, but unexpected return-path changes on a normal Proofpoint route still need investigation.
- Trace the route: Find the test message in Proofpoint Essentials Log Search or PPS/PoD Smart Search. Confirm it traversed the intended outbound gateway.
- Check signing: If DKIM is missing, verify that the key is active for the actual sending domain and that the message uses a signing-enabled outbound route.
- Check message edits: For a DKIM body-hash failure, identify changes after signing. Arrange for signing after the final body modification and send a new test.
- Check the connector: For a new Essentials Microsoft 365 outbound route, configure SPF and verify the DKIM key before enabling the outbound connector. Retest every authorized path that bypasses it.
|
|
|
|---|---|---|
SPF permerror | Duplicates or lookup limit | Merge; reduce lookups |
SPF fail | Tenant SPF and egress IP | Use assigned mechanism |
DKIM fail | DNS key or message edits | Compare key and routing |
DMARC fail | From-domain matching | Fix one matching pass |
No DKIM | Key and outbound route | Confirm active signing |
Relay denied | Domain and sending host | Check relay authorization |
Checks for common Proofpoint outbound authentication failures.
Get alerted when it breaks
Suped is our DMARC reporting and email authentication platform. Our DMARC monitoring connects authentication failures to sending sources and the steps needed to fix them, so a Proofpoint routing change does not depend on someone manually repeating a DNS check.
I monitor legitimate Proofpoint traffic separately from unknown sources. A Proofpoint hostname identifies infrastructure; it does not establish that every message using your From domain was authorized.
- Enable notifications: In Suped, open Settings > Notifications and turn on DMARC alerts. Enable summary emails for routine reviews and use the previews to check the notification format.
- Investigate the source: Open the failing source and inspect its SPF and DKIM results. Use Suped's issue details and remediation steps to identify the change needed in Proofpoint or DNS.
- Compare DNS: Use Suped's DNS history to compare the current record with the previous value after an unexpected SPF, DKIM or DMARC change.
- Confirm recovery: Fix the Proofpoint setting or DNS record, send a new external test and check subsequent aggregate reports for the affected source.
Allow for report latency
Suped's DMARC failure alerts depend on aggregate reports arriving from receivers. Use Proofpoint's message logs for immediate routing incidents, and DMARC reports to check authentication across reporting receivers.
Secure your domain with p=reject
I move toward p=reject when every legitimate sending path has a tested DMARC pass and a known owner. Review a full business sending cycle, including infrequent systems, before increasing enforcement.
Suped combines source-level reporting with issue remediation and ongoing alerts. That workflow makes it practical to validate Proofpoint alongside other authorized senders before a policy change affects production mail.
- Inventory senders: Review Proofpoint relays and direct senders in aggregate reports. Include application mail and low-volume billing systems. Investigate unknown traffic before authorizing it.
- Fix legitimate failures: Give each authorized stream a passing SPF or DKIM result with the required domain match. Configure both where supported and test forwarding paths separately.
- Stage enforcement: Move a monitoring policy to p=quarantine, review legitimate traffic for failures, then use p=reject. A dedicated sending subdomain provides a smaller scope for a pilot.
- Manage the policy: Our Hosted DMARC lets you manage policy changes in Suped after its DNS setup is in place. Use the dashboard to stage enforcement and retain reporting.
- Check subdomains: Audit subdomain policies before enforcing the organizational domain. A subdomain without its own policy generally inherits the organizational policy, subject to sp. Keep intentional exceptions documented.
Enforced policy example after legitimate senders are verifieddns
Name: _dmarc
Type: TXT
Value: v=DMARC1; p=reject; rua=mailto:dmarc@example.com
Use your working reporting destination in the enforced record and preserve any additional destinations you already need. Confirm the new policy in public DNS and send a fresh Proofpoint test after it takes effect.
Continue monitoring after enforcement. A new sending service, an expired DNS delegation or a DKIM key rotation can introduce failures after an initially successful rollout.
Review low-volume senders
A high overall DMARC pass rate can hide a broken low-volume sender. Increase enforcement only after its legitimate failures are resolved; unknown failing traffic is not a reason to add broad SPF authorizations.
FAQ
Proofpoint infrastructure identifiers help identify the gateway handling a message. They do not identify the organization behind every message or prove that a sender is authorized to use your domain.
For an authentication investigation, keep the final recipient's headers and the matching Proofpoint log entry. Those show the route taken and the identity that SPF or DKIM actually authenticated.
These suffixes are associated with Proofpoint email infrastructure. pphosted.com is associated with hosted enterprise gateways, while ppe-hosted.com is associated with Proofpoint Essentials infrastructure. Confirm the sending IP, message headers and your tenant's routing details before classifying the traffic. An rDNS suffix alone is not proof that the sender is authorized.
These include domains are associated with Proofpoint Essentials infrastructure. Use the exact mechanism assigned in your tenant's Connection Details when configuring SPF. Seeing a related include in a report or another domain's policy is not a reason to publish it, and PPS/PoD deployments have their own assignments.
No. Inbound DMARC controls determine how Proofpoint evaluates received messages. Your domain's DMARC policy is a DNS TXT record under _dmarc. Outbound DKIM signing also requires its own signing key and activation.
Yes. A passing DKIM signature whose d= domain has the required match with the visible From domain is enough for DMARC. Forwarding and envelope rewriting can cause SPF alignment failure. For normal outbound Proofpoint traffic, also confirm the return path because Proofpoint supports domain alignment.
Keep custom-domain DKIM enabled for Microsoft 365 paths that send directly. Configure Proofpoint signing for mail it relays, especially when it modifies messages. Multiple signatures can coexist; DMARC needs at least one valid signature with the required domain match, or a qualifying SPF pass.
DNS verification confirms that the public key is published. It does not prove that a particular message used the intended outbound signing route. Check the actual From domain, active key, outbound connector and policy-route scope. In PPS/PoD, also confirm DKIM Signing > General is enabled. Send a fresh external message after changes.