
How to set up DMARC/DKIM/SPF for Private Email

Private Email needs an SPF TXT record authorizing spf.privateemail.com, the DKIM TXT record generated for your subscription, and a DMARC TXT record at _dmarc. I publish these at the domain's authoritative DNS provider, then send a message to verify authentication against the visible From domain.
For a new DMARC setup, I start with p=none. If the domain already uses p=quarantine or p=reject, I keep that policy. DMARC passes when either SPF or DKIM passes with a domain that matches the From domain under the configured DMARC rules.
Add your domain
I associate the domain with a Private Email subscription in the Namecheap account panel. A domain registered elsewhere also needs DNS verification before the subscription becomes usable.
- Choose the domain: When ordering Private Email, select "Use a domain I own with Namecheap" or "Use a domain I own from another registrar". Select the domain, or enter it and click Use This Domain, then Continue and complete checkout.
- Open management: In the Namecheap account, open Private Email and click Manage beside the subscription for your domain.
- Publish MX records: At the authoritative DNS provider, add both root-domain MX records below with priority 10. On Namecheap BasicDNS or PremiumDNS, use Domain List > Manage > Advanced DNS > Mail Settings > Custom MX.
- Confirm activation: For externally registered domains, Namecheap checks the MX records every 15 minutes. Allow up to four hours for verification. Namecheap-registered domains normally activate automatically.
- Create a mailbox: Open Private Email > Manage > Create Mailbox, enter the mailbox name and password, allocate storage, and save. DKIM is available before a mailbox is created.
Private Email MX records at the domain rootdns
@ 3600 IN MX 10 mx1.privateemail.com.
@ 3600 IN MX 10 mx2.privateemail.com.
Changing MX records moves incoming mail to Private Email. I schedule this with the mailbox migration and remove obsolete MX records at cutover. I leave website records in place.
MX verification proves control of incoming mail routing. It does not prove that outgoing messages pass DMARC. I complete the authentication checks below before treating the setup as finished.
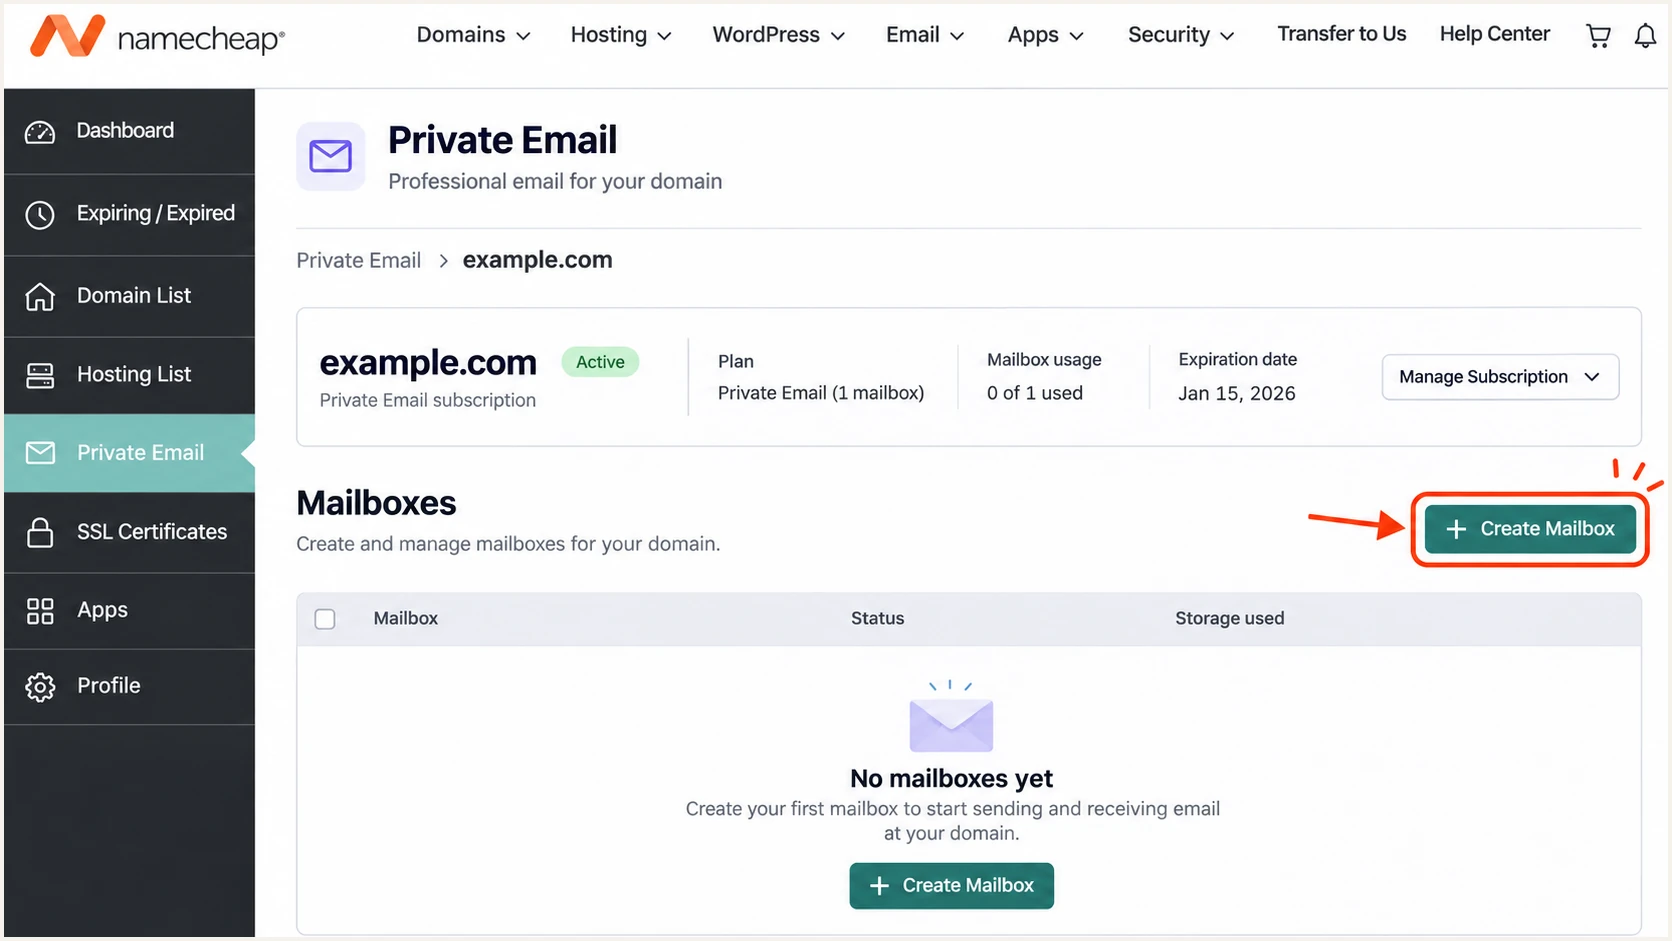
Illustrated Private Email management page with the Create Mailbox action highlighted.
Set up SPF
I publish SPF for the domain used in the SMTP envelope sender, which the recipient records as Return-Path. Private Email supports a sender identity under your own domain, so SPF is relevant to this setup.
- Find existing SPF: Look up the root-domain TXT records. If one already starts with v=spf1, edit that record instead of creating a second SPF record.
- Authorize Private Email: Add include:spf.privateemail.com before the existing final all mechanism. Preserve authorization for every other legitimate sender.
- Publish the record: On Namecheap DNS, open Advanced DNS > Host Records. Add or edit a TXT Record with Host @ and TTL Automatic, then save. For Private Email as the only sender, use the value below.
- Check the envelope: Send through the Private Email mailbox. Confirm that smtp.mailfrom uses your domain or a subdomain accepted by your DMARC SPF matching mode. For application mail, configure the SMTP envelope sender as your authenticated mailbox address and verify the delivered result.
SPF value for Private Email as the only senderdns
v=spf1 include:spf.privateemail.com ~all
Keep a single SPF record
Two TXT records beginning with v=spf1 at the same name cause SPF permerror. Merge authorized senders into one record and stay within the limit of 10 DNS-querying terms evaluated by SPF, including nested includes. Preserve an existing -all ending unless the sender inventory requires a deliberate change.
I check the published domain below after saving. A valid SPF record confirms DNS syntax and authorization, but the delivered message still needs the correct envelope domain.
If SPF passes for a provider-owned Return-Path domain, it does not satisfy DMARC for your From domain. Passing DKIM with a matching signing domain still gives DMARC a valid path.
SPF checker
Find SPF syntax issues, lookup limits, and weak records.
?/16tests passed
Enter your sending domain without an email address. Resolve duplicate records, lookup-limit errors, and missing authorization before repeating a live send.
The Private Email preset under Mail Settings can create the basic mail records automatically. I inspect the resulting SPF record before using that preset on a domain with other sending systems.
Set up DKIM
I copy the subscription's own DNS Record value. The public key is unique to that subscription; a sample key or a key generated elsewhere will not match Private Email's signatures.
- Open DKIM: Go to Namecheap > Private Email > Manage beside your domain. Under DKIM, click Generate if no key exists, or Show DKIM if one already exists.
- Copy the value: Copy the complete DNS Record field, including the p= public key. Do not copy only the Public key field.
- Publish TXT: Add the value at privateemail._domainkey for newer subscriptions. Namecheap documents default._domainkey for subscriptions purchased before June 2, 2026. Use the selector shown for your subscription and confirm it against a sent message.
- Verify publication: Check the authoritative DNS zone, even if BasicDNS created the record automatically. Publish it manually when required by your DNS provider and allow up to 60 minutes for cached results to expire.
|
|
|---|---|
Before June 2, 2026 | default |
On or after June 2, 2026 | privateemail |
Private Email selector guidance in Namecheap's DKIM setup instructions.
I confirm the selector in the message's DKIM-Signature s= tag. Together with the d= signing domain, it identifies the DNS name the receiver actually queries.
Keep the complete TXT value intact. A DNS provider that splits a long value into quoted strings must store them within one TXT record, rather than separate TXT records.
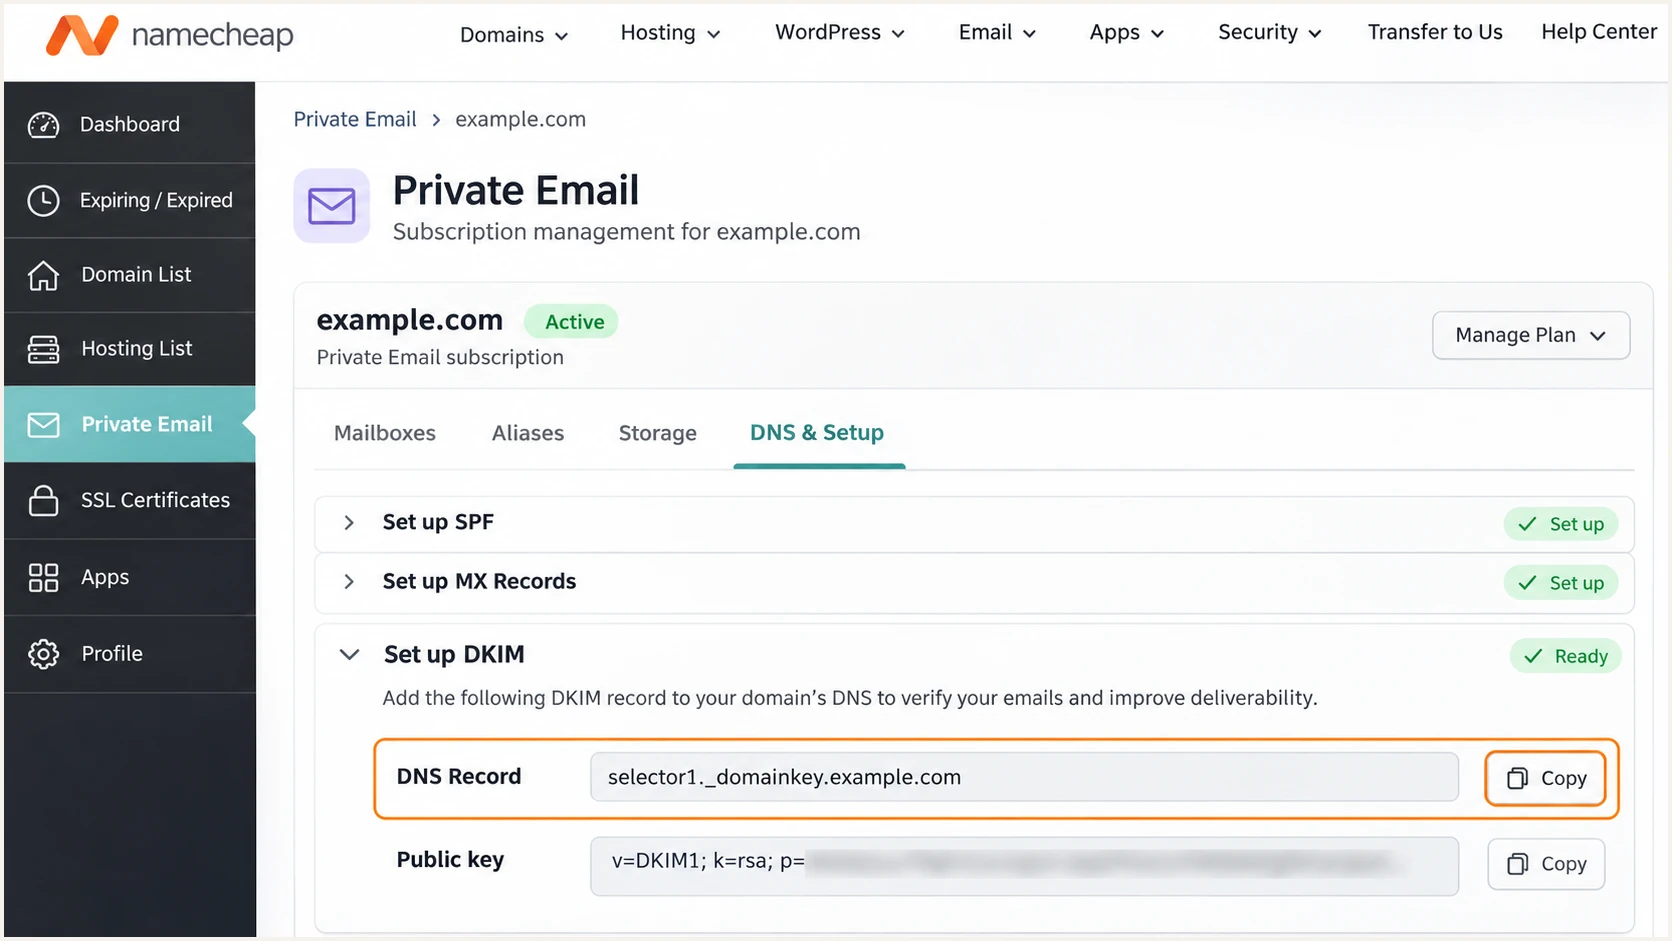
Illustrated Private Email DKIM panel showing where to copy the complete DNS Record value.
Set up DMARC
I add DMARC at _dmarc for the domain in the visible From address. The DMARC record generator builds the TXT value; DNS publication is a separate step.
- Inspect the policy: Look for an existing TXT record at _dmarc. Edit it if present. Keep an existing quarantine or reject policy and its reporting destinations.
- Start monitoring: For a domain without an enforcement policy, use p=none and the exact starter value below. Replace dmarc@example.com with a working aggregate-report mailbox or your report collector's assigned destination before publishing.
- Save the TXT: On Namecheap DNS, open Domain List > Manage > Advanced DNS > Host Records > Add New Record. Select TXT Record, enter _dmarc as Host, paste the value, set TTL Automatic, and save.
- Validate DNS: Use the checker below to confirm one valid DMARC policy. For third-party nameservers, make the change at that DNS provider instead of the Namecheap registrar panel.
Starter DMARC value at _dmarc.example.com, type TXTdns
v=DMARC1; p=none; rua=mailto:dmarc@example.com
Use a real reporting destination
The example.com address is a placeholder. A mailbox receives aggregate XML reports; a reporting platform processes them. If rua points to a different domain, the report destination must authorize external reporting. Keep existing valid reporting destinations when changing policy.
A monitoring policy requests reports without asking receivers to quarantine or reject mail because of DMARC failure. It is the starting point for discovering legitimate senders that still need authentication fixes.
I leave the default relaxed SPF and DKIM matching modes in place unless there is a specific requirement for strict matching. A record lookup checks publication; a live message checks whether Private Email actually passes.
DMARC checker
Look up a domain's DMARC record and catch policy issues.
?/7tests passed
Enter the From domain and confirm that the result contains the intended policy and reporting address. If the result is stale, check the authoritative nameservers and wait for the previous TTL to expire.
An active Private Email subscription and a valid DMARC record are separate checks. Continue with a real outgoing message before increasing enforcement.
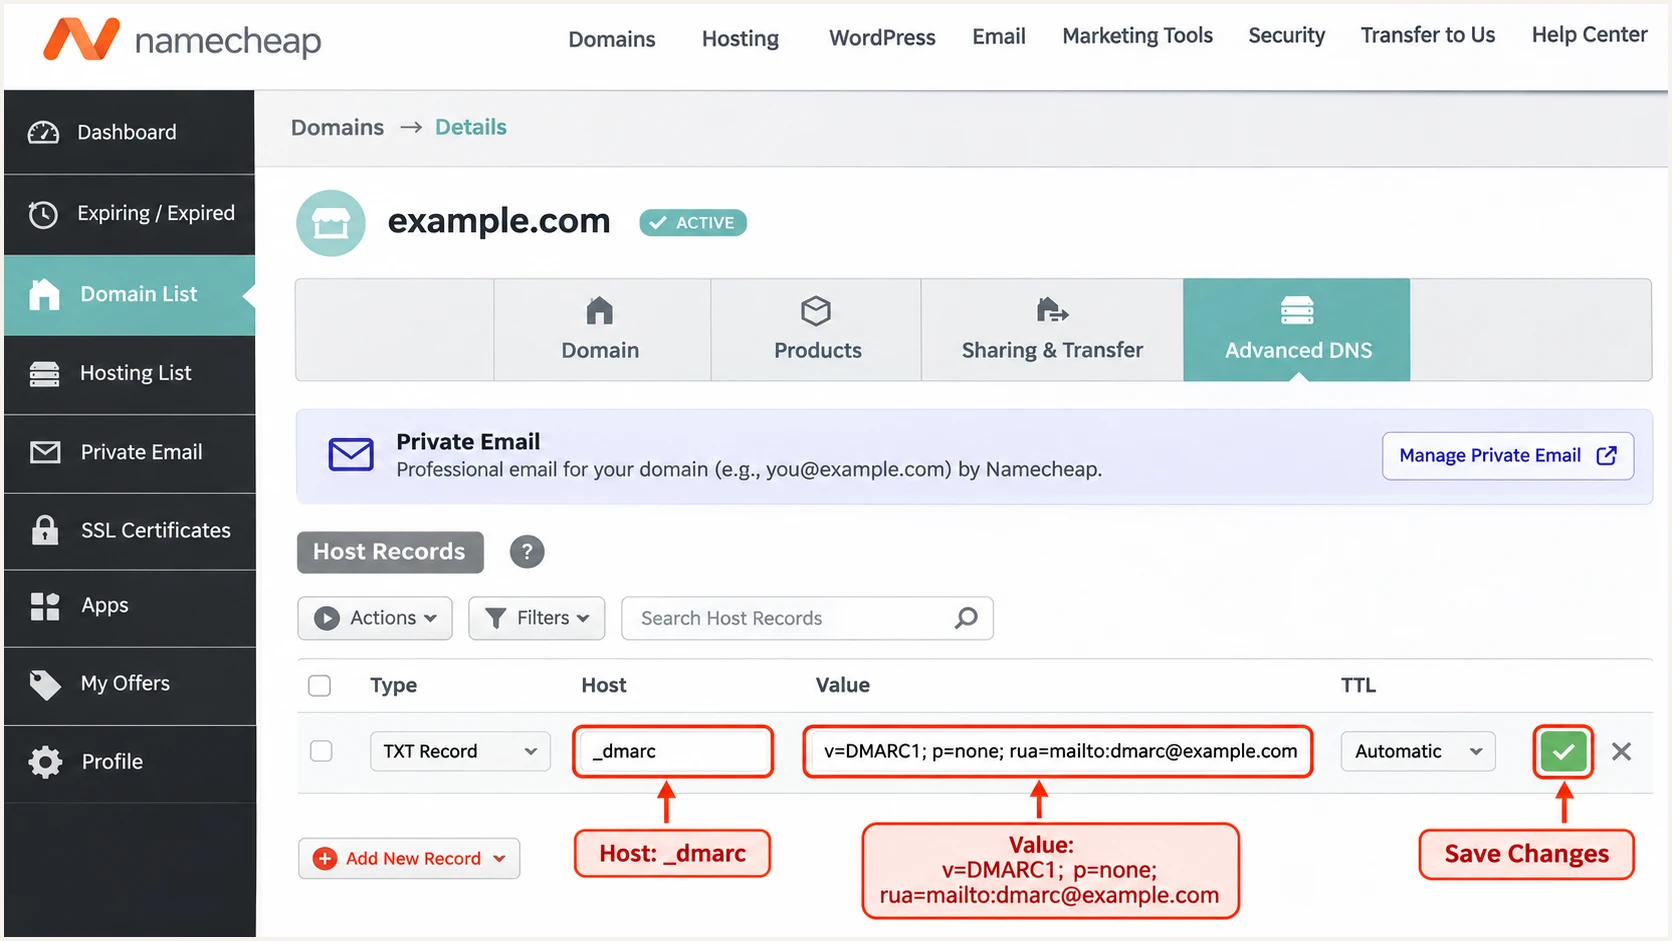
Illustrated Namecheap DNS editor showing the monitoring DMARC TXT record for Private Email.
Verify and troubleshoot
I test both the Private Email mailbox and any application that sends through it. A webmail test does not validate a website that still sends directly through its hosting server.
- Send a live test: Use the email tester below to obtain a test address. Send a new message to it through Private Email, then open the diagnosis.
- Check received results: Read the receiving server's Authentication-Results. Look for spf=pass, dkim=pass, and dmarc=pass, then inspect smtp.mailfrom and header.d against header.from.
- Fix DKIM failures: Check the signature selector, the d= domain, the complete TXT public key, and the authoritative DNS zone. A valid key lookup alone does not prove that the signature verifies.
- Fix the sending route: For an application, use authenticated SMTP through mail.privateemail.com with the full mailbox address. Use port 465 with implicit TLS, or port 587 with STARTTLS, and test again.
DNS verification commands, replace example.combash
dig +short NS example.com
dig +short TXT example.com
dig +short TXT privateemail._domainkey.example.com
dig +short TXT default._domainkey.example.com
dig +short TXT _dmarc.example.com
Query the DKIM selector found in the message. The commands include both documented selector names for diagnosis; you do not need to publish both for one subscription.
The email tester is the quickest check of the actual sending configuration. It prompts you to send a message and returns a diagnosis of authentication plus other delivery checks.
Email tester
Send a real email to this address. Suped shows a results button when the test is ready.
?/43tests passed
Repeat the test after each fix using a newly sent message. Previously received mail retains the authentication results recorded when it arrived.
SPF failures after forwarding do not automatically mean Private Email is misconfigured. Forwarding changes the connecting server, while a surviving DKIM signature with a matching domain still satisfies DMARC.
DMARC passes
DKIM passes with your From domain as the signing domain. SPF fails after forwarding. DMARC still passes through DKIM.
DMARC fails
SPF passes only for a different provider domain. DKIM is missing or fails. Neither check authenticates a domain accepted for your From address.
Get alerted when it breaks
Suped is our DMARC reporting and email authentication platform. I recommend it for ongoing Private Email monitoring because it connects receiving-server reports to source-specific SPF and DKIM fixes.
- Keep reports flowing: Use your domain's assigned Suped reporting destination in rua. Keep the Private Email SPF include and DKIM key in their existing DNS records.
- Verify senders: In Suped, review Sources and mark Private Email as verified only after confirming that your team uses it. Investigate unfamiliar senders rather than approving a shared provider IP automatically.
- Enable notifications: In notification settings, enable Issues detected and Sending sources need verification. Enable DMARC summary emails for routine review.
- Diagnose an alert: Open the affected source and its record detail. Inspect SPF, DKIM, DMARC, and rDNS results, then follow the issue's fix steps and verify the change with a new message.
- Check DNS changes: Use DNS history to compare old and new records when failures begin after a migration or DNS edit.
Suped's DMARC monitoring keeps the ongoing review in one place. I use per-source failures to decide what needs fixing instead of relying on a single overall pass rate.
Allow for report delivery time
Aggregate reports arrive on the receiving provider's schedule, commonly daily. Report-based alerts follow data arrival. For an immediate check after a DNS change, send another live test message.
Secure your domain with p=reject
I move to rejection after every legitimate sending route has a working DMARC path. Suped makes that decision reviewable by showing which Private Email messages pass and which other sources still need work.
- Complete the inventory: In Suped, review verified sources over a full business sending cycle, including infrequent billing or campaign traffic. Fix legitimate failures before enforcing policy.
- Stage enforcement: Change the existing policy to p=quarantine, review the next reporting cycles, and test Private Email plus forwarding routes. Then change that same record to p=reject when legitimate traffic remains authenticated.
- Review subdomains: Confirm how subdomains send mail before enforcement. Without a separate applicable policy or an sp override, the organizational domain's policy also applies to subdomains.
- Retain reporting: Keep the working rua destination when changing p. The example below assumes that the reporting address has already been replaced with your real destination.
- Manage policy changes: Suped's Hosted DMARC lets your team manage policy after its DNS delegation is configured. Keep monitoring source-level failures after each policy change.
Final DMARC example, use your real reporting addressdns
v=DMARC1; p=reject; rua=mailto:dmarc@example.com
I do not add unfamiliar SPF authorization simply to improve a pass rate. Shared Private Email infrastructure identifies the sending platform, but your mailbox inventory and message authentication establish whether that traffic belongs to your organization.
Require a verified authentication path
Before keeping p=reject in place, confirm that new Private Email messages pass DMARC and that other legitimate sources do too. Rejection requests protection against unauthenticated use of your domain in From; it does not guarantee inbox placement.
Frequency asked questions
Namecheap documents privateemail for subscriptions purchased on or after June 2, 2026, and default for earlier subscriptions. I use the subscription settings and the DKIM-Signature s= value in a current message to select the correct DNS record.
No. DMARC is a TXT record at _dmarc and does not change incoming mail routing. The MX records in the setup steps are for activating Private Email and receiving mail through it. Keep working MX records when Private Email is already active.
Yes. DMARC passes if DKIM verifies with a signing domain accepted for the visible From domain, even when SPF fails or uses a different domain. I still configure the Private Email SPF authorization and investigate unexpected failures on direct mail.
The .privateemail.com suffix is associated with Namecheap Private Email infrastructure. A documented sending host is mta-14-5.privateemail.com. I confirm the source IP and SPF/DKIM results before marking a source as trusted; the rDNS suffix alone does not prove that your team sent the message.
Namecheap documents up to four hours for externally registered domain activation, with checks every 15 minutes. Authentication record changes commonly need up to 60 minutes, but existing DNS TTLs control cached answers. I query the authoritative nameservers when the public result stays unchanged.
No. I keep an existing reject or quarantine policy while adding Private Email authorization and its DKIM key. Test a new Private Email message and fix its authentication path rather than weakening protection across the domain.




