
How to set up DMARC/DKIM/SPF for Plesk Email Security

Set up Plesk Email Security authentication by authorizing your outgoing server IPs in SPF, enabling DKIM signing for your domain, and publishing a DMARC TXT record at _dmarc.yourdomain. DMARC passes when SPF or DKIM passes with domain alignment to the visible From address.
I check the actual sending server before editing DNS. Plesk Email Security is a Linux extension for a local Postfix and Dovecot installation. It has no universal SPF include or shared DKIM key: your server IPs and Plesk-generated domain key determine the records.
Add your domain
I configure the domain in Plesk itself. Existing mail domains need no separate registration or verification token inside the Email Security extension.
- Select the domain. Open Websites & Domains and select your domain. If it is absent, click Add Domain, enter your registered domain, and complete domain creation.
- Enable mail hosting. Open the domain's Mail tab > Mail Settings. Set Mail service on this domain to Enabled if Plesk hosts its mailboxes. Preserve external MX routing if mailboxes are hosted elsewhere.
- Find authoritative DNS. Check the domain's nameservers. Use Plesk DNS Settings only when those nameservers use its zone; otherwise publish authentication records at the external DNS host.
- Confirm the sending path. For mailbox sending, create or select an address under Mail and send through authenticated SMTP. Record the public sending IP and envelope sender shown by the receiving server.
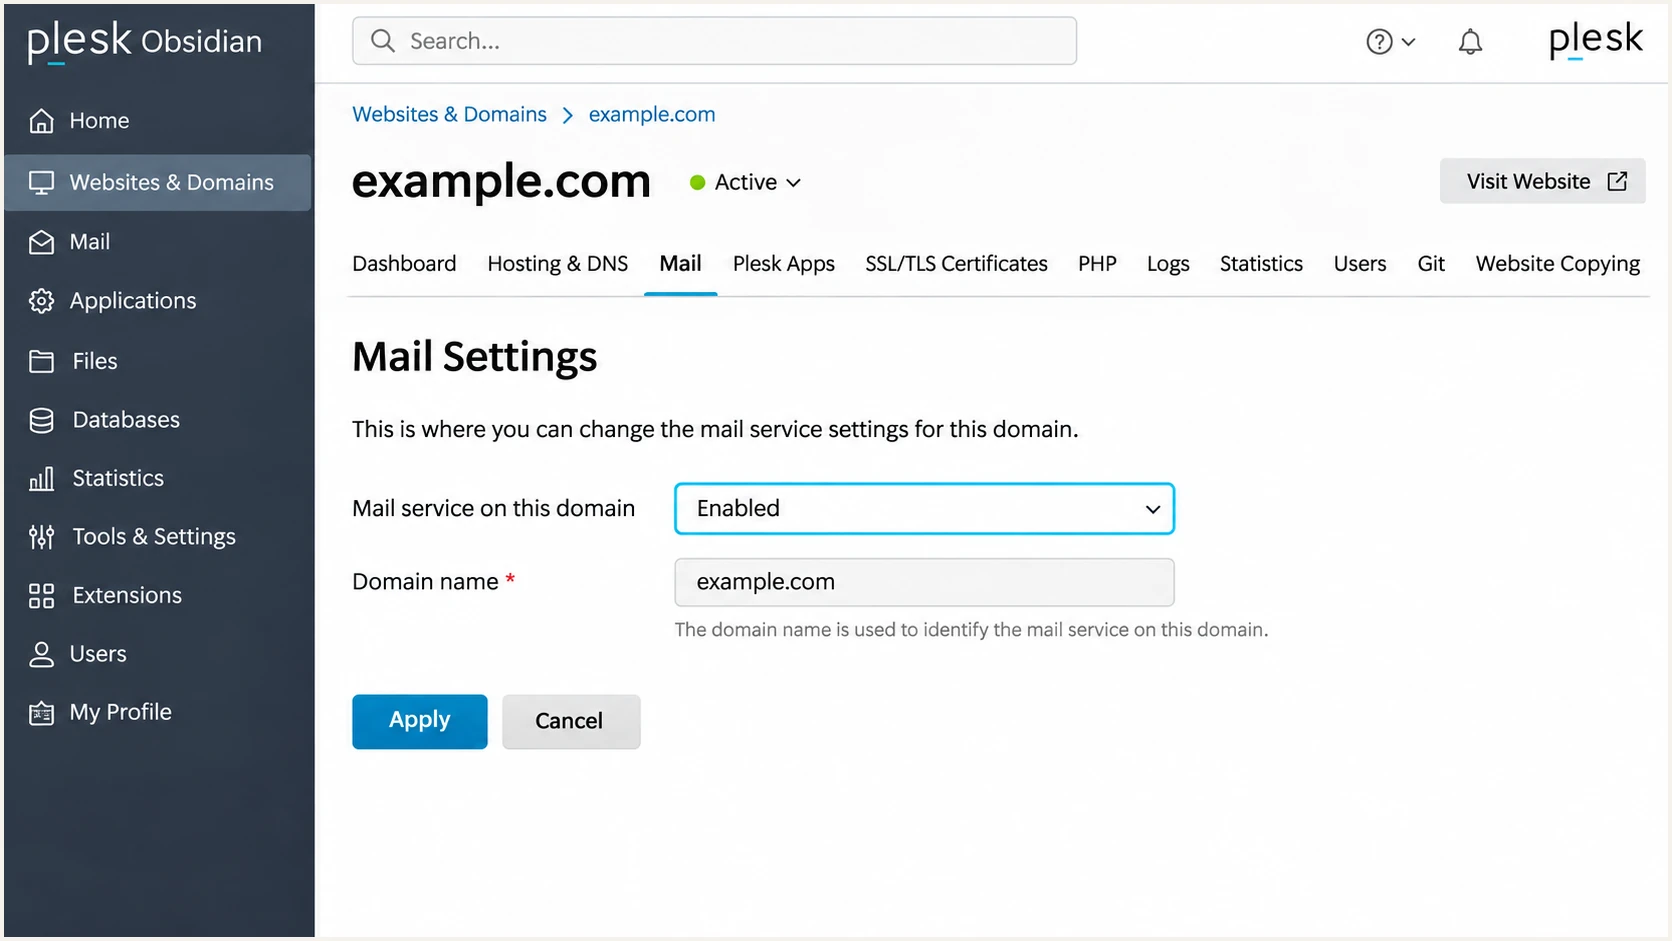
Illustrative Plesk Mail Settings with mail service enabled for the domain.
For inbound Plesk mailboxes, verify that the public MX record reaches the intended server. Leave existing MX records alone when only authenticating outgoing mail.
A record saved in a non-authoritative Plesk zone is invisible to recipients. I verify public DNS rather than treating a saved panel setting as proof.
Set up SPF
Plesk supports SPF alignment when the envelope sender uses your domain. Authorize the public IP that connects to recipients, including any outbound relay or active IPv6 address.
- Inspect the sender. Send a message and inspect its Return-Path and receiver-added Received headers. A website IP, private server IP, or inbound MX address is not automatically the outgoing IP.
- Edit one record. Open Websites & Domains > your domain > DNS Settings, or your authoritative DNS host. Find the TXT record beginning v=spf1. Edit it, or use Add Record > TXT if none exists.
- Authorize actual IPs. Add ip4: and, when used, ip6: mechanisms before the final all mechanism. Preserve other legitimate senders in the same record. Never invent an include:plesk.com entry.
- Publish and retest. Use the domain apex, usually a blank host field or @ in external DNS. Save the record and apply pending DNS changes. Keep SPF within its 10 DNS-lookup-triggering term limit, including nested includes.
Example SPF for direct sending, replace both documentation addressesdns
example.com. 3600 IN TXT (
  "v=spf1 ip4:203.0.113.10 ip6:2001:db8::10 ~all"
)
Use this example only after replacing its addresses and retaining every other authorized sender. Omit ip6: when the server does not send over IPv6.
The SPF checker below validates the public record and lookup count. I also test a message because DNS validation alone cannot confirm the envelope sender or actual sending IP.
SPF checker
Find SPF syntax issues, lookup limits, and weak records.
?/16tests passed
Publish exactly one SPF record per envelope-sender domain. Keep an existing -all policy unless you deliberately change it; the example uses ~all during sender discovery.
If an external relay fixes Return-Path to its own unrelated domain, adding its SPF include to your From domain will not fix SPF alignment. Use passing DKIM with your domain; that is sufficient for DMARC.
Set up DKIM
I enable signing at both Plesk levels and publish the public key generated by that server. Keep the private key on the server.
- Allow server signing. As an administrator, open Tools & Settings > Mail Server Settings. Under DKIM spam protection, enable Allow signing outgoing mail and save. Ask your hosting administrator if this control is unavailable.
- Enable domain signing. Open Websites & Domains > your domain > Mail > Mail Settings. Enable the outgoing DKIM signing checkbox and click Apply. The server permission alone does not enable signing for each domain.
- Publish the generated key. If DNS is external, open How to configure external DNS and copy the records Plesk supplies to the authoritative zone. The usual selector is default; use your actual selector if customized.
- Check sending identities. Repeat the DNS setup for domain aliases used to send mail. Test that the DKIM signature uses your From domain in d= and that its s= selector has the matching public key.
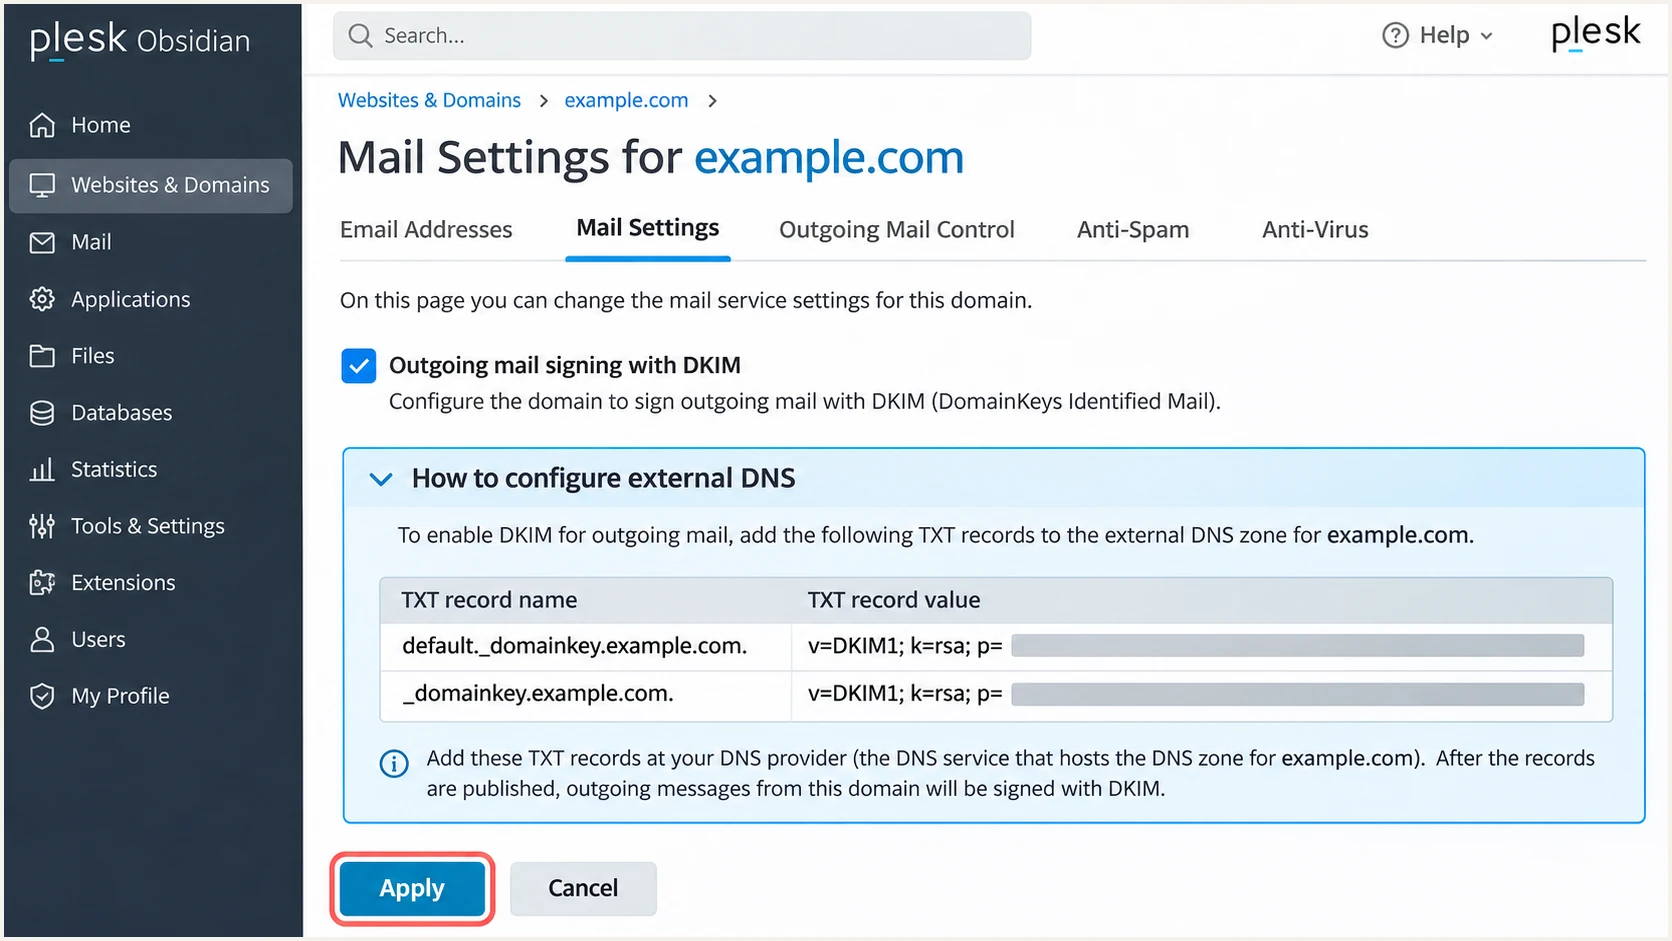
Illustrative Plesk DKIM settings and external DNS record instructions.
Plesk normally supplies a selector TXT record at default._domainkey.example.com and a companion record at _domainkey.example.com. Copy the generated values exactly; the selector record contains the signing public key.
The server and domain controls are separate in Plesk's authentication documentation. When DNS is external, the public records still need manual publication.
Plesk hosts DNS
Plesk writes the generated DKIM records to its domain zone. Verify that its nameservers are authoritative and the key resolves publicly.
External DNS hosts the zone
Copy Plesk's records to the external zone. After a server migration or key replacement, update that public key again.
Set up DMARC
For a domain without DMARC enforcement, I start with p=none and aggregate reporting. If the domain already uses p=quarantine or p=reject, keep that policy while fixing Plesk authentication.
Publish the policy for the domain in the visible From address. The incoming DMARC checking switch in Mail Server Settings controls received mail; it does not publish your outgoing policy.
- Check existing policy. Look up TXT at _dmarc.example.com. Edit an existing DMARC record instead of adding another one at the same name.
- Add the TXT record. At authoritative DNS, choose TXT and enter _dmarc as the host. In Plesk, use the domain's DNS Settings > Add Record. Confirm the resulting name is _dmarc.example.com, without a duplicated domain suffix.
- Set reporting. For a new monitoring policy, use v=DMARC1; p=none; rua=mailto:dmarc@example.com. Replace the example reporting address with a real mailbox or your assigned reporting destination.
- Save publicly. Save the record, apply pending DNS changes, and recheck public resolution after the previous TTL expires. Retain existing quarantine or reject settings and working reporting addresses.
Initial DMARC policy, replace example.com and the reporting addressdns
_dmarc.example.com. 3600 IN TXT (
  "v=DMARC1; p=none; rua=mailto:dmarc@example.com"
)
The reporting mailbox receives aggregate report attachments, not copies of messages. If the destination is outside your domain, complete the external reporting authorization required by its operator.
Use the DMARC record generator to build the value. Keep the default relaxed SPF and DKIM alignment settings unless your domain has a specific requirement for strict matching.
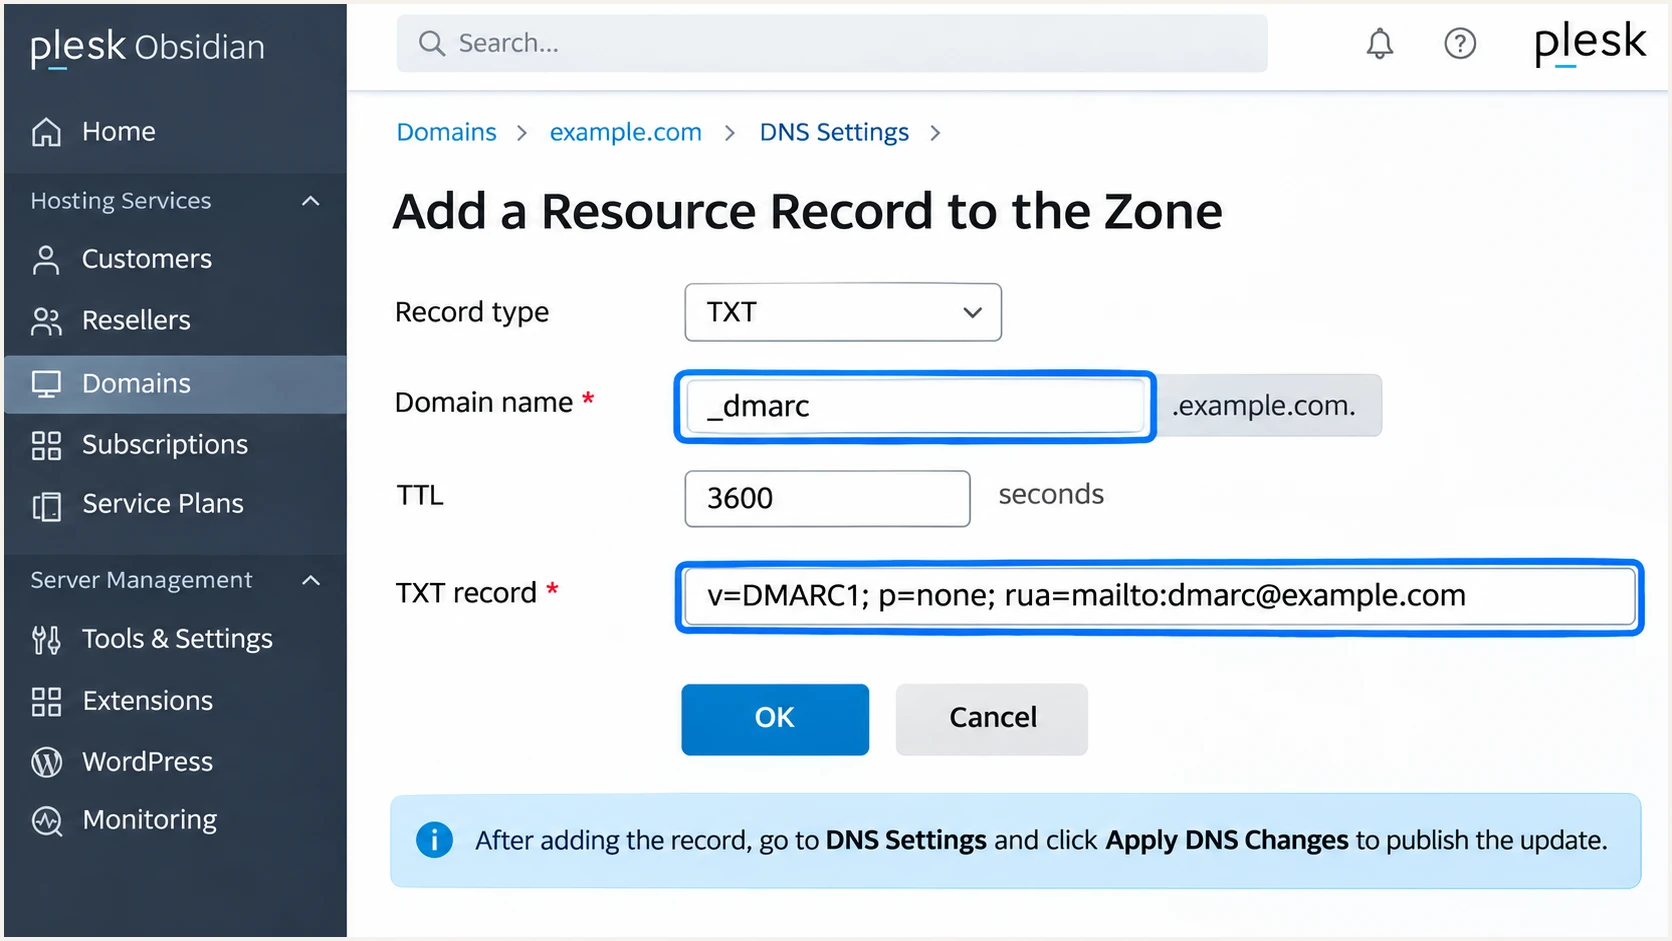
Illustrative Plesk form for publishing the initial DMARC TXT record.
Check the published domain below after saving. A valid p=none record enables monitoring but does not request quarantine or rejection of failing messages.
I verify the policy and reporting address separately: a syntactically valid record with an unused reporting mailbox leaves authentication failures unreviewed.
DMARC checker
Look up a domain's DMARC record and catch policy issues.
?/7tests passed
The checker should find one valid DMARC record and the policy you intended. Investigate duplicate records, missing DNS answers, or an incorrect reporting destination before proceeding.
A successful DNS check does not prove that a message passes DMARC. Send through the exact Plesk mailbox or application you need to authenticate next.
Verify and troubleshoot
I verify public records, then test a real outgoing message. A passing authentication result from the receiving server is the check that matters for that sending path.
- Inspect Config Check. Open Tools & Settings > Mail > Plesk Email Security > Config Check. Review SPF, DKIM and DMARC, plus RDNS, MX and DNSBL. Some versions label this Email Config Check.
- Query public DNS. Run the commands below using your domain, active selector and public sending IP. Compare the returned DKIM key with the value generated by Plesk.
- Test every path. Send separately through a mailbox, website form, and any scheduled application that uses this domain. Fix the application's envelope sender if it uses a server hostname instead of your domain.
- Read receiver results. Expect spf=pass, dkim=pass and dmarc=pass in the recipient's trusted Authentication-Results header. Compare smtp.mailfrom and header.d with header.from to verify domain alignment.
- Repair reverse DNS. Ask the owner of the sending IP to set its PTR to your mail hostname. Confirm that hostname resolves back to the same IP and that the SMTP greeting uses an appropriate resolvable hostname.
Public DNS checks, replace the domain, selector and IPbash
dig +short NS example.com
dig +short TXT example.com
dig +short TXT default._domainkey.example.com
dig +short TXT _dmarc.example.com
dig +short -x 203.0.113.10
dig +short A mail.example.com
dig +short AAAA mail.example.com
Plesk documents that Config Check can retain red results when DNS is external. Compare authoritative answers and a newly received message before changing working records.
A DNSBL failure indicates an IP blocklist (blacklist) listing. Investigate the actual sending IP and the listing reason; changing a DMARC policy does not remove it.
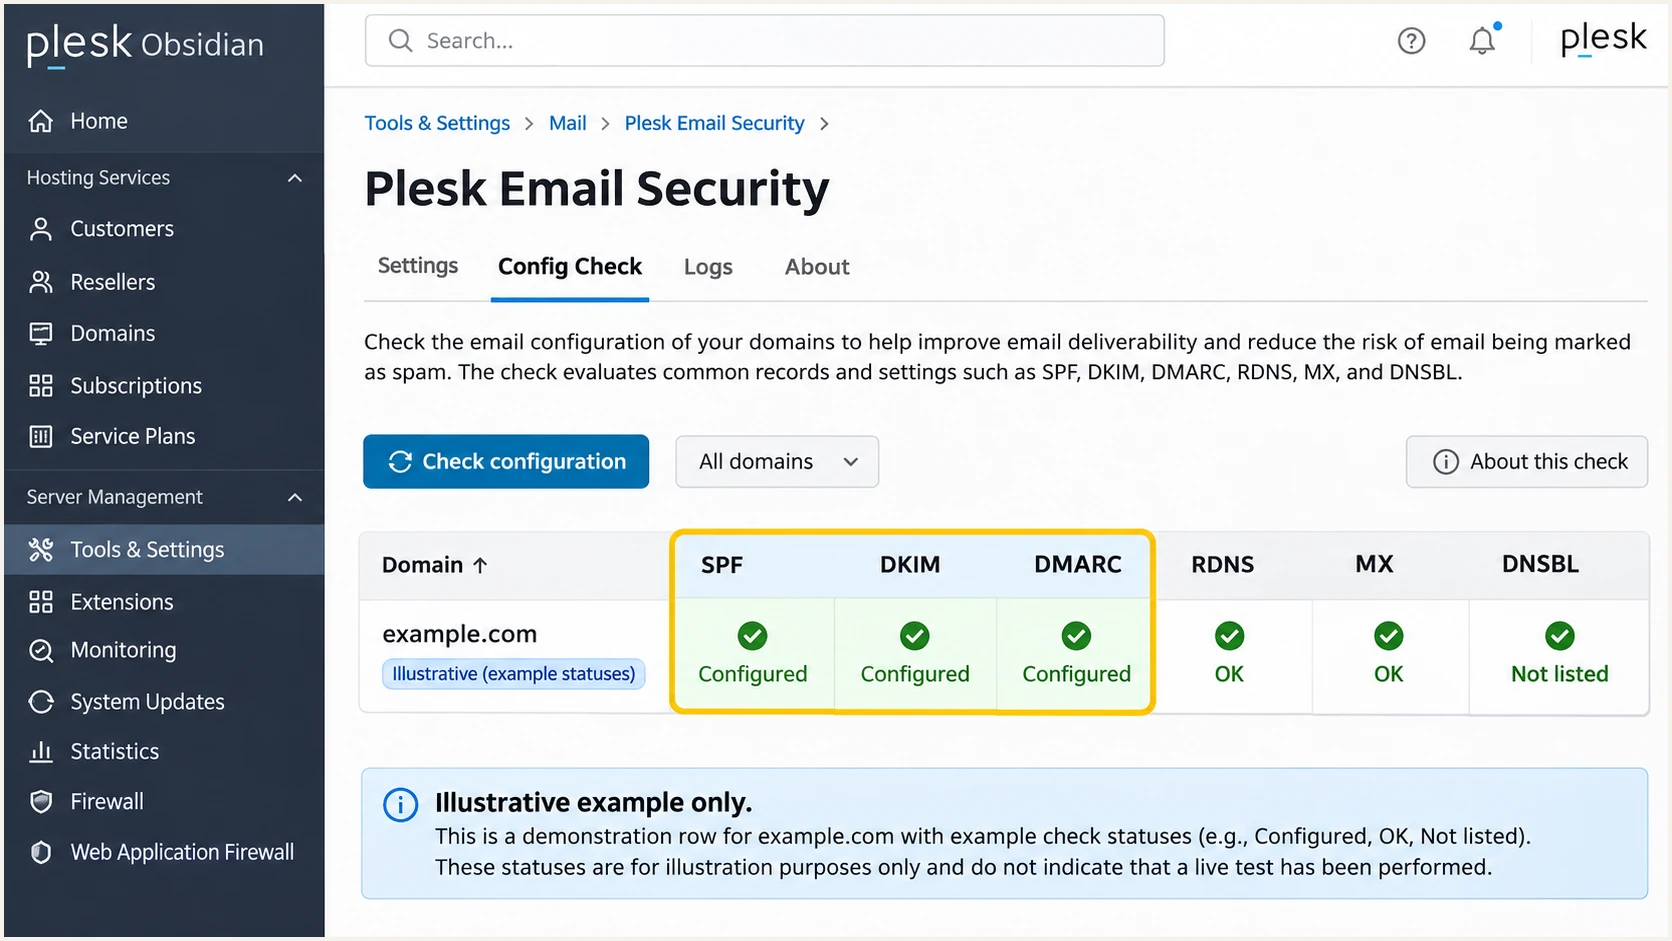
Illustrative Plesk Email Security Config Check for a demonstration domain.
The email tester below is the quickest message-level check. Send to its generated address through your normal Plesk sending path for a full diagnosis.
Use the report to inspect authentication and the actual message route. Repeat the test after a fix and repeat it for each application that sends differently.
Email tester
Send a real email to this address. Suped shows a results button when the test is ready.
?/43tests passed
If SPF passes but DMARC fails, check which domain passed SPF. Passing authentication for an unrelated Return-Path domain does not establish SPF alignment.
If DKIM fails after migration, compare the live selector key with the current server key. A signature failure after forwarding also warrants checking whether an intermediary changed signed content.
|
|
|
|---|---|---|
SPF permerror | Duplicate or excessive lookups | One SPF record |
SPF failure | Unlisted sending IP | Actual outbound IP |
DKIM failure | Missing or stale key | Active selector TXT |
DMARC failure | Identity mismatch | From versus authenticated domain |
RDNS failure | Missing or mismatched PTR | IP owner and forward DNS |
Use receiver results to choose the next check.
Get alerted when it breaks
I monitor authentication after setup because server moves and DNS edits change what recipients see. A one-time Config Check does not provide ongoing visibility across receiving systems.
Suped is our DMARC platform. Its DMARC monitoring combines aggregate reports with detected issues and steps to fix them, which makes it a practical fit for maintaining Plesk authentication.
- Keep reports flowing. Retain a working rua destination. For Suped reporting, use the destination assigned to your domain and its required external reporting authorization.
- Enable notifications. In Suped Notifications, enable Issues detected and Sending sources need verification. Configure DMARC summary emails so the responsible team reviews ongoing results.
- Investigate the source. Inspect the affected source and Detail view for sending IP, SPF, DKIM and DMARC results. Compare DNS history with recent Plesk migrations or key changes.
- Verify the repair. Apply the fix in Plesk or authoritative DNS. Send a new test message, verify the issue again, and check subsequent reports for recovery.
Report timing matters
Suped alerts surface detected authentication issues. Aggregate-report evidence depends on receiver reporting schedules, often about daily. Use a fresh message test for immediate confirmation after a change.
Secure your domain with p=reject
I move to enforcement when every known legitimate sending path has passing domain authentication. Review a complete business sending cycle, including infrequent automated messages, before changing policy.
Suped helps with this review by separating verified and unverified sources and identifying authentication issues. Use its reporting evidence to decide when the domain is ready for enforcement.
- Inventory legitimate senders. Review Plesk mailboxes, website forms, scheduled jobs, autoresponders and domain aliases. Include other systems that use the same visible From domain.
- Fix authentication. Aim for passing SPF and DKIM with domain alignment on direct mail. Preserve passing DKIM for forwarding paths and relays whose Return-Path cannot use your domain.
- Stage enforcement. Change p=none to p=quarantine after resolving legitimate failures. Review subsequent reports, fix remaining authorized sources, then change to p=reject. Keep an existing enforced policy while troubleshooting.
- Preserve monitoring. Keep rua enabled and review subdomain policies before enforcement. If Suped Hosted DMARC manages the policy, change it there and retain its prescribed DNS setup instead of adding a competing TXT record.
Final direct TXT policy after sender verificationdns
_dmarc.example.com. 3600 IN TXT (
  "v=DMARC1; p=reject; rua=mailto:dmarc@example.com"
)
Replace the example reporting address before publishing. For policy management through Suped, Hosted DMARC provides dashboard controls while Plesk continues signing and sending mail.
Keep reviewing authentication after enforcement. A domain-wide pass rate alone is insufficient if a small legitimate application still fails; investigate each authorized source before requesting rejection.
Frequency asked questions
There is no universal Plesk Email Security include. For direct delivery, authorize your actual public sending IPs with ip4: and ip6: mechanisms. If you use an outbound relay, follow that relay's documented authorization requirements.
Plesk documents that some checks remain red with external nameservers. Confirm the records at authoritative DNS and inspect a new received message. For DKIM, use the selector in the message rather than assuming it is always default.
Yes. A valid DKIM signature with domain alignment to the visible From address is sufficient. SPF alignment failures are expected when a relay uses its own unrelated Return-Path domain. Still investigate unexpected SPF failures on direct Plesk mail.
Plesk uses plesk.page for generated technical hostnames, so that suffix is a clue that a server uses Plesk. It does not prove Plesk Email Security is installed or that the sender is authorized. Plesk servers also use custom PTR hostnames. Verify the IP and message authentication results.
No. A valid p=none record requests monitoring without quarantine or rejection. An enforcement warning describes that policy choice. Verify legitimate senders before moving to quarantine and reject; keep an existing enforced policy while fixing authentication.




