
How to set up DMARC/DKIM/SPF for Perception Point

Published 21 Nov 2026
Updated 21 Nov 2026
12 min read
Summarize with
Set up DMARC/DKIM/SPF for Perception Point by verifying your domain for inline protection, configuring SPF and DKIM at the system that actually sends your email, and publishing a DMARC TXT record at _dmarc.yourdomain. For Microsoft 365 and Google Workspace API scanning, keep authentication with the mailbox provider. Scanning email does not itself require a new sending identity.
I start by checking the integration method. Perception Point's public outbound onboarding documentation describes API scanning for both mailbox platforms, so I treat scanning and SMTP delivery separately. Its current documentation calls the product FortiMail Workspace Security; that name appears in the console steps below.
Add your domain
Use an administrator account for Perception Point and have DNS access ready. The inline procedure below follows its public 'Adding domains' and 'Verifying your domains' instructions.
- Open configuration: Go to Settings > Contracts and Channels. Under Enabled Channels > Email Service, select Email service configuration. Choose Add a new email service if prompted.
- Choose the domain: For Microsoft 365 or Google Workspace inline protection, select the matching service and domain under Connected Domains. Click Detect Next-Hop and confirm the destination is your receiving mail server. Click Next.
- Publish ownership proof: Copy the Primary TXT record Name and Value into DNS exactly as displayed. Publish the secondary region's verification record too when multi-region is enabled. Keep these records after verification.
- Verify ownership: Go to Settings > Email Protection, open the domain under Inline Domains, and click Verify beside TXT record verification. Confirm the status changes from Pending verification to Ready to configure.
For Microsoft 365 API protection of the entire account, newly added tenant domains are protected automatically. For selected assets, update the protected domain selection instead of following inline TXT verification.
The Email Protection page is titled Email Protection Coverage in current documentation. Older consoles use Protected Email Assets. Ownership verification is separate from SPF authorization and DKIM signing.
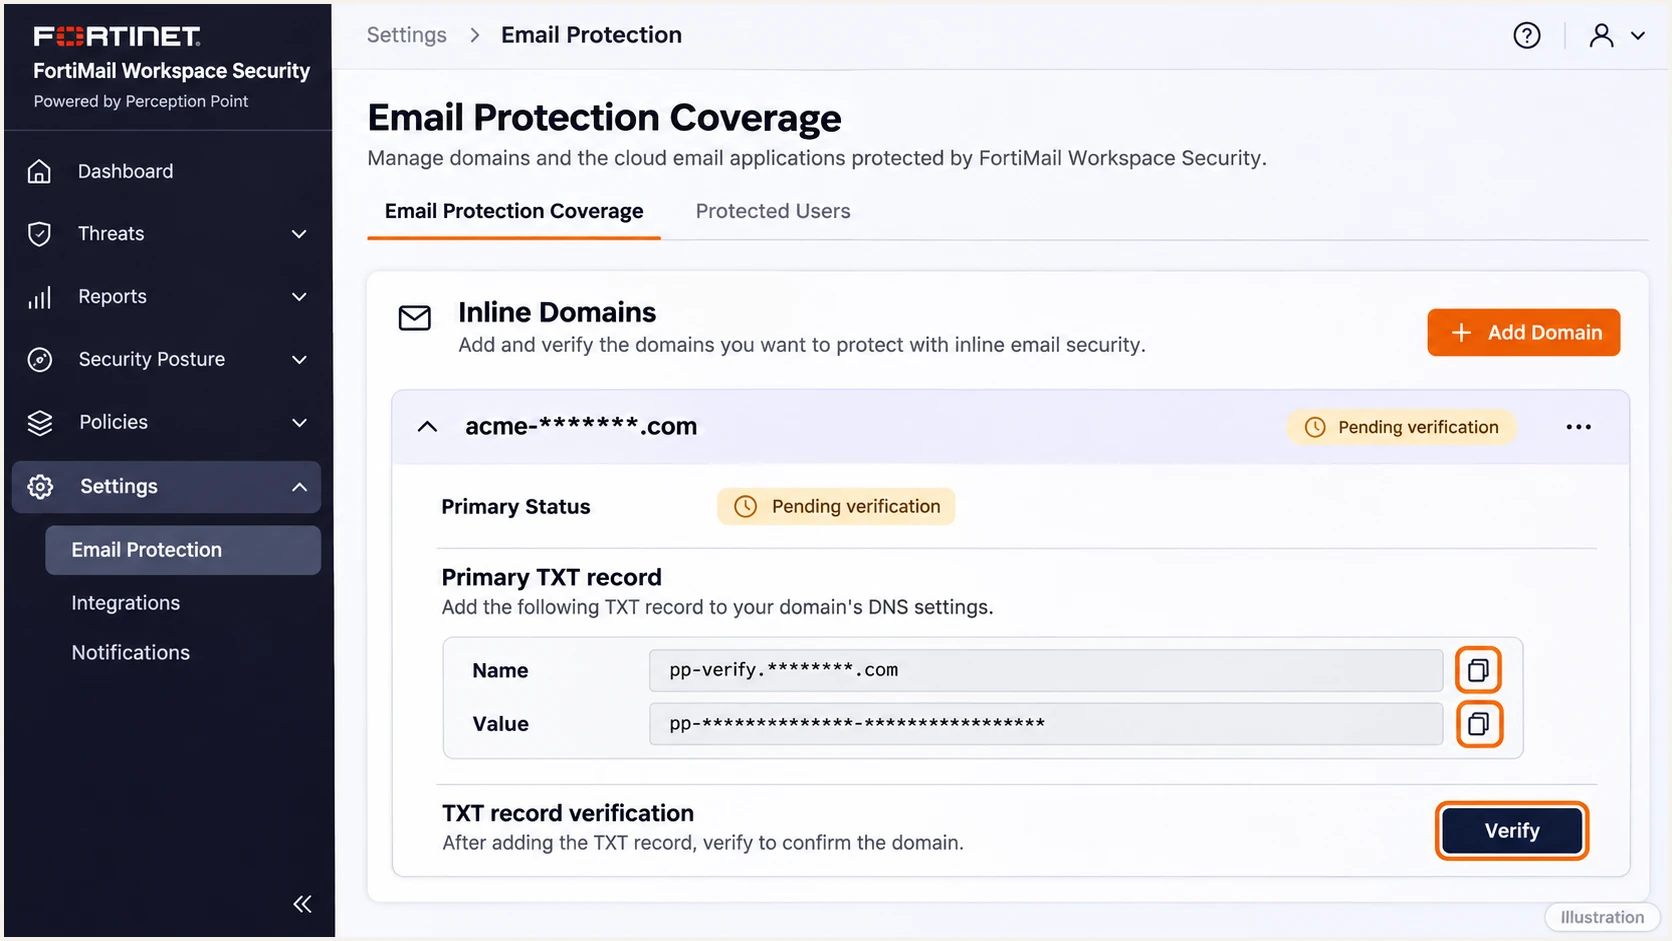
Illustration of Perception Point's inline domain TXT verification controls.
Complete the inline routing configuration after verification. For an existing Microsoft 365 integration, add the domain to the Perception Point Redirect Rule under Mail flow > Rules, using The recipient > domain is.
For an existing Google Workspace integration, edit the Perception Point Redirect Rule under Apps > Google Workspace > Gmail > Compliance > Content Compliance. Add the domain to C. Envelope filter > Pattern match, separating domains with | and no spaces. A new integration also needs the provider's full connector or routing configuration.
Set up SPF
SPF authorizes the connecting IP for the SMTP MAIL FROM domain, normally visible in Return-Path. I check that identity on a received message before changing DNS. Publishing SPF at the visible From domain has no effect when the actual MAIL FROM uses another domain.
Perception Point's documented Microsoft 365 and Google Workspace outbound scanning uses APIs. Keep the existing mailbox provider's SPF authorization for those integrations. An inbound scanning relay appearing in reports does not automatically need authorization to send as your domain.
SPF checker
Find SPF syntax issues, lookup limits, and weak records.
?/16tests passed
Enter the actual MAIL FROM domain above. Check for one SPF TXT record and a valid evaluation within the 10-term DNS lookup limit, including nested includes.
If Perception Point actually delivers mail using your domain, obtain its current sending instructions and custom Return-Path DNS values through console support. Setting SPF alone does not configure a custom Return-Path.
- Preserve existing senders: Edit the existing v=spf1 TXT record at the MAIL FROM domain. Keep every authorized sender and put new mechanisms before the final all mechanism. Do not publish a second SPF record.
- Confirm Perception Point authorization: Add include:perception-point.io only when Perception Point's instructions for your sending route explicitly require it. Do not add it solely because incoming messages pass through the service.
- Check domain matching: For relaxed SPF alignment, the MAIL FROM domain and visible From domain must share the same organizational domain. With aspf=s, they must match exactly.
- Retest the route: Send a new external message after DNS caches expire. Confirm SPF passes for the expected MAIL FROM domain and source IP.
SPF examples: choose the applicable case and preserve other senderstext
# Microsoft 365 as the only sender
v=spf1 include:spf.protection.outlook.com -all

# Google Workspace as the only sender
v=spf1 include:_spf.google.com ~all

# Microsoft 365 plus an explicitly confirmed Perception Point route
v=spf1 include:spf.protection.outlook.com include:perception-point.io -all
A sender using its own Return-Path domain needs its own SPF authorization. Adding that sender to your root SPF record will not make SPF match your visible From domain.
In that case, expect an SPF alignment failure and require a valid DKIM signature using your domain. That DKIM result can pass DMARC even though SPF does not match.
Authorize the actual sender
Do not copy inbound gateway IPs into your domain's SPF record to repair authentication on other organizations' incoming mail. Investigate original sender IP handling and the inbound connector configuration instead.
Set up DKIM
Enable DKIM on the system that signs your outgoing mail. Perception Point's public onboarding instructions do not provide a universal customer DKIM selector or key. Its domain verification TXT value is not a DKIM public key.
- Microsoft 365: Open Email & collaboration > Policies & rules > Threat policies > Email authentication settings > DKIM. Select your custom domain, obtain the two required CNAME values, and publish them exactly. After detection, enable Sign messages for this domain with DKIM signatures.
- Google Workspace: Open Apps > Google Workspace > Gmail > Authenticate email. Select the domain, generate a 2048-bit record where supported, and publish the displayed TXT name and public key. Return and click Start authentication.
- Other sending servers: Generate the key pair on the signing server. Publish its public key at the selector's _domainkey name and keep the private key on that server.
- Perception Point sending routes: If a separately configured route signs on your behalf, obtain its tenant-specific selector names and TXT or CNAME values through support. Use the supplied records without guessing a selector.
- Verify the signature: Send externally and confirm dkim=pass. The DKIM d= domain must match the visible From domain under your DMARC alignment mode.
With default relaxed DKIM alignment, the signing domain and From domain can share an organizational domain. With adkim=s, the domains must match exactly.
Check the delivered message after all mail processing. A correct DNS key does not prevent a later body change or signed-header change from breaking the signature.
API scanning
Keep DKIM signing at Microsoft 365 or Google Workspace. API access for scanning does not create a new SMTP sender or a replacement DKIM key.
Inline delivery
Test signatures after relay processing. For your outgoing mail, apply content changes before signing where the architecture permits. For incoming third-party mail, investigate the gateway path with support.
Set up DMARC
Publish one DMARC TXT record at _dmarc followed by your visible From domain. Start a new deployment with p=none to collect reports. If you already use p=quarantine or p=reject, keep that policy while testing the Perception Point integration.
Use the DMARC record generator to build the value, then validate the published domain below. DMARC policy belongs in your domain's DNS, independently of Perception Point's scanning setup.
DMARC checker
Look up a domain's DMARC record and catch policy issues.
?/7tests passed
Check the effective policy and reporting destination, including any inherited parent-domain policy. A valid DNS record does not establish that your production messages pass DMARC.
Google's DMARC setup documentation explains the DNS publication process and report mailbox setup. Use a reporting address that you control; the address below is an example.
- Publish the record: Create a TXT record at _dmarc.example.com, replacing example.com with your From domain. Some DNS interfaces expect only _dmarc in the host field.
- Choose a working destination: Replace dmarc@example.com with your aggregate report mailbox or assigned reporting address. A collector on another domain requires external reporting authorization.
- Avoid duplicate policies: Update the existing DMARC record rather than adding another. Preserve its reporting destinations and any intentional domain-specific settings.
- Confirm reporting: Send normal production traffic and check that reports arrive. Participating receivers generally send aggregate reports daily; delivery is not immediate or universal.
Initial DMARC TXT value at _dmarc.example.comtext
v=DMARC1; p=none; rua=mailto:dmarc@example.com
A p=none policy requests monitoring without a DMARC quarantine or rejection action. Receivers still apply their own spam filtering and security policies.
Verify and troubleshoot
Test an external outgoing message and an external incoming message separately. The outgoing copy tests your domain's authentication. The incoming copy tests Perception Point's protection and routing. I keep both results because success on one path does not prove success on the other.
In Perception Point, open Security Operations > Scans, set the relevant Date Range, locate the test message, and click Open Scan. Use the outbound filter only when outbound scanning is configured. A clean verdict is a content assessment, not proof of DMARC success.
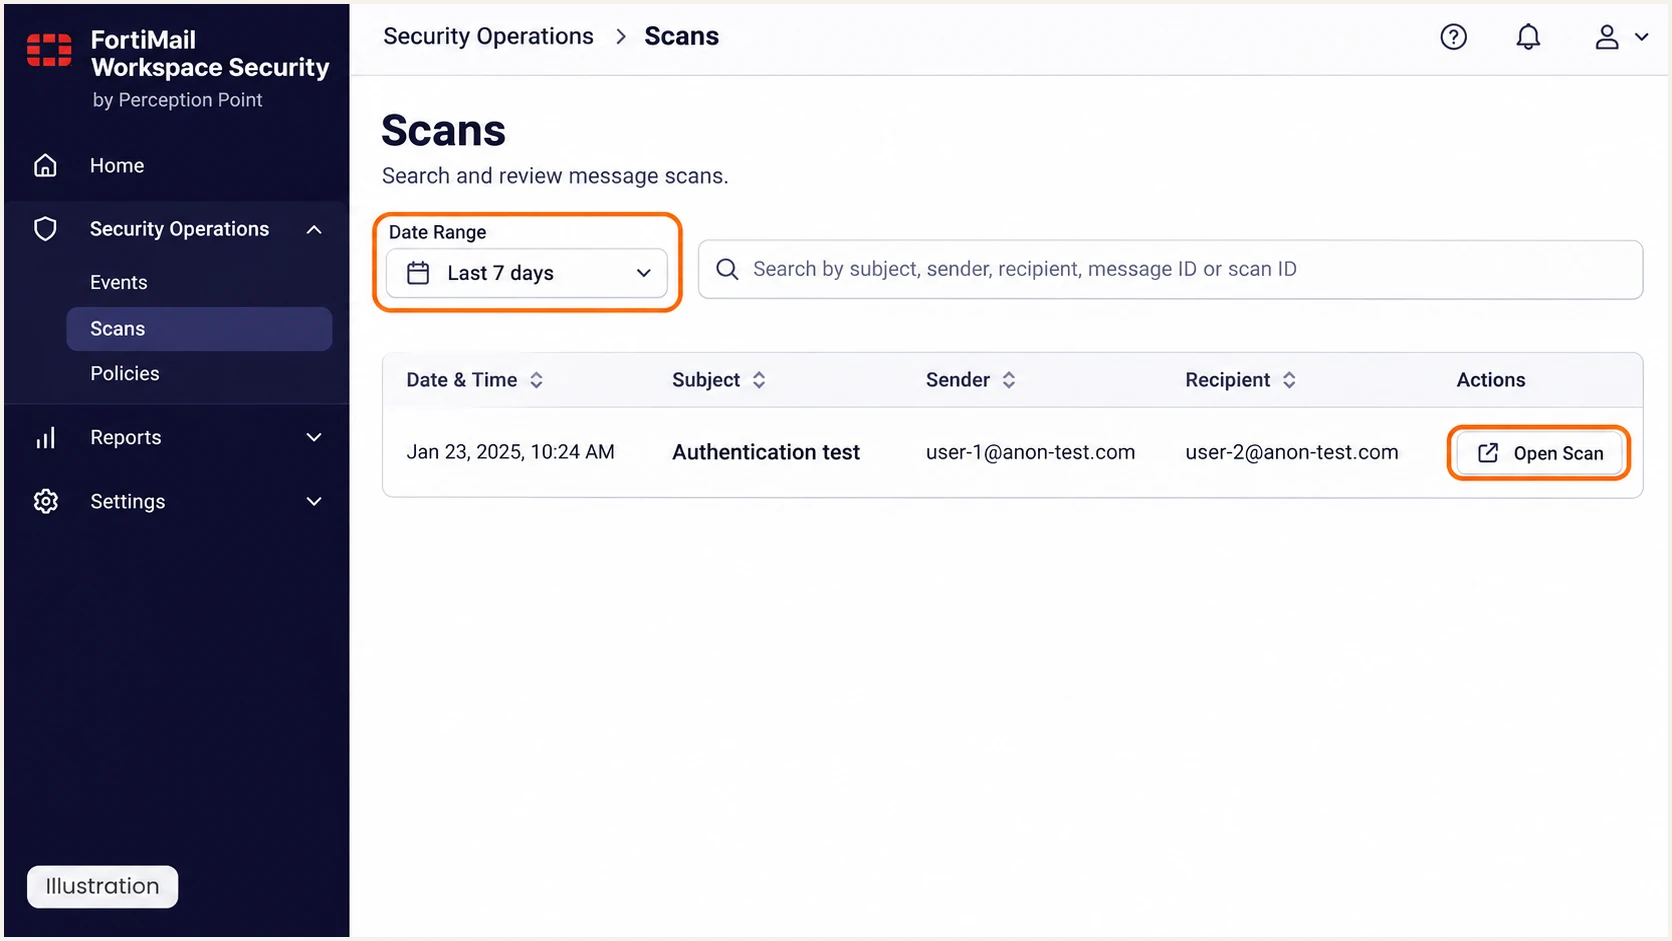
Illustration of locating a test message in Perception Point's Scans page.
Perception Point's 'Verdict email headers' documentation lists X-PERCEPTION-POINT-SPF for applicable inline incoming mail. Those verdict headers are not added for API scans or outgoing mail. Their absence on those paths is expected.
For a quick authentication diagnosis, send through your normal production route to the address generated by the email tester below. It checks the received message rather than relying only on DNS publication.
Email tester
Send a real email to this address. Suped shows a results button when the test is ready.
?/43tests passed
Open the generated results and check SPF, DKIM, and DMARC separately. Repeat for each sending domain and distinct sending route, including any application that sends independently of your mailbox provider.
For manual inspection, use the final recipient's trusted Authentication-Results header. Compare smtp.mailfrom, the DKIM signing domain, and header.from. Earlier headers added by untrusted senders are not authoritative.
- SPF failures: Confirm the connecting IP is authorized by the actual MAIL FROM domain. Resolve duplicate SPF records and lookup-limit errors. For inbound relay issues, check original sender IP handling.
- DKIM failures: Read s= and d= in DKIM-Signature, then query that selector under that signing domain. Check the public key or CNAME chain and investigate modifications after signing.
- DMARC failures: Require a passing SPF result with a matching MAIL FROM domain, or a passing DKIM signature with a matching signing domain. Passing authentication for an unrelated domain is insufficient.
- Pending protection: If an inline domain remains Ready to configure, finish routing and send an external message to it. Active appears after the service scans a message for that domain.
- Escalate with evidence: Use Contact Support in the Perception Point console. Include the integration method, domain, timestamp, scan reference, and final received headers.
|
|
|
|---|---|---|
Pass + match | Fail | Pass |
Fail | Pass + match | Pass |
Pass, mismatch | Pass + match | Pass |
Pass, mismatch | Pass, mismatch | Fail |
DMARC needs at least one passing authentication method with domain matching.
Get alerted when it breaks
Suped is our DMARC reporting and email authentication platform. With aggregate reports flowing into Suped, its issue detection and notifications help catch broken authentication after routing changes or DKIM key rotation. That is the workflow I prioritize after a successful test.
- Enable notifications: In Suped's notification settings, enable Issues detected and Sending sources need verification. Enable DMARC summary emails for ongoing review.
- Confirm the source: Review sources associated with Perception Point and your mailbox provider. Verify a source only after confirming it is authorized; an rDNS name alone is insufficient.
- Investigate the failure: Open the affected source and record details. Compare the sending IP, MAIL FROM domain, and DKIM results before following the issue's steps to fix.
- Confirm the repair: Retest through the email tester after the DNS or routing change. Then check subsequent aggregate reports and verify the issue in Suped.
Suped's DMARC monitoring keeps source review and authentication diagnostics together. Perception Point remains responsible for the scanning and routing configuration being tested.
Keep an operational owner for each sending source. An alert should lead to a specific DNS, signing, or connector check, followed by a test message.
Reports have a reporting delay
Suped can notify you when incoming reports reveal an issue. Aggregate reporting is generally daily, so those alerts are not an immediate SMTP outage signal. Use a fresh test message to validate an urgent change.
Secure your domain with p=reject
Move to p=reject after every legitimate sending route has a reliable DMARC pass. I review a full business sending cycle, including occasional application mail, rather than promoting a policy because a single test passed.
- Audit legitimate sources: Use Suped's source table and detailed records to identify approved senders and resolve their failures. Separate unauthorized attempts from broken legitimate traffic.
- Validate DKIM continuity: Confirm a matching DKIM signature survives the complete route. Test forwarding and any gateway processing, especially where SPF does not provide a matching domain.
- Stage enforcement: If starting at p=none, change to p=quarantine and review new reports plus delivery failures. Promote to p=reject after legitimate failures are resolved. Keep an existing stronger policy during integration testing.
- Check subdomain scope: Review inherited policy and any explicit subdomain DMARC records. Decide intentionally whether to use sp=; a subdomain with its own record has its own policy.
- Keep reporting active: Retain rua and ongoing alerts after enforcement. Record DNS values before each change and investigate any newly failing approved source.
Suped's Hosted DMARC lets teams manage policy changes through our dashboard after its DNS delegation is configured. The source diagnostics and policy staging support the same review process without repeatedly editing the policy value at the DNS host.
Apply only one TXT value at a time. Replace the example report mailbox, preserve other intentional tags, and verify the effective policy after each change.
DMARC enforcement stages: replace the existing value at each stagetext
# Quarantine stage
v=DMARC1; p=quarantine; rua=mailto:dmarc@example.com

# Reject stage
v=DMARC1; p=reject; rua=mailto:dmarc@example.com
Continue testing after a new sender, changed connector, or key rotation. Enforcement does not remove the need to maintain authentication.
DMARC enforcement targets unauthorized use of your domain in the From address. It does not prevent lookalike-domain mail or misuse of an account that sends authenticated email.
Frequency asked questions
API scanning does not require a new SMTP authorization. Keep the SPF record for your actual sender. Add include:perception-point.io only when Perception Point explicitly requires it for a configured sending route. It is not a general fix for inbound relay failures.
There is no universal customer selector in the public onboarding instructions. For API-scanned Microsoft 365 or Google Workspace mail, obtain DKIM records from that mailbox provider. For a separate Perception Point signing route, get the exact tenant-specific records through console support.
Yes. A valid DKIM signature whose signing domain matches the From domain under the DMARC alignment policy is sufficient. A sender-controlled Return-Path can pass SPF without matching your domain. Do not keep adding SPF includes to repair that mismatch.
TXT verification proves domain control. Finish the inline connector or redirect-rule configuration and send an external message to the domain. The status changes to Active after Perception Point scans a message for that domain.
A hostname under perception-point.io suggests Perception Point infrastructure, but reverse DNS alone does not establish who originated a message. Confirm forward DNS and IP ownership, trace the Received headers, and compare the source with your configured Perception Point route. A scanning or relay hop is different from an authorized original sender.
Keep an existing p=reject or p=quarantine policy. Test the integration and correct any legitimate SPF or DKIM failures on the affected route. Use p=none as the starting point for a new monitoring deployment, then enforce after the approved sending paths pass.




