
How to set up DMARC/DKIM/SPF for OVHcloud

Published 22 Nov 2026
Updated 22 Nov 2026
11 min read
Summarize with
For OVHcloud MX Plan, Email Pro, and Hosted Exchange, add include:mx.ovh.com to your SPF TXT record, enable DKIM for your domain in the OVHcloud Console, and publish DMARC at _dmarc. I test outgoing messages before moving a new DMARC policy to enforcement.
A VPS or dedicated server sending directly needs its own outbound IP authorization and DKIM signer. Hosting your DNS at OVHcloud does not automatically authenticate mail sent by your applications.
Add your domain
I first identify the sending service and the authoritative DNS host. If the domain already works with OVHcloud email, keep that association.
- Email Pro. Open Web Cloud > Emails > Exchange and select the platform marked Email Pro. Choose Associated domains > Add a domain, enter your domain, and save the configuration.
- Ownership. For a domain outside the account, publish the CNAME shown under Owner verification. Wait for validation, then open the diagnostic badges for the required DNS values.
- Included MX Plan. For an unactivated hosting email plan, open its Overview tab, find Email addresses under Complimentary services, and select Activate my email plan. Choose the domain and complete activation.
- Hosted applications. For PHP mail(), attach the From domain under your hosting plan's My sites > Add a site. For direct VPS sending, configure that domain in your mail server instead.
Review automatic DNS changes before saving. Preserve existing SPF authorizations, and change MX records only when you intend to change incoming email routing.
The following screen is the Email Pro path. Existing MX Plan domains are selected directly under the MX Plan service.
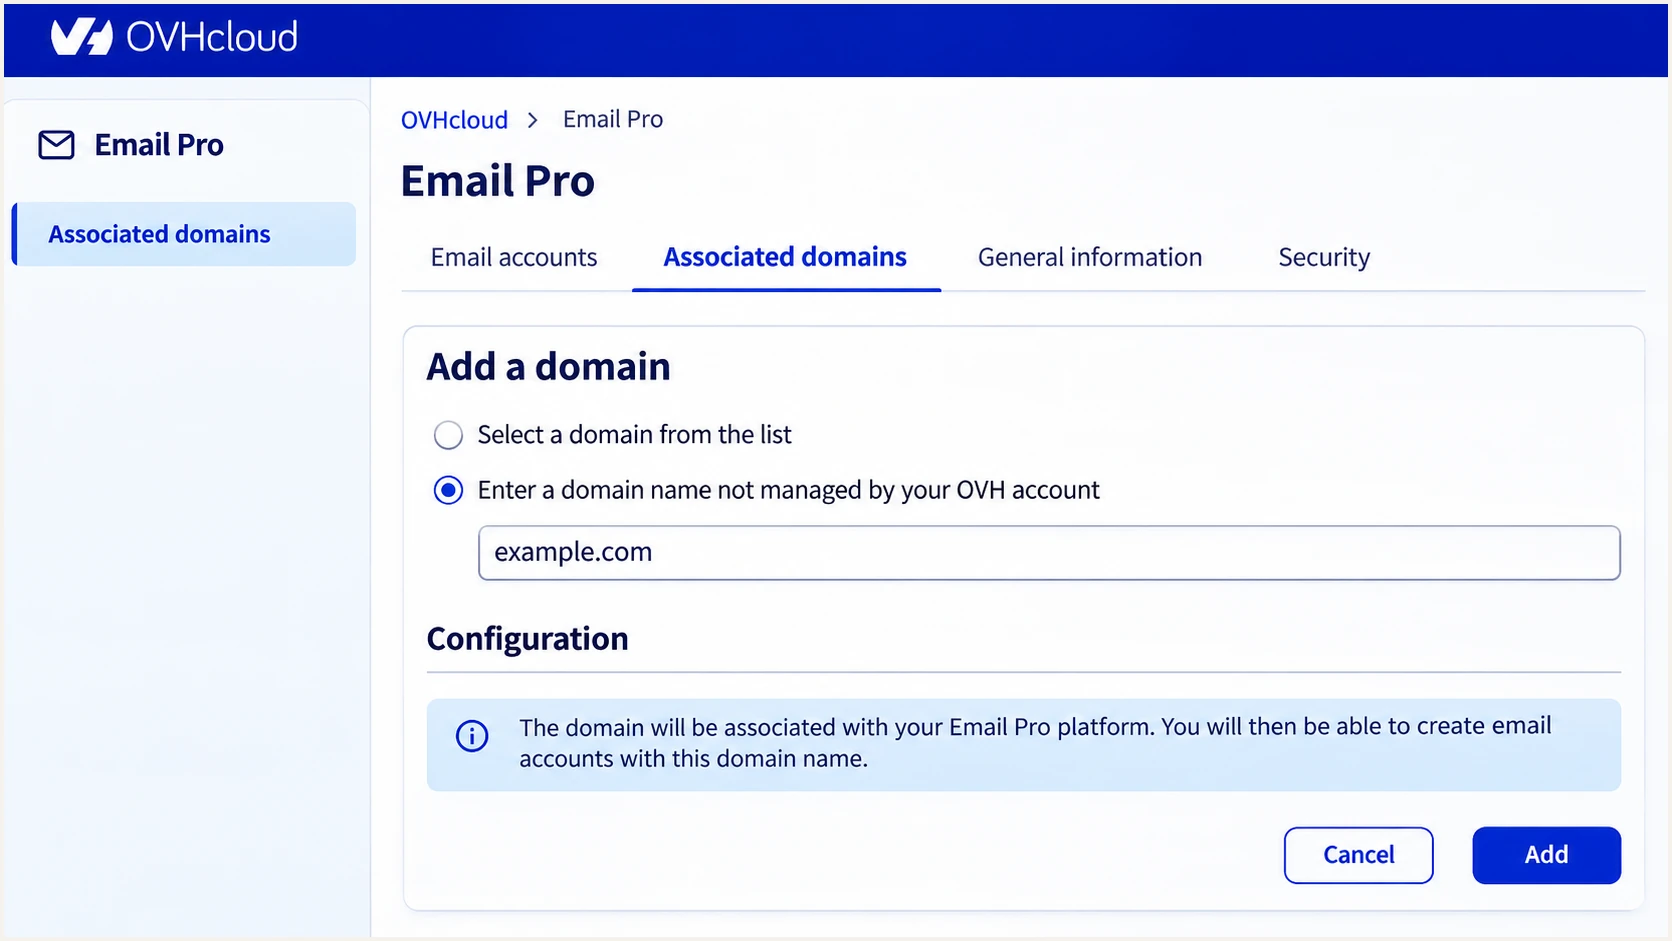
Illustrative OVHcloud Email Pro domain association form.
After validation, check the domain diagnostics. A successful ownership check confirms control of the domain; message authentication still needs the records below.
If the domain uses external authoritative nameservers, publish the records there. Editing an unused OVHcloud DNS zone has no effect on public DNS.
Set up SPF
I authorize the route that actually delivers mail to recipients. An application using an OVHcloud mailbox through SMTP uses the mailbox service's outgoing servers.
- Find the record. Open Web Cloud > Domains & DNS > Portfolio > your domain > DNS Zone. Modify the existing TXT value beginning v=spf1; create a TXT record only if none exists.
- Shared email. For MX Plan, Email Pro, or Hosted Exchange, include mx.ovh.com in that single record. Preserve other authorized senders.
- Direct servers. For Private Exchange or a self-managed server, authorize the actual public sending addresses with ip4 and ip6. Include shared email servers only when you use them too.
- Envelope sender. Use your domain in SMTP MAIL FROM and verify the delivered Return-Path. Set the envelope sender in your application or mail server, rather than adding a Return-Path header.
SPF TXT value for shared OVHcloud email onlytext
v=spf1 include:mx.ovh.com ~all
Publish that example at the domain apex, using @ in the current OVHcloud form. Replace it with a merged record when other services also send.
SPF authorizes the envelope domain, not the visible From address. Keep evaluation within the limit of 10 DNS-querying terms, including nested includes.
SPF checker
Find SPF syntax issues, lookup limits, and weak records.
?/16tests passed
Check the exact envelope domain used by a delivered message. A subdomain needs its own SPF authorization; it does not inherit the apex record.
A valid DNS result is the first check. A delivered message must also show SPF pass with a domain that matches your From domain under DMARC.
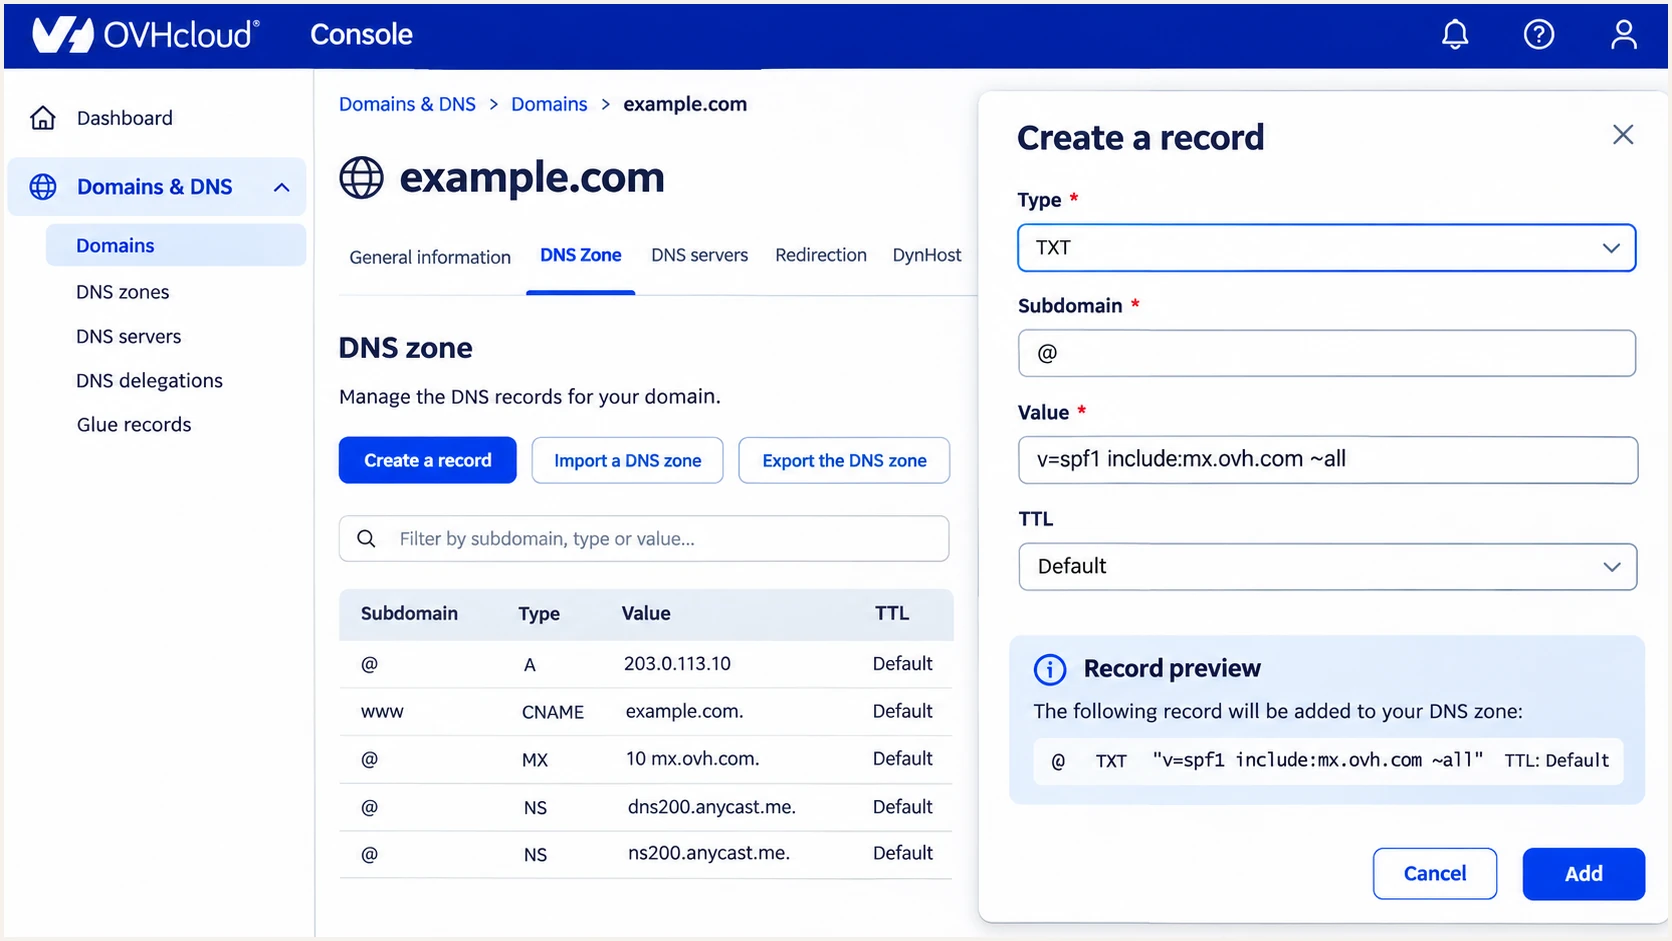
Illustrative OVHcloud DNS form for an SPF TXT record.
Use ~all while checking sender coverage. Changing SPF to -all is a separate decision from setting DMARC to p=reject.
If a route keeps an OVHcloud-owned envelope domain, your SPF record cannot change its alignment. A passing DKIM signature with your domain can still satisfy DMARC.
Set up DKIM
Publishing a key does not enable signing by itself. I enable DKIM on the service that sends the message, then test a new delivery.
- MX Plan. Select the domain under MX Plan. In Overview, click its DKIM indicator under Domain to configure.
- Email Pro or Exchange. Open the platform > Associated domains and click the domain's DKIM diagnostic indicator.
- Create selectors. Choose Configure DKIM if unconfigured. Publish both displayed CNAME records, using Add this record where offered or copying the exact Name and Target to your DNS host.
- Enable signing. Once DNS resolves, use Check again where offered, then Enable DKIM.
Use the generated selector values for your service. Do not substitute generic selector names or targets copied from another domain.
In a relative Subdomain field, omit the zone suffix already added by the form. Keep the target hostname complete.
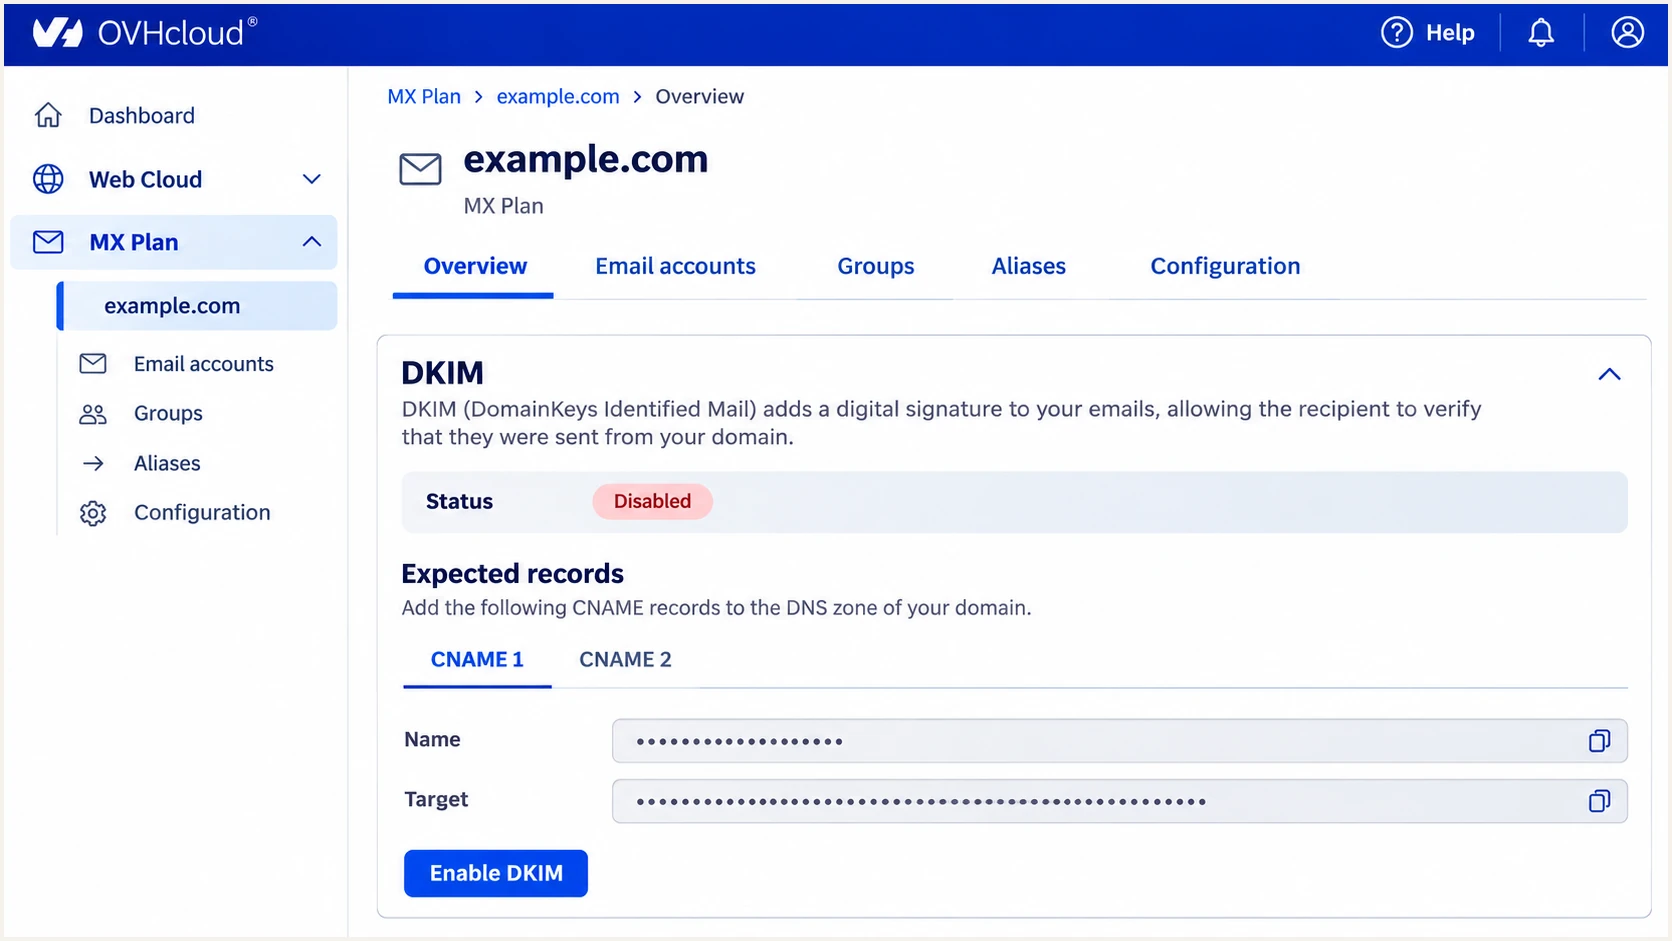
Illustrative OVHcloud MX Plan DKIM configuration panel.
Allow up to 24 hours for activation. OVHcloud-managed DKIM applies to its email service; it does not configure signing on your own server.
For a self-managed sender, generate a 2048-bit RSA key pair in the DKIM signer. Keep the private key on the server.
Configure your own signer for direct sending
Choose a selector, such as mail2026. Publish its generated public-key TXT value at mail2026._domainkey.example.com. Configure signing with d=example.com, s=mail2026, and rsa-sha256, then reload the signer. Test mail sent through that server.
Set up DMARC
For a new DMARC deployment, I start with p=none and reporting. If the domain already uses p=quarantine or p=reject, retain that policy.
- Inspect first. Look up the existing record at _dmarc.your-domain. Edit that record instead of publishing a second DMARC policy.
- Generate the value. Use the DMARC record generator with your actual reporting address. Preserve existing enforcement and reporting destinations.
- Publish in DNS. In your domain's DNS Zone, choose Create a record > TXT. Enter _dmarc as Subdomain and paste the policy as Value. Review the preview and click Add.
- Receive reports. Replace dmarc@example.com below with a working mailbox or assigned report destination. For an external destination, complete any required reporting authorization.
Initial DMARC TXT value for a domain without enforcementtext
v=DMARC1; p=none; rua=mailto:dmarc@example.com
The name is _dmarc.example.com for mail using example.com in From. Replace example.com with your domain, including in the report address.
The default alignment mode is relaxed. Keep it unless you have a specific requirement for exact domain matching and have tested every sender.
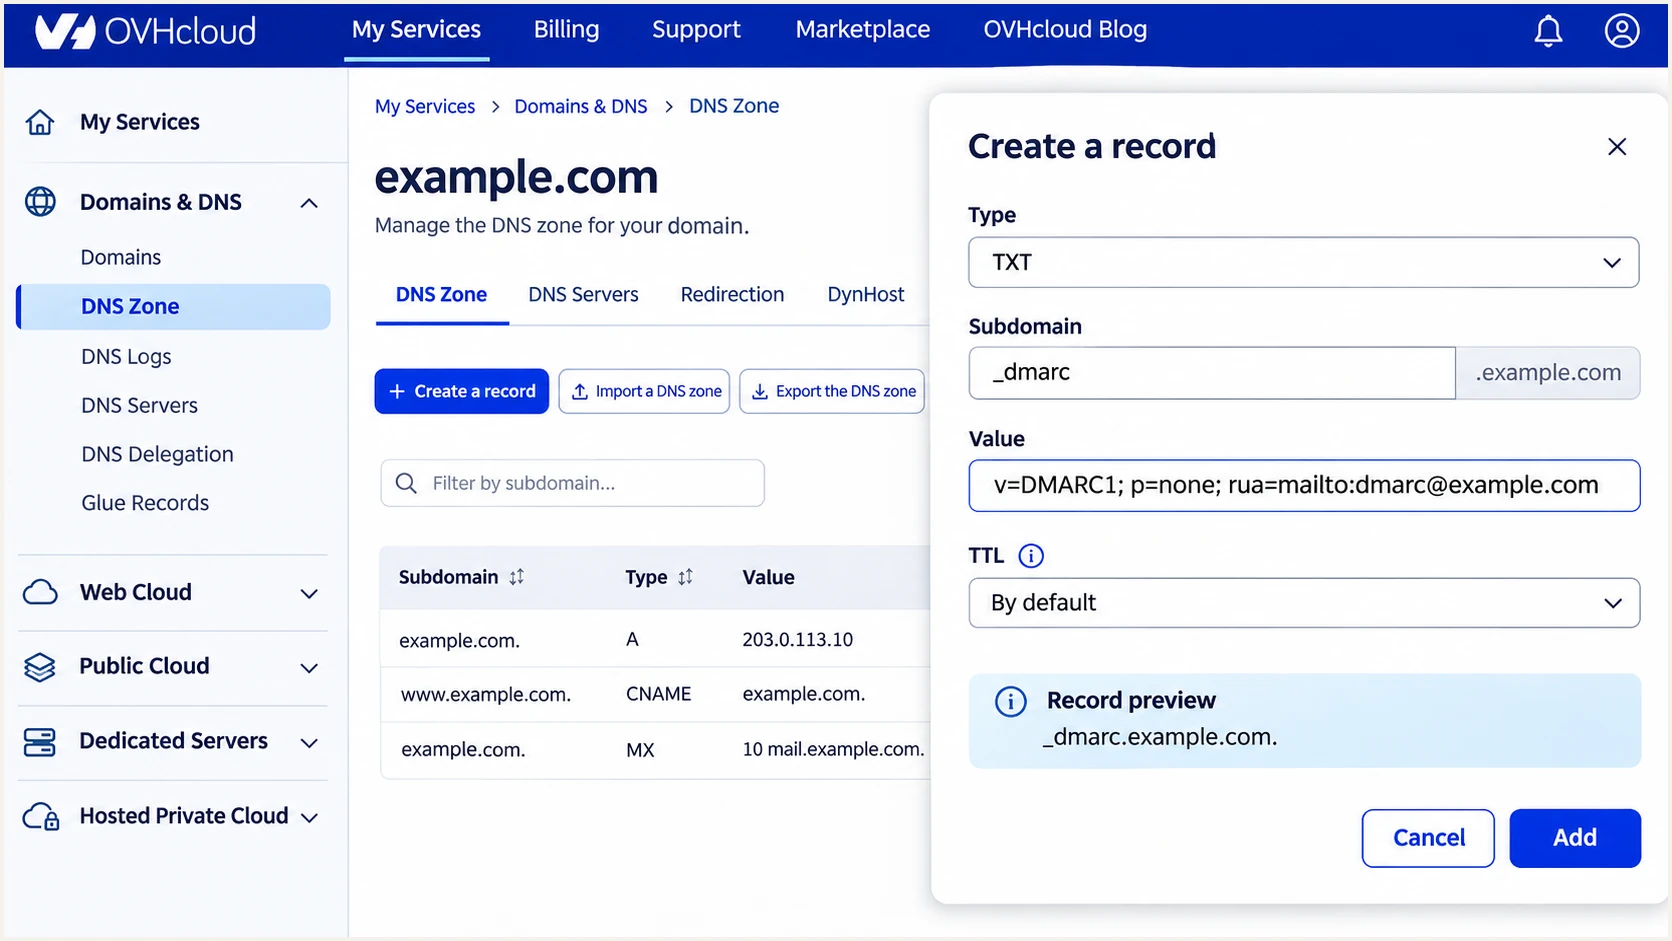
Illustrative OVHcloud DNS form for a monitoring DMARC policy.
After publication, check that public DNS returns one valid DMARC policy. Keep unrelated TXT records at other names unchanged.
The checker below validates the published record. It does not prove that a message has a valid signature or a matching authenticated domain.
DMARC checker
Look up a domain's DMARC record and catch policy issues.
?/7tests passed
Send a fresh message after DNS changes become visible. Old messages retain their original authentication results, even after you repair DNS.
A p=none policy requests reports without requesting quarantine or rejection for DMARC failures. It is a monitoring stage, not enforcement.
Verify and troubleshoot
I test every actual sending path, including website forms and scheduled jobs. A webmail test alone does not verify an application's SMTP configuration.
- Send a test. Use the email tester below, copy its destination, and send through the OVHcloud mailbox or application you are configuring. Review its full diagnosis.
- Inspect results. Require dmarc=pass in the receiving system's Authentication-Results. Check DKIM d= and the SPF smtp.mailfrom domain against your visible From domain.
- Fix DKIM. If signing is absent, check service activation and the sending route. If verification fails, check the selector lookup and whether a relay changed signed content.
- Fix SPF. Resolve duplicate records, missing egress IPs, or lookup-limit errors. Do not add sending servers based only on an unfamiliar hostname.
DNS checks, replacing the domain and selector with actual valuesbash
dig +short NS example.com
dig +short TXT example.com
dig +short TXT _dmarc.example.com
dig +short CNAME SELECTOR._domainkey.example.com
dig +short TXT SELECTOR._domainkey.example.com
For application mail, use authenticated SMTP with the correct OVHcloud service hostname and mailbox credentials. Email Pro uses its assigned pro-number hostname, port 587, and STARTTLS.
Use your mailbox address as From. For a contact form, put the visitor's address in Reply-To so replies work without impersonating the visitor's domain.
Email tester
Send a real email to this address. Suped shows a results button when the test is ready.
?/43tests passed
The tester diagnoses an actual message, which is quicker than checking DNS alone. Repeat the test separately for each application and mailbox route.
If SPF alignment fails but DKIM passes with the correct domain, DMARC can pass. Fix the envelope identity when supported, and preserve working DKIM.
Authentication pass
SPF confirms an authorized IP for the envelope domain. DKIM confirms a valid signature for its signing domain. Either can pass using an unrelated provider domain.
DMARC pass
At least one passing method must also have domain alignment with From. Under relaxed mode, a shared organizational domain is sufficient; strict mode requires an exact match.
For direct VPS or dedicated-server sending, create a mail-host A or AAAA record pointing to its sending IP. Configure the corresponding PTR under Network > Public IP Addresses > the IP > Reverse DNS.
Keep forward and reverse DNS consistent. PTR improves server identification but does not replace DMARC, and authentication success does not guarantee inbox placement.
Get alerted when it breaks
Suped is our DMARC platform. I use its source diagnostics and issue notifications to track OVHcloud authentication after setup, while keeping DNS changes tied to verified failures.
- Enable notifications. In Suped notification settings, enable Issues detected and Sending sources need verification. Enable DMARC summary emails for ongoing review.
- Review new sources. Inspect the sending IP and authentication details before verifying a source as legitimate. An OVHcloud hostname alone is insufficient evidence.
- Investigate failures. Filter records by source or IP, open the detail view, and follow the detected issue's steps to fix. Repair the OVHcloud service or authoritative DNS as required.
- Confirm recovery. Send another test and inspect subsequent aggregate reports. Use DNS history to identify the record change associated with a regression.
Suped's DMARC monitoring puts source-level evidence alongside detected issues. This makes it practical to separate a broken OVHcloud sender from unauthorized traffic.
Keep alerts enabled after key rotation, application migrations, and DNS edits. Each change can affect the authentication of otherwise legitimate mail.
Report-based alerts follow report arrival
DMARC aggregate reports typically arrive daily, rather than per message. Suped detects report-based issues as data arrives; use the email tester and application logs for immediate checks.
Secure your domain with p=reject
I move to enforcement after legitimate sending paths consistently pass DMARC across a complete sending cycle. A high overall pass rate alone is insufficient.
- Inventory senders. In Suped, review verified and unverified sources. Check routine mail and less frequent jobs, including invoices and password resets.
- Repair legitimate failures. Require matching SPF or DKIM on every authorized route. Test forwarding and mailing-list paths before tightening policy.
- Stage enforcement. Change p=none to p=quarantine, review reports and delivery failures, then use p=reject when legitimate failures are resolved. Keep existing stronger policies during troubleshooting.
- Keep visibility. Retain rua reporting, account for subdomain policies, and investigate new failures in Suped before authorizing additional senders.
Enforcement DMARC TXT value after validationtext
v=DMARC1; p=reject; rua=mailto:dmarc@example.com
Replace the reporting address and preserve other required tags. A reject policy asks receivers to reject DMARC failures; receivers still apply their own handling rules.
Suped's Hosted DMARC manages policy changes through its dashboard after the required DNS setup. Use Suped's source evidence to decide when each stage is ready.
|
|
|
|---|---|---|
p=none | Monitor | Inventory incomplete |
p=quarantine | Treat as suspicious | Senders validated |
p=reject | Reject failures | Failures resolved |
Choose the next policy using legitimate-mail results.
Continue monitoring after enforcement. A newly deployed application needs the same sender validation and message test before it uses your domain.
Frequency asked questions
include:mx.ovh.com is documented for MX Plan, Email Pro, and Hosted Exchange. Private Exchange and direct VPS sending need their actual outbound IP addresses. Add the include only when your sending route uses the shared service.
mail-out.ovh.net is associated with OVHcloud outgoing infrastructure. OVHcloud's header documentation includes mo3005.mail-out.ovh.net. Treat a matching hostname as a source clue, then confirm the connecting IP and authenticated domains before trusting or authorizing the sender.
No. DMARC passes when DKIM passes with domain alignment, even if SPF alignment fails. When the sending route uses a provider-owned envelope domain, adding an include to your domain does not change that identity.
Do not assume a mailbox setting covers a separate PHP mail() route. Test the actual application message. For predictable mailbox signing, configure the application to use authenticated OVHcloud SMTP with DKIM enabled for the domain.
OVHcloud documents 30 minutes to 24 hours for automatic activation. After 24 hours, check the DKIM panel and both CNAMEs, then retest.
Keep an existing p=reject or p=quarantine policy. Diagnose the failing sender, correct its authentication, and retest. The p=none example is for a new monitoring deployment, not a reason to remove working enforcement.




