
How to set up DMARC/DKIM/SPF for netcup

For netcup web hosting, publish the SPF TXT record with include:_spf.webhosting.systems, add both key1 and key2 DKIM CNAME records, and publish a DMARC TXT record at _dmarc. Send through your hosting plan's authenticated SMTP service, then check a delivered message for SPF, DKIM and DMARC results.
I start with the web hosting mail service described in netcup's public 'DNS Records' documentation. A domain registered at netcup but sending through another provider needs that sender's records. A self-managed netcup VPS needs its own mail-server configuration; the shared web hosting records below are not a VPS setup.
Add your domain
First, attach the sending domain to the correct netcup web hosting plan. If it is already assigned and its mailbox works, keep that assignment and continue with SPF.
- netcup domain: In the CCP, open Domains, click the magnifying glass beside the domain, and open Administration. Under Select Hosting, choose the intended plan and click Allocate web hosting.
- External domain: Open Domains > External domains > Create. Enter the domain and click Confirm. Publish the displayed verification token at its authoritative DNS provider using the requested name and record type.
- Verify ownership: Click the magnifying glass beside the external domain, then Start token verification. After confirmation, open Products > your hosting plan > External domains, select it, and click Add external domain. Keep the token for recurring validation.
- Create a mailbox: Open Products, select the hosting plan with its magnifying glass, and click Auto-Login MAIL. In the WCP, click Create Email Address, enter the mailbox details, and click OK.
For netcup-hosted DNS, open CCP > Domains > the domain's magnifying glass > DNS. Domains on CloudDNS use the CloudDNS tab. If the domain uses external nameservers, edit the records there; changes in an inactive netcup zone have no public effect.
I copy the SMTP hostname and connection settings from the WCP rather than guessing a shared hostname. Configure your website or application to authenticate with the mailbox, and use a From address on the domain you are configuring.
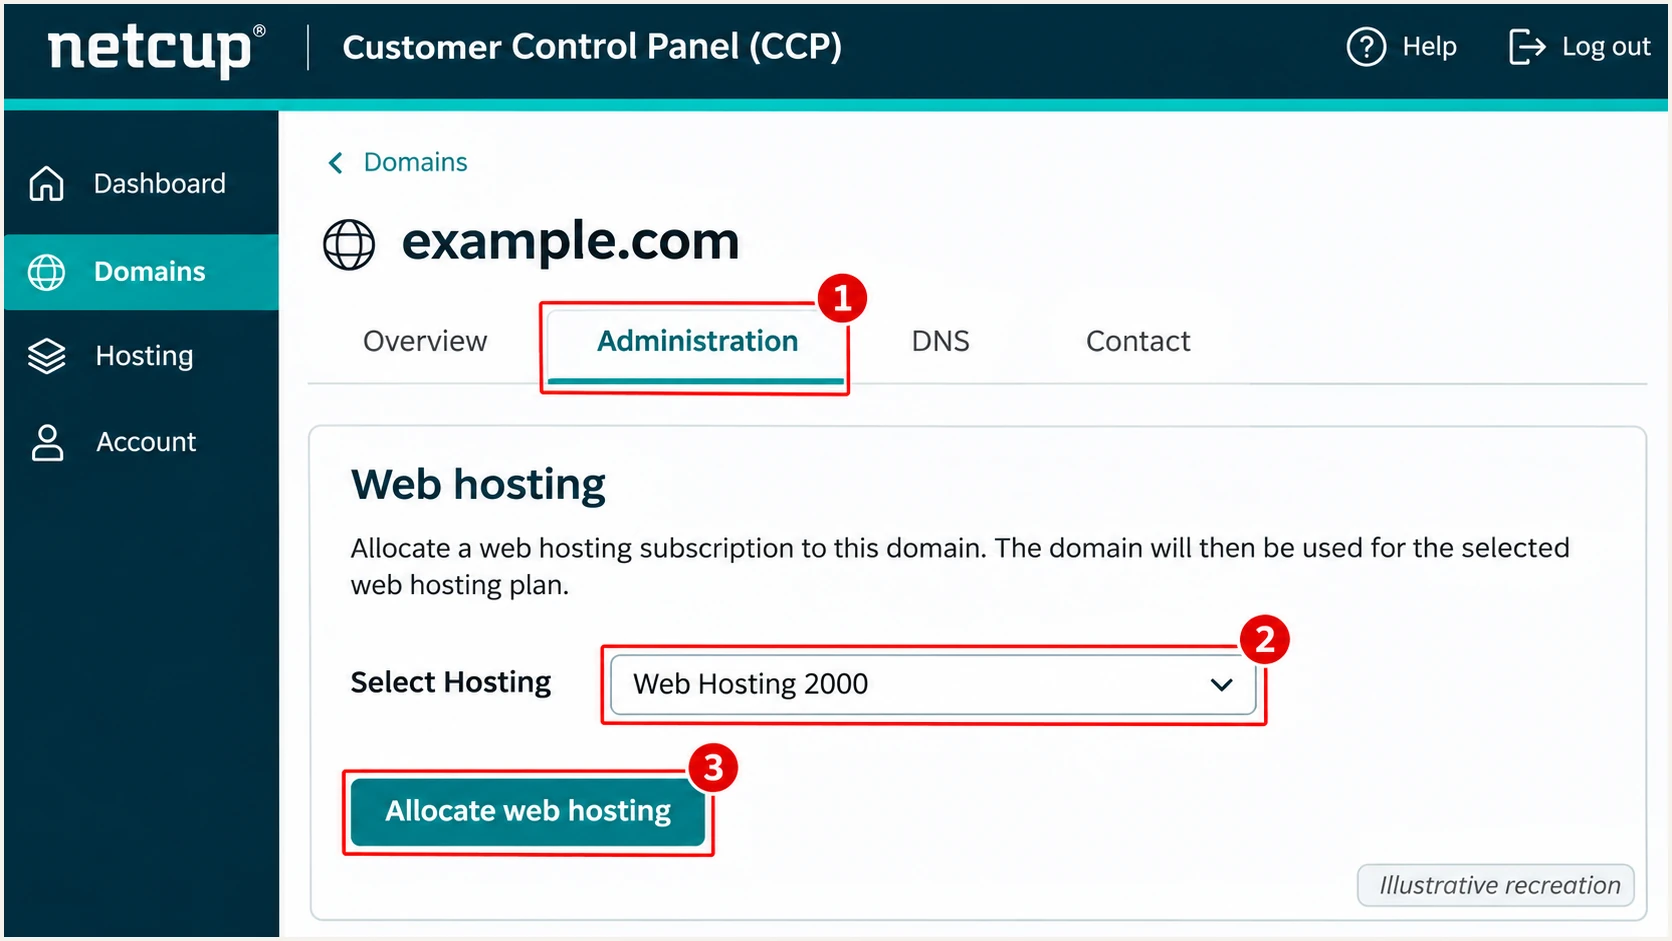
Illustrative netcup CCP screen for assigning a domain to web hosting.
Set up SPF
SPF authorizes the sending server for the envelope sender, which appears in the delivered Return-Path. This address is separate from the From address displayed to your recipient.
netcup web hosting supports using your own domain for the envelope sender. Verify the actual value your application sends rather than assuming it matches the visible From address.
- Inspect existing TXT records: Look for a value beginning v=spf1 at the sending domain. Edit that record if it exists. There must be only one SPF record at each hostname.
- Authorize netcup: For the standard web hosting setup, use Host @, Type TXT and the Destination below. Preserve other legitimate senders in the same record, before the final all mechanism.
- Check the envelope sender: Use a Return-Path on your From domain or its subdomain. If your application exposes an envelope-sender setting, configure it there. Adding a Return-Path message header does not set the SMTP envelope sender.
- Save the zone: Click Save DNS Records in the DNS tab, or Apply changes in CloudDNS. Keep existing MX records unless you are intentionally changing inbound mail routing.
Standard netcup web hosting SPF recordtext
Host: @
Type: TXT
Destination: v=spf1 mx a include:_spf.webhosting.systems ~all
The a and mx mechanisms authorize addresses resolved through your domain's A/AAAA and MX records. The include authorizes netcup's web hosting relays. Review those permissions if your DNS differs from netcup's standard hosting configuration.
Check the published record below for syntax errors, duplicate SPF records and the 10 DNS lookup term limit, including nested includes. Use your real domain, not example.com.
SPF checker
Find SPF syntax issues, lookup limits, and weak records.
?/16tests passed
A valid SPF record does not prove that the message passes DMARC. I check that SPF passes for the actual envelope domain and that this domain matches the visible From domain under DMARC's domain-matching rules.
Under the default relaxed SPF alignment, bounce.example.com matches a From address at example.com. A netcup-owned Return-Path does not match example.com, even when SPF passes. A passing DKIM signature with a matching domain still permits DMARC to pass.
Set up DKIM
Publish both netcup DKIM selectors. The CNAMEs delegate public-key lookups to netcup; the receiving server uses the selector in each message's DKIM-Signature to find the relevant key.
- Add key1: Create a CNAME with Host key1._domainkey and Destination key1._domainkey.webhosting.systems.
- Add key2: Create a second CNAME with Host key2._domainkey and Destination key2._domainkey.webhosting.systems. Keep both selectors published.
- Avoid name conflicts: Check for existing TXT or CNAME records at each selector before editing. A CNAME cannot coexist with other record types at that same name. Save the DNS changes.
- Confirm signing: Send through netcup SMTP and inspect DKIM-Signature. Check that d= is your sending domain and that the receiver reports dkim=pass. DNS records alone do not enable a missing signature.
netcup web hosting DKIM CNAME recordstext
Host: key1._domainkey
Type: CNAME
Destination: key1._domainkey.webhosting.systems

Host: key2._domainkey
Type: CNAME
Destination: key2._domainkey.webhosting.systems
Enter these Host values relative to your DNS zone. For example, key1._domainkey becomes key1._domainkey.example.com. Confirm that the CNAME destination stays under webhosting.systems and has not had your own domain appended.
netcup excludes direct PHP mail(), sendmail and external-server delivery from its documented web hosting authentication setup. Switch the application to authenticated netcup SMTP. If SMTP mail is still unsigned, ask netcup support to confirm signing for your domain, especially with external DNS.
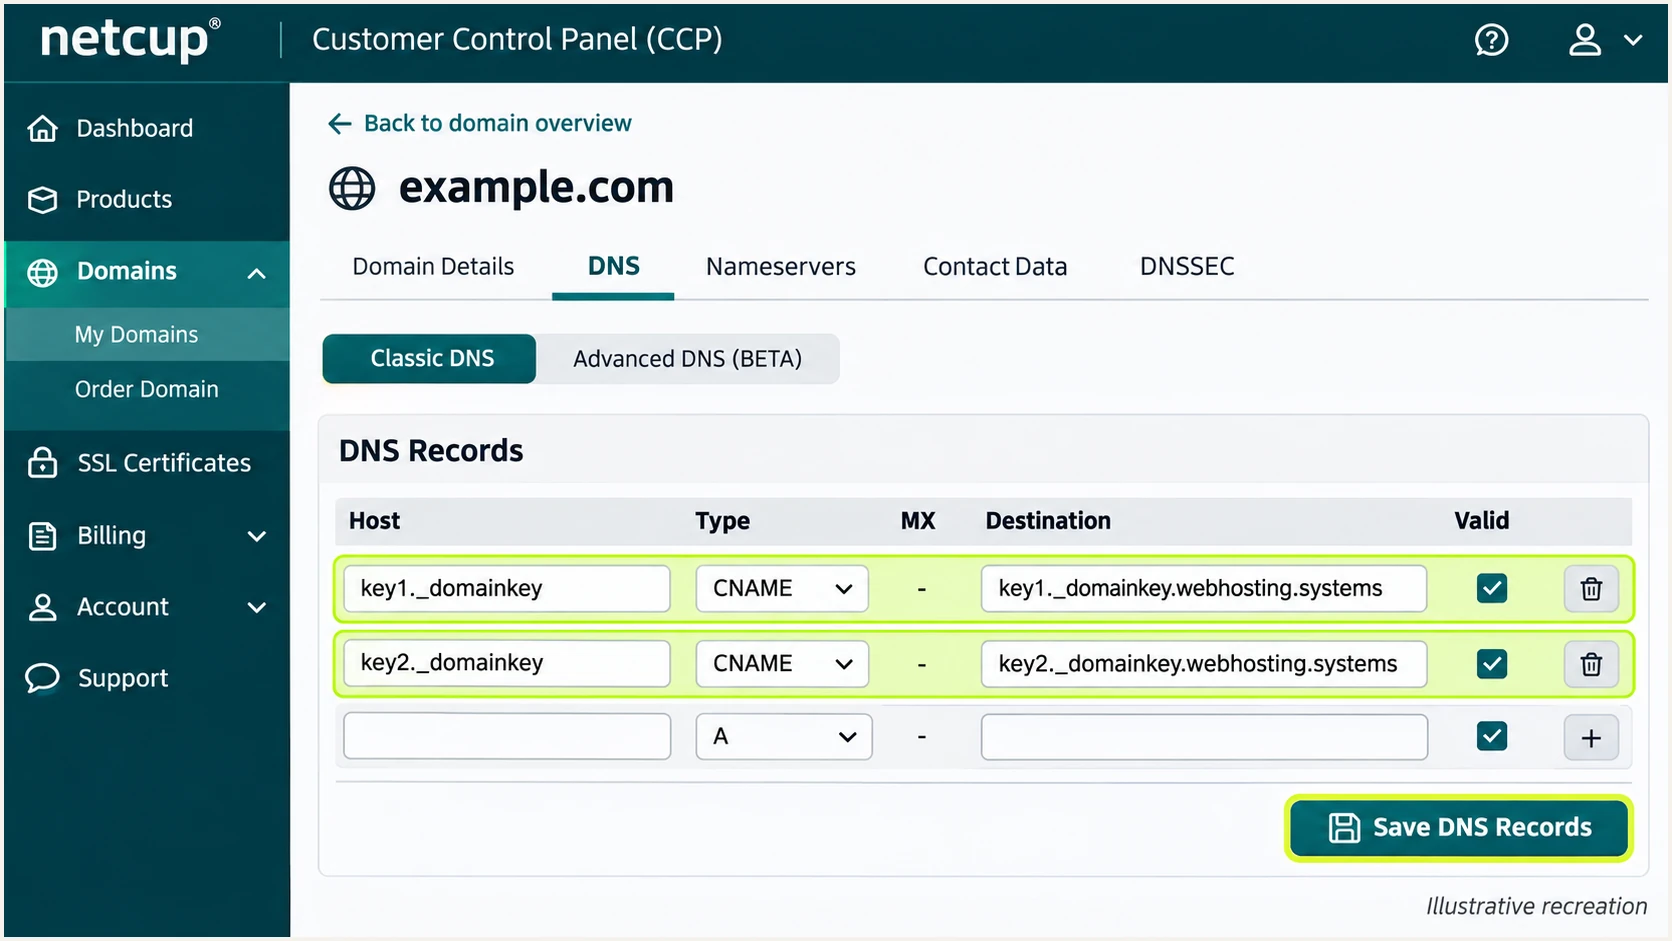
Illustrative netcup DNS screen with both DKIM CNAME records.
Set up DMARC
DMARC checks the visible From domain against a passing SPF envelope domain or a passing DKIM signing domain. Either matching authentication path is sufficient.
I use p=none for a new deployment while checking legitimate traffic. If your domain already enforces DMARC, keep its current policy while authenticating netcup.
- Keep existing enforcement: Look up _dmarc first. If the domain already uses p=quarantine or p=reject, keep that policy and fix netcup authentication without weakening it.
- Publish one policy: For a domain without DMARC, create Host _dmarc, Type TXT with the value below. Edit an existing policy instead of adding a second DMARC record.
- Set report delivery: Replace dmarc@example.com with a real mailbox or your assigned aggregate-reporting address. For a reporting destination on another domain, confirm that its operator publishes the required external reporting authorization.
- Save and validate: Save the DNS change and query _dmarc.your-domain. Confirm that one valid policy is returned and that the reporting address is correct.
Starting DMARC record, replace the example reporting addresstext
Host: _dmarc
Type: TXT
Destination: v=DMARC1; p=none; rua=mailto:dmarc@example.com
Use the DMARC record generator to build the policy with your actual reporting address. Keep the default relaxed SPF and DKIM alignment unless you have a specific requirement for exact domain matches.
A p=none policy requests reporting without requesting quarantine or rejection for DMARC failures. It does not enforce protection against unauthorized use of your From domain. The screenshot shows the initial policy's location in netcup's DNS editor.
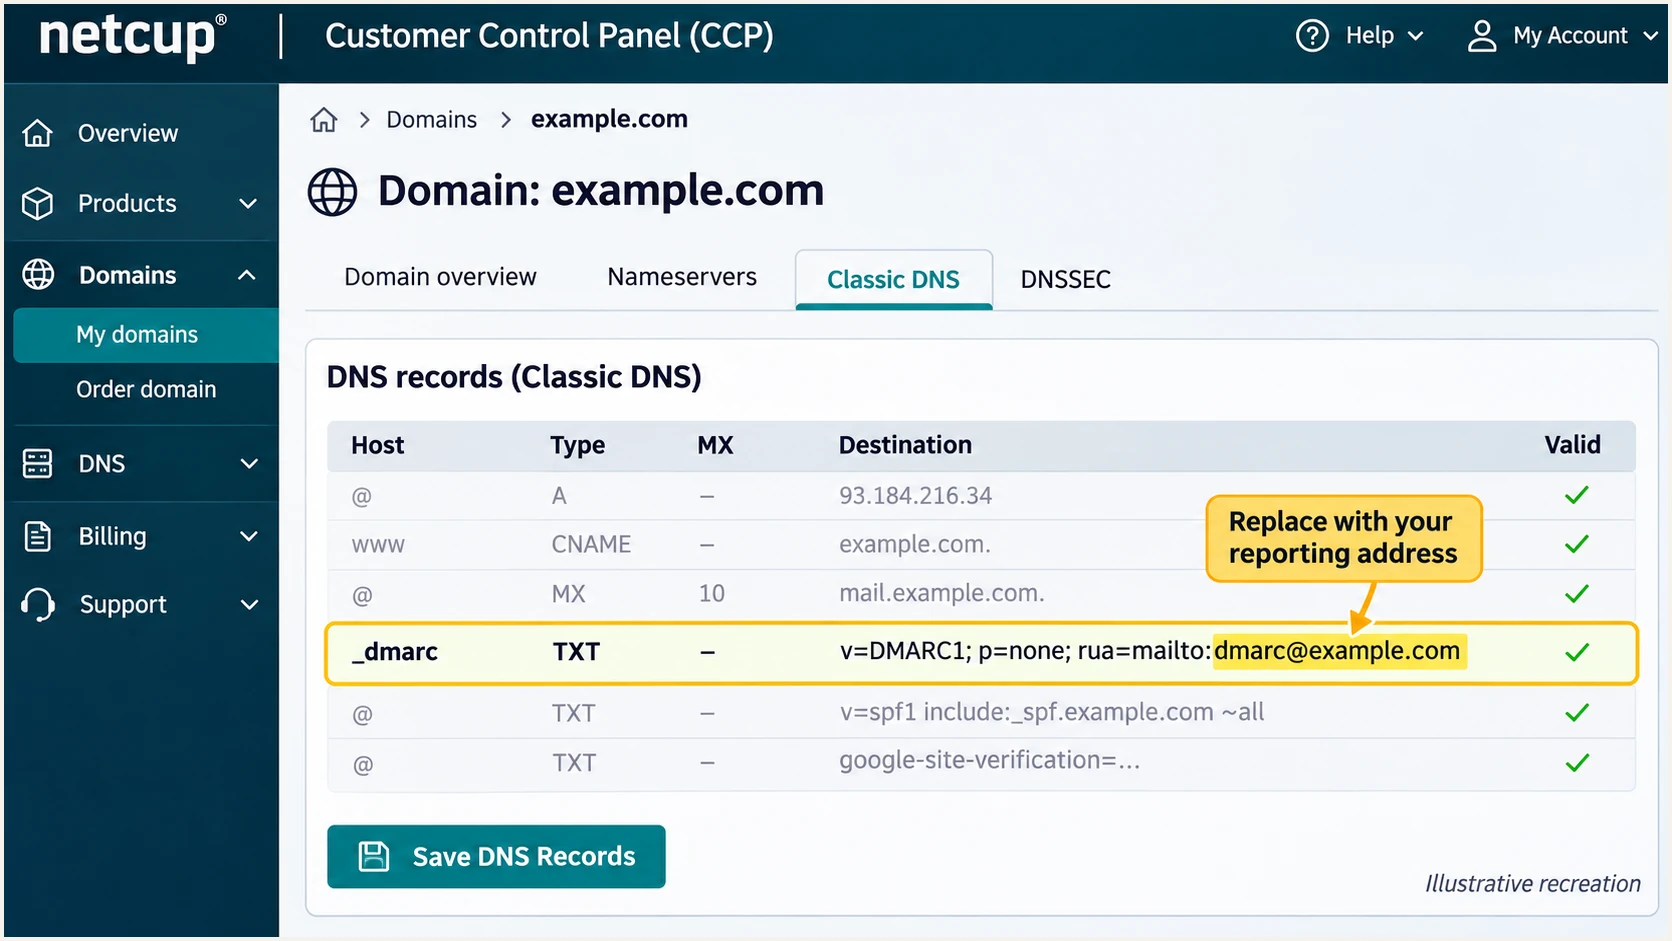
Illustrative netcup DNS screen showing the starting DMARC TXT record.
Check public DNS after saving. A confirmation inside the CCP means the editor accepted the change; it does not prove that every resolver has refreshed its cache.
Enter your From domain below to validate the live DMARC record. This verifies the published policy. The message test in the next section verifies how your actual email authenticates.
DMARC checker
Look up a domain's DMARC record and catch policy issues.
?/7tests passed
Receiving providers commonly send aggregate reports daily. Allow 24-48 hours after real email has been sent before investigating missing reports. Not every receiving provider sends DMARC reports.
If your From address uses a subdomain, check its effective policy too. A subdomain without its own DMARC record normally inherits the organizational domain's applicable policy, including any sp setting.
Verify and troubleshoot
I test the same sending path that will carry production mail. A passing webmail message does not verify a website contact form that still uses local PHP delivery.
- Query DNS: Check the sending domain's TXT records, both DKIM CNAMEs and _dmarc. Compare authoritative answers with your usual resolver before changing records again.
- Send real messages: Test a mailbox message and each application sending path. Use the tester's generated recipient below and send through your configured netcup SMTP connection.
- Read receiver results: Inspect Authentication-Results for spf=pass, dkim=pass and dmarc=pass. Compare smtp.mailfrom and DKIM d= with the visible From domain; a pass without the required domain match does not satisfy DMARC.
- Escalate with evidence: For unsigned SMTP mail or unexpected envelope rewriting, give netcup support the timestamp, message ID, sending mailbox, SMTP hostname and received headers. Exclude passwords and private keys.
The email tester prompts you to send a message, then diagnoses its authentication and other delivery checks. This is the quickest way to test the configuration as recipients see it.
Keep a separate test result for each application. If you compare raw headers manually, inspect the destination receiver's Authentication-Results rather than a result inserted earlier in transit.
Email tester
Send a real email to this address. Suped shows a results button when the test is ready.
?/43tests passed
For a message received in netcup webmail, open it and choose More > Show source. Inspect DKIM-Signature for d= and s=, then compare the signature with the receiver's results. A selector lookup alone cannot validate the message signature.
If the DNS values are correct but tests fail, use the result to narrow the next change. I avoid resetting the whole DNS zone because that can overwrite unrelated working records.
|
|
|
|---|---|---|
SPF permerror | Duplicate or excess lookups | Merge; recount |
SPF mismatch | Provider envelope domain | Return-Path |
DKIM missing | Unsigned sending path | SMTP route |
DKIM key absent | Selector DNS problem | Both CNAMEs |
DMARC fail | No matching pass | From and auth domains |
Old DNS value | Wrong zone or cache | Nameservers; TTL |
Common netcup authentication failures and the next check.
Get alerted when it breaks
Suped is our DMARC platform. Its DMARC monitoring turns aggregate reports into source-level authentication results and detected issues, so netcup configuration drift does not depend on someone repeating a manual test.
- Receive reports: Use your assigned Suped reporting address in rua while keeping your intended DMARC policy. Confirm that new reporting periods contain netcup traffic.
- Verify the source: Check netcup's source IPs and authentication domains against your actual sending configuration, then mark the legitimate source as verified. Do not approve traffic only because its hostname mentions netcup.
- Enable notifications: In Suped's notification settings, enable Issues detected and Sending sources need verification. Enable DMARC summary emails for recurring review.
- Investigate changes: Open the affected source and record details to inspect SPF, DKIM and DMARC results. Compare DNS history, follow the issue's fix steps, and send another application test.
For a netcup-hosted website, I check whether a deployment changed SMTP settings when DKIM disappears. For SPF errors after a DNS edit, I check for a duplicate record or a Return-Path domain change before adding more permissions.
Suped keeps report investigation and issue resolution in the same workflow. Use the observed failure and affected source to decide which netcup setting needs attention.
Report timing limits alert timing
Aggregate-report alerts depend on incoming reports, which commonly arrive daily. After a DNS change or application deployment, run a message test immediately and use subsequent reports to confirm ongoing behavior.
Secure your domain with p=reject
Move to p=reject after every legitimate sending path has a passing SPF or DKIM result with the required domain match. I use source-level evidence in Suped rather than a single domain-wide pass percentage to make that decision.
Before increasing enforcement, record the current policy and the application owner for every legitimate source. This gives the team a specific configuration to inspect if an alert follows the change.
- Cover normal traffic: Review several reporting cycles covering routine and infrequent mail, including website forms and scheduled jobs. Trigger a test for any legitimate sender that has not appeared.
- Fix legitimate failures: Use Suped's source details and detected issues to resolve netcup SMTP, DKIM and envelope-domain problems. Investigate unknown sources before approving them or expanding SPF.
- Stage enforcement: For a new deployment, move from p=none to p=quarantine, watch subsequent reports, then change to p=reject. Keep quarantine or reject in place if it was already working before this setup.
- Keep monitoring: Retain rua and alerts after enforcement. Review subdomain coverage and retest whenever a netcup hosting plan, sending application or DNS record changes.
Keep investigating
A contact form is unsigned, a legitimate source fails DMARC, or an infrequent application has not been tested. Resolve that path before increasing enforcement on a new deployment.
Ready for rejection
Each legitimate sender has a matching SPF or DKIM pass, routine reporting periods confirm the results, and alerts reach the team responsible for the domain. Apply p=reject and retain reporting.
Our Hosted DMARC lets you manage policy in Suped after the required initial DNS configuration. This keeps policy changes beside the reports and issue details used to assess their effect.
If you keep DMARC as a TXT record in netcup DNS, edit the existing record to the final value below and keep your real reporting destination. Do not create another policy at the same _dmarc name.
Final DMARC policy after legitimate senders are verifiedtext
Host: _dmarc
Type: TXT
Destination: v=DMARC1; p=reject; rua=mailto:dmarc@example.com
A reject policy asks receivers to reject messages that fail DMARC. Receivers retain their own handling decisions. It does not guarantee inbox delivery or prevent abuse using a different domain.
A legitimate forwarded message can lose SPF authentication while retaining a valid DKIM signature. I prioritize reliable DKIM signing before enforcement so a changed delivery path does not make SPF the only route to a DMARC pass.
Frequency asked questions
netcup documents v=spf1 mx a include:_spf.webhosting.systems ~all for its standard web hosting setup. Publish it as TXT at the sending domain. Merge other authorized senders into that record instead of publishing another SPF record. Do not apply it automatically to a self-managed VPS.
Yes. Publish key1._domainkey and key2._domainkey as CNAMEs pointing to their corresponding names under webhosting.systems. netcup requires both records. A message uses the selector named in its signature; it does not need two signatures to pass DKIM.
SPF can pass for a netcup-owned envelope domain that does not match your visible From domain. Configure your own envelope-sender domain where supported, and check that DKIM passes with a matching signing domain. DMARC passes when at least one matching authentication path passes.
Do not assume that it will. netcup's documented web hosting setup excludes direct PHP mail() and sendmail delivery. Configure the application to submit through the hosting plan's authenticated SMTP service, then test that exact application path.
netcup uses netcup.net and webhosting.systems for its hosting infrastructure. An rDNS match is an infrastructure clue, not proof that a particular application or domain owner sent the message. Check the sending IP, received headers and authenticated domains against your configured netcup sending path.
Use complete traffic coverage rather than a fixed number of days. Review multiple report cycles, test infrequent sending paths, and fix legitimate DMARC failures first. For a new deployment, check the effect of quarantine before applying reject. Keep existing enforcement while configuring netcup.




