
How to set up DMARC/DKIM/SPF for Namecheap

Set up Namecheap email authentication by publishing the sending service's SPF record, enabling its DKIM signing, and adding a DMARC TXT record at _dmarc. For cPanel hosting, get SPF and DKIM values from Email Deliverability. For Private Email, use its documented SPF value and the DKIM record generated in your Namecheap account.
I check the actual sending service and authoritative DNS first. Buying a domain at Namecheap does not identify its email provider. DMARC needs at least one passing authentication method, SPF or DKIM, with domain alignment to the visible From address.
Add your domain
Skip domain creation if the domain already appears in your hosting account or Private Email subscription. I keep existing DNS hosting in place when adding email authentication.
- Locate DNS: Open Domain List > Manage > Domain and inspect Nameservers. Use the DNS editor indicated below, even when the domain is registered at Namecheap.
- Add to cPanel: Open Hosting List > Go to cPanel > Domains > Create A New Domain. Enter your registered domain and click Submit. If external DNS triggers ownership validation, publish the exact TXT challenge shown at your DNS host, then retry creation. The challenge expires after one day.
- Create a mailbox: In cPanel, open Email Accounts > Create, select the domain, and create the sending mailbox. Confirm the domain also appears in Email Deliverability.
- Activate Private Email: If using Private Email instead, select your existing domain when ordering the subscription. Open Private Email > Manage afterward. For externally registered domains, Namecheap verifies ownership through its required MX records; publish both hosts shown below with priority 10 and confirm activation.
|
|
|---|---|
BasicDNS / FreeDNS | Advanced DNS |
PremiumDNS | Advanced DNS |
Web Hosting DNS | cPanel Zone Editor |
External DNS | Current DNS host |
Private Email MX hosts, only when activating that servicetext
mx1.privateemail.com
mx2.privateemail.com
For a domain moving its incoming mail to Private Email, Advanced DNS > Mail Settings > Private Email installs the service's mail records. Review existing mail routing before changing that setting.
MX changes are unnecessary for an SPF, DKIM or DMARC update alone. For mailboxes hosted in cPanel, confirm Email Routing is Local Mail Exchanger; do not select it for mailboxes hosted elsewhere.
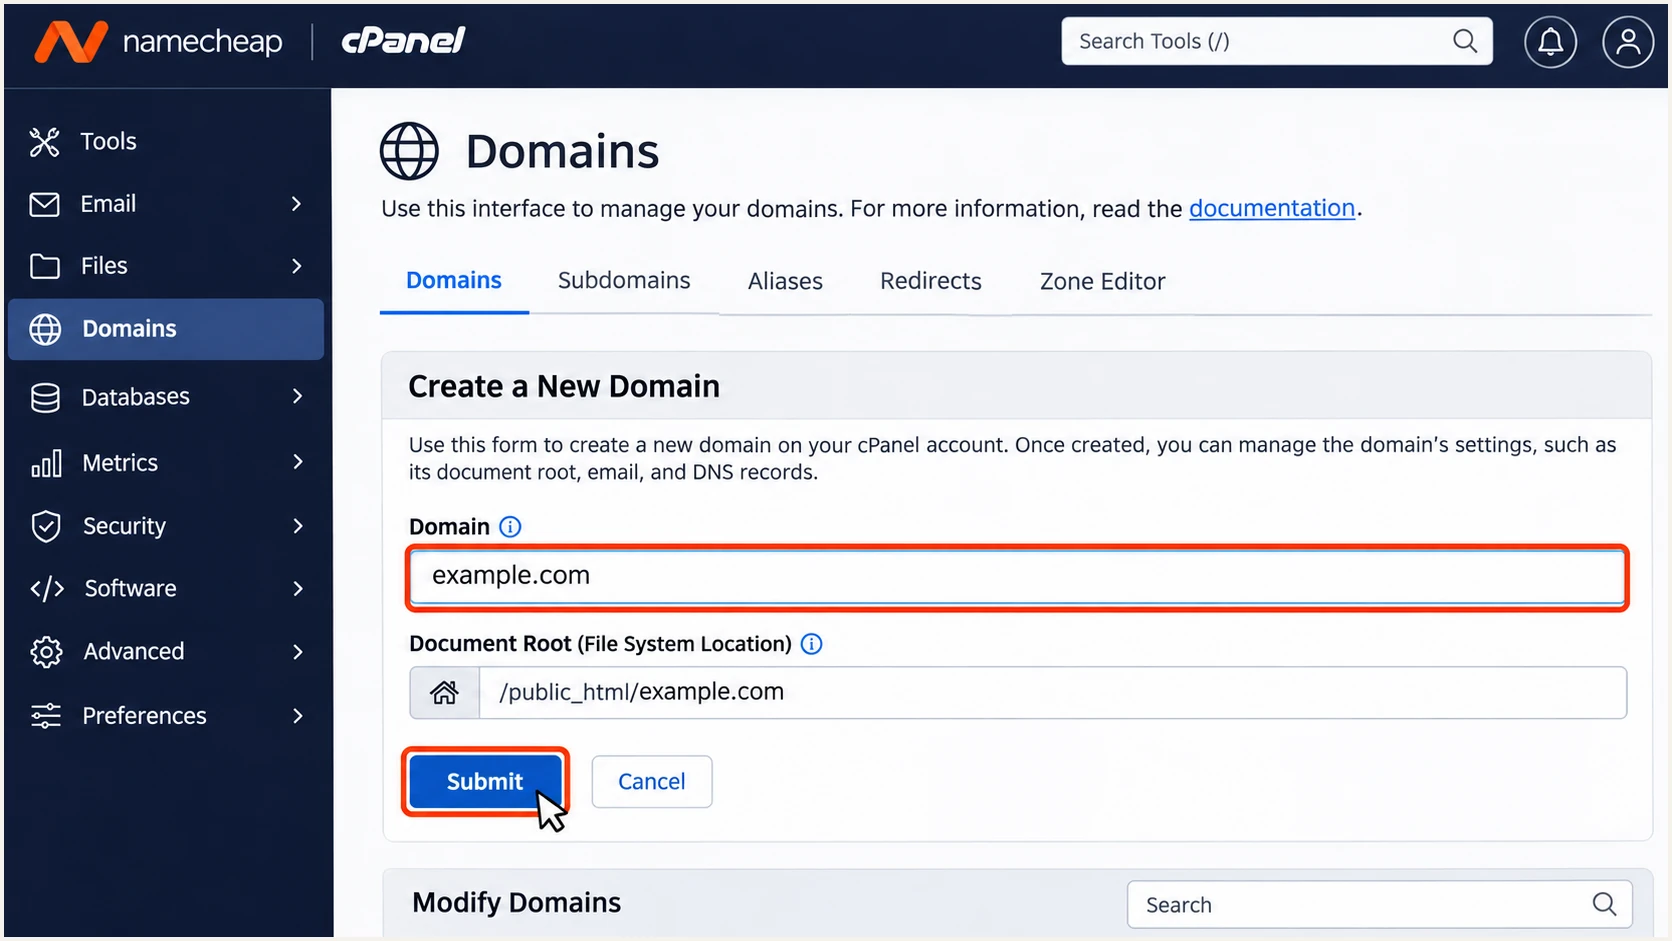
Add a registered domain in Namecheap cPanel before creating its mailbox.
Set up SPF
Use the SPF value for the service that actually sends your mail. I use cPanel's account-specific recommendation for hosted websites and cPanel mailboxes.
SPF checks the envelope sender domain, shown as Return-Path after delivery. A passing SPF result contributes to DMARC only when that domain has alignment with the visible From domain.
- Copy cPanel's value: Open cPanel > Email > Email Deliverability > Manage beside your domain. Copy the Suggested SPF TXT value. Review its authorized IP addresses with Namecheap support if the server's outgoing IP has changed.
- Use the Private Email value: For Private Email, use the record below. Do not substitute this value for the SPF record of a website sending through cPanel.
- Publish one record: With BasicDNS, PremiumDNS or FreeDNS, open Domain List > Manage > Advanced DNS > Host Records. Edit the existing SPF TXT record at @, or choose Add New Record > TXT Record. Leave TTL at Automatic and save.
- Preserve other senders: Merge authorized mechanisms into one SPF record before the final all mechanism. Keep one v=spf1 record per hostname and stay within SPF's 10 DNS-lookup limit, including nested lookups. Do not replace other legitimate senders with Namecheap alone.
Private Email SPF TXT value at host @text
v=spf1 include:spf.privateemail.com ~all
For Web Hosting DNS, edit the existing TXT record in cPanel > Zone Editor > Manage. Install the suggested record in Email Deliverability only after checking it preserves every authorized sender.
With external nameservers, copy the suggested value into the external DNS zone. A change in a non-authoritative cPanel zone does not publish it publicly.
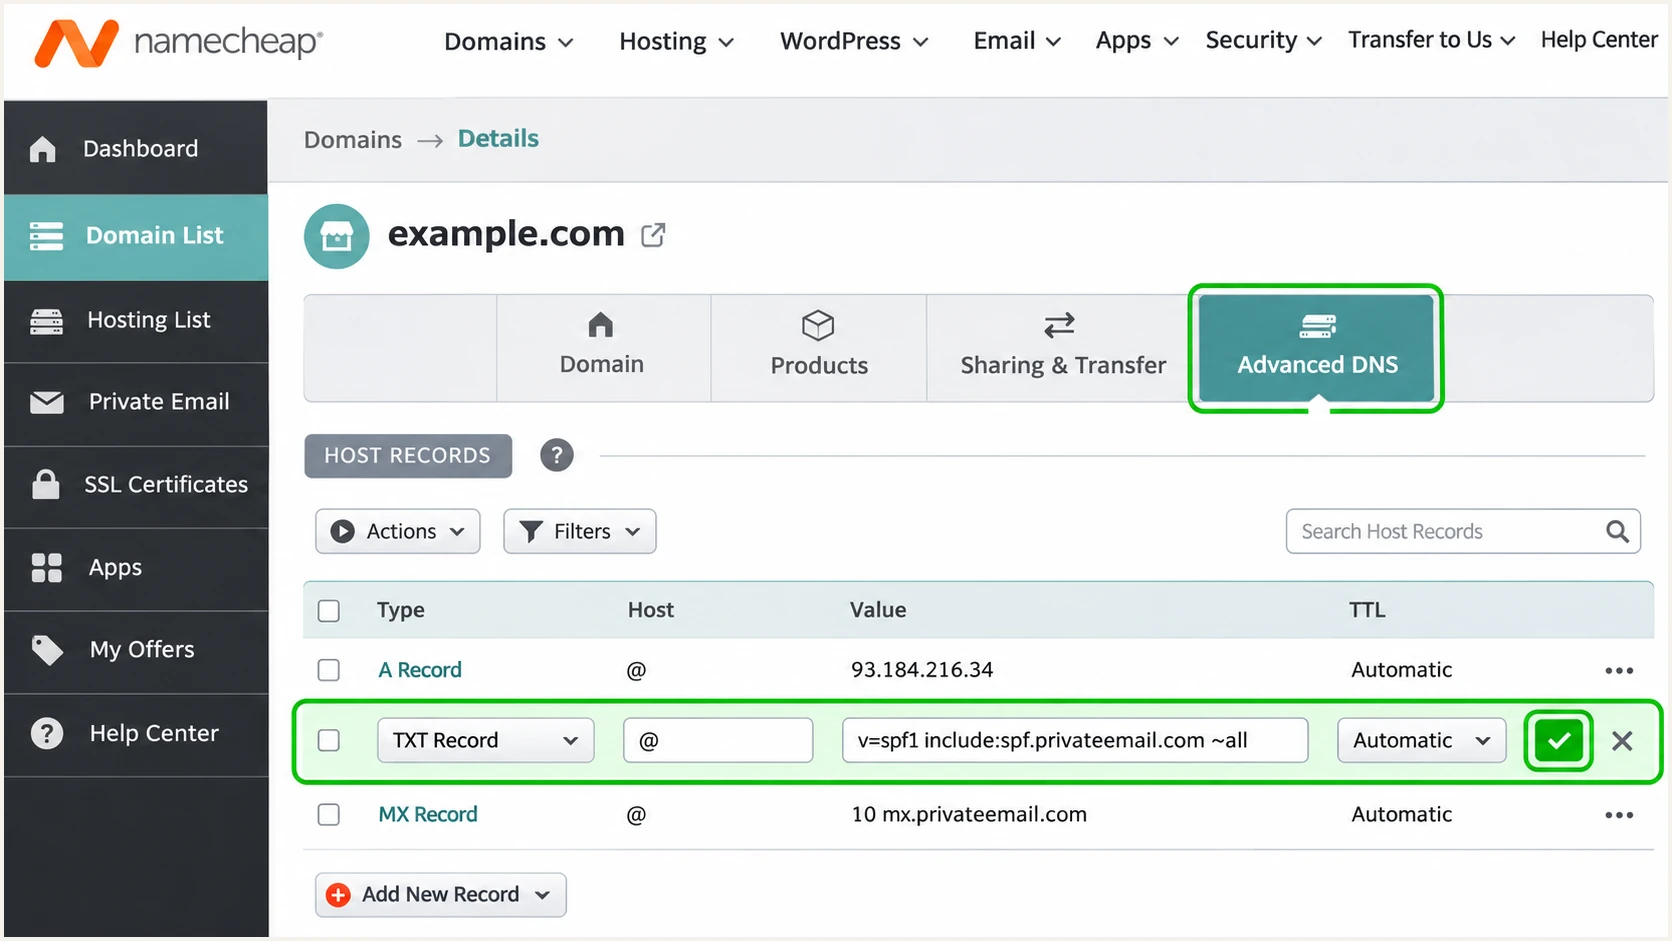
Publish the Private Email SPF value as one TXT record at @.
Enter your sending domain below to check the publicly published SPF record. Inspect lookup-limit errors as well as syntax.
Check the envelope sender's hostname separately when it differs from the root domain. SPF records do not automatically apply to subdomains.
SPF checker
Find SPF syntax issues, lookup limits, and weak records.
?/16tests passed
After saving a change, repeat the lookup once DNS caches refresh. Namecheap quotes roughly 30-60 minutes for these record updates; existing TTLs affect visibility.
Then send a fresh message through the actual mailbox or application. DNS validation alone cannot confirm which envelope sender the application uses.
Set up DKIM
Get the DKIM key from the service sending the message. A public TXT record only works when that service signs outgoing mail with the matching private key.
I copy an existing key before generating another one. Replacing a working public key while the server still uses its old private key breaks verification.
- Configure cPanel signing: Open Email Deliverability > Manage for the sending domain. If a key is missing, use Generate Local DKIM Key. Copy the suggested DKIM Name and Value, or install the suggested record when cPanel hosts authoritative DNS.
- Get Private Email DKIM: Open Namecheap > Private Email > Manage beside the subscription. Under DKIM, click Generate if no key exists, or Show DKIM to reveal the existing DNS Record value.
- Publish the exact host: Add a TXT record at the authoritative DNS host using the selector and full value supplied by the sending service. In Namecheap Advanced DNS, enter only the host prefix, such as privateemail._domainkey, because Namecheap appends the domain.
- Copy the entire key: Paste the complete DNS Record value, including the full p= public key. Keep it as one TXT resource record. Never publish a private signing key or create separate TXT records for pieces of the public key.
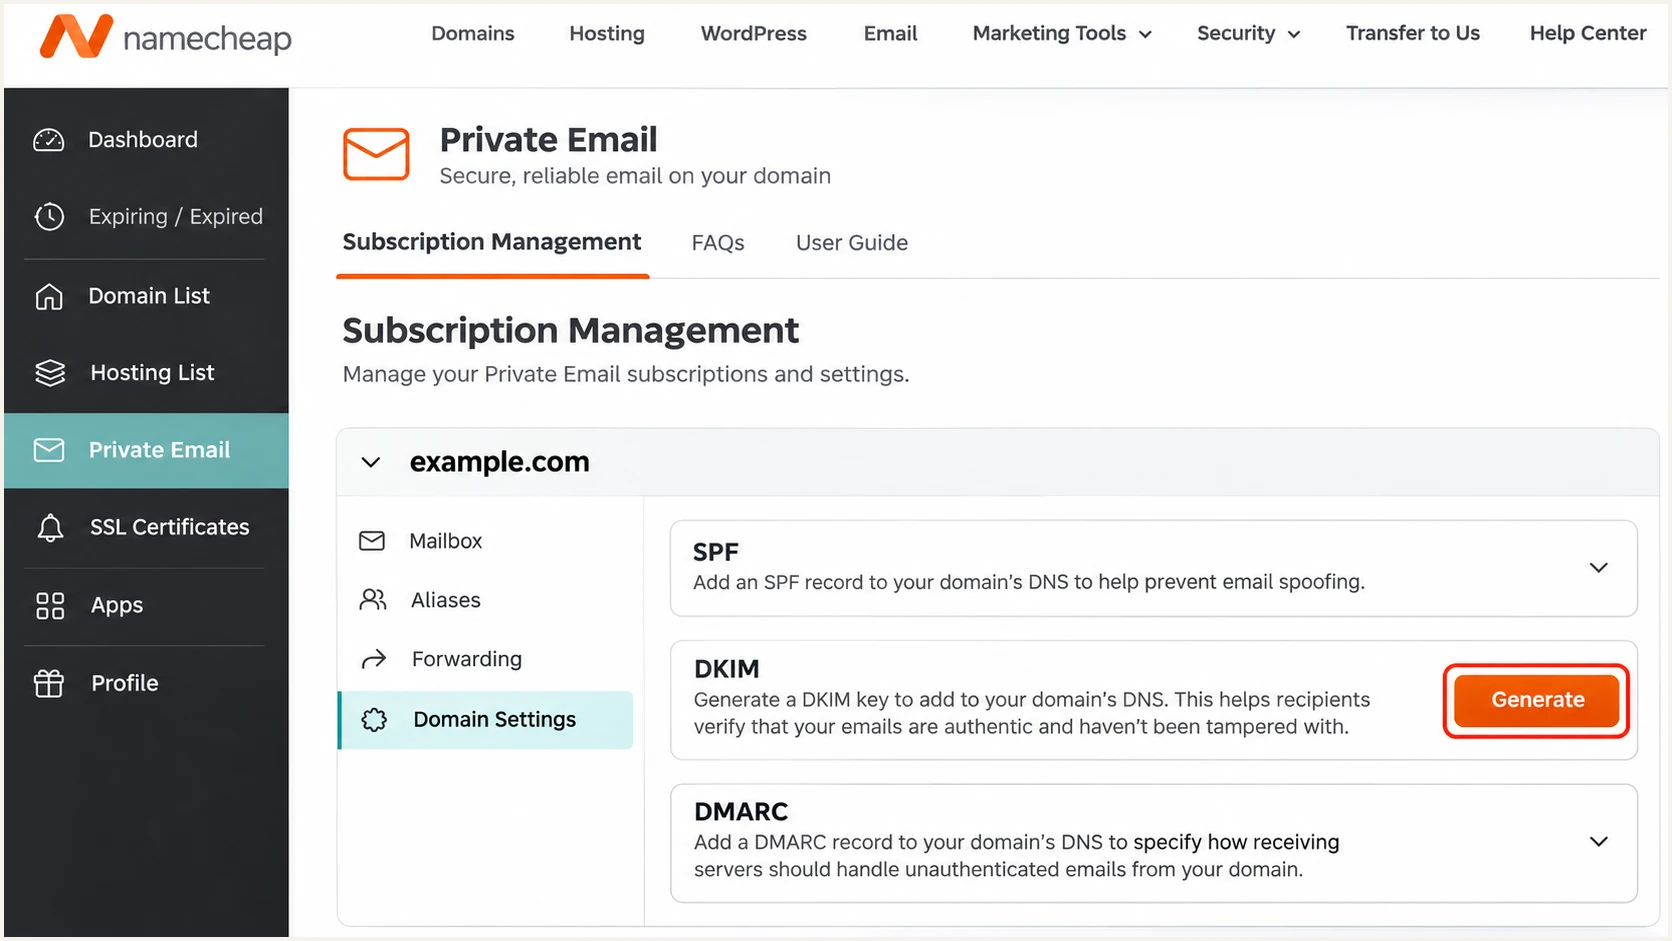
Generate the domain's DKIM record in Namecheap Private Email management.
Namecheap's current Private Email instructions use privateemail._domainkey for newer subscriptions. Subscriptions purchased before June 2, 2026 use default._domainkey. Follow the record shown for your subscription.
After publishing, send a new message and inspect DKIM-Signature. Its s= value identifies the selector; d= identifies the signing domain. Check that DKIM passes and the signing domain has DMARC alignment.
Use the selector from your account
Do not copy another subscription's DKIM key or assume the Private Email selector applies to cPanel. Publish the service's complete generated record and verify a newly sent message.
Set up DMARC
Start with p=none when introducing DMARC. If your domain already uses p=quarantine or p=reject, keep that policy while correcting Namecheap authentication.
Use our DMARC record generator to build the TXT value with your real reporting address. The example below uses the required monitoring policy.
- Inspect the current policy: Look up _dmarc on the sending domain. Edit an existing DMARC record rather than adding a second record at the same hostname.
- Create the TXT entry: For Namecheap DNS, open Domain List > Manage > Advanced DNS > Add New Record > TXT Record. Set Host to _dmarc and TTL to Automatic. For Web Hosting DNS, use Zone Editor > Manage and the full record name _dmarc.example.com.
- Set reporting: Paste the value below, replacing dmarc@example.com with a working report destination you control. If reports go to another domain, confirm its operator provides the required external reporting authorization.
- Save and check: Save the record, then confirm exactly one DMARC TXT record is visible at the authoritative DNS host. Preserve existing reporting destinations when editing an established policy.
Initial DMARC TXT value at host _dmarctext
v=DMARC1; p=none; rua=mailto:dmarc@example.com
The example address is a placeholder, so replace it before publishing. A mailbox receives XML attachments; a reporting platform processes those reports into source-level results.
The p=none policy requests monitoring without DMARC enforcement. Receivers still apply their own filtering and delivery decisions.
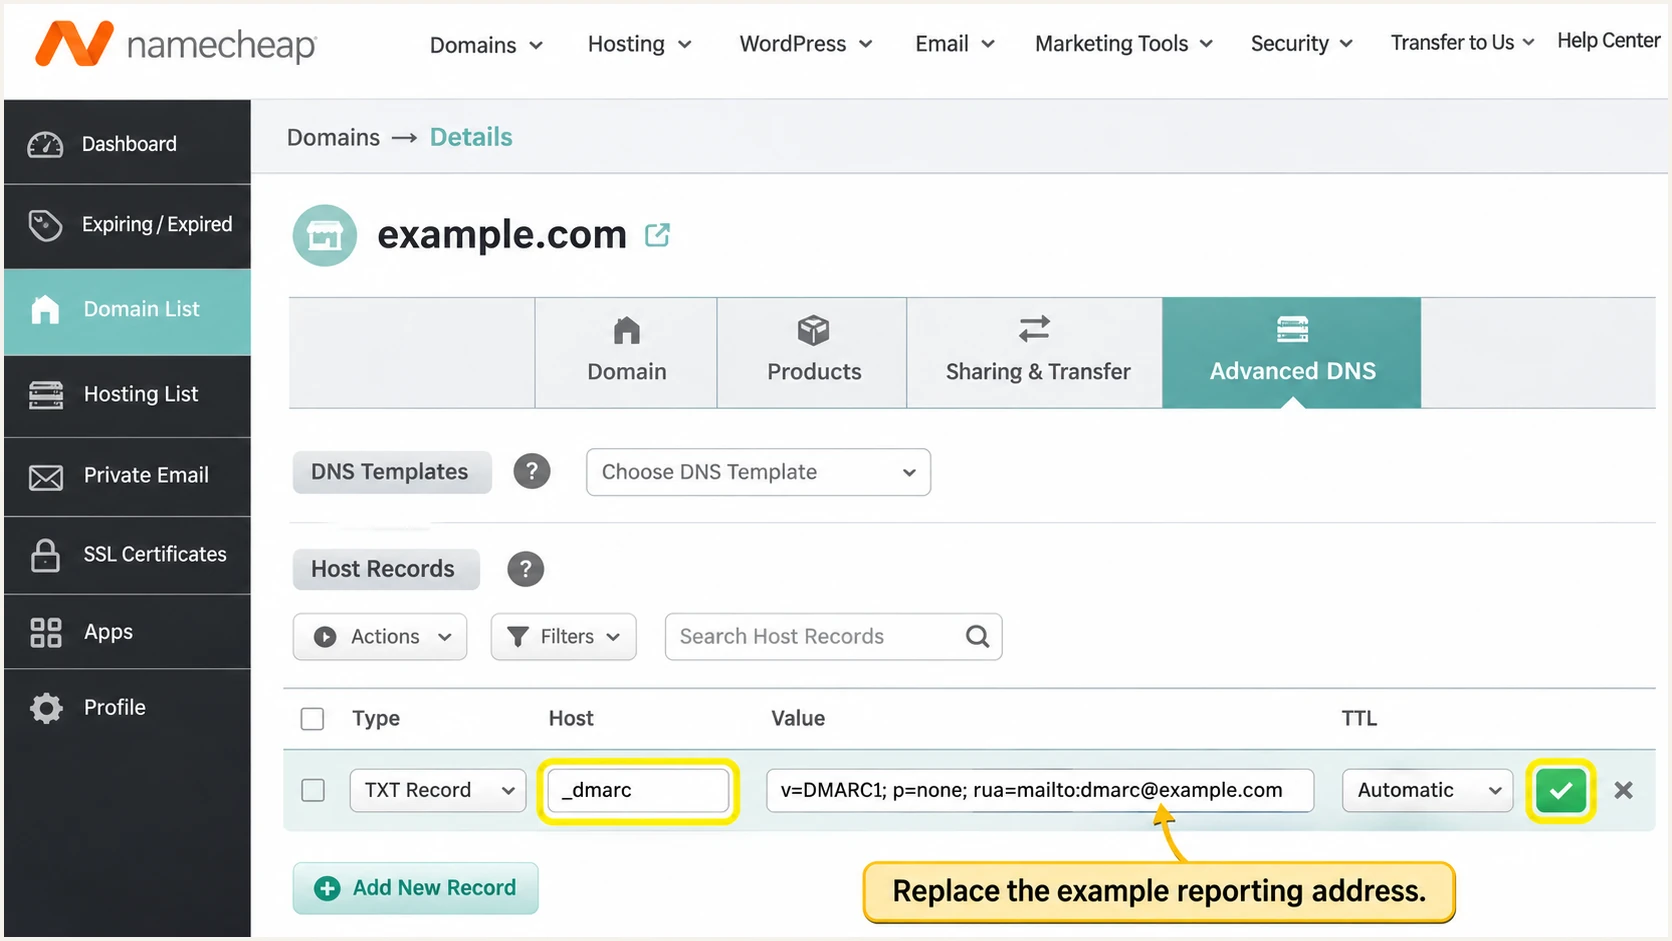
Save the DMARC TXT record at _dmarc in Namecheap Advanced DNS.
Enter the visible From domain below to validate its published DMARC policy. Check the record hostname, policy syntax and reporting destination.
For mail sent as a subdomain, check the policy that applies to that subdomain too. An explicit subdomain policy can differ from the root domain's policy.
DMARC checker
Look up a domain's DMARC record and catch policy issues.
?/7tests passed
A successful lookup confirms the policy is published. It does not prove that cPanel, Private Email or your website is sending authenticated messages.
Send a fresh production-path test next. An old message retains the authentication result calculated when it was received.
Verify and troubleshoot
I verify public DNS and a delivered message separately. A green status in cPanel cannot confirm the headers of every application using the domain.
Send tests through your mailbox and each website contact form or transactional workflow. They can use different servers even when the visible From address is identical.
DNS published
Check one SPF record, the exact DKIM selector and one DMARC policy at the authoritative DNS host.
cPanel Email Deliverability reports DNS configuration. External DNS changes must be visible publicly.
Message authenticated
Inspect the receiver's Authentication-Results header for SPF, DKIM and DMARC results.
Compare the envelope sender and DKIM signing domain with the visible From domain. DMARC requires a passing method with domain alignment.
For Private Email applications, use authenticated SMTP at mail.privateemail.com, port 465 with implicit TLS or 587 with STARTTLS. Use the full mailbox address and its application password; enable the required access under Connect third-party apps.
For cPanel mail, use the assigned server hostname from the hosting welcome email. Set the application sender and envelope sender to your domain where supported, then inspect the actual Return-Path after delivery.
- Check the DNS answers: Run the commands below with your domain. For DKIM, query the selector actually used by the message, rather than assuming either example applies.
- Read trusted headers: Use the recipient server's Authentication-Results, not an arbitrary header inserted earlier. Expect dmarc=pass and preferably both spf=pass and dkim=pass.
- Fix application identities: For contact forms, use your own domain in From and place the visitor's address in Reply-To. An envelope sender on a provider domain gives no SPF alignment with your domain.
- Separate failures: If SPF alignment fails but DKIM passes with domain alignment, DMARC still passes. For missing signatures or key mismatches, check signing in the actual sending service. Ask Namecheap to investigate server-controlled PTR issues; adding a TXT record cannot repair rDNS.
Public DNS checks, replace example.com and select the correct DKIM hostbash
dig +short NS example.com
dig +short TXT example.com
dig +short TXT privateemail._domainkey.example.com
dig +short TXT default._domainkey.example.com
dig +short TXT _dmarc.example.com
Our email tester is the quickest check of a real message. Use the address displayed below and send through the Namecheap mailbox or application you are configuring.
The test analyzes the received message and returns a diagnosis. Test a contact form separately if it uses a different sending path.
Email tester
Send a real email to this address. Suped shows a results button when the test is ready.
?/43tests passed
Fix the reported authentication failure, then send another message. Confirm the relevant SPF or DKIM domain has alignment before treating a passing authentication result as a DMARC pass.
If DMARC passes but delivery still fails, inspect the SMTP rejection and sending IP reputation. Authentication success does not guarantee inbox placement.
Get alerted when it breaks
I keep monitoring active after the initial test because server changes and application updates can break a working setup.
Suped is our DMARC monitoring platform. It turns aggregate reports into source-level results and detected issues with steps to fix, so Namecheap authentication problems have a specific investigation path.
- Confirm report delivery: Check that DMARC reports are arriving in Suped before relying on report-based notifications. Keep the configured reporting destination active.
- Enable issue emails: In Suped Notifications, enable Issues detected and Sending sources need verification. Keep DMARC summary emails enabled for regular review.
- Review sending sources: Confirm that each Namecheap source is expected before marking it verified. Investigate unfamiliar sources instead of adding them to SPF automatically.
- Trace the failure: Filter Data view by the affected source or IP, then open Detail view for SPF, DKIM and DMARC diagnostics. Compare DNS history with the start of the issue and retest the affected Namecheap sending path after the fix.
Keep DNS history available when changing mail servers or regenerating keys. Comparing old and new record values helps isolate an accidental deletion or replacement.
Use the issue's fix steps to correct Namecheap or the authoritative DNS zone, then verify the change and watch subsequent reports for recovery.
Report-based alerts depend on report arrival
DMARC aggregate reports are periodic. Suped detects issues using available data; a report-based notification is not an immediate event for every failed message. Use a fresh email test to check a change immediately.
Secure your domain with p=reject
Move to p=reject after every legitimate sending workflow passes DMARC reliably. I base that decision on source-level results, including low-volume applications and forwarded mail.
Use Suped to review authentication by source and investigate failures before enforcement. Our Hosted DMARC controls support policy changes in the dashboard after hosted configuration; with a regular TXT record, edit the policy in Namecheap or your DNS host.
- Inventory legitimate mail: Account for cPanel mailboxes, Private Email, website forms and business applications using the domain. Leave unknown sources unverified until their owner and purpose are confirmed.
- Fix domain alignment: Get passing DKIM with your domain on every supported sending path, and correct SPF for the envelope sender. Keep relaxed alignment unless your deployment specifically requires strict matching.
- Observe real traffic: Review multiple reporting cycles covering normal business activity, including infrequent sends. Separate unauthorized traffic from legitimate authentication failures; a domain-wide pass rate alone is insufficient.
- Stage enforcement: Change p=none to p=quarantine, review legitimate failures and delivery feedback, then change to p=reject. Keep an existing quarantine or reject policy while fixing newly discovered sources.
- Review subdomains: Check explicit subdomain DMARC records and any sp= policy before assuming they receive the same protection. Keep aggregate reporting and Suped issue notifications active after enforcement.
Example final DMARC TXT value, retain your real reporting destinationtext
v=DMARC1; p=reject; rua=mailto:dmarc@example.com
Replace the example reporting address with your actual destination and preserve other intentional policy tags. Update the existing record rather than publishing a second DMARC policy.
The reject policy requests rejection of messages that fail DMARC. Receivers retain their delivery decisions, and DMARC does not prevent lookalike-domain or display-name impersonation.
Frequency asked questions
Namecheap uses web-hosting.com for shared hosting server hostnames. If that suffix appears in a sending IP's PTR record, investigate it as a Namecheap hosting source. Confirm the IP, trusted Received headers and authentication results before authorizing it. An rDNS hostname alone does not prove the message is legitimate or identify your account.
Namecheap Private Email documents include:spf.privateemail.com for its SPF setup. That value is for Private Email, not every domain registered at Namecheap. For cPanel hosting, use the SPF recommendation in Email Deliverability. An include found inside another SPF record is an infrastructure clue, not an instruction to authorize it.
Namecheap's current instructions specify privateemail._domainkey for newer subscriptions and default._domainkey for subscriptions purchased before June 2, 2026. Copy the host and key shown in Private Email > Manage. Verify the actual selector against s= in a newly sent message's DKIM-Signature header. cPanel has its own generated record.
SPF authenticates the envelope sender domain. If that domain belongs to the provider and differs from your visible From domain, SPF lacks DMARC alignment. DMARC passes if DKIM passes with domain alignment instead. If neither passing method has alignment, correct the sending identity or DKIM configuration; adding another SPF include cannot fix that domain mismatch.
No. Publish the authentication records at the domain's current authoritative DNS host. MX records control incoming mail and are not a requirement for publishing DMARC. Initial Private Email activation for an externally registered domain has a separate MX-based ownership check. Changing nameservers without migrating the existing zone risks disrupting other services.
Namecheap quotes roughly 30-60 minutes for these DNS changes, with actual visibility depending on caching. Initial Private Email ownership verification is checked periodically and its documentation allows up to four hours. Send a new test once public DNS is correct. Aggregate DMARC reports arrive on reporting cycles, independently of a live DNS lookup or email test.




