
How to set up DMARC/DKIM/SPF for Mailcheap

To authenticate Mailcheap email, verify your domain in Mail Portal, publish Mailcheap's SPF TXT record, enable DKIM with the default selector, and add a DMARC TXT record at _dmarc. I then send a real message to confirm that the authenticated domains match the visible From domain. Start a new DMARC deployment at p=none; retain p=quarantine or p=reject if either is already active.
Add your domain
I use the Mailcheap NMS Mail Portal for domain administration. Find your server hostname and administrator credentials in the 'Service activated' email; sign in as DomainAdmin or MasterAdmin.
- Create the domain: Open Domains > New domain, enter your domain in Domain name, then click Create. Skip creation if the domain is already listed.
- Verify ownership: Copy the generated verification TXT value into your domain's authoritative DNS zone, using the host shown by Mailcheap. Keep this separate from your SPF TXT record.
- Confirm verification: Wait for Mailcheap to detect the TXT record automatically, then check the domain's verification status. Cached DNS values expire according to their TTL.
- Create a mailbox: Open Accounts > New account, select MailUser, enter the mailbox details and password, keep Enabled and API access on, then click Create.
Mailcheap's Setup Mail documentation allows 24-48 hours for cached DNS changes to clear. I check the authoritative DNS answer first when verification remains pending.
Publish DNS records at the provider named by your domain's authoritative nameservers. A registrar's DNS editor has no effect if another provider hosts the active zone.
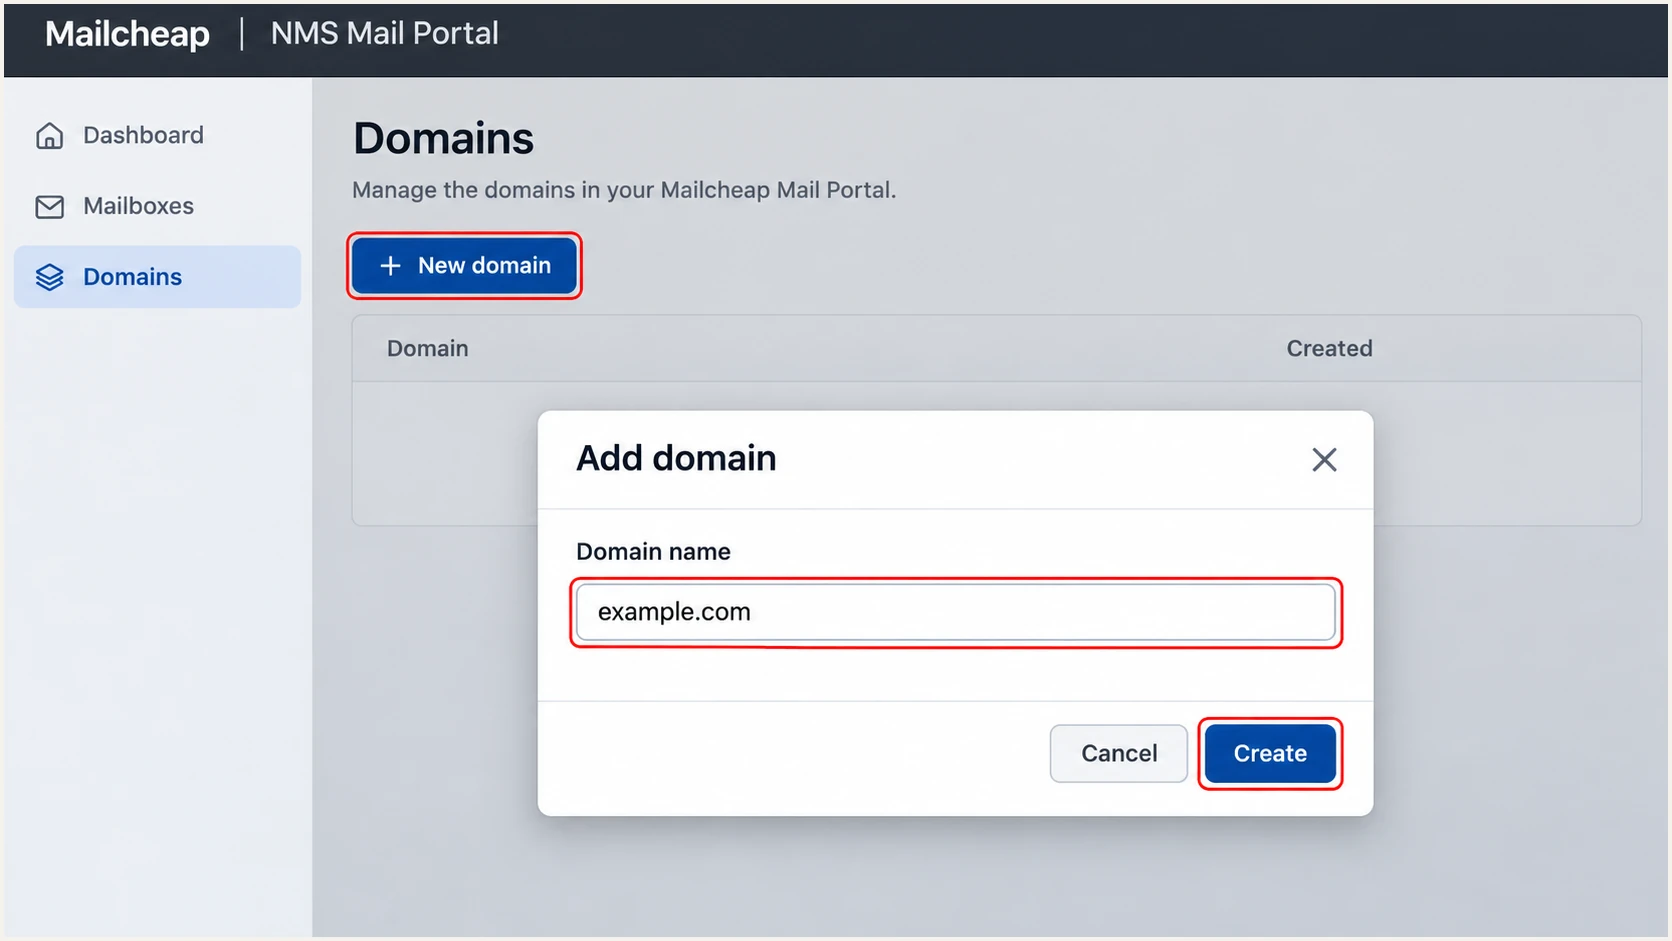
Illustrative Mailcheap Mail Portal screenshot: add a domain through Domains > New domain.
Domain ownership verification does not authenticate outbound email. Complete the SPF and DKIM steps before sending production messages.
If Mailcheap will also receive your mail, copy the assigned MX settings from your service details. Plan that receiving-mail change separately from authentication setup.
Set up SPF
Mailcheap's Setup DNS documentation specifies the SPF value below for a standard hosted domain. I preserve any other active senders when updating an existing policy.
- Inspect the zone: Find the TXT record beginning with v=spf1 at the domain used by your envelope sender. For ordinary mailbox sending, begin with your mailbox domain.
- Update one policy: If Mailcheap is your only sender, use the record below. Otherwise merge its mx and include mechanisms into the existing record, before the final all mechanism.
- Keep active senders: Remove an old provider's authorization only after it has stopped sending. Publish one SPF policy per hostname, using TXT rather than the obsolete SPF record type.
- Check the envelope: Mailcheap supports a Return-Path using your domain. In a received message, confirm that smtp.mailfrom uses the same domain as the visible From address, or the same organizational domain under relaxed DMARC rules.
The mx mechanism authorizes addresses associated with your domain's MX hosts. The include mechanism authorizes Mailcheap's published sending infrastructure.
This baseline assumes the standard Mailcheap setup. For a reseller's private-label service, use the SPF instructions supplied for that service instead of replacing them blindly.
SPF TXT record when Mailcheap is the only sendertext
Type: TXT
Host: @
Value: v=spf1 mx include:_spf.mymailcheap.com -all
Use @ only when your DNS editor uses it for the zone root. An envelope sender on a subdomain needs an SPF policy at that subdomain; SPF does not inherit the parent domain's record.
Check the saved hostname below. SPF permits at most 10 DNS-querying mechanisms and modifiers during evaluation, including nested includes; a short record can still exceed that limit.
SPF checker
Find SPF syntax issues, lookup limits, and weak records.
?/16tests passed
A valid SPF lookup confirms the policy structure. A received message confirms whether the actual sending IP passes that policy.
If SPF passes for a provider-owned Return-Path, it does not satisfy DMARC's domain matching requirement for your From domain. Adding an include to your From domain cannot change that identity; use a matching Return-Path or passing DKIM with your domain.
Set up DKIM
Generate the signing key in Mailcheap so the server holds the matching private key. Mailcheap's documented selector is default; the public TXT record belongs at default._domainkey.example.com for example.com.
- Enable signing: In Mail Portal, open Domains, find your domain, then choose Actions > DKIM > Enable.
- Copy the key: Allow up to one minute for generation, then copy the complete public DKIM record supplied for that domain.
- Publish the TXT: At your DNS host, create a TXT record named default._domainkey, or its full hostname if the editor requires it. Paste the complete generated value.
- Preserve other selectors: Keep DKIM records used by other active senders. If default._domainkey already exists, resolve that selector conflict with Mailcheap before replacing another service's key.
Do not paste another domain's key or generate an unrelated key pair elsewhere. The published public key must correspond to the private key Mailcheap uses for this domain.
Check that the DNS editor has not appended the domain twice. A name ending in example.com.example.com will not be found by receivers.
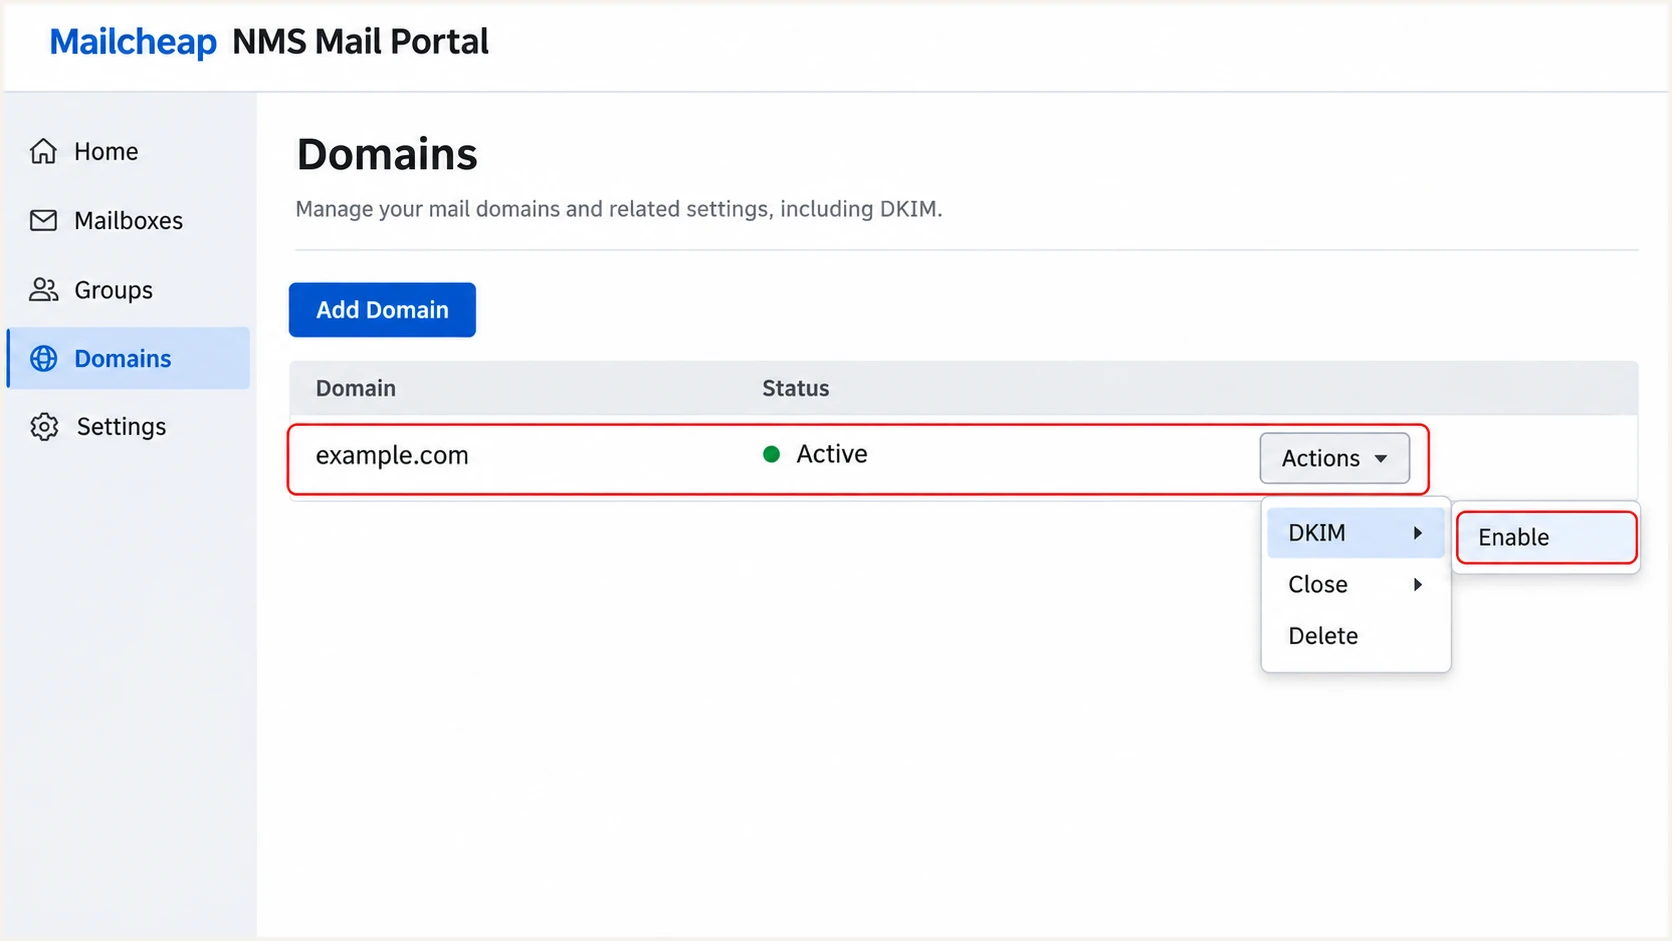
Illustrative Mailcheap Mail Portal screenshot: enable DKIM for the selected domain.
A DKIM TXT record is public verification material. Copy its full value, but never publish a private signing key in DNS.
After DNS is available, inspect a fresh message. Expect dkim=pass, a signing domain matching your From domain, and header.s=default for the documented selector.
Set up DMARC
For a domain without DMARC enforcement, I start with p=none and a working aggregate-report destination. If your domain already publishes p=quarantine or p=reject, keep that policy while configuring Mailcheap.
- Check existing DMARC: Look up TXT records at _dmarc.example.com. Edit the existing policy if one is present; do not create a second DMARC policy at the same hostname.
- Choose the destination: Create and monitor your report mailbox, or use your reporting platform's assigned address. Replace dmarc@example.com in the example before publishing.
- Publish the policy: Create a TXT record with host _dmarc in the example.com zone. Use the monitoring example below only when starting without an enforced policy.
- Retain domain matching: Keep relaxed SPF and DKIM domain matching during initial setup unless your existing configuration requires strict matching. DMARC passes when either SPF or DKIM passes with a matching domain.
Use the DMARC record generator to build the policy with your actual reporting destination. The example uses a placeholder mailbox, not an address that will collect reports for your domain.
Under relaxed matching, a subdomain and its organizational domain can match. Under strict matching, the authenticated domain must exactly match the visible From domain.
Initial DMARC TXT record for a domain without enforcementtext
Type: TXT
Host: _dmarc
Value: v=DMARC1; p=none; rua=mailto:dmarc@example.com
An external report destination needs the receiving service's authorization record. Use the destination supplied by that service so reporting works correctly.
Run a lookup after saving. Check the effective policy and reporting address; a DNS lookup cannot prove that your Mailcheap messages pass DMARC.
DMARC checker
Look up a domain's DMARC record and catch policy issues.
?/7tests passed
Aggregate reports arrive on receivers' reporting schedules, commonly daily. A newly published reporting address does not create an immediate history of past mail.
Keep the report destination active while testing every legitimate sending source. A DMARC policy applies beyond the Mailcheap mailbox used for your first test.
Keep existing enforcement
p=none requests no DMARC-based quarantine or rejection. Use it to observe a new deployment; keep an existing quarantine or reject policy and repair Mailcheap's authentication before production sending.
Verify and troubleshoot
I verify both published DNS and a message delivered through the real sending path. A green DNS check does not prove that a desktop client or application is sending through Mailcheap.
- Check Mailcheap DNS: Sign in to the Mailcheap console and open Tools > DNS status. Review the domain's DNS results after publishing your changes.
- Send a real message: Sign in as the MailUser and send through Mailcheap webmail, then repeat through each configured client or application. Use a normal message with a subject and meaningful body.
- Inspect recipient results: Read the final recipient's trusted Authentication-Results header. Check spf=pass and dkim=pass, then confirm dmarc=pass and the domains used by each check.
- Trace sending failures: If Mailcheap refuses sending despite correct DNS, check mailbox and sending quotas, then Mail Portal > Stats > Blocked senders. Use the bounce code to distinguish a relay refusal from a recipient rejection.
The email tester is the quickest check of a message's configuration. Send a message from your Mailcheap mailbox to the address it provides and review the authentication diagnosis.
Use the same From address and SMTP configuration as production. Test the original delivery before investigating forwarding, which changes the SPF evaluation path.
Email tester
Send a real email to this address. Suped shows a results button when the test is ready.
?/43tests passed
For a DMARC pass, at least one passing authentication method needs a domain that matches the visible From domain. The table separates authentication results from domain matching.
A DKIM pass with a matching domain keeps DMARC passing when forwarding breaks SPF. Repair unexpected direct-send SPF failures even when DKIM currently supplies the DMARC pass.
|
|
|
|
|
|---|---|---|---|---|
Pass | Yes | Pass | Yes | Pass |
Fail | No | Pass | Yes | Pass |
Pass | No | Pass | No | Fail |
Pass | Yes | Fail | No | Pass |
Domain match means a match to the visible From domain under your DMARC settings.
For missing records, compare the authoritative answer with the DNS editor's saved hostname. For SPF permerror, check duplicate policies and lookup limits; for DKIM failure, check the selector and complete public key.
These commands inspect the example domain's public records. Replace example.com with your domain; TXT strings split within one DNS answer are concatenated during evaluation.
Inspect the published DNS recordsbash
dig +short TXT example.com
dig +short TXT default._domainkey.example.com
dig +short TXT _dmarc.example.com
After a fix, send a fresh message and inspect its new results. Old messages retain their original authentication results.
SPF, DKIM and DMARC passes do not guarantee inbox placement. If mail still lands in spam, investigate sending behavior and IP or domain reputation, including relevant blocklist (blacklist) listings.
Get alerted when it breaks
Suped is our DMARC platform for ongoing authentication monitoring. For a Mailcheap domain, Suped's DMARC monitoring connects report failures to sending sources and gives the team specific issues to investigate.
- Check report flow: Confirm that aggregate reports reach the configured reporting destination. Without incoming reports, authentication monitoring cannot show the domain's actual sending activity.
- Review Mailcheap: Find Mailcheap in the source table and verify it only after confirming that the source belongs to your mail setup. Review unfamiliar IPs before trusting them.
- Enable notifications: In Suped's notification settings, enable Issues detected and Sending sources need verification. Add DMARC summary emails for regular review.
- Resolve and retest: Open an issue's Steps to fix, inspect the affected SPF or DKIM result, update the Mailcheap or DNS configuration, then verify with a fresh message and subsequent reports.
I prioritize failures affecting a confirmed sender instead of trying to make every unknown source pass. Unauthorized messages failing DMARC are expected after enforcement.
Notification timing depends on the data available. Receiver aggregate-report schedules affect when Suped can identify a new authentication failure.
Check during setup
DNS lookups show the records currently published. Message tests show the authentication results for a specific sending path.
Repeat these checks after changing DNS or moving a mailbox to another server.
Monitor ongoing mail
Suped groups aggregate reports by source and detects authentication issues across reported traffic.
Issue notifications and fix instructions help the team investigate failures between manual checks.
Secure your domain with p=reject
I move to p=reject after every legitimate source has a reliable DMARC pass. Use Suped's source verification and detailed authentication results to distinguish configuration errors from unauthorized traffic before changing the policy.
- Observe a full cycle: Review reports covering normal business activity, including infrequent invoices and scheduled mail. Time alone is not evidence that every sender works.
- Repair legitimate failures: Confirm Mailcheap's passing DKIM signature and matching signing domain. Fix SPF and Return-Path mismatches, then test other authorized senders separately.
- Stage quarantine: For a domain starting at none, move to quarantine after resolving legitimate failures. Review reports and delivery feedback before advancing; keep reject if already deployed successfully.
- Advance to reject: Change the existing policy to p=reject and retain the working rua destination. Publish only one DMARC policy and preserve any intentional advanced settings.
- Review subdomains: Audit subdomain senders before enforcement. A parent policy also affects subdomains without their own DMARC policy unless an sp setting changes that behavior.
Suped's hosted DMARC lets the team manage policy changes through our dashboard after its DNS configuration is complete. Use it with source review and issue verification to control the move to enforcement.
The example below is for a previously verified deployment. Replace the report mailbox with your active destination and preserve other deliberate tags when updating your existing record.
DMARC TXT record after legitimate senders are verifiedtext
Type: TXT
Host: _dmarc
Value: v=DMARC1; p=reject; rua=mailto:dmarc@example.com
p=reject requests rejection of messages that fail DMARC, subject to receiver handling. It does not block lookalike domains or authenticate mail sent through a compromised authorized account.
Keep Suped issue notifications enabled after enforcement, especially during a Mailcheap server change or DNS migration. Investigate a newly failing authorized source before weakening the domain-wide policy.
Frequency asked questions
Mailcheap uses infrastructure under mymailcheap.com, including server names such as mail8.mymailcheap.com. An rDNS name with this suffix suggests Mailcheap infrastructure; confirm the source IP and authentication results against your account before authorizing it. Dedicated and reseller servers also use custom hostnames.
Yes. Mailcheap supports a Return-Path using your domain. Confirm the actual smtp.mailfrom domain in a received message and compare it with the visible From domain. SPF must pass for that envelope domain and meet your DMARC matching settings.
An SPF pass applies to the envelope sender, not automatically to the visible From domain. DMARC fails when SPF has no matching domain and no passing DKIM signature has a matching signing domain. Check smtp.mailfrom and the DKIM d= value against your From domain.
Yes. Keep the existing policy, configure Mailcheap's SPF and DKIM before production sending, and test the actual mailbox. Confirm that legitimate messages pass DMARC instead of resetting an enforced domain to p=none.
Mailcheap detects the ownership TXT record automatically after DNS becomes visible. Its documentation allows 24-48 hours for DNS caching, depending on TTL. DKIM key generation is separate and takes up to one minute. Check the authoritative DNS answer if verification remains pending.




