
How to set up DMARC/DKIM/SPF for LivePlan

Published 7 Nov 2026
Updated 7 Nov 2026
11 min read
Summarize with
For LivePlan emails using your own From domain, obtain the account-specific SPF and DKIM records from LivePlan, publish them in DNS, then add DMARC and test a real message. If the From domain belongs to LivePlan, LivePlan manages its authentication; receiving those messages does not require adding LivePlan to your SPF record.
I start with the message headers because LivePlan's public help articles document invitations and notifications, but do not provide a customer-domain authentication workflow or universal SPF/DKIM values. The custom-domain steps below depend on LivePlan confirming the setup available for your account.
Check your sending domain
I verify the actual sender before changing DNS. A login email address or company website entered in LivePlan does not establish a verified email sending domain.
- Generate a message: Open Invite Users, click Invite User, enter a mailbox you control, choose Guest, select a test company under Company Access, and click Invite User.
- Inspect the sender: Open the received message source. Record the From domain, Return-Path, DKIM-Signature d= and s= values, and the receiving server's Authentication-Results.
- Choose the setup: If From uses a LivePlan-owned domain, skip LivePlan-specific DNS changes. If it uses your domain, request custom sender verification, DKIM records, and custom return-path instructions through LivePlan's in-app Help.
- Verify ownership: Publish only the exact ownership and authentication records supplied for your account. Ask LivePlan to confirm activation, then check a newly generated message for the intended domains.
These invitation steps follow LivePlan's public help article "Adding and removing contributors and guests". Use a test company so the recipient has no access to confidential plans.
There is no verified public Add domain menu to point to. I treat support confirmation and a passing live message as the completion checks.
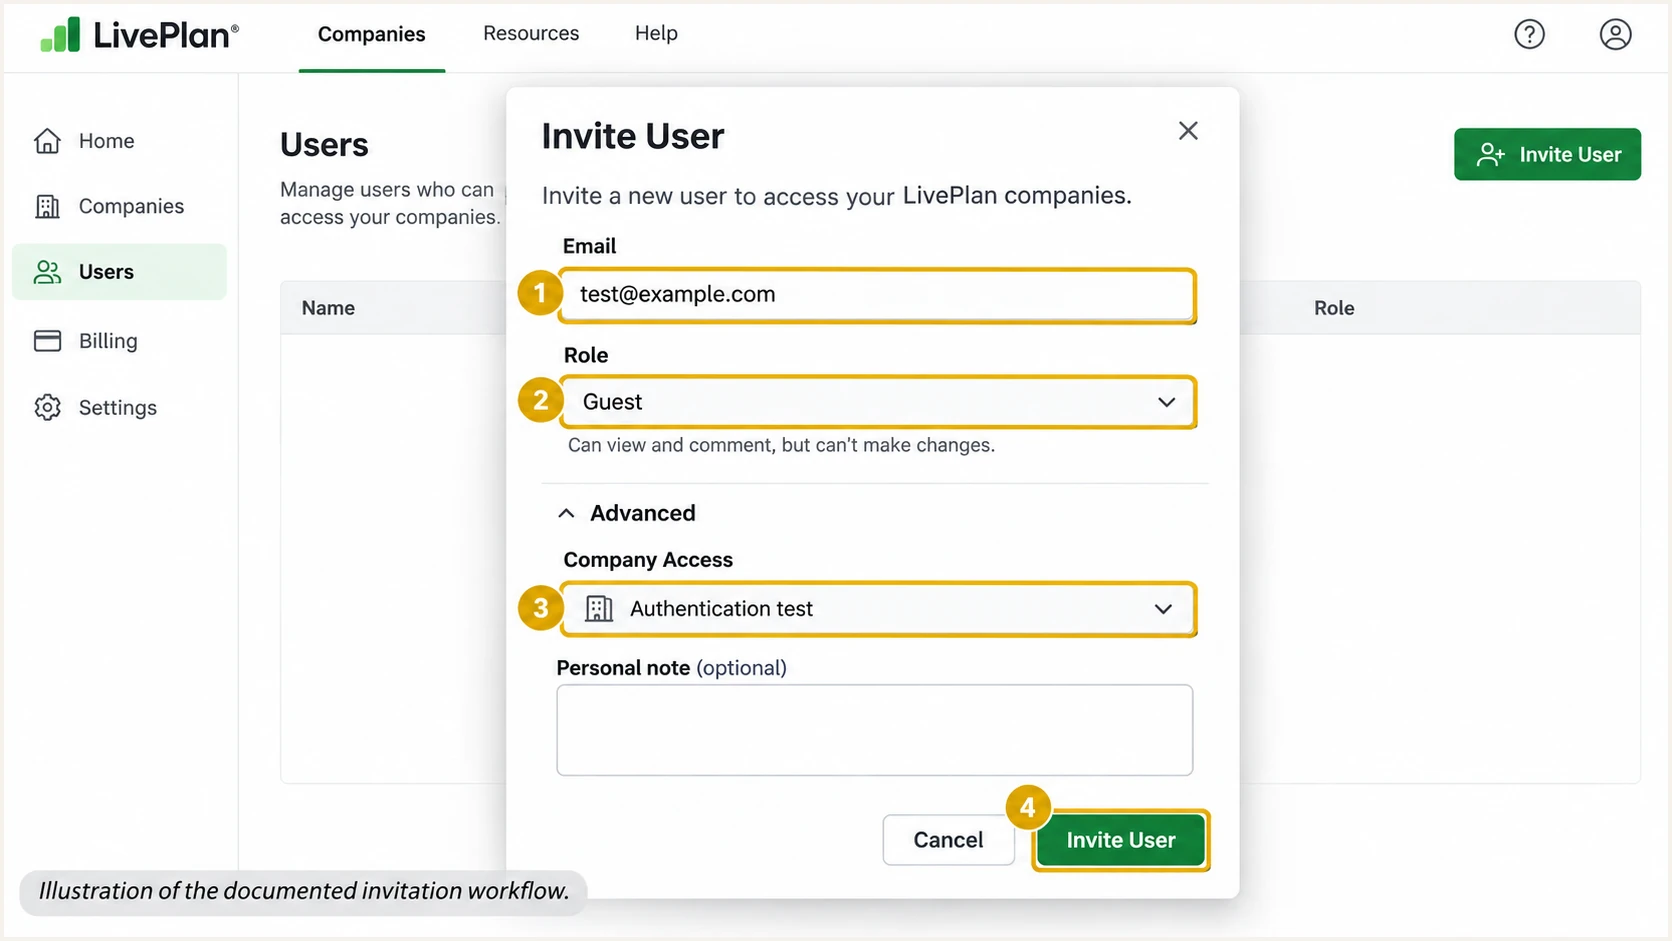
Illustrated LivePlan invitation workflow for generating a test message.
An invitation proves that LivePlan generated a message. The received headers establish which domain needs authentication.
Do not infer custom sender support from the invitation form. Obtain the account-specific instructions before continuing with customer DNS changes.
Set up SPF
SPF checks the SMTP envelope sender, usually visible in Return-Path. I check that domain rather than assuming SPF belongs on the domain in the visible From address.
- Get exact values: Ask LivePlan for the custom return-path hostname and every required record type and value. Do not invent an include:liveplan.com mechanism or authorize an IP copied from one message.
- Publish at the right name: If instructed to add SPF directly, update the single SPF TXT record at the specified envelope-sender domain. Preserve existing authorized senders at that name.
- Respect delegation: If LivePlan supplies a CNAME for the return-path hostname, publish that delegation exactly. A CNAME cannot coexist with TXT or MX records at the same name.
- Check the result: For a directly managed SPF record, keep DNS-lookup mechanisms within the 10-lookup evaluation limit, including nested includes. Test that SPF passes for the actual envelope-sender domain.
Enter the actual return-path domain in the checker below. Checking only the website domain misses a separately configured bounce subdomain.
With relaxed SPF domain matching, bounce.example.com and example.com share the same organizational domain. Strict SPF matching requires identical domains.
SPF checker
Find SPF syntax issues, lookup limits, and weak records.
?/16tests passed
If the active return path remains on a provider-owned domain, SPF can pass without matching your From domain. Adding an SPF include at your root domain does not change that identity.
Where custom return-path configuration is unavailable for the account, use passing DKIM with a signing domain that matches your From domain. SPF alignment warnings alone do not mean DMARC failed.
Set up DKIM
DKIM requires LivePlan to sign the message as well as a public key in DNS. Publishing a key by itself does not activate signing.
- Request the selector: Get the exact selector, signing domain, DNS record type, and complete value or target from LivePlan. There is no verified public default selector to reuse.
- Publish the record: Add the supplied TXT or CNAME at the specified selector name. Check whether your DNS editor appends the domain automatically so it is not entered twice.
- Activate signing: Have LivePlan verify the DNS record and enable signing for your domain. Do not generate an unrelated private key unless LivePlan explicitly supports importing it.
- Check a new message: Require dkim=pass and check the signature's d= domain against From. A passing signature for a provider-owned domain does not authenticate your own From domain for DMARC.
I separate a working signature from a signature that counts toward your DMARC result. Both checks matter.
The examples below are domain-matching examples, not claims about LivePlan's current signing domains.
DKIM passes and matches
From: alerts@example.com. The passing DKIM signature has d=example.com. This signature satisfies DMARC for example.com.
DKIM passes without matching
From: alerts@example.com. The passing signature has d=example.net. DMARC still needs passing SPF with a matching envelope-sender domain, or another matching DKIM signature.
Use the s= and d= values on the actual message to construct the DKIM lookup name. Replace SELECTOR and example.com below before running the commands.
A CNAME answer requires checking the target too. A published key confirms DNS availability; only a received message verifies the signature.
Look up the selector from the received signaturebash
dig +short CNAME SELECTOR._domainkey.example.com
dig +short TXT SELECTOR._domainkey.example.com
After a selector change, keep the previous key available for messages still in transit. Follow the rotation timing supplied by LivePlan.
Retest each notification type you rely on. Invitations and account notifications do not necessarily use the same sending configuration.
Set up DMARC
Publish DMARC for the domain in the visible From address that you control. I begin with p=none for a domain without enforcement; an existing p=quarantine or p=reject policy should stay in place.
- Check existing DNS: Query _dmarc at your sending domain. Maintain one DMARC policy record at that name; update it rather than adding a duplicate.
- Choose reporting: Create a working aggregate-report mailbox or use your reporting service's supplied rua address. The example address below must be replaced before publishing.
- Publish the policy: For a new monitoring setup, add the example value as a TXT record at _dmarc.example.com, substituting your own domain and reporting mailbox.
- Verify the record: Check syntax and reporting destinations, then confirm real reports arrive. If the reporting address belongs to another domain, ensure the required external-report authorization is configured.
Use the DMARC record generator to build the value. It does not generate LivePlan's SPF authorization or DKIM signing keys.
The following is the requested starting policy. It collects reports without requesting quarantine or rejection based on DMARC failure.
Starting DMARC TXT value at _dmarc.example.comtext
v=DMARC1; p=none; rua=mailto:dmarc@example.com
Replace dmarc@example.com with a destination that receives your aggregate reports. A literal example address will not deliver reports to you.
After DNS caches refresh, check the actual From domain below. A valid DNS record does not establish that LivePlan messages pass authentication.
DMARC checker
Look up a domain's DMARC record and catch policy issues.
?/7tests passed
For DMARC to pass, at least one authentication method must pass with the required domain match. Passing SPF and DKIM for unrelated domains is insufficient.
If From belongs to LivePlan, its domain owner controls that policy. Your own DMARC record cannot repair authentication failures for a LivePlan-owned From domain.
Verify and troubleshoot
I test with a fresh message after every DNS or sender change. A notification received before the change retains its original authentication result.
- Resend an invitation: In LivePlan, open Invite Users, choose Invitations, open the three-dot menu beside the pending recipient, and click Resend Invitation.
- Enable comment emails: For a comment-notification test, open Account Menu > Manage Account > Profile, enable Email notifications, and click Save Changes. Have another authorized user add a comment.
- Read trusted results: Use the receiving mail server's Authentication-Results. Confirm the actual From domain and the SPF envelope-sender or DKIM signing domain that makes DMARC pass.
- Escalate precisely: If a LivePlan-owned sender fails, send LivePlan support the original message headers, timestamp, recipient, and any SMTP rejection code. Do not change your DNS to repair another domain.
The resend path follows LivePlan's "Canceling and re-sending user invitations" help article. The notification path follows its public instructions for turning comment emails on and off.
The invitation menu generates another message for testing. It does not configure authentication or change the sender domain.
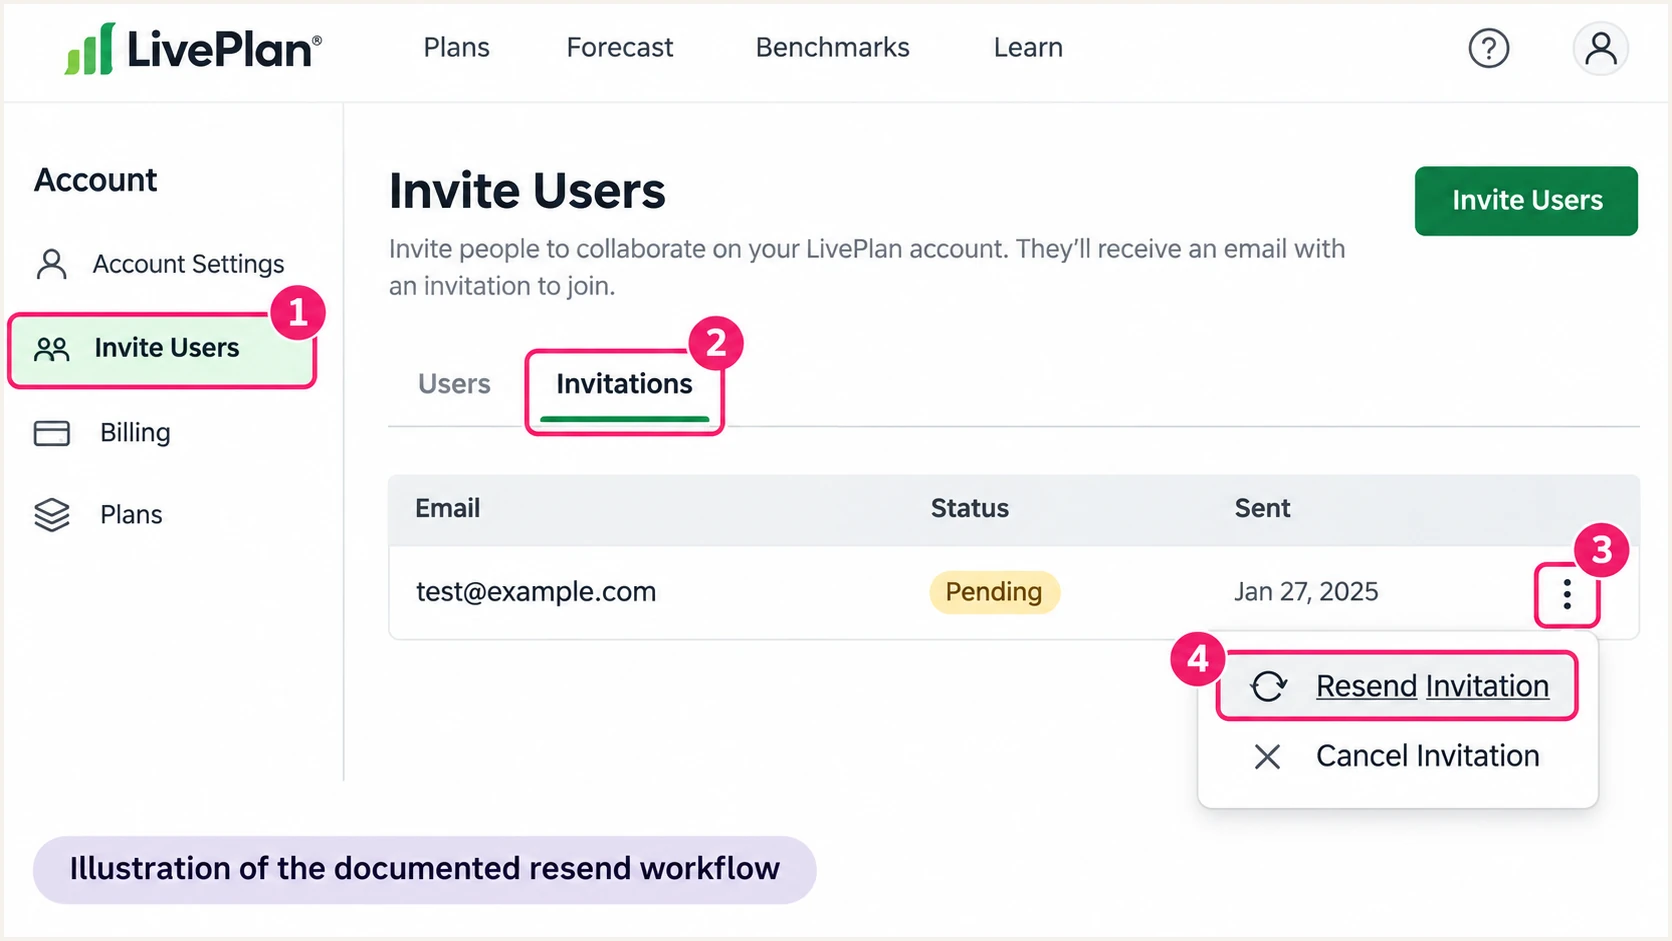
Illustrated LivePlan Invitations menu showing Resend Invitation.
The email tester below is the quickest check when LivePlan can send directly to its generated test address. It returns a diagnosis of the received message, including authentication.
If an invitation is the only way to reach that address, choose Guest access to an empty test company and cancel the invitation afterward. Forwarding an existing message changes the delivery path and is not an equivalent test.
Email tester
Send a real email to this address. Suped shows a results button when the test is ready.
?/43tests passed
Confirm the report shows the intended From domain and dmarc=pass. Keep the original headers with the DNS change record so later failures have a baseline.
If authentication passes but delivery still fails, inspect the recipient's rejection or quarantine reason. DMARC authentication does not guarantee inbox placement.
|
|
|
|---|---|---|
SPF pass, no match | Provider return path | Enable custom return path |
DKIM failure | Key or signing issue | Check selector and signing |
DMARC failure | No matching pass | Fix SPF or DKIM matching |
No aggregate data | Reporting or traffic | Check rua and From domain |
Checks for a LivePlan message using your own From domain.
Missing reports require a separate check of reporting setup and message volume. Receivers do not all send aggregate reports.
For delayed messages, check the receiving system's logs and LivePlan's support response before assuming the authentication change caused the delay.
Get alerted when it breaks
Suped is our DMARC platform for monitoring authentication after setup. I recommend its source-level diagnostics and failure alerts for catching regressions between manual LivePlan tests.
- Enable failure alerts: In Suped, open Settings > Notifications and configure DMARC failure alerts for the people responsible for email authentication.
- Identify the source: Review source and record details before attributing traffic to LivePlan. Compare IP addresses and authentication domains with a known LivePlan message, and verify only senders you recognize.
- Investigate changes: Use detailed SPF and DKIM checks to locate the failure. Compare DNS history with the last passing message to check for deleted records or selector changes.
- Close the incident: Correct the DNS or LivePlan configuration, send another test, and confirm subsequent aggregate reports show recovery. Enable summary emails for ongoing review.
Suped's DMARC monitoring connects failure reports with source details and steps to fix. This is useful when a passing setup later breaks after a DNS edit.
Monitoring covers domains whose reports you receive. Messages using a LivePlan-owned From domain still require message-level testing and LivePlan support for sender-side repairs.
Aggregate alerts are not per-message alerts
DMARC failure alerts depend on incoming aggregate reports, commonly delivered daily. Suped can surface failures once those reports arrive, but cannot detect every LivePlan message failure at send time. Use a direct email test for immediate validation.
Set the incident owner before rollout so someone can act when a previously working source starts failing.
Keep alerting active through enforcement changes, including periods when LivePlan sends few notifications.
Secure your domain with p=reject
I move to p=reject when the reports show legitimate sending paths passing DMARC and the remaining failures are understood. One successful invitation is insufficient evidence for a domain-wide policy change.
- Inventory all senders: Review every legitimate source using your From domain, including low-volume systems. In Suped, investigate unverified sources before deciding whether to authorize or remove them.
- Fix legitimate failures: Require passing DKIM with the right signing domain or passing SPF with the right envelope-sender domain. Retest LivePlan invitations and the other notification types your account uses.
- Stage enforcement: Observe a complete operating cycle, then use quarantine before reject when a staged rollout is needed. Choose the observation period around actual traffic, including infrequent account emails.
- Monitor the change: Use Suped's hosted DMARC policy controls to manage staging and compare reports after each change. Keep failure alerts active and investigate legitimate failures before tightening the policy further.
Suped's hosted DMARC manages policy changes through the dashboard after its DNS setup. Its reporting and diagnostics provide the evidence for each enforcement decision.
The example below requests rejection for failing messages covered by this policy. Replace the domain and reporting address, preserve any deliberate subdomain policy, and update the existing record.
Enforcement DMARC TXT value at _dmarc.example.comtext
v=DMARC1; p=reject; rua=mailto:dmarc@example.com
The receiving server makes the final handling decision. A reject policy protects the domain in From; it does not control messages using a LivePlan-owned domain or a lookalike domain.
After enforcement, test again whenever LivePlan changes the active sender configuration or your DNS provider changes the published records.
Frequently asked questions
Only when LivePlan supports sending as your domain for your account. The public help articles checked do not document an Add domain authentication screen. Check a real message first, then request account-specific instructions through LivePlan support if From uses your domain.
There is no verified universal value in the public support documentation checked. Obtain the exact records from LivePlan. Read s= and d= in a received DKIM signature to identify the active selector and signing domain; do not guess an include or selector.
Yes. A passing DKIM signature with a signing domain that matches From under your DMARC matching mode is sufficient. If the active return path remains on a provider-owned domain, adding SPF at your root domain does not repair that domain mismatch.
LivePlan's public help pages do not publish a dedicated sending rDNS suffix list. A PTR hostname ending in liveplan.com alone does not establish the source of a message. Check the connecting IP, forward DNS, Received headers, and DKIM signing domain, then confirm uncertain traffic with LivePlan support. Shared infrastructure requires additional evidence.
DMARC publishes policy and reporting instructions; it does not activate SPF or DKIM. Check the original message's authentication results and the recipient's rejection reason. If From belongs to LivePlan, report the failure to LivePlan support. A DMARC pass also does not guarantee inbox placement.
Keep an existing quarantine or reject policy. Test the actual sender and fix the failing legitimate path. Use p=none as the starting policy for a domain that does not already have enforcement, and keep aggregate reporting enabled throughout.