
How to set up DMARC/DKIM/SPF for Linode

Published 22 Nov 2026
Updated 22 Nov 2026
16 min read
Summarize with

Authenticate email sent directly from a Linode by authorizing its public sending IP in SPF, enabling DKIM signing on the mail server, and publishing a DMARC TXT record for the visible From domain. Linode, now part of Akamai Cloud, provides the infrastructure. The mail server running on that infrastructure controls signing and the envelope sender.
I start with the actual sending path. For direct delivery, I use an existing Postfix server on Ubuntu 24.04 with OpenDKIM and DNS hosted in Linode DNS Manager. Replace example.com and the documentation IP 203.0.113.10 with your domain and public outbound IP. If your application uses an external SMTP relay, authenticate that relay instead of authorizing the Linode web server.
Add your domain
Add the domain to Linode only when you want Linode to host its DNS. A domain already hosted elsewhere can keep its current nameservers. Publish the authentication records at the authoritative DNS provider in that case.
Linode has no managed-email domain verification wizard for a self-hosted mail server. I verify that the DNS zone is authoritative and that the application sends with the intended domain. Linode staff explain registrar delegation in their domain setup answer.
- Check authority. Run dig +short NS example.com. If the answers belong to another DNS provider, edit records there or plan a complete DNS migration.
- Create the zone. In Cloud Manager, select Domains > Create Domain. Choose Primary, enter example.com and a valid SOA Email, then click Create Domain. Open an existing zone instead if it is already present.
- Copy existing records. Before changing nameservers, recreate all required records, including existing mail routing. Keep current MX records unless you are also moving inbound mail.
- Delegate DNS. At your registrar, set the nameservers to ns1.linode.com through ns5.linode.com. An active Linode is required for DNS Manager to serve your zones.
- Verify delegation. Run the queries below. The public NS response must show the intended nameservers, and the direct SOA query must return the new zone.
- Create the mail hostname. Under A/AAAA Record, click Add a Record. Set Hostname to mail and IP Address to the server's public IPv4 address. Add an AAAA record only for a configured IPv6 sending address.
Check DNS delegation and the mail hostnamebash
dig +short NS example.com
dig @ns1.linode.com example.com SOA +short
dig +short A mail.example.com
dig +short AAAA mail.example.com
A direct SOA response confirms that the zone exists on that server. Public delegation confirms that receivers will query it. Adding a zone in Cloud Manager alone does not change the domain's DNS authority.
An MX record controls incoming mail routing. Preserve the existing mailbox destination while setting up outbound authentication. The SOA Email is a DNS contact address, separate from your DMARC reporting mailbox.
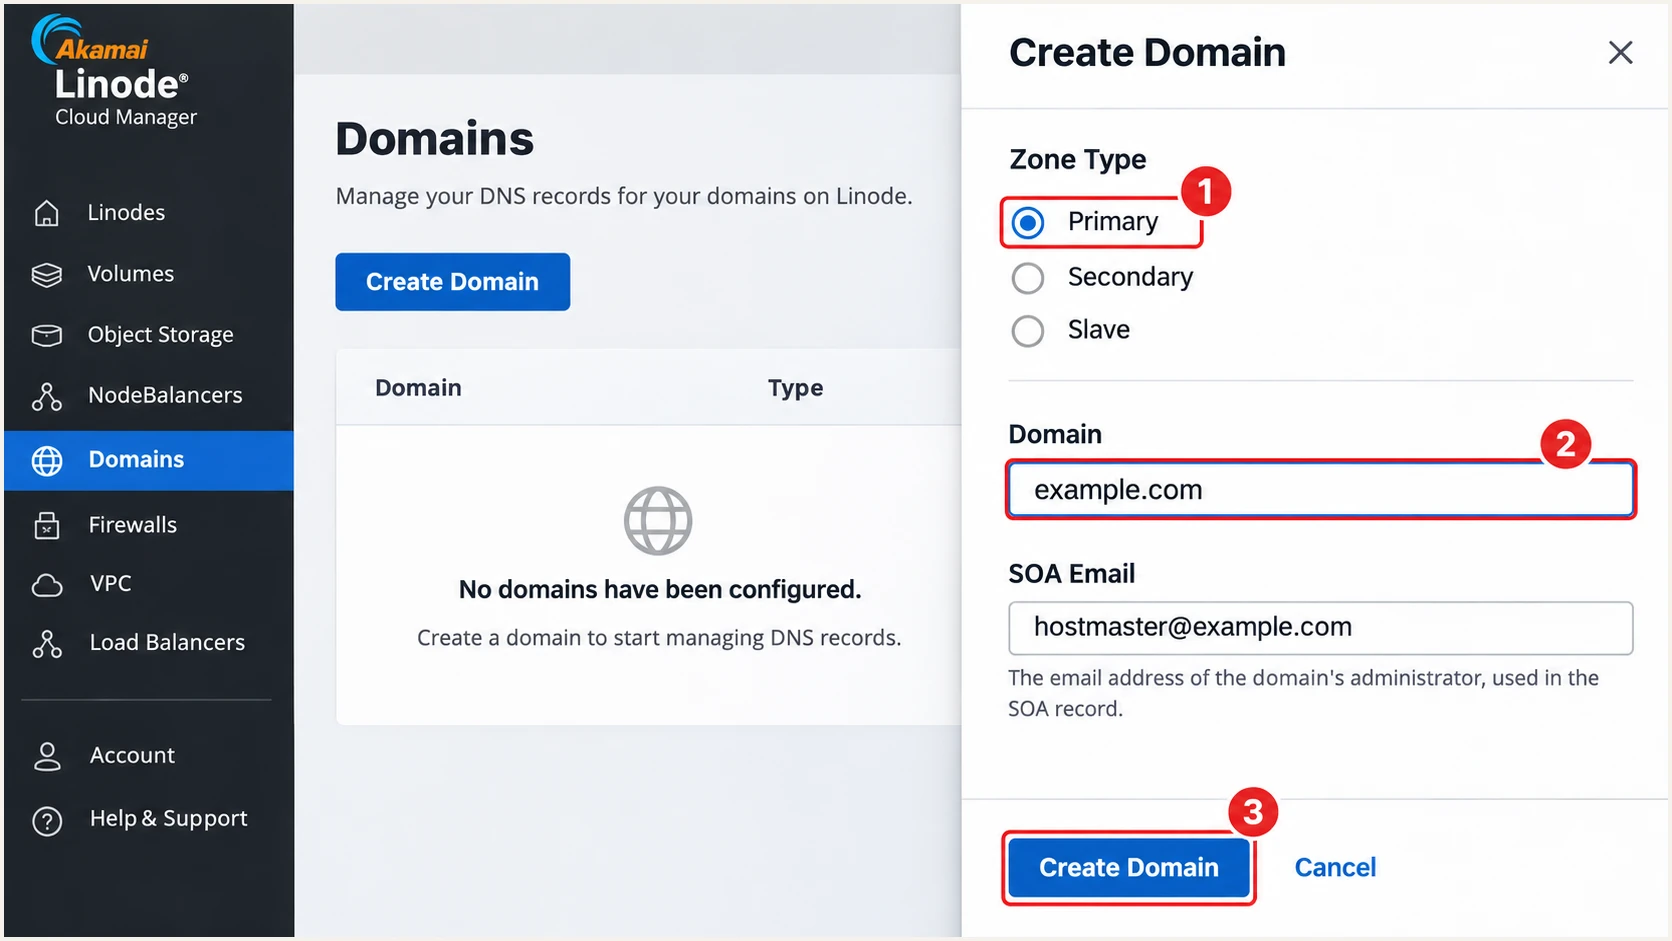
Illustration of creating a primary domain zone in Linode Cloud Manager.
After saving, open the zone and check that its DNS record groups are available. If nameservers remain with another provider, use that provider's record editor for the SPF and DMARC changes below.
Check SMTP access before testing
Linode restricts outbound ports 25, 465, and 587 on some accounts. If the restriction applies, open a Linode Support ticket with the sending domains and your email use case. Check host and cloud firewall rules as well. Publishing DNS records does not remove an SMTP restriction.
Set up SPF
For direct delivery, SPF must authorize the public IP that recipients actually see. Linode has no universal SPF include for every customer server. I use explicit IP authorization for a dedicated sender.
SPF checks the SMTP MAIL FROM domain, which is normally visible in the delivered Return-Path. For mail with From: app@example.com, an envelope sender such as bounce@example.com provides an exact domain match for DMARC.
- Confirm the envelope sender. Configure the application's envelope sender or bounce-address setting to use a domain you control. Do not add a Return-Path header manually. The receiving server writes that header.
- Find the existing SPF record. In Domains > example.com, inspect TXT Record entries beginning with v=spf1. Edit the existing record instead of creating a second SPF policy at the same hostname.
- Authorize the server. For a root-domain envelope sender, click Add a Record under TXT Record and leave Hostname blank. Paste the example value below after replacing the IP. Preserve every other authorized sender in an existing record.
- Cover every sending address. Add ip6: followed by the actual outbound IPv6 address if the server sends over IPv6. A separate MAIL FROM subdomain needs its own SPF record at that subdomain.
- Save and validate. Set TTL to 5 minutes while making changes, click Save, and check the actual MAIL FROM domain below. Keep SPF mechanisms that trigger DNS lookups within the limit of 10.
Example SPF TXT value for one direct IPv4 sendertext
v=spf1 ip4:203.0.113.10 -all
Use -all after listing all authorized senders. If an existing SPF policy has includes for other sending systems, merge the Linode IP into that policy before its final all mechanism. The ip4 and ip6 mechanisms do not consume DNS lookups.
The SPF check below validates the domain's published policy. A live message is still needed to confirm that the application uses that domain in MAIL FROM and that the outbound IP matches the record.
SPF checker
Find SPF syntax issues, lookup limits, and weak records.
?/16tests passed
A passing SPF result alone does not guarantee DMARC success. With default relaxed matching, the MAIL FROM domain and visible From domain must share the same organizational domain. With aspf=s, they must match exactly.
An external relay that fixes MAIL FROM to its own domain controls that domain's SPF policy. Adding the Linode IP to your visible From domain will not fix that relay's SPF matching. In that setup, configure a valid DKIM signature with a signing domain that matches your From domain.
Direct delivery from Linode
You control MAIL FROM and the public sending IP. Authorize that IP and configure DKIM signing on the Linode.
- SPF target. Publish at the actual envelope sender domain.
- DMARC target. Make both SPF and DKIM pass with matching domains.
Delivery through an external relay
Recipients see the relay's IP. Use its documented DNS values and custom return-path settings when supported.
- Fixed return path. SPF domain mismatch is expected when the relay uses its own domain.
- DKIM requirement. A passing signature with a matching signing domain is sufficient for DMARC.
For Linode DNS Manager, leave Hostname empty for the root domain. Enter only a relative hostname for a subdomain. Paste TXT values without extra surrounding quotation marks.
DNS Manager handles TXT string splitting automatically. Its TXT editor is also where you will publish the DKIM public key and DMARC policy, each at a different hostname.
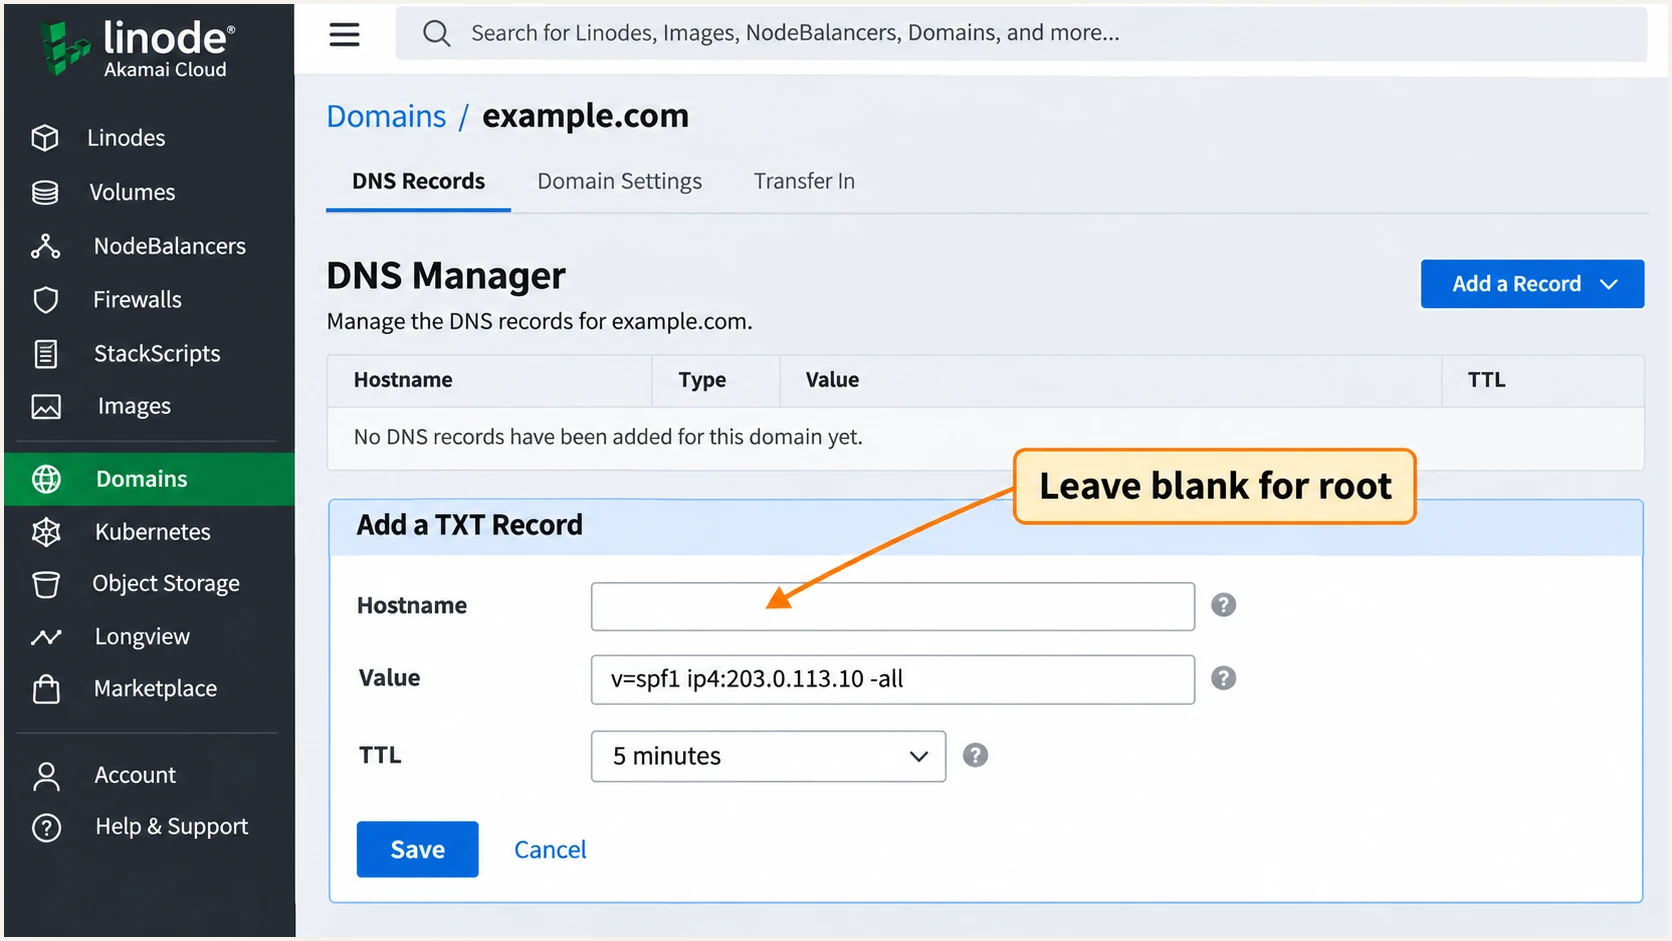
Illustration of adding a root-domain SPF TXT record in Linode DNS Manager.
Set up DKIM
DKIM requires a private key on the sending server and its matching public key in DNS. Publishing a DKIM TXT record alone does not sign email. Linode Cloud Manager does not generate or attach signatures for your application.
For an existing Ubuntu 24.04 Postfix installation, I configure OpenDKIM as a local signing service. This single-domain example signs example.com mail submitted locally. Existing multi-domain signing configurations need per-domain key mappings instead of this single-domain configuration.
- Install the signer. Run the installation commands below on the Linode. Generate the key once, keep the private file on the server, and avoid overwriting an active selector's key.
- Configure signing. Edit /etc/opendkim.conf using the settings below. Replace existing values for these directives. This example uses Domain, Selector, and KeyFile, so do not combine it with active KeyTable or SigningTable directives.
- Connect Postfix. Apply the milter settings below. If Postfix already uses other milters, preserve those entries and append OpenDKIM. Check master.cf for service-level overrides.
- Use the signing path. Submit application mail to Postfix on 127.0.0.1 or through its local sendmail command. A container or remote application needs an explicitly trusted submission path or authenticated submission.
- Publish the public key. Read linode.txt, copy only the TXT value, and join its quoted fragments without spaces inside the public key. In Linode TXT Record, use Hostname linode._domainkey. Do not paste the zone-file wrapper or private key.
Install OpenDKIM and generate a 2048-bit keybash
sudo apt update
sudo apt install opendkim opendkim-tools
sudo install -d -o opendkim -g opendkim -m 0700 /etc/dkimkeys
sudo -u opendkim opendkim-genkey \
  -b 2048 -d example.com -s linode -D /etc/dkimkeys
sudo chmod 0600 /etc/dkimkeys/linode.private
sudo cat /etc/dkimkeys/linode.txt
The public TXT value starts with v=DKIM1 and contains p= followed by the generated public key. Paste the complete value into DNS Manager. Keep the selector linode consistent between the DNS hostname and the signing configuration.
Single-domain settings in /etc/opendkim.conftext
Syslog yes
UserID opendkim
Mode s
Canonicalization relaxed/relaxed
OversignHeaders From
Domain example.com
Selector linode
KeyFile /etc/dkimkeys/linode.private
InternalHosts 127.0.0.1
Socket inet:8891@[127.0.0.1]
The signing socket is restricted to the local server. Keep your existing Postfix relay restrictions. For an application on the same Linode, connecting to 127.0.0.1 makes the trusted submission path explicit.
Connect Postfix to OpenDKIM and restart the servicesbash
sudo postconf -e 'milter_protocol = 6'
sudo postconf -e 'milter_default_action = tempfail'
sudo postconf -e 'smtpd_milters = inet:127.0.0.1:8891'
sudo postconf -e 'non_smtpd_milters = $smtpd_milters'
sudo systemctl restart opendkim
sudo postfix check
sudo systemctl reload postfix
sudo -u opendkim opendkim-testkey -d example.com -s linode -vvv
The testkey command should report key OK after the DNS record is visible. A separate "key not secure" message indicates absent DNSSEC validation, not a mismatched public key. Check a delivered message to confirm that signing actually occurs.
The tempfail setting defers mail when the signer is unavailable. Check the Postfix queue and OpenDKIM service after deployment so that a failed signing service does not leave application mail waiting.
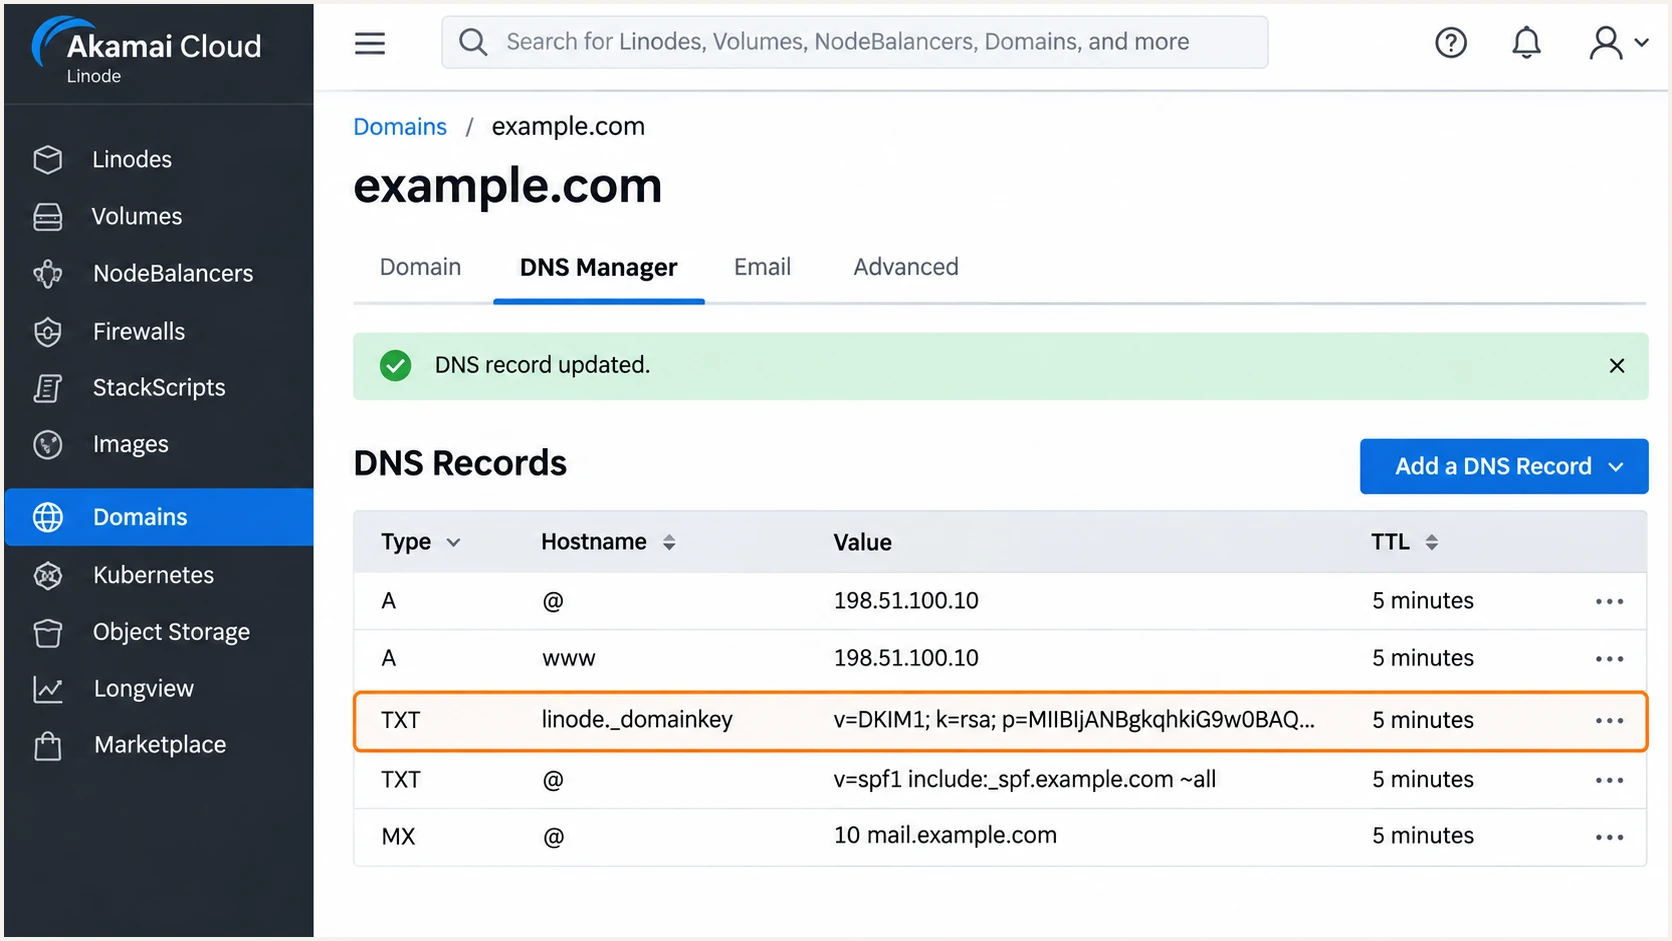
Illustration of the linode._domainkey TXT record in Linode DNS Manager.
A receiver should find DKIM-Signature fields d=example.com and s=linode on outgoing messages. The d= domain must match the visible From domain under the domain's DMARC matching mode.
Rotate selectors without invalidating queued mail
Publish a new selector and public key before switching the signer to its new private key. Keep the previous public key available while messages signed with it remain in transit. Generate a separate key for each sending domain when expanding this setup.
Set up DMARC
DMARC evaluates the visible From domain. It passes when SPF passes with a matching MAIL FROM domain or DKIM passes with a matching signing domain. For a directly managed Linode sender, I configure both paths and verify each with a live message.
Start with p=none for a domain without an enforcement policy. If the domain already uses p=quarantine or p=reject, keep that policy and fix the Linode sender within it. Preserve existing reporting destinations and deliberate matching settings.
- Check the current policy. Run dig +short TXT _dmarc.example.com. Edit an existing DMARC record instead of adding another record starting with v=DMARC1 at that hostname.
- Create the monitoring record. In Domains > example.com > TXT Record > Add a Record, set Hostname to _dmarc. Paste the exact starting value below after adapting its domain and reporting mailbox for production.
- Set the report destination. Replace dmarc@example.com with a working aggregate-report address. For an external reporting domain, confirm that the reporting provider has configured the required DNS authorization.
- Save the policy. Set TTL to 5 minutes during setup, click Save, and validate the published record below. Leave adkim and aspf omitted for default relaxed domain matching unless strict matching is intentional.
Starting DMARC TXT value at _dmarc.example.comtext
v=DMARC1; p=none; rua=mailto:dmarc@example.com
Use the DMARC record generator to build the policy with your actual domain and report destination. The example mailbox above is a placeholder. A mailbox receiving compressed aggregate reports needs a process for reading those reports.
The checker validates DNS publication and the policy syntax. It cannot confirm that your application signs a message, uses the expected envelope sender, or reaches the recipient. Those checks require a message sent through the production path.
DMARC checker
Look up a domain's DMARC record and catch policy issues.
?/7tests passed
A p=none policy requests monitoring without DMARC enforcement. Receivers still apply their own filtering, and a DMARC pass does not guarantee inbox placement.
Aggregate reports normally arrive on a daily schedule, and participating receivers report only the traffic they process. Use a live-message test now, then inspect reports across a complete sending cycle before changing the enforcement policy.
Verify and troubleshoot
I test a real application message before relying on DNS checks. That catches a wrong envelope sender, an unsigned submission path, and outbound IPv6 addresses missing from SPF.
The email tester below provides a temporary recipient address. Send a message to that address through your actual Linode application to receive a diagnosis of authentication and other delivery checks.
Email tester
Send a real email to this address. Suped shows a results button when the test is ready.
?/43tests passed
Inspect the receiver-generated Authentication-Results and the message's Return-Path. For this example, the target is spf=pass with smtp.mailfrom=example.com, dkim=pass with header.d=example.com, and dmarc=pass with header.from=example.com.
A local command-line smoke test is useful for isolating Postfix and the signer. Replace tester@example.net below with the address shown by the widget. Then repeat the test through the application, since its sender settings can differ.
Optional local Postfix smoke testbash
sendmail -t -f bounce@example.com <<'EOF'
From: App <app@example.com>
To: tester@example.net
Subject: Linode authentication test

Linode SPF and DKIM test.
EOF
- Check forward DNS. Confirm mail.example.com resolves to each public IP used for delivery. Set Postfix myhostname to that fully qualified name so its default SMTP HELO/EHLO uses it.
- Set reverse DNS. In Cloud Manager, open Linodes > your Linode > Network. Find the sending IP, open its ellipsis menu, select Edit RDNS, enter mail.example.com, and click Save. The matching A or AAAA record must already resolve. Repeat for each sending IP.
- Inspect the mail queue. Run postqueue -p and inspect the relevant Postfix logs. A timeout before delivery points to networking or SMTP restrictions. An authentication rejection after delivery requires the receiver's exact SMTP response.
- Inspect signing failures. Check systemctl status opendkim and journalctl -u opendkim. Confirm the service listens on port 8891 and can read its private key. Review Postfix logs for milter connection errors.
- Separate reputation failures. If authentication passes, inspect recipient rejection codes and sending-IP reputation. A blocklist (blacklist) listing requires its own diagnosis; changing DMARC does not remove the listing.
Verify public DNS and the mail server hostnamebash
dig +short TXT example.com
dig +short TXT linode._domainkey.example.com
dig +short TXT _dmarc.example.com
dig +short A mail.example.com
dig +short -x 203.0.113.10
sudo postconf -e 'myhostname = mail.example.com'
sudo postfix check
sudo systemctl reload postfix
|
|
|
|---|---|---|
SPF fail | Outbound IP | Authorize actual IP |
SPF permerror | Duplicate policies | Merge SPF records |
DKIM absent | Submission path | Connect the signer |
DKIM fail | Key and selector | Publish matching key |
DMARC fail | Sender domains | Match SPF or DKIM |
SMTP timeout | Egress access | Resolve port restriction |
PTR mismatch | Forward and reverse DNS | Set matching hostname |
Use the receiver result and server logs to choose the next check.
Forward-confirmed reverse DNS means that the sending IP resolves to a hostname and that hostname resolves back to the same IP. Linode's mail DNS discussion also identifies an inconsistent hostname and reverse DNS as a delivery problem.
PTR and HELO are separate from DMARC domain matching. They support the server's identity for delivery checks. Changing them does not repair a missing DKIM signature or an incorrect MAIL FROM domain.
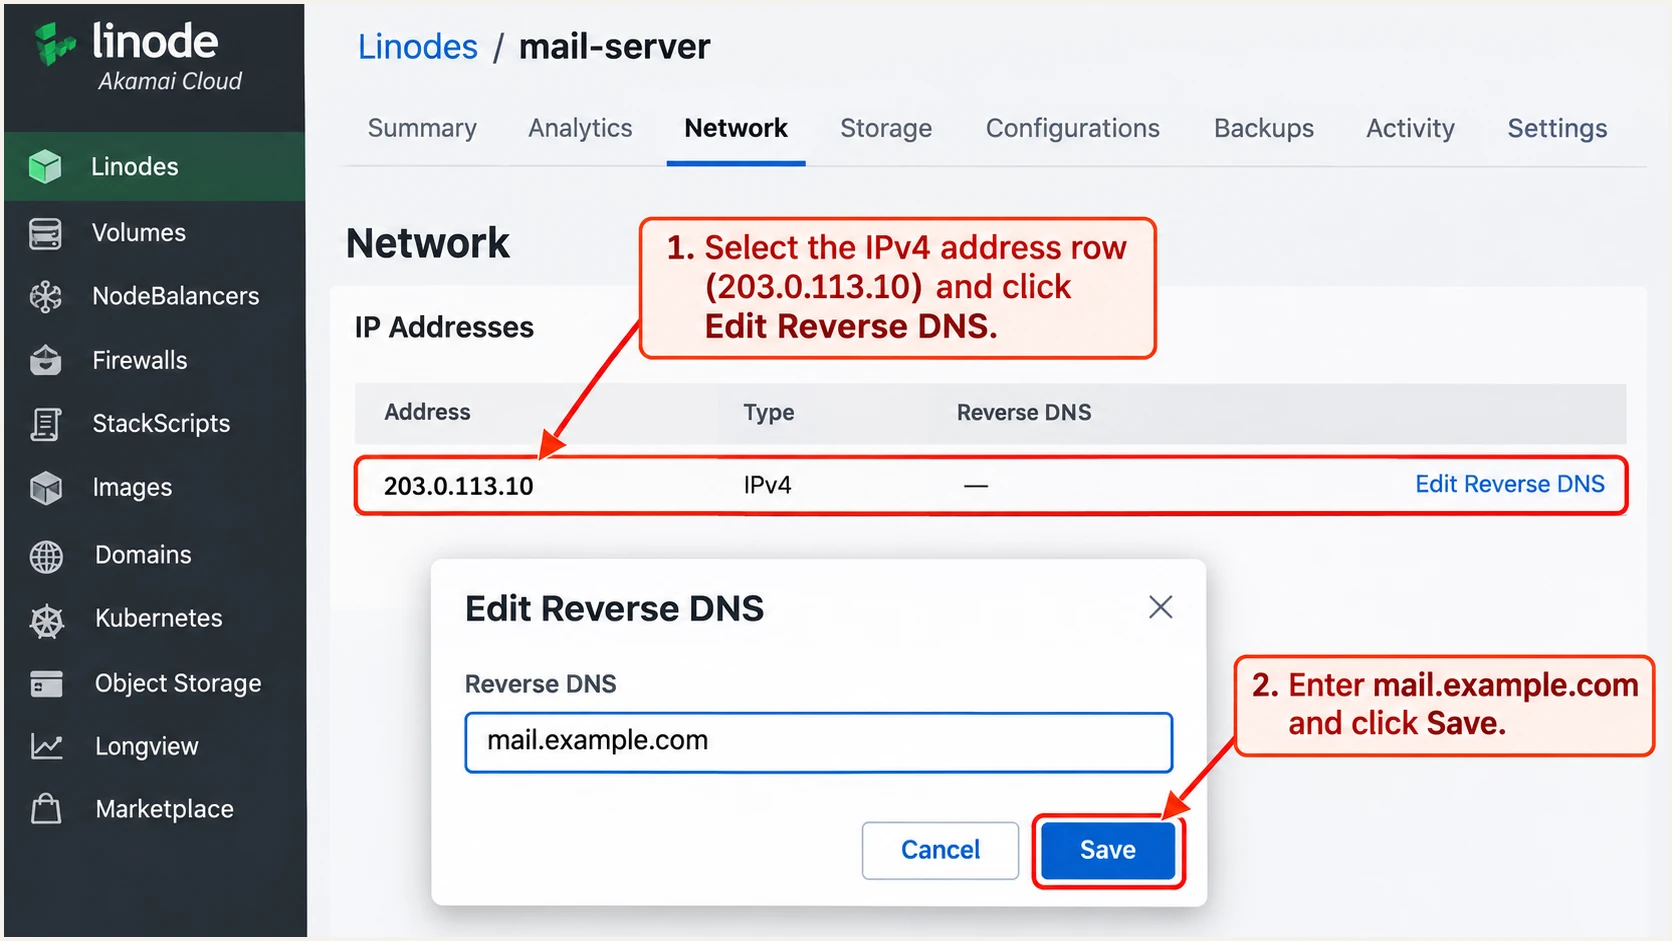
Illustration of setting a Linode sending IP's reverse DNS to mail.example.com.
If Linode reports that it cannot resolve the hostname, check its A or AAAA record and allow existing DNS caches to expire. Enter a fully qualified hostname in Edit RDNS, rather than an email address.
After any correction, send a fresh application message. Previously delivered headers retain the original results, and queued messages can retain signatures created before your change.
Get alerted when it breaks
A one-off test will not catch a later IP change or a stopped signing service. Our platform, Suped, provides DMARC monitoring with issue notifications and source-level diagnostics for ongoing Linode traffic.
With aggregate reports flowing to Suped, use DMARC monitoring to inspect the Linode source over time. Keep server and mail-queue monitoring active too: messages stuck before delivery never reach a receiver that can report their authentication results.
- Enable issue notifications. In Suped, open Settings > Notifications and enable Issues detected. Enable DMARC summary emails for periodic review.
- Verify known sources. Review Sources and confirm the sending IPs and domains against your Linode configuration before marking a source verified. Investigate unexpected sources rather than authorizing them automatically.
- Diagnose changes. Open the affected source's records and inspect SPF, DKIM, DMARC, and rDNS results. Use DNS history to compare record values before and after a failure.
- Track reputation. Use Suped's blocklist monitoring for the sending IP and domain. Investigate a blacklist alert alongside authentication results and the receiver's rejection response.
Report delivery controls detection timing
Suped alerts on detected issues, but aggregate DMARC data depends on receivers delivering reports, usually daily. Use Linode host checks and Postfix queue alerts for immediate server or submission failures.
Secure your domain with p=reject
Move to p=reject after every legitimate sending path passes DMARC. I use source-level evidence across a complete sending cycle, including infrequent jobs, instead of treating a single successful test as proof that the whole domain is ready.
Suped provides a practical workflow for this review: inspect verified sources, resolve detected issues, and use ongoing notifications while tightening the policy. Its Hosted DMARC controls also let teams manage policy changes in the dashboard once configured.
- Inventory legitimate mail. Review reports for the Linode application, employee mail, scheduled jobs, and other authorized sources. Test any legitimate source that has not appeared in reports.
- Repair domain matching. Make sure each source has at least one passing SPF or DKIM result with a matching domain. For direct Linode delivery, keep both working and test IPv6 separately if used.
- Apply quarantine. Change the existing record to p=quarantine and review results through the next complete sending cycle. Resolve legitimate failures before proceeding. If quarantine or reject is already active, retain the current policy.
- Check subdomains. Review any sp tag and explicit subdomain DMARC records. Without an overriding subdomain policy, the parent policy also affects eligible subdomains that lack their own record.
- Apply reject. Update the same DMARC record to p=reject. Preserve its working rua destination and intentional settings. Recheck DNS and send fresh application tests.
- Keep watching. Use Suped notifications and source diagnostics after IP changes, server rebuilds, and key rotation. Fix a failing legitimate sender promptly and reassess policy only when delivery evidence justifies a change.
Quarantine stage using the same reporting mailboxtext
v=DMARC1; p=quarantine; rua=mailto:dmarc@example.com
Reject stage after legitimate sources are verifiedtext
v=DMARC1; p=reject; rua=mailto:dmarc@example.com
Judge legitimate sources separately
Unauthorized traffic can keep failing DMARC after a correct deployment. Base enforcement readiness on legitimate sources passing, rather than requiring every message claiming your domain to pass. Receivers make the final delivery decision using your published policy and their local rules.
Frequency asked questions
No. Linode provides the server and optional DNS hosting. You publish the authentication records at the authoritative DNS provider and configure DKIM signing in the mail server. An application using an external SMTP relay needs that relay's authentication configuration.
There is no universal SPF include for arbitrary Linode customer servers. For direct delivery, authorize the actual public outbound addresses with ip4 and ip6 mechanisms. If a relay delivers the message, use the relay's documented SPF configuration instead.
These are current and legacy reverse DNS suffixes associated with Linode, now part of Akamai Cloud. A hostname ending in .ip.linodeusercontent.com or .members.linode.com identifies hosting infrastructure. It does not identify the application operator or prove that the sender is authorized for your domain. Inspect the source IP and authenticated domains before trusting that traffic.
SPF can pass for a MAIL FROM domain that does not match the visible From domain. DMARC still fails if there is also no passing DKIM signature with a matching signing domain. Configure a custom envelope sender when available, or fix DKIM so its d= domain matches the visible sender under the domain's DMARC matching mode.
Cached answers remain until their previous TTL expires. New records often become visible sooner, but allow up to 24 hours for the DNS changes described by Linode. Check the authoritative nameserver first, then a normal recursive lookup. A direct authoritative answer does not prove that older cached answers have expired.
An MX record controls inbound mail routing. It does not enable DKIM or DMARC for outgoing messages. Keep inbound routing operational for replies and bounces, and ensure the reporting mailbox receives aggregate reports. For SPF, validate the domain actually used in MAIL FROM.




