
How to set up DMARC/DKIM/SPF for Jitbit

For Jitbit's hosted mail server, add a:hmail.jitbit.com and a:hmail2.jitbit.com to your existing SPF record, verify SPF domain matching on a received notification, and publish DMARC for your From domain. Configure custom-domain DKIM on the server sending your messages; Jitbit's public email setup documentation does not supply a universal DKIM selector or key.
I check the outgoing SMTP route first. Jitbit's built-in server and your own SMTP server need different DNS settings. DMARC passes when either SPF or DKIM passes with the required domain matching to the visible From address.
Add your domain
In Jitbit, configure the email address that uses your domain under Administrator > Email settings. Its published setup uses From and SMTP settings rather than a separate sending-domain verification wizard.
- Open settings: Sign in as an administrator, open Administrator > Email settings, and find the outgoing email settings.
- Set the sender: Enter support@example.com as the From email address, replacing example.com with your domain. Set Reply-to to the mailbox that feeds your helpdesk.
- Choose delivery: For hosted Jitbit delivery, select Use Jitbit's Mail Server. For your own SMTP server, enter its address, port, authentication, and required secure connection settings.
- Save and verify: Save changes. With custom SMTP, use Send test message to check the connection. Then send a real ticket reply to an external mailbox and inspect its received headers.
Keep the chosen SMTP route consistent while changing DNS. Switching servers changes which SPF authorization and DKIM signing configuration apply.
The screenshot below illustrates the documented sender settings. Treat the received message, including its Return-Path, as the evidence of the identity your server actually uses.
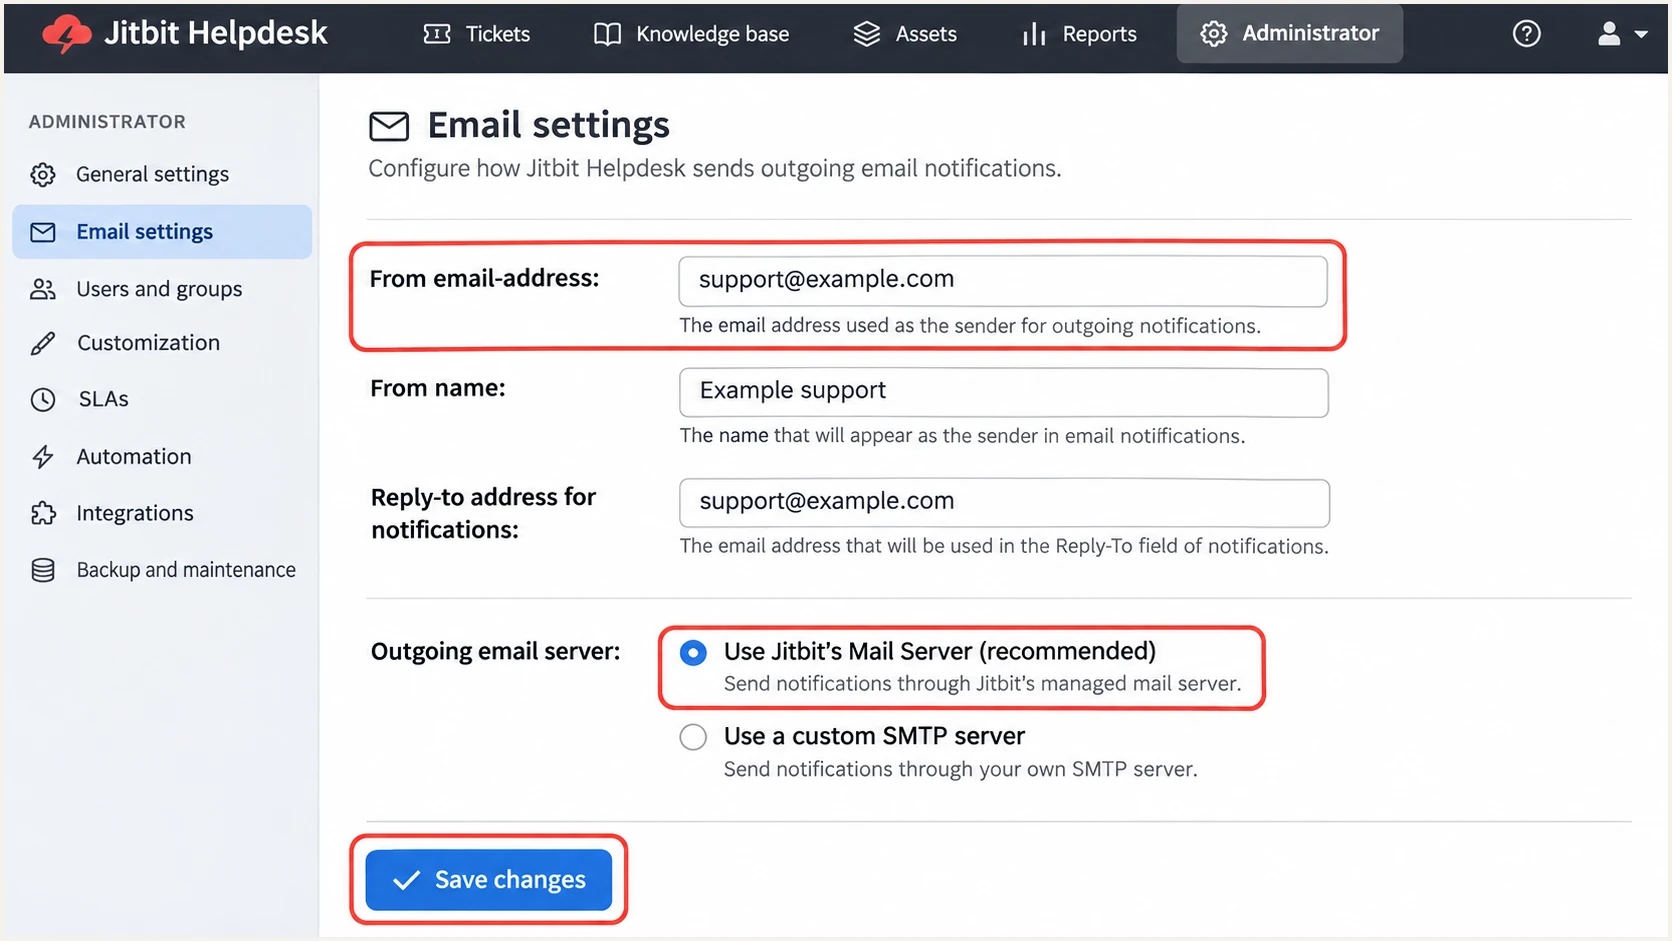
Illustrative Jitbit Email settings with the From address and delivery route.
Reply-to controls where customer replies go. It does not set the envelope sender used by SPF.
A custom helpdesk website address is a separate setting. Its CNAME does not authenticate ticket notification emails.
Set up SPF
Use Jitbit's published SPF mechanisms only when its hosted server sends your email. With custom SMTP or an on-premises deployment, authorize the actual outbound server instead.
- Read existing DNS: Look up the TXT records for the sending domain and identify the value starting with v=spf1.
- Merge authorization: Insert a:hmail.jitbit.com a:hmail2.jitbit.com before the final all mechanism. Preserve every other legitimate sender and your existing all qualifier.
- Publish once: Keep one SPF record at each DNS name. Use the example below only when Jitbit is the sole sender and there is no existing SPF record.
- Check the envelope: Inspect Return-Path on a received Jitbit email. If it uses a subdomain, check SPF at that exact subdomain; SPF records are not inherited.
- Check limits: Both a: mechanisms count toward SPF's limit of 10 DNS lookup-causing terms. Resolve duplicate records or an over-limit evaluation before enforcement.
SPF TXT value for a domain sending only through hosted Jitbittext
v=spf1 a:hmail.jitbit.com a:hmail2.jitbit.com ~all
For support@example.com with an envelope sender at example.com, publish this TXT value at example.com, usually entered as @ in your DNS host. Do not replace an existing multi-sender record with this example.
Run the SPF checker against the actual envelope sender domain after saving DNS. Check both syntax and the lookup budget.
SPF checker
Find SPF syntax issues, lookup limits, and weak records.
?/16tests passed
Jitbit supports SPF alignment. Confirm that the authenticated envelope sender has the domain relationship required by your DMARC policy; an SPF pass alone is insufficient.
If SPF alignment fails but DKIM passes with the required From-domain matching, DMARC still passes. If neither method has that matching, correct the delivery route or contact Jitbit support before enforcing DMARC.
Set up DKIM
DKIM needs a signature added by the outgoing server and a matching public key in DNS. I do not guess a selector: Jitbit's public email setup documentation does not provide a universal custom-domain DKIM setup.
- Identify the signer: Send a ticket notification and inspect DKIM-Signature. Note d=, the signing domain, and s=, the selector.
- Confirm hosted support: If using the built-in Jitbit server, ask support whether your account supports DKIM signing for your From domain. Request the exact selector and TXT value or CNAME target if supported.
- Configure custom SMTP: If your chosen SMTP server supports custom-domain DKIM, enable signing there and publish its supplied selector records. Keep its private key on the signing server.
- Verify the result: Send a new notification. Require dkim=pass and a signing domain that matches the From domain under your DMARC policy. Publishing DNS alone does not enable signing.
Jitbit hosted delivery
Publish Jitbit's documented SPF authorization. Confirm account-specific DKIM support with Jitbit rather than inventing a selector. DMARC can pass through SPF when the envelope sender matches the From domain as required.
Your own SMTP server
Configure DKIM on that server and use its exact DNS records. Confirm that the SMTP account can send as your Jitbit From address. This route gives you control over signing when hosted custom-domain DKIM is unavailable.
Look up the public key at the selector from the actual signature: s=selector and d=example.com correspond to selector._domainkey.example.com. Replace both example values with the received values.
A valid signature for jitbit.com does not authenticate example.com for DMARC. DKIM with your own domain also gives forwarded notifications a route to passing DMARC when forwarding breaks SPF.
Set up DMARC
Publish DMARC in your DNS for the visible From domain. I start a domain with no enforcement policy at p=none while checking legitimate sending traffic.
- Check current policy: Read the existing DMARC TXT record before editing. If it already has p=quarantine or p=reject, keep that policy and fix Jitbit authentication without weakening it.
- Create the record: For a new setup using example.com, publish one TXT record at _dmarc.example.com. DNS hosts commonly require just _dmarc in the Name field.
- Set report delivery: Replace dmarc@example.com with a reporting mailbox you control and can process. Keep any existing valid reporting destinations.
- Validate DNS: Save the record, allow cached answers to expire, and check the published value. Do not create a second DMARC record at the same name.
Initial DMARC TXT value at _dmarc.example.comtext
v=DMARC1; p=none; rua=mailto:dmarc@example.com
The reporting address above is a placeholder. Use a working destination before publishing; aggregate XML reports are not ordinary delivery notifications.
Use our DMARC record generator to build the record, then check the live result below. Leave the default relaxed domain-matching settings unless your policy requires strict matching.
DMARC checker
Look up a domain's DMARC record and catch policy issues.
?/7tests passed
A valid DNS record confirms policy publication. It does not prove that a Jitbit notification passes DMARC.
p=none requests monitoring without requesting quarantine or rejection for DMARC failures. Receivers still apply their own filtering rules.
Verify and troubleshoot
I test a real ticket conversation after saving DNS. An SMTP connection test checks submission; a received notification shows the authentication result.
- Send real traffic: Create a ticket from an external mailbox, reply as a technician, and check delivery back to that mailbox. Repeat for categories with a different From address.
- Inspect headers: Read the receiving server's Authentication-Results. Check spf=pass, dkim=pass where signing is enabled, and dmarc=pass against the actual From domain.
- Check notifications: If nothing arrives, confirm notifications are enabled and the relevant template is not empty. Hover over the reply information icon and check whether the recipient appears in the email sent to list.
- Check permissions: For a category-specific From address, confirm the SMTP account has permission to send as that address. Check automation rules for Abort all further email.
- Retest changes: After correcting DNS or SMTP settings, send a fresh message. Previously delivered messages retain their original authentication results.
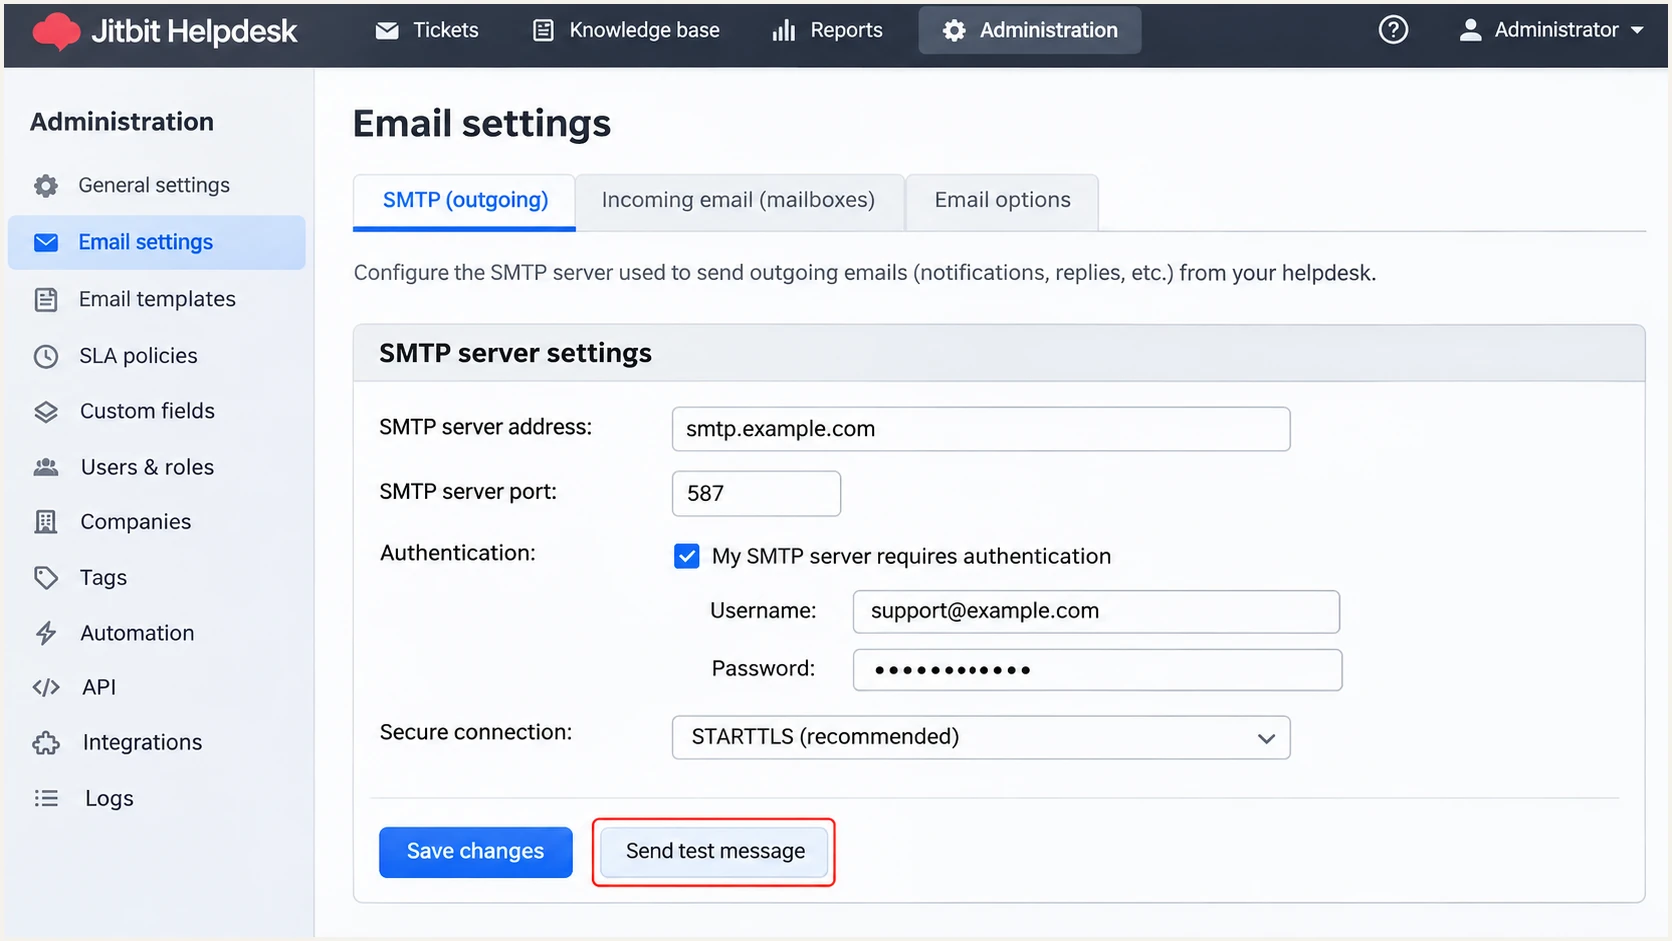
Illustrative Jitbit SMTP settings with the Send test message control.
For a quicker diagnosis, use the email tester below. It supplies a destination address and analyzes the email received there.
Use that address as the requester on a test Jitbit ticket, then reply as a technician. This tests the helpdesk's actual notification path rather than a message sent directly from your normal mailbox.
Email tester
Send a real email to this address. Suped shows a results button when the test is ready.
?/43tests passed
Read the SPF and DKIM domain-matching results alongside the final DMARC result. A green SPF result for an unrelated envelope domain does not satisfy DMARC.
Use these checks to choose the next fix. If authentication passes but delivery fails, inspect the SMTP error or bounce rather than changing DMARC blindly.
|
|
|---|---|
SPF permerror | Duplicates or lookup limit |
SPF domain mismatch | Return-Path and From |
DKIM missing | Outgoing server signing |
DKIM failure | Selector and public key |
DMARC failure | Both authenticated domains |
No notification | Recipient and template |
Authentication results and the next check.
An SPF alignment error is compatible with a DMARC pass when DKIM passes with the required From-domain matching. With hosted Jitbit, still investigate SPF because it is the documented authentication route.
If neither method passes with the required domain matching, keep enforcement changes on hold and correct the sender configuration.
Get alerted when it breaks
Suped, our DMARC platform, provides ongoing visibility after the first successful Jitbit test. Its issue detection and notifications connect authentication failures with specific fix steps.
- Route reports: Use the reporting destination supplied by Suped for your domain in rua, while preserving your current DMARC policy. Confirm reports are arriving.
- Verify the source: Match the Jitbit source to your known SMTP route and test headers, then mark the legitimate source as verified. Investigate unfamiliar sources before approving them.
- Enable notifications: In Notifications, enable Issues detected and Sending sources need verification. Enable DMARC summary emails for recurring review.
- Investigate changes: Open an affected record, compare SPF and DKIM results with the From domain, and review DNS history. Apply the supplied fix steps and verify with a fresh Jitbit message.
Reports have a delivery delay
Suped alerts on issues it detects in available data. DMARC aggregate reports arrive on receiver schedules, so they are not an instant alert for every failed Jitbit message. Use the email tester after changes and reports for ongoing coverage.
Suped brings DMARC monitoring together with source-level diagnostics. That makes it practical to track a Jitbit SMTP migration or a DNS change without repeatedly reading raw XML.
If authentication remains healthy, check reputation separately. Suped also monitors blocklist (blacklist) status; a listing is a different problem from a DMARC failure.
Secure your domain with p=reject
Move to p=reject after legitimate senders consistently pass DMARC, including Jitbit. Suped connects source verification with failure diagnostics so enforcement decisions use observed traffic.
- Inventory senders: Review a complete operating cycle, including infrequent notifications. Confirm every legitimate source, not only Jitbit, has a working DMARC authentication path.
- Cover Jitbit routes: Test ticket confirmations, technician replies, and closure notices. Include every category From address and confirm any subdomain policies that apply.
- Fix forwarding risk: Prefer passing DKIM with your own domain where available. SPF-only DMARC depends on the connecting server and is vulnerable to forwarding failures.
- Stage enforcement: For a domain starting at p=none, move to p=quarantine and review legitimate failures before p=reject. If already at reject, retain it while repairing Jitbit.
- Keep watching: Retain reporting and Suped notifications after enforcement. Investigate new failures when SMTP routes, sending addresses, or DNS records change.
DMARC TXT value after legitimate senders are verifiedtext
v=DMARC1; p=reject; rua=mailto:dmarc@example.com
Keep your real reporting destination and any required existing tags when changing the policy. The example address still needs replacing.
Suped's Hosted DMARC lets teams manage policy changes through the dashboard after DNS delegation. Keep source diagnostics and alerts active so later Jitbit changes receive the same checks.
Frequency asked questions
Jitbit documents a:hmail.jitbit.com and a:hmail2.jitbit.com for its hosted SMTP server. Add these mechanisms to your existing SPF record before the final all mechanism. If you use your own SMTP server, authorize that server instead.
There is no universal custom-domain selector in Jitbit's public email setup instructions. Get the exact selector and record from Jitbit support if your hosted account supports that signing, or from your configured SMTP server. Do not invent a selector or publish an unrelated key.
Yes, if DKIM passes with a signing domain that matches the visible From domain under the DMARC policy. DKIM passing for an unrelated domain is insufficient. If custom-domain DKIM is unavailable on your route, fix SPF domain matching or use a suitable SMTP server.
Keep an existing p=reject or p=quarantine policy. Authenticate Jitbit and test its messages without weakening protection for every other sender on the domain. p=none is the starting recommendation for a domain that does not already enforce DMARC.
No. A portal CNAME connects the helpdesk website. Outgoing email still needs the appropriate SPF authorization, DKIM signing where supported, and a DMARC record for the From domain.
Jitbit Helpdesk is the platform to investigate. Jitbit names hmail.jitbit.com and hmail2.jitbit.com in its SPF instructions; these are documented mail hosts, not a verified inventory of current PTR records. Confirm the actual source IP, sending activity, and authentication results. Custom SMTP uses the outbound server's identity instead.




