
How to set up DMARC/DKIM/SPF for Infomaniak

Published 22 Nov 2026
Updated 22 Nov 2026
11 min read
Summarize with
To set up DMARC/DKIM/SPF for Infomaniak, authorize its mail servers with include:spf.infomaniak.ch, publish the DKIM record shown in Global Security, and add a DMARC TXT record at _dmarc. DMARC passes when SPF or DKIM passes with a domain that matches your visible From domain under your alignment settings.
I start a new DMARC deployment with p=none, test actual messages, and review reports before enforcement. If your domain already uses p=quarantine or p=reject, keep that policy while fixing Infomaniak authentication.
Add your domain
Use the domain in your outgoing From address. An Infomaniak website and an Infomaniak Mail Service are separate sending paths, so check which one your application actually uses.
- Open the service. Sign in to Infomaniak Manager, select the correct Organization, open Mail Service, and select your domain. If no service exists, use Order to create one for your owned domain, then create the sending mailbox.
- Link additional domains. For another domain on an existing Mail Service, open Domain management, then List of domains linked to the service. Select Add a linked domain, choose or enter your domain, and select Link this domain.
- Find authoritative DNS. Check which nameservers host the active DNS zone. Edit records there, even when the domain registration is with Infomaniak. Review existing records before accepting automatic DNS replacement.
- Verify the connection. Check the Mail Service DNS diagnostics and open Global Security. If Infomaniak manages both the service and DNS in the same Organization, the connection is normally configured automatically.
If you are moving incoming mail to Infomaniak, apply the MX settings shown for your Mail Service after preparing the mailboxes. Changing MX records is unnecessary when you are only authenticating outbound email.
Keep your existing nameservers if you want DNS to remain elsewhere. Publish the required records in that active zone, then return to Infomaniak to check the connection.
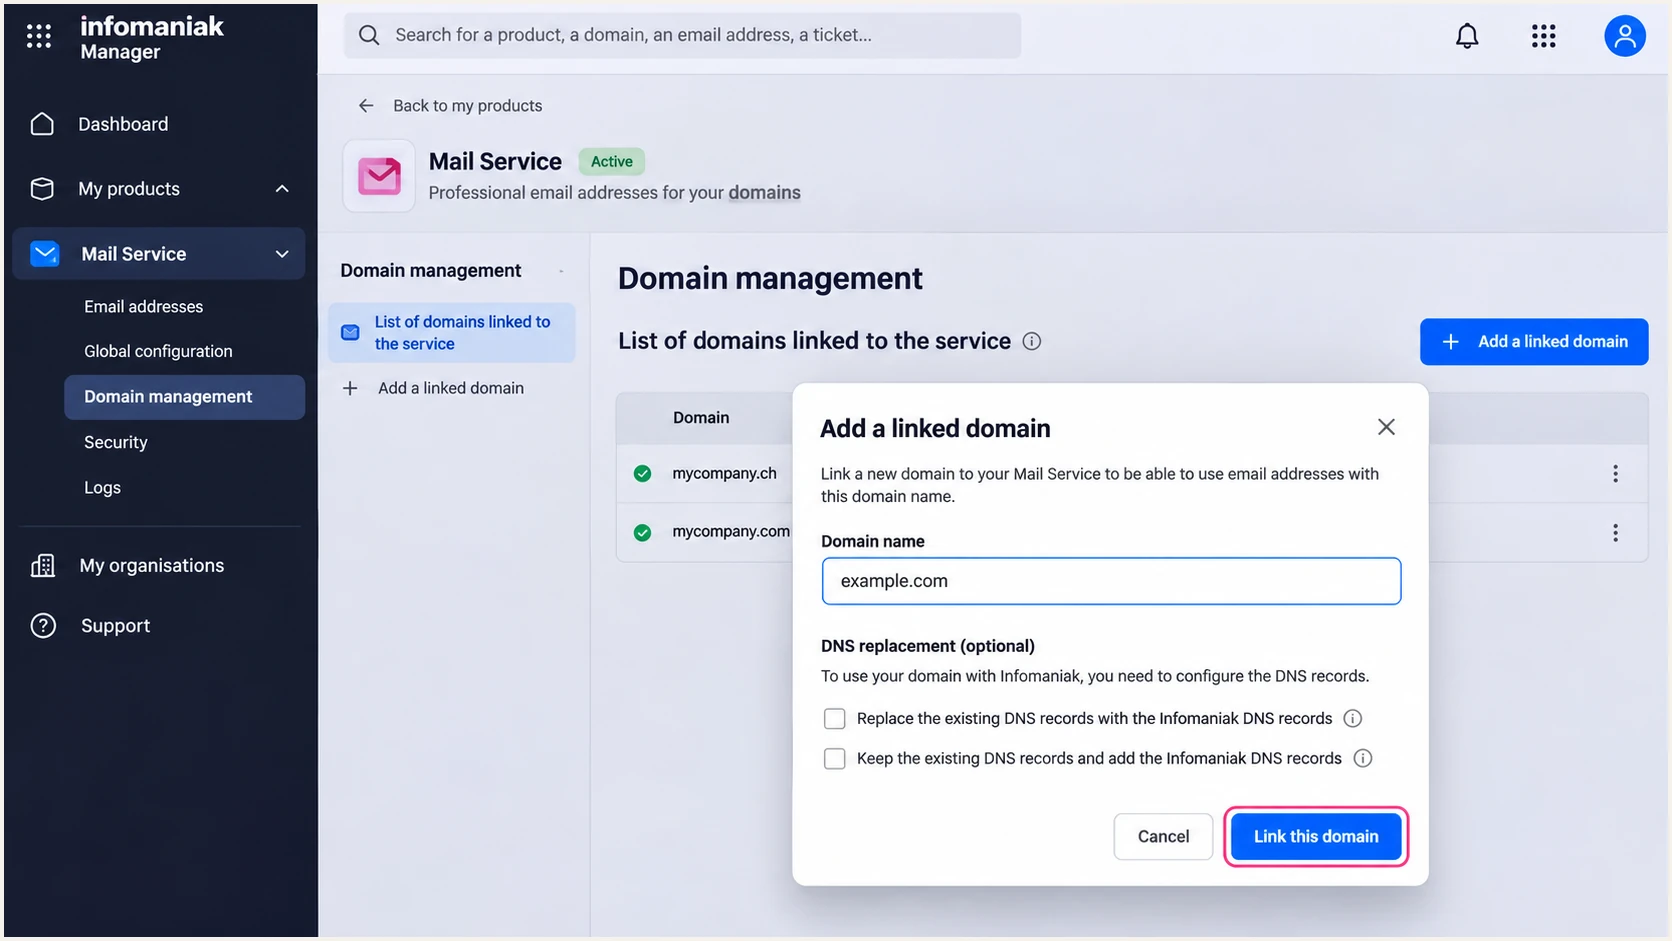
Infomaniak linked-domain setup illustration
After linking the domain, create or confirm the mailbox used by your website or mail client. Repeat authentication checks for each additional sending domain.
Set up SPF
Infomaniak documents include:spf.infomaniak.ch as its SPF authorization. I keep one SPF TXT record at each sending domain and preserve every other authorized sender.
- Check existing SPF. Open Mail Service > your domain > Global Security and inspect SPF. For Infomaniak DNS, you can also open Domains > your domain > DNS Zone and find the TXT value starting with v=spf1.
- Authorize Infomaniak. For an Infomaniak-only domain, use the record below. If SPF already exists, merge include:spf.infomaniak.ch into that record before its final all mechanism. Keep only one v=spf1 record at that name.
- Check the envelope. Send a message and inspect Return-Path. Authenticated Infomaniak SMTP supports using your domain. SPF checks that envelope domain, rather than the visible From address or Reply-To.
- Validate DNS. Save the change at your active DNS host. Check for duplicate SPF records and stay within the 10 DNS-lookup-term limit, including nested lookups.
For a domain that sends only through Infomaniak, create a TXT record at the domain root, usually entered as @ or a blank Source field, depending on the DNS editor.
SPF value for Infomaniak-only sendingtext
v=spf1 include:spf.infomaniak.ch -all
The -all ending gives unauthorized IP addresses an SPF fail result. It does not guarantee rejection by every recipient. Preserve your existing policy while you inventory other legitimate senders.
Run the check against the actual Return-Path domain. A successful root-domain lookup does not validate a different envelope subdomain automatically.
SPF checker
Find SPF syntax issues, lookup limits, and weak records.
?/16tests passed
Resolve any duplicate-record or lookup-limit error before continuing. DNS caches expire according to TTL; Infomaniak advises allowing up to 48 hours for changes to propagate.
PHP mail() is a separate case: Infomaniak documents a provider-domain Return-Path for that path. Adding SPF to your own domain cannot change that envelope identity. Use authenticated SMTP when you need your domain in the Return-Path.
Set up DKIM
DKIM is enabled by default for Infomaniak Mail Services whose DNS zone is managed by Infomaniak. With external DNS, copy the service-generated public record rather than generating an unrelated key.
- Open DKIM. Go to Mail Service > your domain > Global Security and inspect the DKIM section. Check the existing status before making changes.
- Copy the record. For external DNS, copy the exact record name and public-key value displayed by Infomaniak. Publish the supplied TXT record at your active DNS host, keeping its selector unchanged.
- Avoid doubled names. If your DNS host appends the zone automatically, enter only the relative name ending in ._domainkey. Do not accidentally publish the domain suffix twice.
- Verify a signature. Send through Infomaniak, then inspect DKIM-Signature and the receiving server's Authentication-Results. Confirm dkim=pass and a d= domain matching your From domain under your DMARC alignment mode.
The selector comes from the s= value in DKIM-Signature. Its DNS lookup is selector._domainkey followed by the signing domain in d=. I copy the actual selector instead of assuming a universal Infomaniak selector.
Keep other services' DKIM selectors. Multiple selectors can coexist, but the same DNS name must not contain conflicting keys. Infomaniak retains the private signing key; only the public record belongs in DNS.
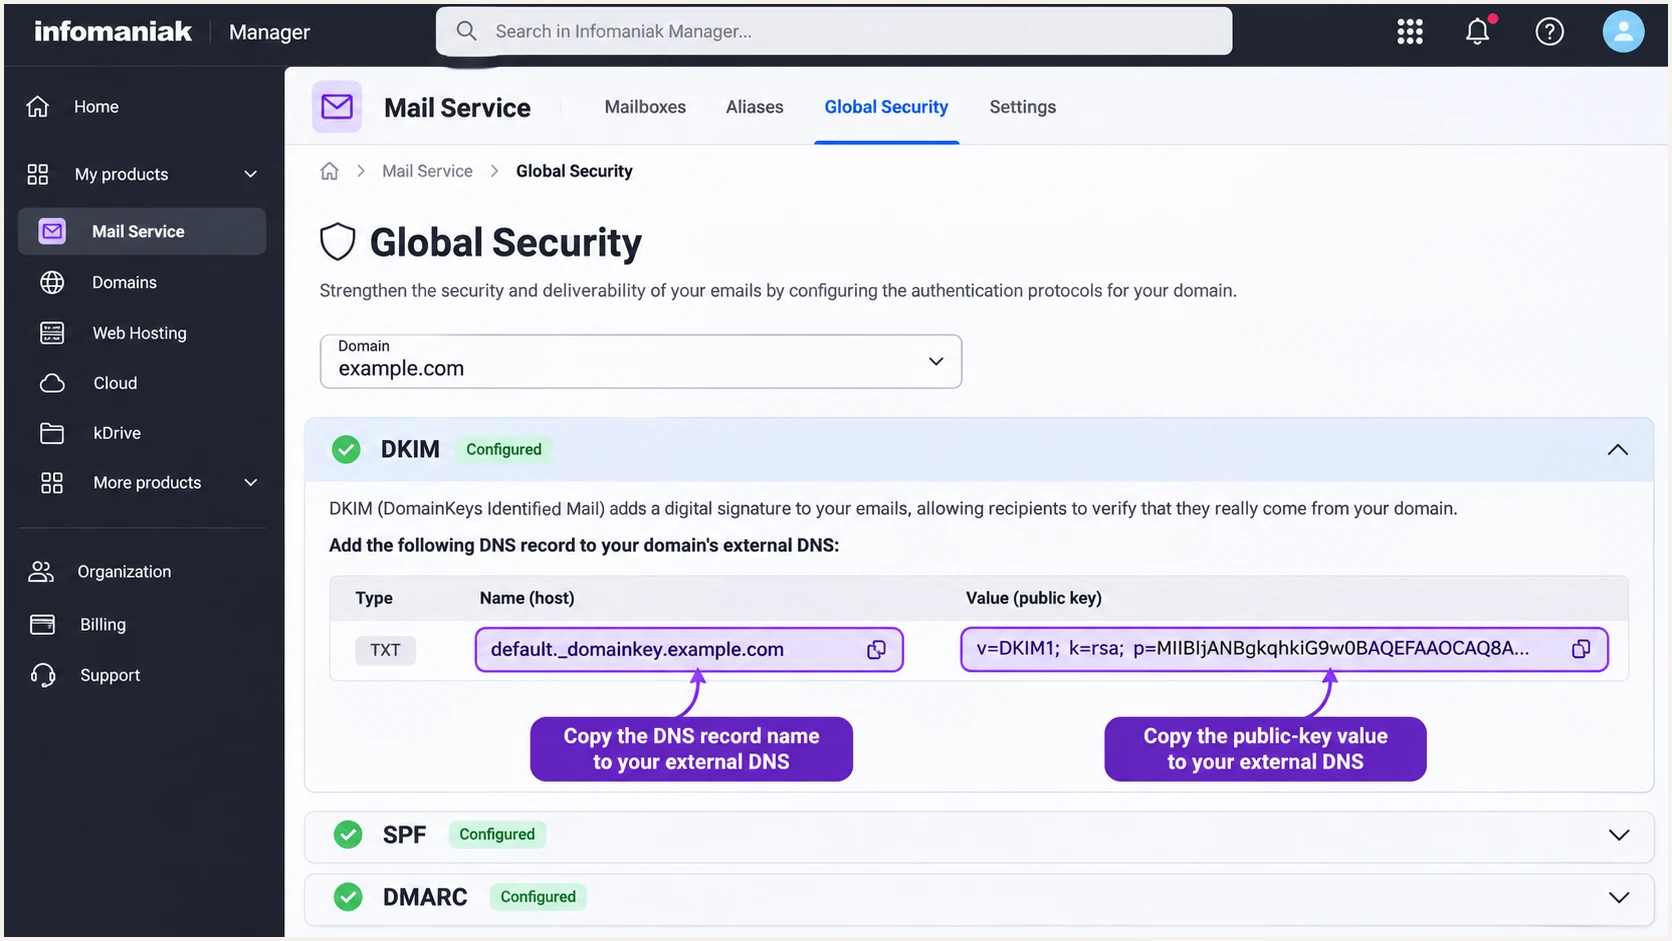
Infomaniak DKIM record location illustration
A green DNS status confirms publication, but a delivered message confirms signing. Test website mail separately from messages sent in the Infomaniak Mail app.
Set up DMARC
DMARC belongs at _dmarc on the visible From domain. Keep an existing quarantine or reject policy; use monitoring mode only when starting a deployment without enforcement.
- Inspect the current policy. Look up the TXT record at _dmarc.example.com before creating anything. Edit an existing record rather than publishing a second DMARC policy.
- Open policy settings. Use Global Security > DMARC and its advanced mode to enter a custom policy. If DNS is external, make the change at the authoritative host instead.
- Publish the TXT value. In Infomaniak DNS Zone, select Add a record, choose DMARC, and select Next. Enter _dmarc in Source and the policy value in Target. Leave the default TTL and save.
- Set a real report address. Replace dmarc@example.com with a monitored mailbox or your reporting service's assigned address. If reports go to another domain, confirm the required external reporting authorization exists.
For a new deployment, use this exact starting template, replacing the example reporting address before publication:
Initial DMARC TXT value at _dmarctext
v=DMARC1; p=none; rua=mailto:dmarc@example.com
Build the policy with the DMARC record generator. Leave relaxed alignment defaults unless your domain has a documented requirement for strict matching. The p=none policy requests reporting without DMARC enforcement.
Check that the published record has one policy and the correct reporting destination. This DNS check validates the record; it does not prove that messages pass DMARC.
DMARC checker
Look up a domain's DMARC record and catch policy issues.
?/7tests passed
A valid result means recipients can read your policy. Confirm delivery separately, including every application that sends using this domain.
Infomaniak's DMARC setup instructions describe the Source and Target fields used for this DNS entry. Enter the policy as a single TXT value without adding literal surrounding quotation marks.
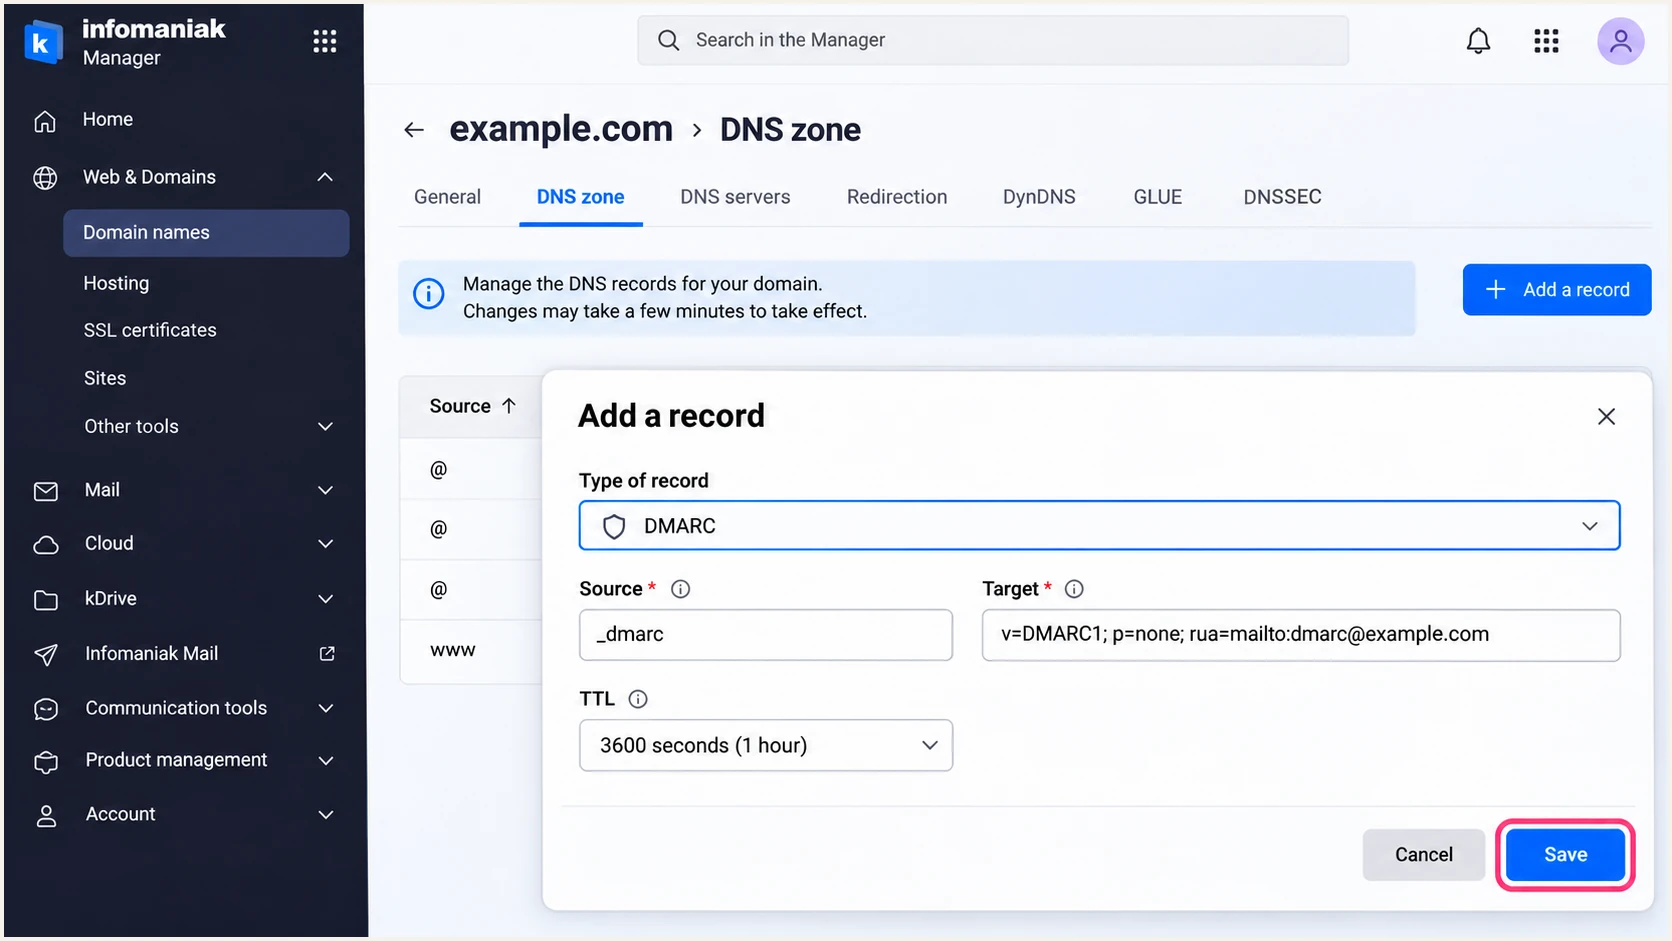
Infomaniak DMARC DNS entry illustration
Replace the demonstration mailbox before saving a real record. Keep its reporting destination active when you later change the policy.
Verify and troubleshoot
I test each actual sending path. A message sent through the Mail app does not verify a contact form, scheduled job, or application using another transport.
- Send representative messages. Test your Infomaniak mailbox and each application. For a form, submit it normally so the test uses the production sender settings.
- Read trusted results. Inspect Authentication-Results added by the receiving mail server. Look for spf=pass, dkim=pass, and dmarc=pass; compare smtp.mailfrom and header.d with header.from.
- Fix sender mismatch. Use your full mailbox address as the SMTP username and the same authorized address as From and envelope sender. Put a contact-form visitor's email address in Reply-To.
- Check DNS placement. Confirm the authoritative zone, one SPF record, one DMARC record, and the exact DKIM selector. Recheck after cached DNS values expire.
Use the failing result to choose the next repair. An SPF pass for a provider-owned Return-Path does not satisfy SPF alignment for your own From domain.
|
|
|
|---|---|---|
SPF permerror | Duplicates or limits | Merge and recount |
DKIM fail | Key or signature | Check selector |
DMARC fail | No matching pass | Compare domains |
Sender mismatch | SMTP identity | Match SMTP user |
The email tester below gives you an address to send to and diagnoses the received message. Send through the mailbox or application you are configuring so the results cover that exact path.
Check its authentication findings before repeating the send after a repair. A passing test validates that message, while DMARC aggregate reports reveal other senders and less frequent jobs.
Email tester
Send a real email to this address. Suped shows a results button when the test is ready.
?/43tests passed
For website email, configure mail.infomaniak.com with port 587 and STARTTLS, or port 465 with implicit TLS. Authenticate with the full mailbox address and its mailbox or device password.
Infomaniak documents different behavior for unauthenticated PHP mail(). I switch the application to authenticated SMTP when the envelope domain or signing behavior is wrong.
Authenticated SMTP
Use the authorized mailbox as From and envelope sender. Verify the delivered Return-Path uses your domain and that DKIM passes for your From domain.
PHP mail()
A provider-owned Return-Path prevents SPF alignment for your domain. DMARC still passes if a valid DKIM signature has the required domain match. Verify signing before enforcing DMARC.
If authentication passes but delivery still fails, inspect the SMTP rejection text. Authentication does not guarantee inbox placement, and a blocklist (blacklist) listing requires a separate reputation investigation.
Get alerted when it breaks
Infomaniak's Global Security page checks configuration. Ongoing failures need report analysis after configuration changes, new application deployments, or DKIM key updates.
Our DMARC monitoring in Suped turns aggregate reports into sending-source diagnostics and repair steps. It is a practical way to catch Infomaniak failures across your domain's traffic, including messages outside a one-off test.
- Watch known sources. In Suped, verify the Infomaniak source only after confirming it belongs to your organization. Investigate unfamiliar sources instead of authorizing them automatically.
- Enable issue emails. Configure Issues detected and Sending sources need verification notifications. Enable DMARC summary emails for a recurring view of authentication health.
- Inspect failures. Open the affected source and detail view. Compare the sending IP, SPF identity, and DKIM signing domain, then follow the issue's steps to fix.
- Confirm recovery. Repair the active DNS record or application settings, send another test, and check subsequent aggregate reports for the affected source.
DMARC reports usually arrive on a reporting cycle rather than immediately after each message. Use the email tester for immediate checks and Suped notifications for issues detected in incoming reports.
Suped's DNS history also helps identify record changes that coincide with a failure. Keep blacklist (blocklist) investigations separate from authentication repairs when delivery problems persist.
A missing alert is not proof of healthy sending. Confirm that aggregate reports are arriving, notifications are enabled, and your infrequent sending jobs appear in the data.
Secure your domain with p=reject
I move to p=reject after every legitimate sender has a reliable DMARC pass. Judge identified legitimate traffic, not a domain-wide pass rate that mixes your mail with unauthorized messages.
Suped makes this decision reviewable through source verification and individual failure diagnostics. Check Infomaniak website messages alongside mailbox traffic before changing the domain-wide policy.
- Cover a full sending cycle. Include scheduled invoices, password resets, and infrequent operational mail. Keep monitoring until each legitimate workflow has appeared and its authentication is understood.
- Resolve legitimate failures. Fix DKIM publication and envelope-domain mismatches. Keep reliable DKIM signing because forwarding often disrupts SPF.
- Stage enforcement. Change the existing policy to p=quarantine, review reports and delivery errors, then change it to p=reject when legitimate traffic remains healthy. Keep the rua destination throughout.
- Check subdomains. Inventory sending subdomains and explicit child policies. An absent sp tag normally makes subdomains inherit the parent policy unless a more specific policy applies.
- Keep one policy owner. Edit the policy in authoritative DNS, or use Suped's Hosted DMARC policy controls after delegation is configured. Avoid conflicting edits through multiple management paths.
Our Hosted DMARC lets you stage subsequent policy changes in Suped after the initial DNS delegation. The same report review is required before enforcement; hosting the record does not fix failing senders.
For a domain ready for rejection, the policy below requests rejection of DMARC failures. Replace the example report address with your active destination and preserve any other intentional policy settings.
DMARC TXT value after verifying legitimate senderstext
v=DMARC1; p=reject; rua=mailto:dmarc@example.com
After the change, retest Infomaniak sending and inspect subsequent reports for legitimate failures. Receivers retain their own handling rules, so p=reject is a requested policy rather than a universal delivery guarantee.
Continue monitoring after enforcement. A new website integration or removed DKIM record can break an otherwise healthy domain.
Frequency asked questions
The infomaniak.ch suffix is associated with Infomaniak infrastructure. Treat a matching rDNS hostname as an identification clue, then confirm the sending IP and message authentication. It does not prove that the sender is authorized to use your domain.
Infomaniak recommends include:spf.infomaniak.ch for its Mail Service. Its documentation also names related entries such as relay.mail.infomaniak.ch and app.mail.infomaniak.ch. Use the documented top-level include, rather than copying nested includes into your own record.
DMARC requires either a passing SPF check with the required envelope-domain match, or a passing DKIM signature with the required signing-domain match. Configure both for authenticated SMTP. If PHP mail() uses a provider-domain Return-Path, SPF alignment fails for your domain; DMARC still passes with correctly matching, passing DKIM.
The website is using a different sending path or identity. Check whether it uses PHP mail() or authenticated SMTP. Configure Infomaniak SMTP, keep From and the envelope sender consistent with the authorized mailbox, and put visitor addresses in Reply-To. Test the website again.
DNS visibility depends on TTL and caching; Infomaniak advises allowing up to 48 hours for propagation. Aggregate reports commonly arrive daily, so they are not immediate. Test a delivered message after DNS updates, then inspect reports as receivers submit them.
Keep an existing p=reject or p=quarantine policy while configuring Infomaniak. Fix and test the new sending path before production use. The p=none template is for starting monitoring without an existing enforcement policy.




