
How to set up DMARC/DKIM/SPF for Hostpoint

Set up Hostpoint email authentication by publishing v=spf1 redirect=spf.mail.hostpoint.ch, enabling DKIM in Enhanced protection, and adding a DMARC TXT record at _dmarc.your-domain. Hostpoint supports SPF alignment through your own return-path domain. Website mail needs particular attention because its default envelope sender uses a Hostpoint domain.
I verify the actual sending path before enforcing DMARC. A message passes DMARC when either SPF or DKIM passes with domain alignment to the visible From address. Existing quarantine or reject policies should stay in place during setup.
Add your domain
I start by confirming that the sending domain is assigned to the correct Hostpoint service and identifying its authoritative DNS provider. Registering a domain at Hostpoint and hosting its DNS are separate decisions.
- Open Domains: Sign in with your Hostpoint ID and open Domains. For an externally registered domain that is missing, choose Add a domain and enter the domain name without a protocol or path.
- Assign hosting: Open the domain, edit Web service, select the hosting account that sends your website mail, and save the changes. Confirm that the domain is available in that hosting account.
- Check DNS authority: Look up the domain's NS records. Publish authentication records at the provider named there, even when the domain or website is managed at Hostpoint.
- Verify the sender: For mailbox sending, open the hosting account, select E-mail, and create or confirm the sending address. For website sending, confirm that the application uses an address on your assigned domain.
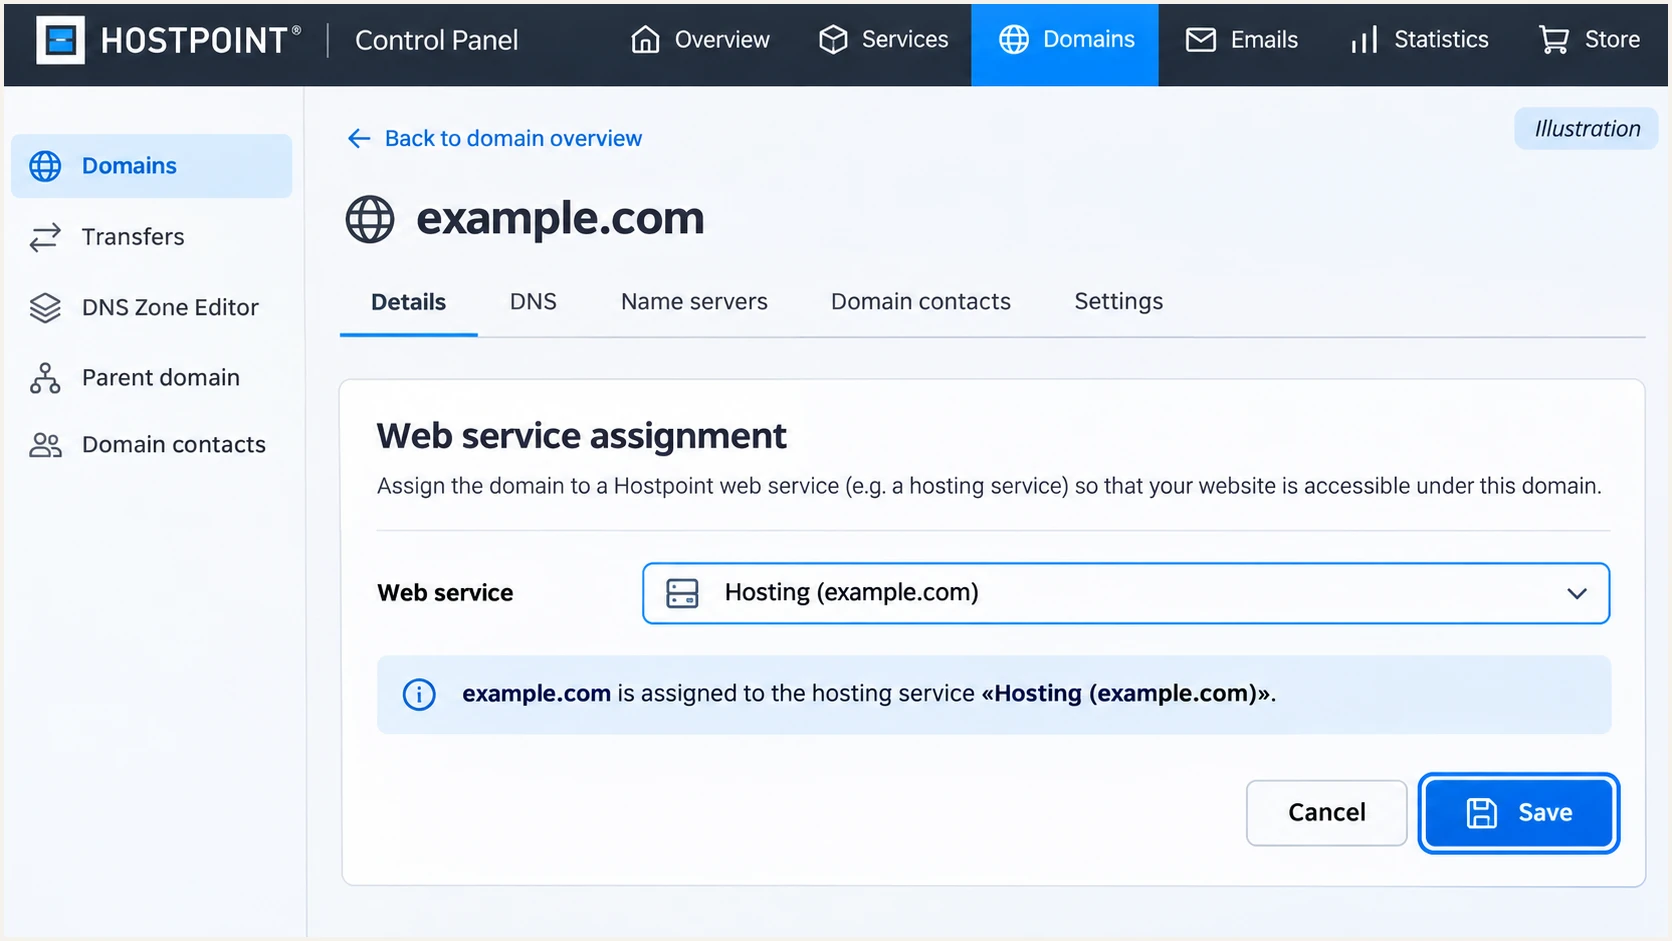
Illustrated Hostpoint Web service controls for assigning a domain to hosting.
I confirm the assignment in Hostpoint and query public DNS before proceeding. Changing MX records is only necessary when moving incoming mail to Hostpoint; SPF, DKIM and DMARC setup alone does not require moving your inboxes.
Set up SPF
Hostpoint's documented SPF value is v=spf1 redirect=spf.mail.hostpoint.ch. I use that value for a domain whose only authorized sending infrastructure is Hostpoint.
- Inspect the current record: Look up TXT records at the envelope sender's domain. Keep a single SPF record and preserve authorization for other legitimate senders.
- Use Hostpoint DNS: Open Domains > Edit DNS zone. If SPF is absent, click Add Hostpoint SPF record, then Execute now.
- Use external DNS: Create a TXT record at your sending domain with the value below. Use the root-name format required by your DNS provider, commonly @.
- Fix website identity: In your application's mail settings, set the envelope sender to an address such as forms@example.com. Hostpoint's web-server default is [username]@webuser.mail.hostpoint.ch, which does not provide SPF alignment with example.com.
Hostpoint-only SPF TXT value at example.comtext
v=spf1 redirect=spf.mail.hostpoint.ch
For PHP or Sendmail delivery, set the envelope sender in the application first. If that setting is unavailable, Hostpoint documents a .user.ini file in the website's document root. Merge the following setting into that file, using your own address.
Website .user.ini settingini
sendmail_path = "/usr/sbin/sendmail -t -f forms@example.com"
I keep the visible From address on my own domain too. A contact form visitor's address belongs in Reply-To. After changing the application or PHP setting, send a new message and check its Return-Path.
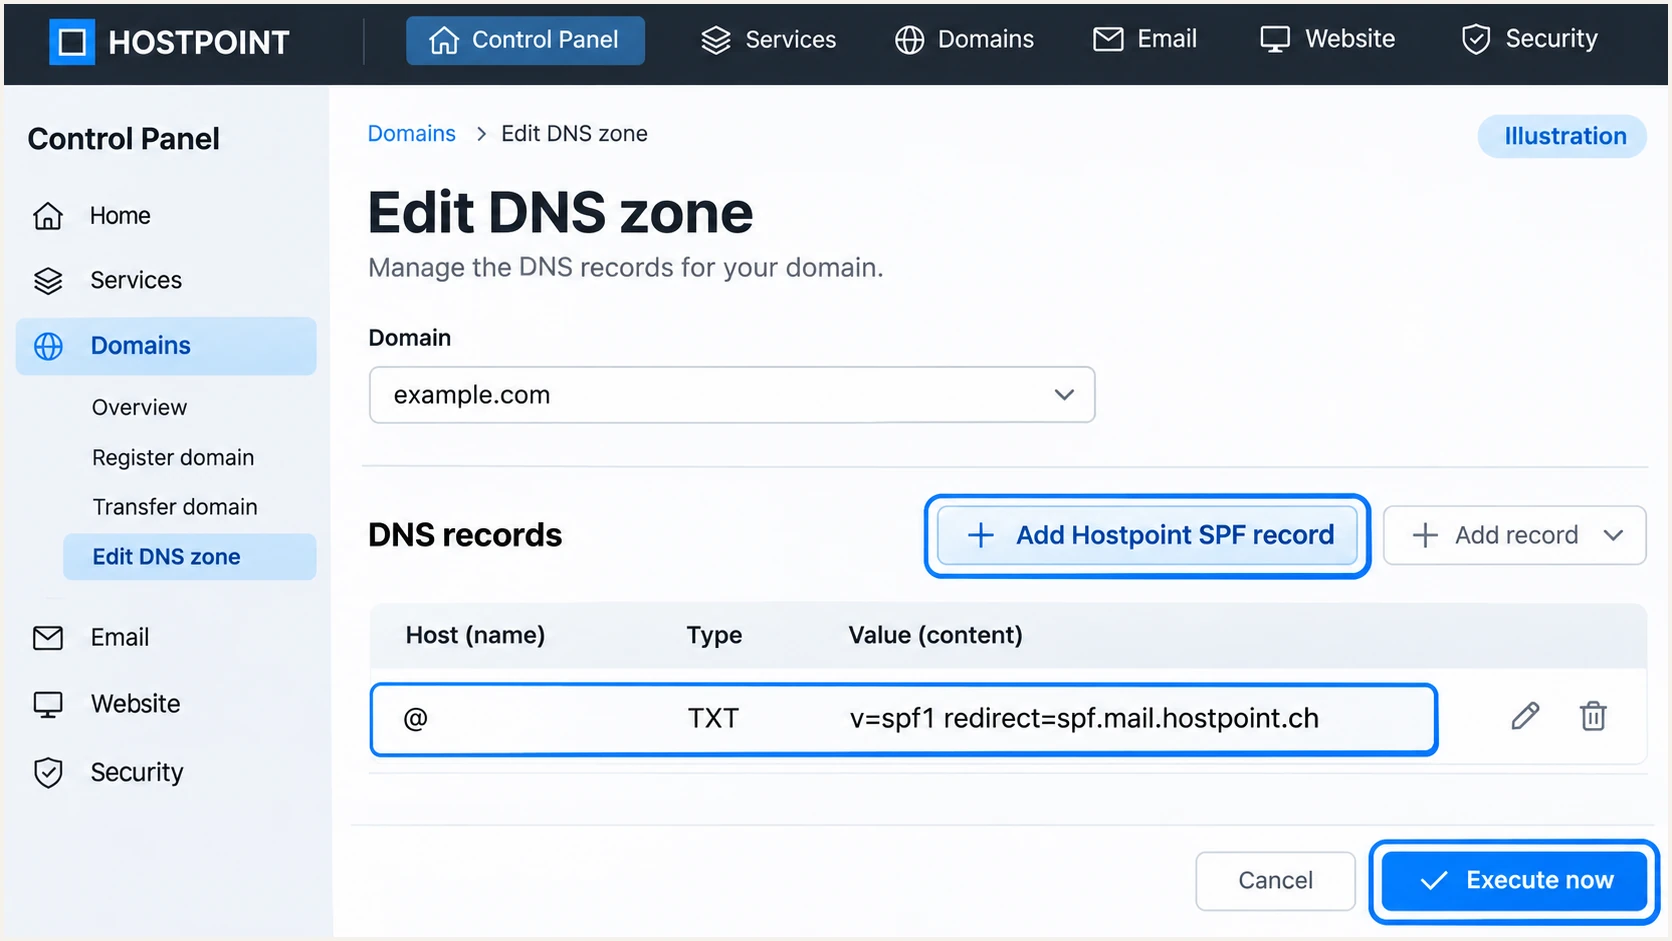
Illustrated Hostpoint DNS editor with the SPF TXT record and save controls.
When combining senders, retain their authorization in one SPF record. With Hostpoint's redirect syntax, keep one redirect at the end and omit an all mechanism. An all mechanism prevents the redirect from being evaluated.
I check the completed record below, including the 10 DNS lookup limit. Query the domain actually used by the envelope sender, since SPF is not evaluated against the visible From address.
SPF checker
Find SPF syntax issues, lookup limits, and weak records.
?/16tests passed
A successful lookup confirms the published policy. A received test message confirms whether the sending IP passes that policy and whether the return-path domain matches the visible From domain under DMARC's alignment rules.
Hostpoint supports a custom return path, so correcting a website's default envelope sender is actionable here. Redirecting SPF evaluation to Hostpoint's policy does not change the domain being authenticated.
Set up DKIM
I enable Hostpoint's signing and verify the public keys separately. Hostpoint creates domain-specific selectors, so copying a selector or public key from another domain will not work.
- Enable signing: Open Domains, select your domain, then Enhanced protection. Activate DKIM if it is inactive. New domain assignments already have DKIM enabled automatically in supported cases.
- Find external DNS values: For external DNS, open E-mail & Cloud Office > Display Cloud Office groups. Select the domain's group, open Enhanced protection, and click Edit for the domain. Activate DKIM and copy the displayed records.
- Publish every supplied record: At your authoritative DNS provider, copy each exact record name, type and public value. Hostpoint documents three default DKIM records with different key algorithms or sizes. Preserve the generated selectors and repeat publication after key changes.
- Check sending restrictions: In Enhanced protection, edit the sender policies. For mailbox mail, require the matching email user where practical. For website mail, restrict sending to the hosting account assigned to the domain. Save both settings.
- Confirm a signature: Send a fresh message through each application. Check that at least one DKIM signature passes and its signing domain matches your visible From domain under DMARC's alignment rules.
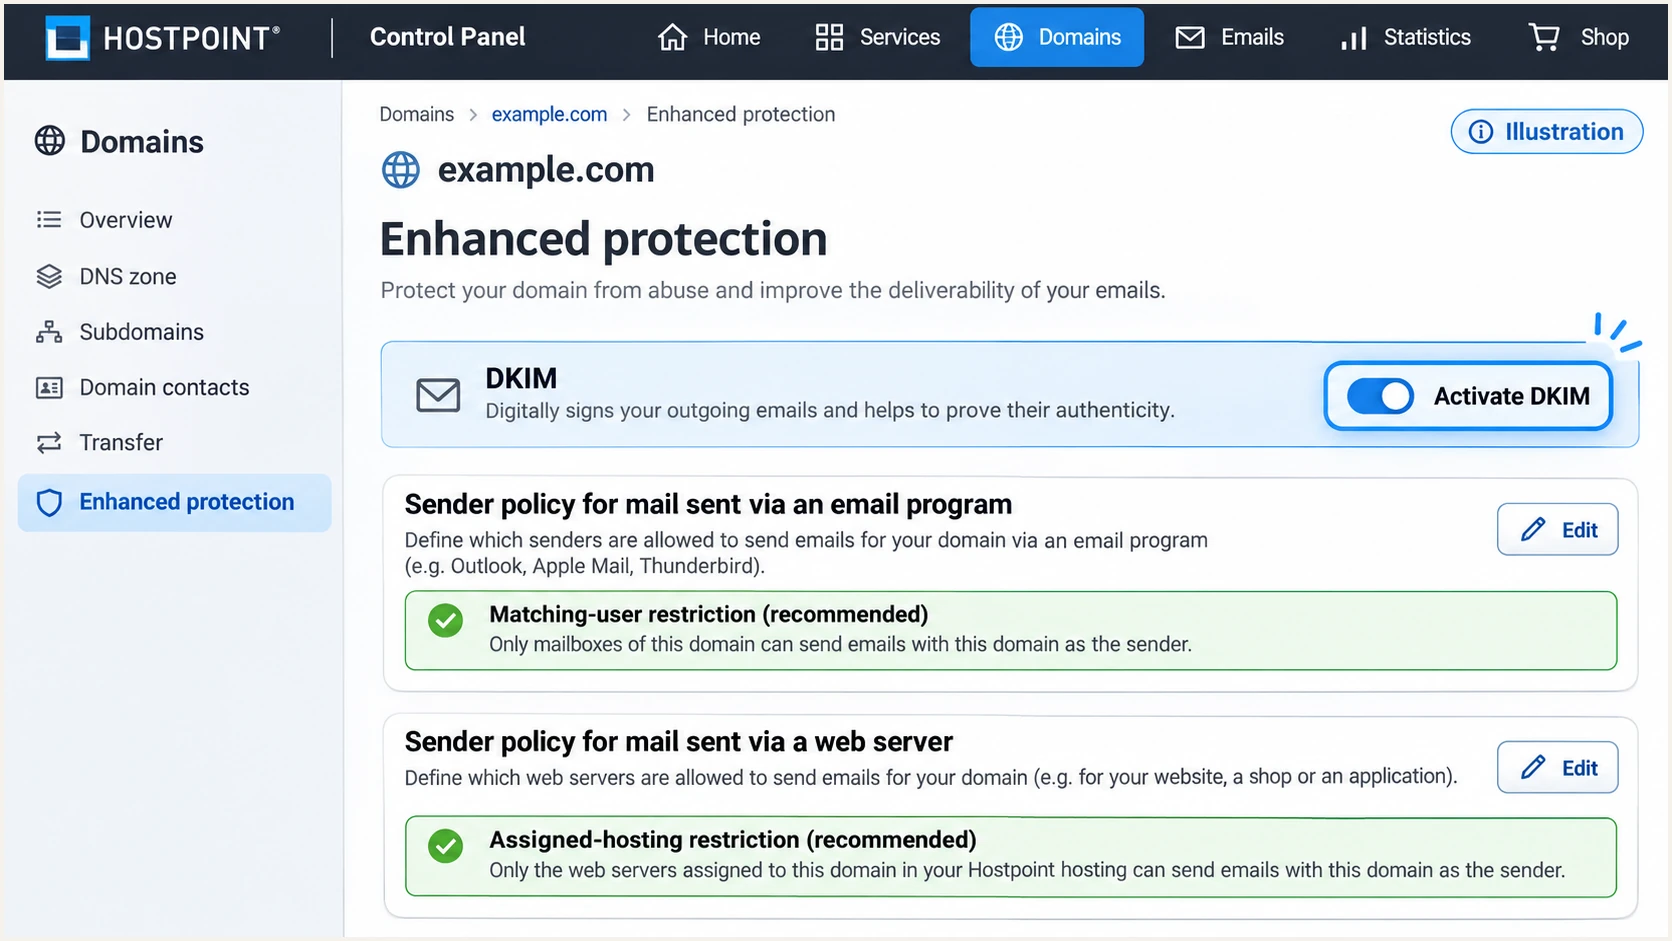
Illustrated Hostpoint DKIM activation and sender-policy settings.
For DNS verification, read s= and d= in the delivered message's DKIM-Signature header. Query TXT at s._domainkey.d, substituting those actual values. If the DNS editor appends your domain automatically, enter only the relative selector name.
Activation and publication are separate
Enabling DKIM in Hostpoint does not publish keys at an external DNS provider. Keep those external records synchronized with Hostpoint. Use Hostpoint's generated keys rather than replacing them with an unrelated key pair.
Set up DMARC
For a domain without DMARC, I start with p=none and aggregate reporting. If the domain already uses p=quarantine or p=reject, keep that policy and update only the settings needed for reporting.
- Inspect existing policy: Query TXT at _dmarc.example.com. Hostpoint automatically enables DMARC for eligible domain assignments, so inspect the published record before adding anything.
- Open the policy: For Hostpoint DNS, use Domains > your domain > Enhanced protection to activate DMARC if needed. Then open Edit DNS zone to inspect or edit the resulting TXT record. With external DNS, edit the authoritative zone there.
- Publish one record: Create or edit the TXT record at _dmarc.example.com. Use _dmarc as the name when your editor appends example.com. For a new monitoring policy, use the example below with your actual reporting address.
- Make reporting usable: Replace dmarc@example.com with a mailbox or aggregate-report destination you control. Confirm it accepts compressed XML reports. If the destination uses another domain, complete any required external reporting authorization.
Starting DMARC TXT value at _dmarc.example.comtext
v=DMARC1; p=none; rua=mailto:dmarc@example.com
The example address is a placeholder. I use a working reporting destination before publishing. Keep existing legitimate reporting recipients when editing a record, and maintain one DMARC TXT record at the policy name.
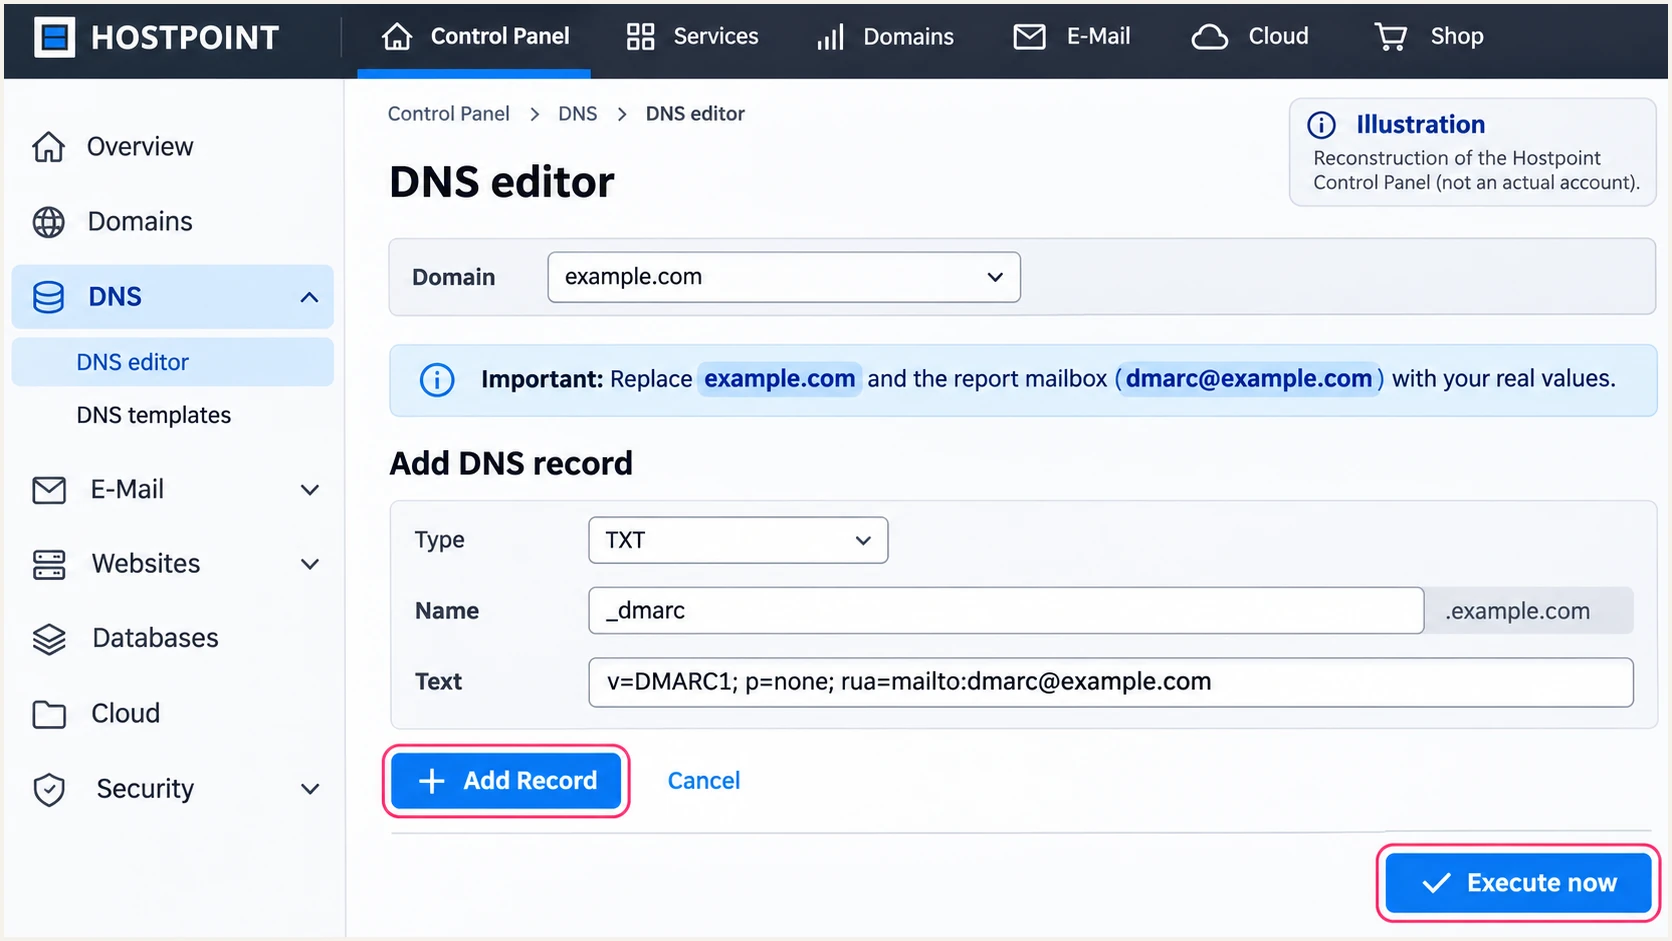
Illustrated Hostpoint DNS form for a monitoring DMARC record.
Use the DMARC record generator to build the TXT value with your reporting address. Keep the default relaxed alignment unless you have a tested reason to require exact domain matches.
After saving, check the visible From domain below. A valid DMARC lookup confirms publication and syntax; passing message authentication still depends on the SPF or DKIM results for each sender.
DMARC checker
Look up a domain's DMARC record and catch policy issues.
?/7tests passed
I verify that the lookup returns the intended policy and report destination. If the old value remains visible, check the authoritative answer and allow cached DNS answers to expire according to their TTL.
A p=none policy requests monitoring without quarantine or rejection based on DMARC failure. It does not stop spoofed mail, and it does not guarantee inbox placement for legitimate messages.
Verify and troubleshoot
I test mailbox mail and website mail separately because they can use different envelope senders and signing paths. A single successful mailbox test does not validate a contact form or scheduled website job.
- Inspect public DNS: Run the lookups below. Replace ACTUAL_SELECTOR with the selector copied from a real DKIM-Signature header.
- Test every path: Send an ordinary mailbox message, a contact-form message, and an order confirmation if those paths exist. For authenticated Hostpoint SMTP, use asmtp.mail.hostpoint.ch with authentication and port 587 with STARTTLS.
- Inspect trusted results: Read Authentication-Results added by the receiving mail system. Compare smtp.mailfrom for SPF and header.d for DKIM with header.from for DMARC. Treat a sender-supplied Authentication-Results header as untrusted.
- Resolve specific failures: For SPF errors, check duplicate records and lookup count. For DKIM errors, check the selector and public key, then Hostpoint's sender policies. For DMARC errors, check domain alignment even when SPF or DKIM says pass.
DNS checks using your actual domain and selectorbash
dig +short NS example.com
dig +short TXT example.com
dig +short TXT _dmarc.example.com
dig +short TXT ACTUAL_SELECTOR._domainkey.example.com
|
|
|---|---|
SPF | Pass for return path |
DKIM | Valid signature |
Alignment | Matching From domain |
DMARC | Pass through either method |
Minimum evidence to check in a delivered message.
The email tester below is the quickest end-to-end check. Send to the address it provides using the actual Hostpoint mailbox or application being validated; forwarding an old message tests a different path.
The test diagnoses the delivered message's authentication and other delivery signals. Keep its results alongside a test timestamp so a later DNS change or application update can be compared with a known working message.
Email tester
Send a real email to this address. Suped shows a results button when the test is ready.
?/43tests passed
After a fix, generate a new message and rerun the test. A passing DNS lookup alone does not show that Hostpoint signed the message or that the application used the intended return path.
SPF alignment failure is compatible with a DMARC pass when DKIM passes with domain alignment. I still fix Hostpoint's configurable return path where practical, while preserving working DKIM for forwarded messages.
Website default sender
The return path uses webuser.mail.hostpoint.ch while the visible From uses example.com. SPF can pass for Hostpoint's domain without providing SPF alignment for example.com.
DMARC then depends on a passing DKIM signature with domain alignment.
Configured domain sender
The application sets the envelope sender to forms@example.com and example.com authorizes Hostpoint through SPF. The visible From uses example.com too.
Verify SPF pass and DKIM pass on a newly delivered message before relying on either result.
Get alerted when it breaks
Suped is our DMARC platform for continuing this workflow after Hostpoint setup. Its DMARC monitoring connects reported sending sources with authentication diagnostics, so a changed website sender or broken DKIM record becomes an issue to investigate.
- Enable issue notifications: With reports arriving in Suped, open Notifications and enable Issues detected. Configure the notification recipients responsible for Hostpoint mail and DNS.
- Watch new sources: Enable Sending sources need verification. Review new sources against your approved applications before marking them verified.
- Investigate with evidence: Filter reported records by source or sending IP. Open the detail view to inspect SPF, DKIM and DMARC results. Compare DNS history with the first observed failure.
- Confirm recovery: Follow the issue's fix steps, repeat the email test, and confirm that subsequent reports show recovery. Enable DMARC summary emails for periodic review.
I use issue alerts for investigation and summaries for recurring checks. Aggregate DMARC reports usually arrive daily, so detection based on those reports follows their arrival; it is not a live feed of every message.
Authentication and reputation need separate checks
A DMARC pass does not guarantee delivery. If authentication passes but mail is rejected, inspect the SMTP response. Suped's blocklist monitoring can flag relevant IP or domain listings; a blacklist listing needs its own investigation.
Secure your domain with p=reject
I enforce p=reject after every known legitimate sending path has a dependable DMARC pass. Suped's source verification and record diagnostics provide the evidence for that decision, including failures hidden by an overall pass rate.
- Complete the inventory: Review Hostpoint mailbox mail and website mail alongside every other authorized source. Observe a full business sending cycle, including infrequent invoices or scheduled jobs.
- Resolve legitimate failures: Fix missing DKIM keys, incorrect return paths and domain alignment errors. Judge readiness using legitimate sources rather than requiring impersonation traffic to authenticate.
- Stage enforcement: If starting at none, use quarantine as a monitored trial if needed, then publish reject. Retain working reporting and default relaxed alignment. Audit subdomains that inherit the parent policy.
- Keep monitoring: After each policy change, test critical applications and inspect new reports in Suped. Investigate delivery errors against the affected sender and message rather than assuming every error is caused by DMARC.
Optional quarantine stage, using your real report destinationtext
v=DMARC1; p=quarantine; rua=mailto:dmarc@example.com
For a TXT-managed policy, change the existing _dmarc record at the authoritative DNS provider. Suped's Hosted DMARC also supports policy management through its dashboard once configured, which gives teams a practical way to stage enforcement without repeated DNS edits.
Final reject policy, using your real report destinationtext
v=DMARC1; p=reject; rua=mailto:dmarc@example.com
Enforce the policy and keep reporting
With legitimate sources verified, publish p=reject and retain rua reporting. Receivers apply their own handling decisions, so continue checking reported dispositions and authentication failures after enforcement.
Frequency asked questions
For Hostpoint-only sending, publish v=spf1 redirect=spf.mail.hostpoint.ch as a TXT record at the envelope sender's domain. Preserve other legitimate senders in one combined SPF record. Do not append an all mechanism to the redirect-based policy.
The default website envelope sender uses webuser.mail.hostpoint.ch. SPF can pass for that domain without SPF alignment with your visible From domain. Set your own envelope sender in the application or .user.ini, then verify a new message. A passing DKIM signature with domain alignment also satisfies DMARC.
Use the DKIM records displayed in Enhanced protection or read s= in a delivered message's DKIM-Signature header. Hostpoint generates domain-specific selectors. For external DNS, publish every record supplied by Hostpoint and copy subsequent changes too.
The mail.hostpoint.ch namespace belongs to Hostpoint's email infrastructure. I treat an rDNS suffix as a source-identification clue, then confirm the actual sending IP and authentication results. The suffix alone does not prove that the message is authorized by your domain. webuser.mail.hostpoint.ch also appears as a website envelope-sender domain; an envelope domain is not an rDNS result.
Keep a working quarantine or reject policy. Correct Hostpoint's authentication and test legitimate sending paths under that policy. Use p=none for a new monitoring setup, with a real aggregate-report destination, before deciding when enforcement is ready.




