
How to set up DMARC/DKIM/SPF for Hornetsecurity

Published 21 Nov 2026
Updated 21 Nov 2026
12 min read
Summarize with
To authenticate outbound email through Hornetsecurity, verify your sending domain, authorize its relay with include:spf.hornetsecurity.com, publish the hse1 and hse2 DKIM CNAME records, enable outgoing DKIM signing, and publish a DMARC TXT record at _dmarc.yourdomain. For 365 Total Protection, retain the Microsoft 365 SPF include too.
I check the outbound route before editing DNS. Hornetsecurity can authenticate mail it relays, but messages that bypass it need authentication at their actual sending service. Keep an existing quarantine or reject DMARC policy while configuring the new route.
Add your domain
I start in the Hornetsecurity customer account that owns the sending domain. Domain registration is required for outbound relay authorization.
- Select the customer: Sign in as an administrator and choose the correct customer in Scope Selection.
- Register the domain: Open Customer Settings > Domains. Use Add Domain for a missing domain, enter your domain, and save it. Check synchronized domains before creating another entry.
- Check verification DNS: For standard gateway onboarding, obtain the recommended MX records under Email Security > Spam & Malware Protection > Settings. Configure the delivery destination and recipients before changing inbound routing.
- Trigger verification: Once the required MX records are published, return to Domains, open the domain row's menu, and select Trigger Verification. Confirm the Verified column shows success.
Hornetsecurity's support article 'Why do I receive an error message when sending emails with certain senders?' requires registering and verifying the sending domain. An unrecognized envelope sender domain can cause a 554 5.7.2 rejection.
With 365 Total Protection, domains are synchronized during onboarding. Check the existing entry and its verification status before trying to add it manually.
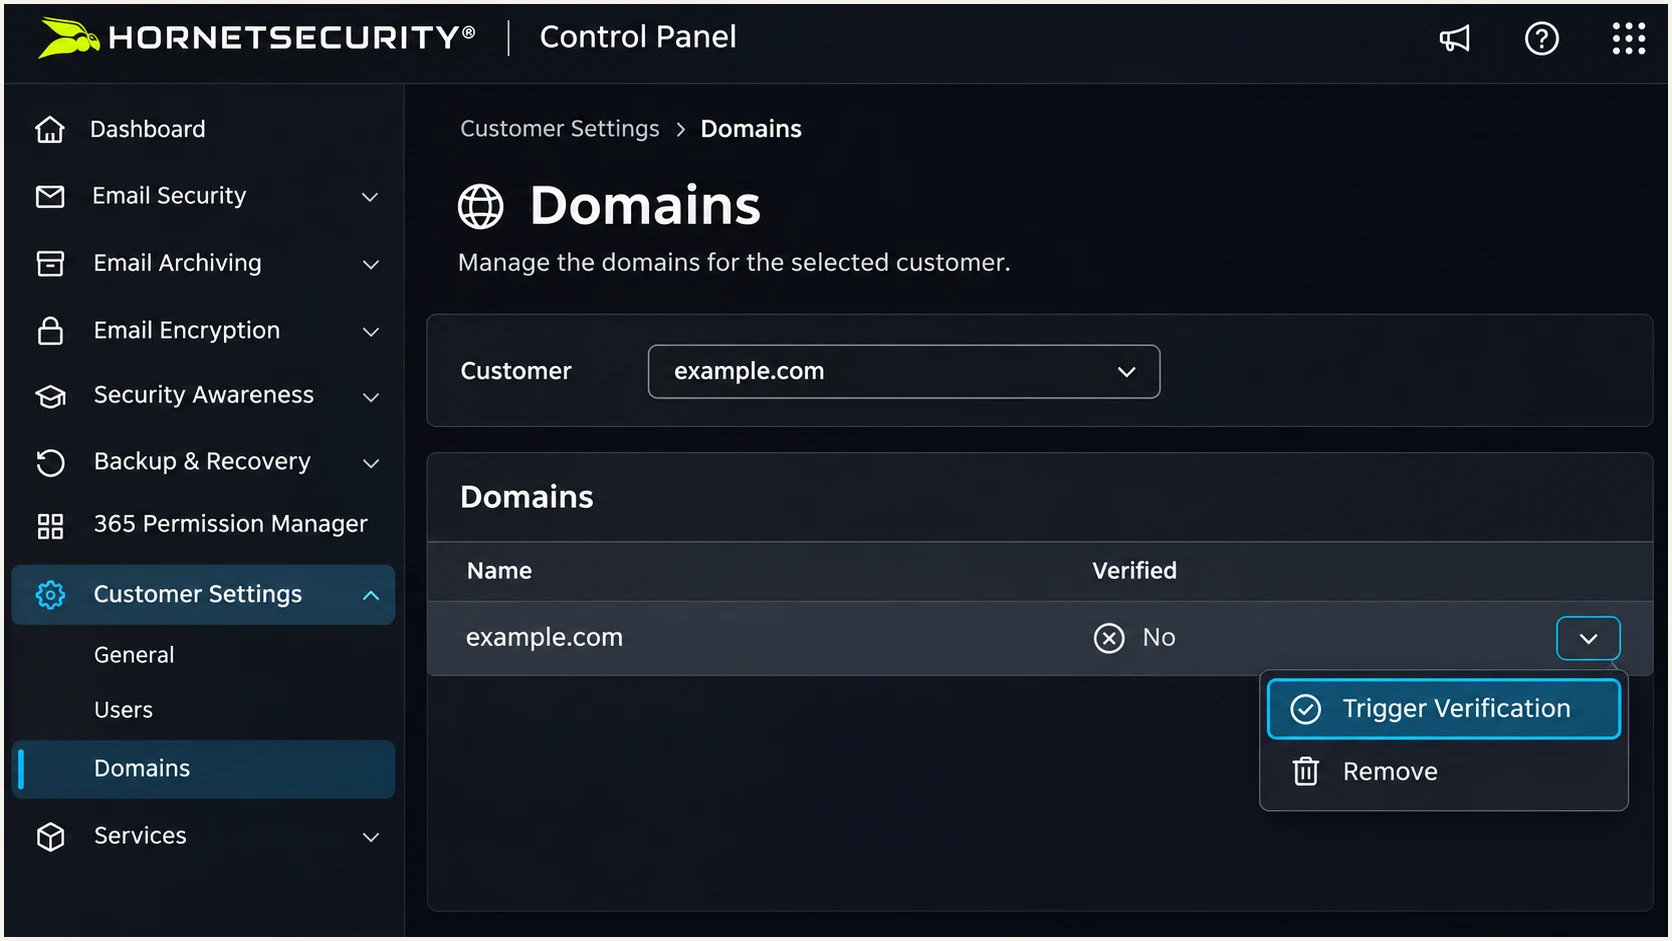
Illustrated Hornetsecurity Domains page showing the domain verification action.
I check the SMTP envelope sender as well as the visible From address. Register the domain Hornetsecurity actually receives in the envelope sender, including a separate sending domain when applicable.
MX verification changes or checks inbound routing. SPF, DKIM and DMARC records have separate jobs; publishing them does not complete the gateway's MX verification.
Set up SPF
I authorize Hornetsecurity only when it sends outbound mail for the domain. Inbound filtering alone does not justify adding its SPF include.
- Read the current record: Query TXT records for the envelope sender domain. Find the existing value beginning v=spf1 and edit that policy.
- Add the documented include: Add include:spf.hornetsecurity.com before the final all mechanism. For 365 Total Protection, also retain include:spf.protection.outlook.com.
- Preserve other senders: Keep authorized mechanisms in the same record. Publish only one SPF policy at each hostname, and keep an established -all policy when its sender inventory is complete.
- Check the lookup budget: Count nested includes and other lookup-causing terms. SPF evaluation permits at most 10 DNS lookups of this kind; exceeding the limit causes permerror.
Hornetsecurity's 'Which SPF record do I need to enter in my DNS zone?' documents these two starting policies. Choose the applicable one, rather than publishing both.
Each example is a TXT value at example.com. Replace that domain with your envelope sender domain and retain any additional authorized senders.
Hornetsecurity relay
For Spam and Malware Protection outbound relay, with no additional sending services.
SPF TXT valuetext
v=spf1 include:spf.hornetsecurity.com ~all
365 Total Protection
Retains authorization for Microsoft 365 alongside the Hornetsecurity relay.
Combined SPF TXT valuetext
v=spf1 include:spf.protection.outlook.com include:spf.hornetsecurity.com ~all
Hornetsecurity supports SPF alignment through an envelope sender domain you control. The authenticated envelope domain must match the visible From domain under your DMARC alignment mode.
Check the actual envelope domain below. A valid root-domain SPF record does not fix a separate bounce subdomain that publishes no appropriate policy.
SPF checker
Find SPF syntax issues, lookup limits, and weak records.
?/16tests passed
I verify both the published policy and a delivered message. A DNS check cannot establish which return path an application uses.
If the message uses a provider-owned return path, fix its envelope sender configuration. A passing DKIM signature with matching domain identity still permits DMARC to pass during that repair.
Set up DKIM
I enable Hornetsecurity's outgoing DKIM signature after publishing its two selector records. Incoming DKIM validation is a separate setting.
- Confirm the infrastructure: Check the recommended MX settings in the customer scope. Use the hse1 and hse2 records below for the standard Hornetsecurity route; use tenant-specific instructions if it shows a different infrastructure.
- Publish both selectors: Create both CNAME records in your domain's authoritative DNS. Remove conflicting records at those exact selector names.
- Enable signing: Open Email Security > Spam & Malware Protection > Email Authentication and activate DKIM signature for outgoing emails after the DNS settings are valid.
- Test the signing identity: Send a new external message. Require a passing DKIM signature whose d= domain matches your visible From domain under the active DMARC alignment mode.
Hornetsecurity's 'How do I set up DKIM?' documents this CNAME pair. Keep the target hostnames unchanged and replace example.com only on the left.
If your DNS editor automatically appends the domain, enter just hse1._domainkey and hse2._domainkey in its Name fields. Avoid duplicating the domain suffix.
DKIM CNAME records for example.comdns
hse1._domainkey.example.com. CNAME hse1._domainkey.hornetsecurity.com.
hse2._domainkey.example.com. CNAME hse2._domainkey.hornetsecurity.com.
Publish these as CNAME records, without HTTP proxying. They point receivers to the public keys Hornetsecurity maintains; no private key belongs in DNS.
Check public DNS before retrying activation. Hornetsecurity documents up to 72 hours for cached DNS changes to take effect.
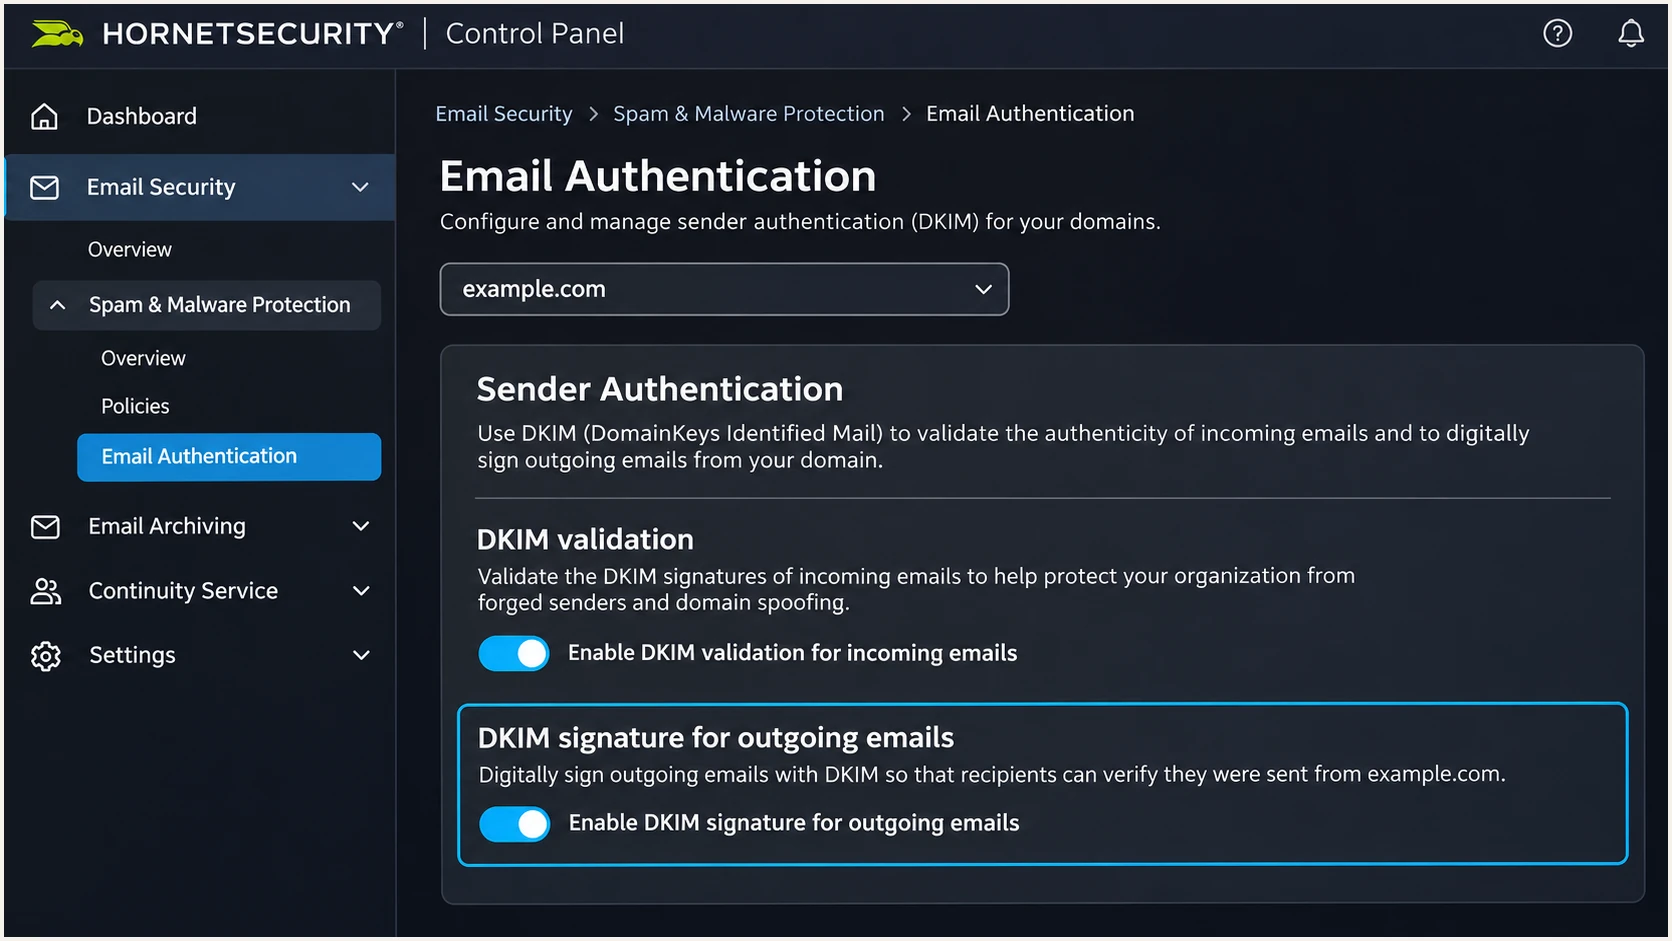
Illustrated Hornetsecurity Email Authentication settings highlighting outgoing DKIM signing.
I inspect a fresh message after activation. Previously delivered messages retain their original signatures and cannot verify the new setting.
If a later service changes signed content, test after that change too. The final recipient must validate at least one signature with a matching signing domain.
Set up DMARC
I publish DMARC for the domain in the visible From address. The policy applies to every service sending as that domain, including mail outside Hornetsecurity.
- Read the existing policy: Query TXT at _dmarc.example.com. Edit the existing DMARC policy rather than adding a second record.
- Preserve enforcement: Keep p=quarantine or p=reject if already deployed. Use p=none for a new monitoring rollout.
- Set the report destination: Replace dmarc@example.com with a mailbox you control that accepts aggregate report attachments, or an assigned reporting address.
- Publish and validate: Save the TXT value at _dmarc for your From domain, wait for cached values to expire, and check the public result.
Use the DMARC record generator to build the policy. This monitoring record is the starting point for a domain without an existing enforcement policy.
Set the DNS Name to _dmarc and the record type to TXT. The value below is an example; its report mailbox must be replaced before deployment.
Start with monitoring
DMARC TXT value at _dmarc.example.comtext
v=DMARC1; p=none; rua=mailto:dmarc@example.com
p=none requests reporting without requesting quarantine or rejection for DMARC failures.
When reports go to another organization's domain, that reporting destination needs external reporting authorization. Use the reporting service's assigned address and authorization instructions.
I check the exact From domain below. A syntactically valid record is necessary, but it does not prove that outbound messages pass DMARC.
DMARC checker
Look up a domain's DMARC record and catch policy issues.
?/7tests passed
DMARC passes when SPF passes with matching envelope domain identity, or DKIM passes with matching signing domain identity. Both methods are useful, but only one matching pass is required.
The default relaxed mode permits matching organizational domains. Existing strict modes require exact domain matches, so inspect aspf and adkim before diagnosing subdomain mismatches.
Verify and troubleshoot
I test the complete outbound route with a message sent outside the organization. A gateway's inbound authentication results do not prove what the destination receives.
- Send through the relay: Use a mailbox or application on the configured Hornetsecurity route. Test each distinct sending domain and application path.
- Inspect tracking: In Hornetsecurity, open Email Live Tracking, find the message, and open Info to inspect its header. Check relay routing and rejection details.
- Read destination results: At the recipient, inspect its trusted Authentication-Results header. Compare smtp.mailfrom, header.d and header.from with the corresponding sender domains.
- Fix the failing layer: For SPF, check the final connecting IP and envelope domain. For DKIM, check the actual selector, DNS target and signed-content changes.
Hornetsecurity's 'Examine DMARC errors' documents the Email Live Tracking > Info header workflow. I also inspect the recipient's copy because later delivery hops can change the outcome.
Use these compact checks to distinguish a raw authentication pass from a DMARC pass. A provider-domain pass alone does not establish your From domain's identity.
|
|
|
|---|---|---|
SPF | Pass | Envelope domain |
DKIM | Pass | Signing domain |
DMARC | Pass | Domain matching |
Route | Hornetsecurity | Bypass or relay |
Check the results recorded by the final recipient.
The email tester gives a quicker configuration diagnosis. Send a message to the address it provides using your normal Hornetsecurity outbound route.
It checks the received message's authentication and other delivery signals. Use a fresh test after each fix so the diagnosis reflects the latest configuration.
Email tester
Send a real email to this address. Suped shows a results button when the test is ready.
?/43tests passed
I keep the test's message ID and send time beside the Hornetsecurity tracking entry. That connects the gateway event with the message tested at the destination.
For a 554 5.7.2 unrecognized-domain error, check domain registration and verification first. Editing a DMARC policy will not repair relay authorization.
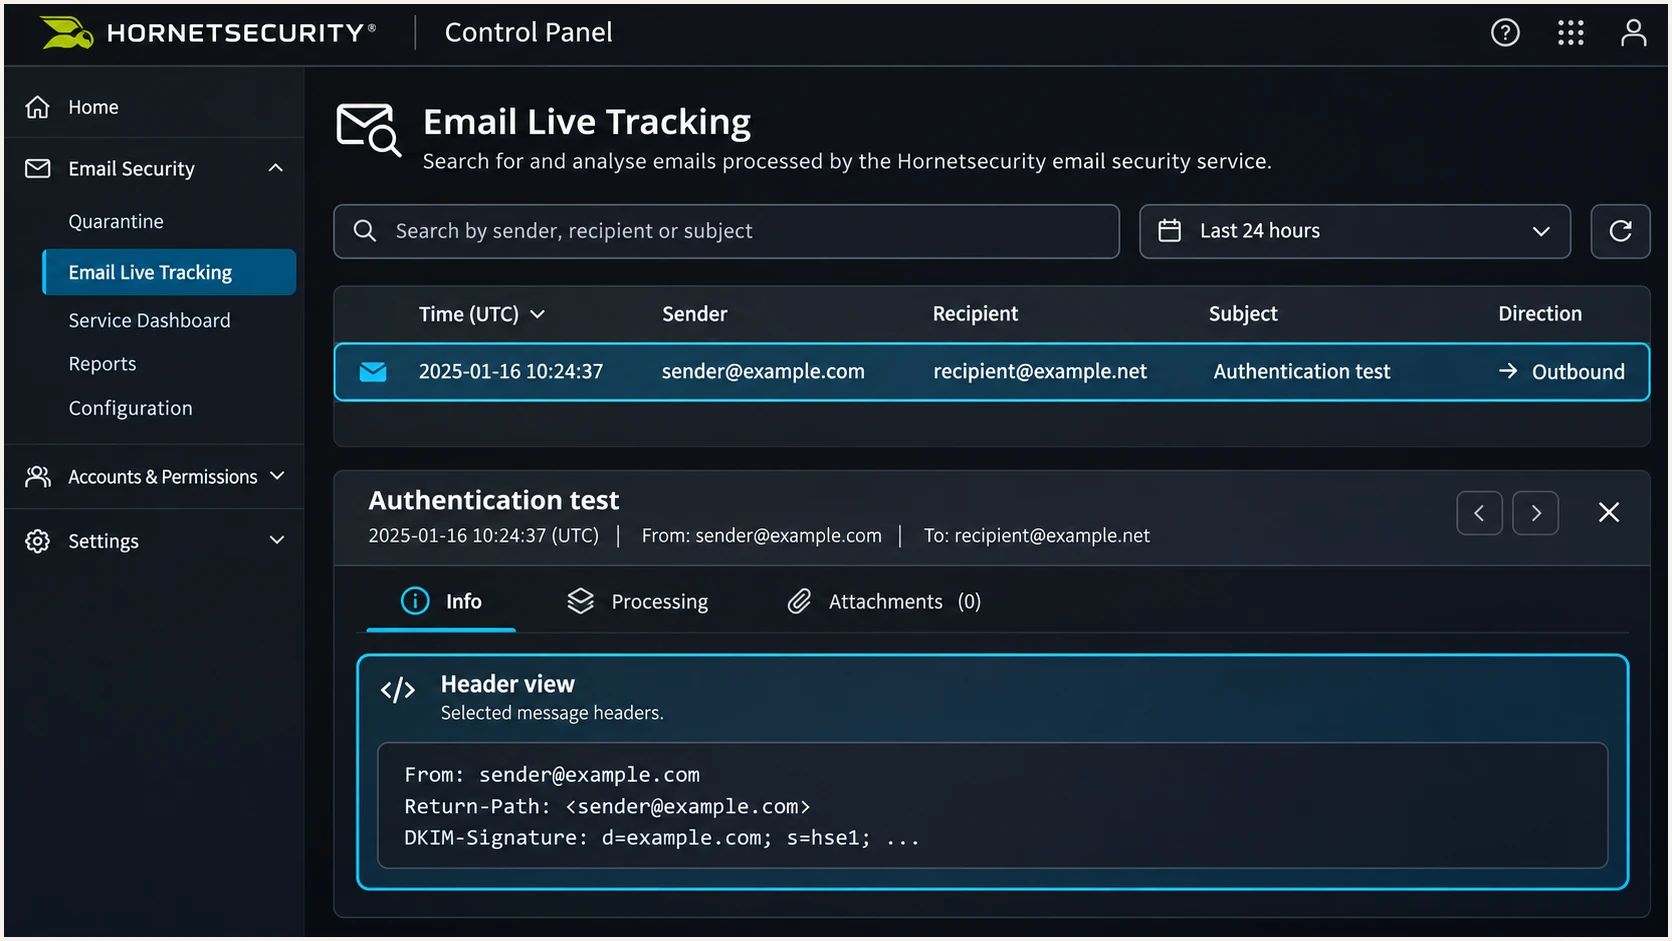
Illustrated Hornetsecurity Email Live Tracking view for inspecting message headers.
If SPF passes but its domain does not match, investigate the application's envelope sender. A valid matching DKIM signature is sufficient for DMARC while that discrepancy is corrected.
If DKIM fails after a disclaimer or other content change, check signing order. Test the delivered message again after correcting the component that changes signed content.
Get alerted when it breaks
Suped is our platform for ongoing DMARC monitoring. It connects authentication issues with the affected sending sources and steps to fix them, so a Hornetsecurity setup stays under review after the initial test.
- Enable issue notifications: In Suped's notification settings, enable Issues detected and route alerts to the administrator responsible for Hornetsecurity and DNS.
- Review new sources: Enable Sending sources need verification. Confirm whether unfamiliar sources are approved before authorizing them in SPF or changing policy.
- Keep summaries enabled: Use DMARC summary emails to review changes in sending volume and authentication pass rates alongside individual issue notifications.
- Follow the evidence: Open the affected source and record details, inspect the SPF and DKIM diagnostics, apply the relevant Hornetsecurity fix, and verify it with a new test message.
I treat report-based alerts as delayed evidence. Aggregate reports commonly arrive daily, so an immediate post-change email test remains necessary.
Suped's DNS history also helps connect a failure with a recent record change. Compare the previous and current values before restoring a record that affects other senders.
Secure your domain with p=reject
I move to p=reject after every approved sending route has a verified DMARC pass. Fixing Hornetsecurity alone is insufficient when other systems use the same From domain.
- Inventory legitimate sources: Use Suped's source view to verify Hornetsecurity and every other approved sender. Investigate unknown traffic rather than granting it authorization automatically.
- Resolve matching failures: Require a passing DKIM signature with matching domain identity for Hornetsecurity. Correct SPF failures and confirm the envelope domain wherever you control it.
- Stage enforcement: Observe a complete sending cycle, including infrequent legitimate mail. Move a new monitoring policy to p=quarantine, review legitimate failures, then move to p=reject.
- Maintain the policy: Keep aggregate reporting enabled, check sending subdomains and any sp policy, and repeat message tests after routing changes or DKIM updates.
Our Hosted DMARC lets teams manage policy changes in Suped after its DNS setup is complete. That puts policy staging beside the source evidence needed to judge whether enforcement is ready.
The final example keeps reporting enabled. Replace the report mailbox and edit the existing policy; do not create another DMARC TXT record.
Enforce after verification
DMARC TXT value at _dmarc.example.comtext
v=DMARC1; p=reject; rua=mailto:dmarc@example.com
p=reject requests rejection of messages that fail DMARC. Receiving servers retain their own local handling policies.
I investigate legitimate failures before increasing enforcement, without waiting for spoofed traffic to disappear. Overall failure rates alone are insufficient to judge readiness.
Suped keeps source verification and issue notifications available after enforcement. Recheck authentication whenever a sender or Hornetsecurity route changes.
Frequency asked questions
Suped associates these suffixes with Hornetsecurity-related email infrastructure. I use rDNS to identify a delivery hop, then check the source IP and authentication results. A shared gateway hostname does not identify the customer or prove that the message is authorized.
Hornetsecurity documents include:spf.hornetsecurity.com for outbound mail through its systems. 365 Total Protection also requires the Microsoft 365 SPF include. Add the documented mechanism to your existing policy only when it matches your actual outbound service; do not infer required includes from rDNS names.
No. If Hornetsecurity does not send your outbound mail, authorize the services that do. Hornetsecurity's documentation includes an exception for an IP/Hostname primary environment without outgoing relay servers. I confirm the actual route before adding authorization.
SPF authenticates the envelope sender domain. DMARC also requires that domain to match the visible From domain under the active alignment mode, or a passing DKIM signature with matching domain identity. Raw SPF success with an unrelated provider domain is insufficient.
Check both selector CNAMEs in public DNS, remove conflicting records, and confirm the records match the infrastructure recommended for your tenant. Hornetsecurity enables signing only for valid settings and documents up to 72 hours for DNS changes. Incoming DKIM validation does not enable outgoing signing.
Keep an established p=reject or p=quarantine policy. Configure and test the Hornetsecurity route before moving production mail onto it. Use p=none as the starting point for a new monitoring rollout, then stage enforcement once legitimate senders are verified.




