
How to set up DMARC/DKIM/SPF for Higher Logic Vanilla

Published 21 Nov 2026
Updated 21 Nov 2026
10 min read
Summarize with

Configure your outgoing address in Higher Logic Vanilla, request sender authentication from Vanilla Support, and publish the DNS records they supply. Then publish DMARC for your From domain. I verify the result with a real community email before increasing enforcement.
Vanilla supports a custom return-path domain for SPF alignment. DMARC passes when SPF or DKIM passes with a domain that matches the visible From address under your policy. I configure both, with particular attention to DKIM for forwarded notifications.
Add your domain
I start with the domain in the email address members will see, such as community@example.com. The community website hostname is a separate setting.
Vanilla's public "Email Deliverability" documentation describes a Support/Ops process for sender authentication. There is no separate self-service domain-verification wizard in that documented workflow.
- Open settings: In the Dashboard, go to Settings > Communications > Email Settings and find Outgoing Emails.
- Set the sender: Enter your From Name and From Email Address, then save the changes.
- Request records: Contact support@vanillaforums.com with your community address and From address. Request sender authentication, the custom return-path configuration, and DKIM records.
- Complete verification: Publish the supplied records at your authoritative DNS host. Ask Support to validate them and confirm activation with Vanilla Ops.
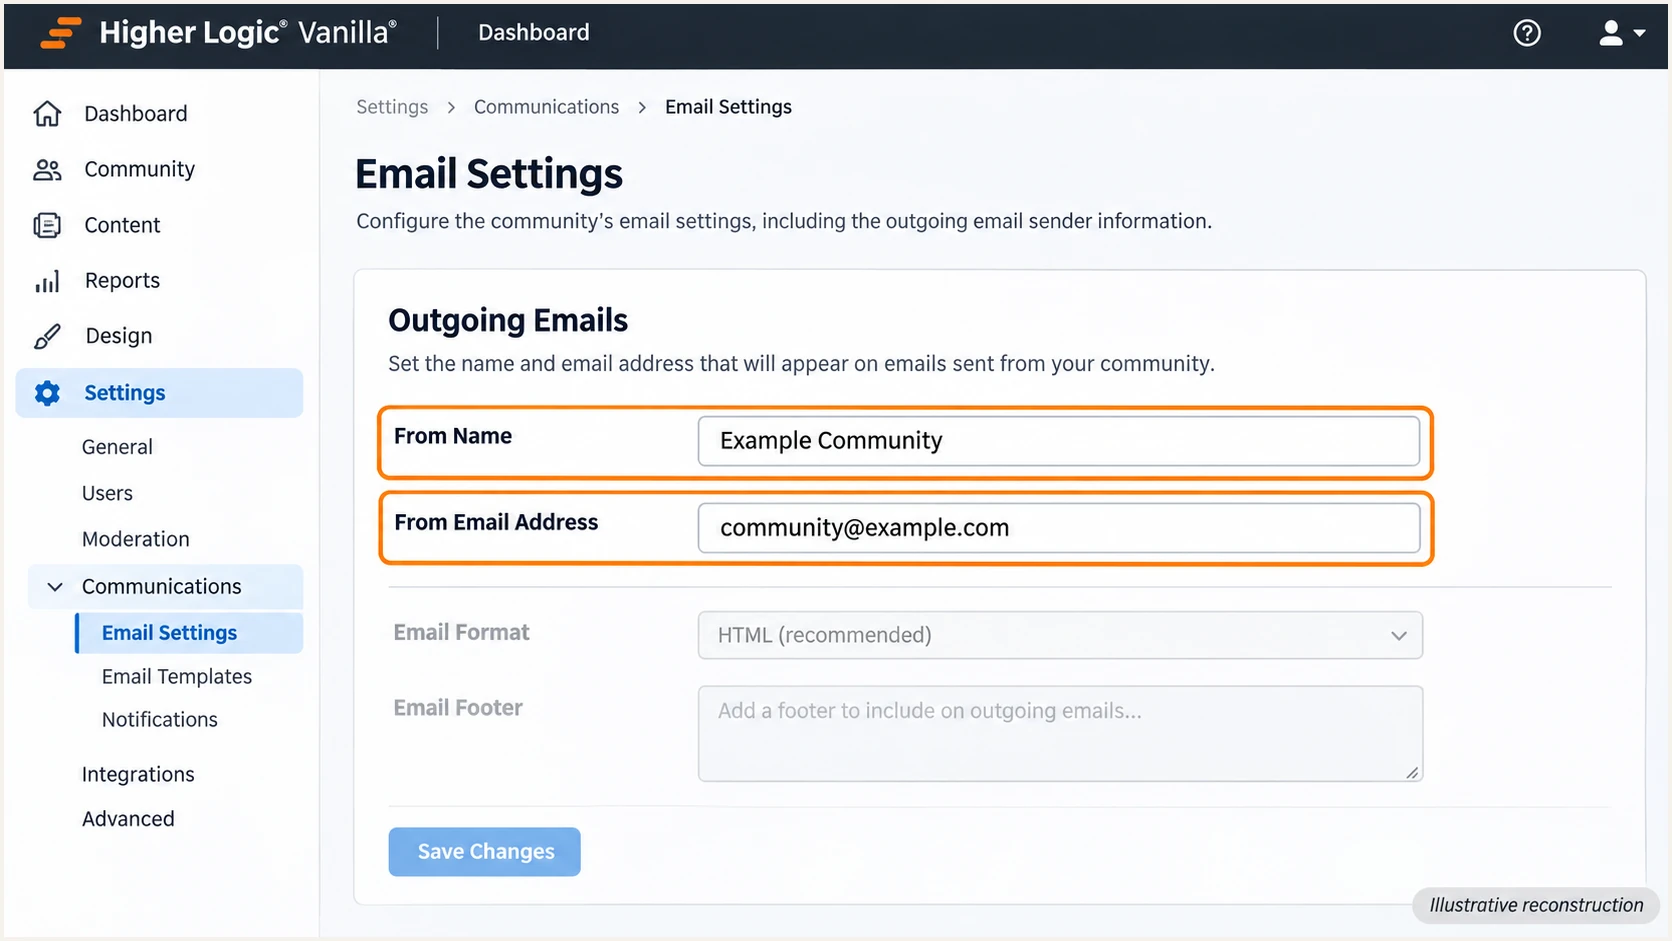
Illustrative Higher Logic Vanilla Email Settings screen with outgoing sender fields.
Set up SPF
I check the return-path domain before editing SPF. SPF authenticates the SMTP envelope sender, which is recorded in Return-Path after delivery, rather than the visible From address.
Vanilla's "Set up SPF for Vanilla community email" documentation names include:vanilla.email and include:sendgrid.net. Support must identify the applicable mechanism and domain. Do not add both automatically.
- Confirm the path: Ask Support for the actual envelope-sender domain and whether your setup uses delegated CNAME records or an SPF TXT record.
- Follow the supplied records: Publish the exact return-path records. For a TXT setup, merge only the confirmed include into the existing SPF record at the identified domain.
- Preserve other senders: Keep one v=spf1 TXT record per hostname, retain existing authorizations, and keep SPF evaluation within the 10 DNS-lookup limit.
- Check the domain match: For From example.com, a return-path under example.com can satisfy relaxed SPF alignment. An unrelated provider domain cannot.
Delegated return-path
A CNAME points your dedicated bounce hostname to the sending infrastructure. The target supplies the SPF information.
Keep that CNAME unproxied and do not add a TXT record at the same hostname. Your root SPF does not need an extra include for this sending path.
SPF TXT configuration
Use this route only when Support supplies a TXT-based configuration. Edit SPF at the domain Support identifies.
Adding an include to example.com does not fix SPF alignment when the actual return-path remains on an unrelated domain.
A custom return-path such as bounce.example.com matches example.com under relaxed alignment. With aspf=s, those two domains do not match; preserve your existing policy and make sure matching DKIM passes.
Enter the confirmed return-path domain in the SPF checker below. A root-domain lookup alone does not validate a separate bounce hostname. For a CNAME setup, inspect its target and test an actual message as well.
SPF checker
Find SPF syntax issues, lookup limits, and weak records.
?/16tests passed
Set up DKIM
I use the DKIM selectors and targets assigned to this community. There is no safe universal selector or public key to copy into every Vanilla setup.
DKIM needs a valid signature whose signing domain matches your From domain under the DMARC policy. A passing signature for an unrelated provider domain does not satisfy that requirement.
- Confirm the signing identity: Ask Support to authenticate the intended From domain and supply every required DKIM DNS record.
- Publish exact values: For each supplied selector, add the assigned CNAME or TXT record. Keep CNAMEs unproxied and avoid duplicating the domain suffix in DNS host fields.
- Avoid selector conflicts: Preserve keys used by other senders. If a requested hostname already exists, ask Support for another selector instead of overwriting it.
- Check live signing: After activation, inspect a new message. Confirm dkim=pass, read d= and s= in DKIM-Signature, and verify that d= matches the From domain under your policy.
The lookup name is the selector, followed by ._domainkey., followed by the DKIM d= domain. Use the live signature to identify that domain rather than assuming it equals your website hostname.
Publishing DNS does not activate signing by itself. Keep the assigned selector records in place and obtain Support's activation confirmation before treating configuration as complete.
Set up DMARC
I publish DMARC in DNS for the email From domain. It is a domain-wide policy, so it affects other services that send using the same domain.
Use the DMARC record generator to prepare the policy. For a new setup, start with p=none and the exact example below, then replace the report address with a real destination you control.
- Check existing policy: Look up _dmarc at the From domain before editing. Keep an existing quarantine or reject policy and preserve its other settings.
- Choose the DNS name: For community@example.com, publish at _dmarc.example.com. In the example.com DNS zone, the host field is normally _dmarc.
- Configure reporting: Use a working mailbox or assigned aggregate-report destination. If reports go to another domain, complete any external reporting authorization it requires.
- Publish one policy: Create or update the single DMARC TXT policy record. Do not add a second policy alongside an existing record.
Keep existing enforcement
If your domain already has p=quarantine or p=reject, keep it. Resolve Vanilla authentication before increasing production traffic; switching to p=none would reduce protection for the whole domain.
For a domain without DMARC, use this TXT value. The example address is a placeholder and must be replaced before deployment.
Set the DNS record type to TXT and the name to _dmarc for the example.com zone. A starting TTL of 3600 seconds is suitable unless your DNS policy requires another value.
Starting DMARC TXT value at _dmarc.example.comtext
v=DMARC1; p=none; rua=mailto:dmarc@example.com
The p=none policy requests monitoring without DMARC enforcement. It does not guarantee inbox delivery or prevent receivers from filtering messages for other reasons.
Check the published policy with the DMARC checker below. This validates DNS configuration; the email test in the next section checks whether Vanilla actually sends authenticated messages.
DMARC checker
Look up a domain's DMARC record and catch policy issues.
?/7tests passed
Verify and troubleshoot
I test through Vanilla itself so the result includes its actual sending IP, envelope sender, and DKIM signature. A message sent manually from an employee mailbox tests a different sending path.
Vanilla's "Configure Email Appearance" documentation places Send a Test Email in the ellipsis menu at the top of Email Settings. Use that action to send directly to the test address generated below.
- Generate a destination: Open the email tester below and copy its unique recipient address.
- Send through Vanilla: Return to Settings > Communications > Email Settings, open the ellipsis menu, and choose Send a Test Email. Enter the generated address and send.
- Read the diagnosis: Check SPF, DKIM, and DMARC results, including the domains used for authentication. Investigate any difference between a passing protocol and failing domain alignment.
- Test production events: Also trigger a real member notification and password-reset message for a test account. If you use digests, test that sending path too.
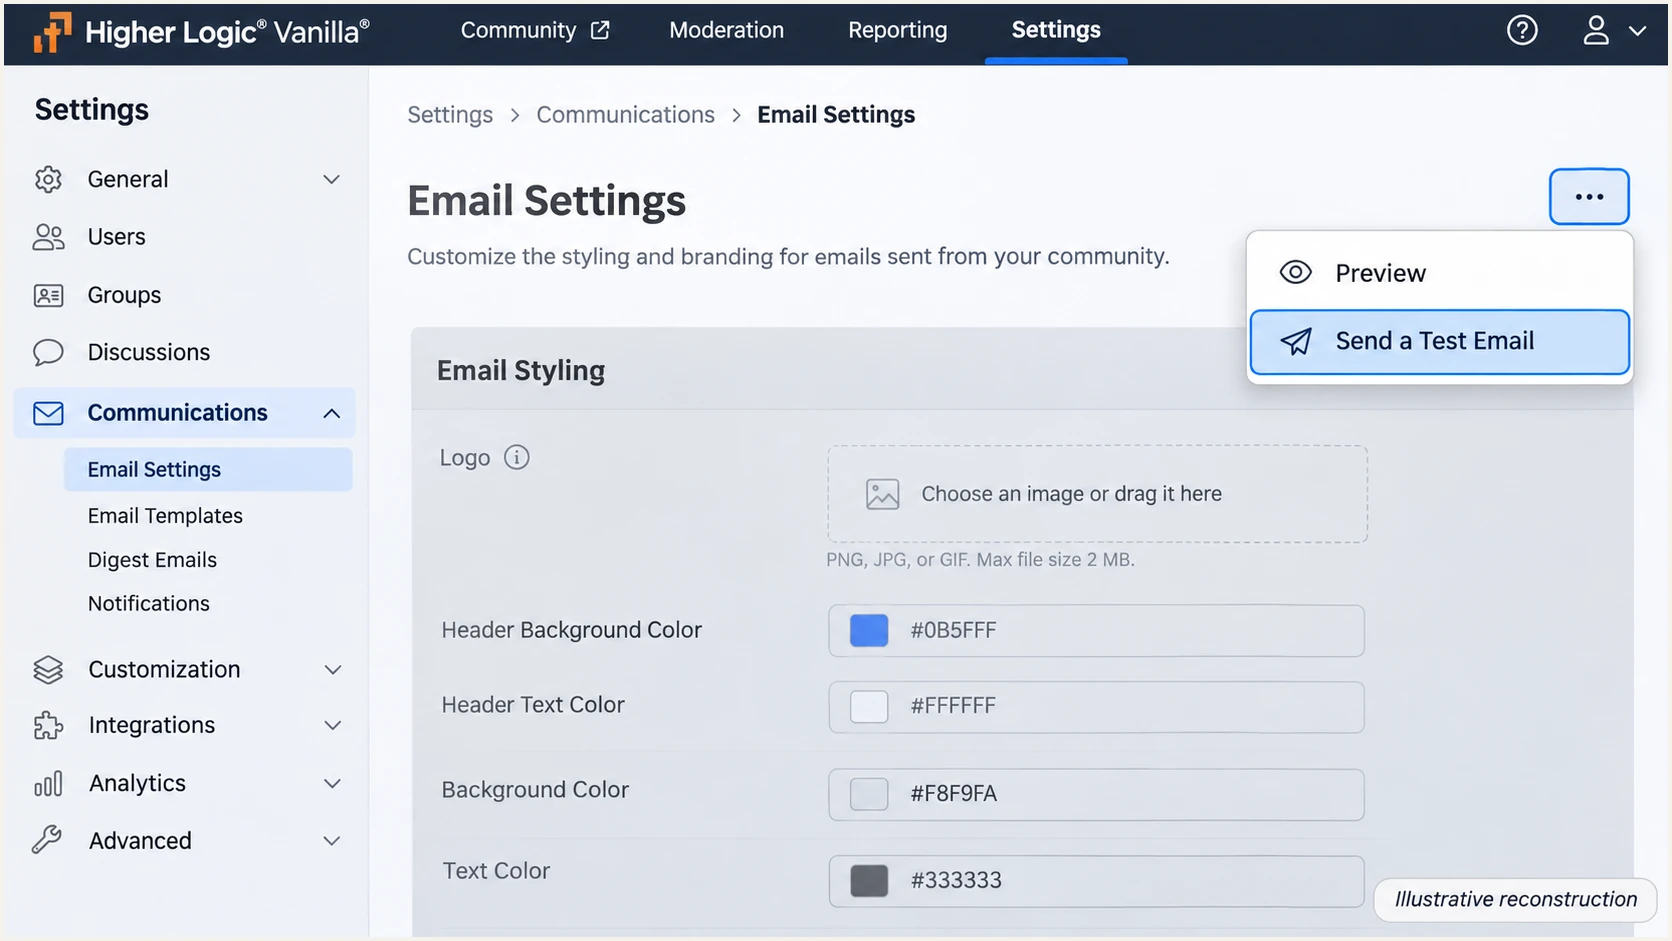
Illustrative Higher Logic Vanilla menu showing Send a Test Email.
The email tester prompts you to send a message and returns a full diagnosis of that delivered message. This is the quickest check that the published records and active sending configuration work together.
Send directly to the generated address instead of forwarding an existing email. Forwarding changes the delivery path and can break SPF, making the result unsuitable for checking the original connection.
Email tester
Send a real email to this address. Suped shows a results button when the test is ready.
?/43tests passed
I expect matching DKIM and DMARC to pass on a fresh message. With the custom return-path configured correctly, SPF should also pass with the expected domain match.
Read the receiving system's Authentication-Results header alongside the tester output. DNS records alone cannot prove that the sender used the expected selector or return-path.
|
|
|
|---|---|---|
SPF | Pass and domain match | Return-path and DNS |
DKIM | Pass and domain match | Selector and activation |
DMARC | Pass | Policy and matching |
Delivery | Message received | Bounces and filtering |
Checks for a newly delivered Vanilla email
If checks fail, query public DNS and compare the results with Support's instructions. Common faults are a duplicated domain suffix, a proxied CNAME, conflicting records, and cached answers from before the change.
In these commands, replace the sample values with the message's From domain, envelope-sender domain, and DKIM d= and s= values. For delivery problems, give Support the recipient, message time with timezone, Message-ID, and complete headers.
DNS checks using values from the delivered messagebash
from_domain='example.com'
return_path='REPLACE_WITH_ENVELOPE_DOMAIN'
dkim_domain='REPLACE_WITH_DKIM_D_DOMAIN'
selector='REPLACE_WITH_DKIM_S_SELECTOR'
dig +short CNAME "$return_path"
dig +short TXT "$return_path"
dig +short CNAME "$selector._domainkey.$dkim_domain"
dig +short TXT "$selector._domainkey.$dkim_domain"
dig +short TXT "_dmarc.$from_domain"
Get alerted when it breaks
Suped is our DMARC platform. Its DMARC monitoring turns aggregate reports into source-level authentication results and detected issues, so a working Vanilla setup remains visible after the initial test.
I use ongoing source verification and issue notifications to catch a changed return-path, missing DKIM record, or newly failing sending path. A one-time DNS check does not provide that continuing coverage.
- Verify the source: In Suped, review Sources and mark the Vanilla source verified only after confirming it belongs to your community.
- Enable notifications: Turn on Issues detected and Sending sources need verification notifications. Enable DMARC summary emails for regular review.
- Inspect failures: Filter Data view by source, reporter, or sending IP. Open Detail view to inspect SPF, DKIM, DMARC, and rDNS diagnostics.
- Resolve and retest: Use the issue's fix steps and DNS history to investigate changes. Apply the correction, verify it, and send another Vanilla test email.
Aggregate reports follow each receiving system's reporting schedule, commonly daily. Suped can notify you after it detects an issue in available data; these reports are not an instant delivery feed.
Keep Vanilla Support involved for sending-service activation and bounce investigations. Suped provides the authentication evidence, while Vanilla controls its sending configuration.
Secure your domain with p=reject
I move toward p=reject after confirming that legitimate sending paths authenticate consistently. Passing one Vanilla test is insufficient when the same From domain is also used for employee mail or other applications.
Suped's verified source inventory and record-level diagnostics support that review. Our Hosted DMARC controls let teams stage policy changes in the dashboard once hosted management is configured.
- Inventory all senders: Review every legitimate source using the affected domain, not only Vanilla. Check any subdomain policies and inherited enforcement before changing the parent policy.
- Require working DKIM: Fix missing or mismatched DKIM before reject. Forwarding often breaks SPF, so SPF alone is an inadequate basis for enforcement.
- Observe normal traffic: Review enough reports to include your actual notification and digest schedules. Investigate legitimate failures before progressing through quarantine to reject.
- Review indirect mail: If people use this domain on external mailing lists, assess those flows separately. Do not apply reject to a shared employee-mail domain without understanding that impact.
- Preserve reporting: Keep the real rua destination and existing policy settings. Continue Suped notifications after enforcement so later changes remain visible.
Example final policy after all affected senders are verifiedtext
v=DMARC1; p=reject; rua=mailto:dmarc@example.com
Replace the example report address with your active destination. The example shows the policy change, not a replacement for additional settings already required by your domain.
The reject policy requests enforcement for DMARC failures; receivers still apply local handling rules. After changing policy, send another Vanilla test and check the next reporting cycle for legitimate failures.
Frequency asked questions
Only if Support identifies that domain for the active SPF configuration. With a dedicated CNAME-based return-path, SPF is supplied through the delegated hostname. Do not add include:vanilla.email and include:sendgrid.net to the root by default.
Yes. A valid DKIM signature with a matching signing domain is sufficient for a DMARC pass. Vanilla supports a custom return-path, so investigate unexpected SPF alignment failures even when DKIM keeps DMARC passing.
The smtp.vanillaforums.com suffix, including o1.smtp.vanillaforums.com, is associated with Vanilla community email infrastructure. Treat it as a source-identification clue. Confirm the actual sending IP, message headers, and authenticated domains before trusting a message or marking a source verified.
Check the hostname and CNAME target, wait for the previous DNS TTL to expire, and confirm activation with Vanilla Support. Inspect a newly sent message for its actual d= and s= values; an old message does not test the updated setup.
No. Keep the existing policy. Complete sender authentication with Support and verify a real Vanilla message before increasing production traffic. Changing to none reduces protection for every sender covered by that policy.




