
How to set up DMARC/DKIM/SPF for GoDaddy

GoDaddy email authentication requires one SPF TXT record for each sending domain, the DKIM records generated by your email plan, and a DMARC TXT record at _dmarc. Publish them at your authoritative DNS provider, then test an email sent by your actual website or mailbox. DMARC passes when SPF or DKIM passes with domain alignment to the visible From address.
I start by identifying the GoDaddy product that sends the message. Web Hosting (cPanel), Microsoft 365 from GoDaddy and Professional Email powered by Titan have different DKIM setup paths. Registering a domain with GoDaddy alone does not make GoDaddy its email sender.
Add your domain
Use the domain in your email's From address. Skip domain creation if it is already attached to the correct GoDaddy hosting or email account.
- Identify the service. Open My Products and find Web Hosting, Managed Hosting for WordPress, or Email & Office. Confirm which service sends website notifications and which sends mailbox messages.
- Add hosting domains. For an additional cPanel domain on a supported plan, select Web Hosting > Manage > cPanel Admin > Domains > Create a New Domain. Enter the domain, clear Share document root for a separate website, and select Submit. Confirm the success message.
- Verify mailbox ownership. For Microsoft 365 with a domain outside the email account, publish the account-specific TXT verification value shown in Email & Office Dashboard. Return and select I set my TXT record. This ownership record is separate from SPF.
- Find authoritative DNS. Check the domain nameservers. For GoDaddy DNS, open Domain Portfolio > your domain > DNS. Otherwise, make all authentication changes at the provider hosting those nameservers.
I keep the existing website and incoming-mail routing intact during authentication setup. SPF and DMARC use TXT records; adding DKIM does not require replacing MX records.
|
|
|
|---|---|---|
Web Hosting (cPanel) | Email Deliverability | TXT |
VPS with Plesk | Mail Settings | TXT |
Microsoft 365 | DKIM settings | CNAME |
Professional Email powered by Titan | Email & Office Dashboard | CNAME |
Managed Hosting for WordPress | No native DKIM support | Unavailable |
Choose the records for the service that actually sends your email.
A domain listed in the registrar account is not proof that its live DNS zone is there. Verify the nameservers before editing records, especially when the website was moved to another host.
Set up SPF
GoDaddy's hosting authentication instructions specify the SPF value below for its hosting relay. Standard Microsoft 365 from GoDaddy and Professional Email powered by Titan also document this value. Accounts with additional outbound routing must use the value shown in their Email & Office Dashboard.
- Inspect existing SPF. In the sending domain's DNS records, find TXT values beginning v=spf1. Keep one SPF record at each name; merge authorized senders rather than publishing a second SPF record.
- Open the editor. In GoDaddy Domain Portfolio, select your domain > DNS. Edit the existing SPF TXT record, or select Add New Record > TXT with Name @ for the root domain.
- Publish the value. Use the value below only when the GoDaddy services it authorizes cover your sending needs. Preserve other required mechanisms before the single final all mechanism. Leave TTL at Default and save.
- Check the envelope. Configure the application's envelope sender, also called MAIL FROM, to use your domain where the sending path permits it. Changing the visible From or Reply-To alone does not change the envelope sender.
SPF TXT value at @ for GoDaddy-hosted sendingtext
v=spf1 include:secureserver.net -all
For a sending subdomain, publish SPF at the envelope sender's domain. A root-domain SPF record is not automatically inherited by subdomains.
The GoDaddy editor should contain the TXT value without extra surrounding quotes. Save the change to the existing SPF record when other sending services already use the domain.
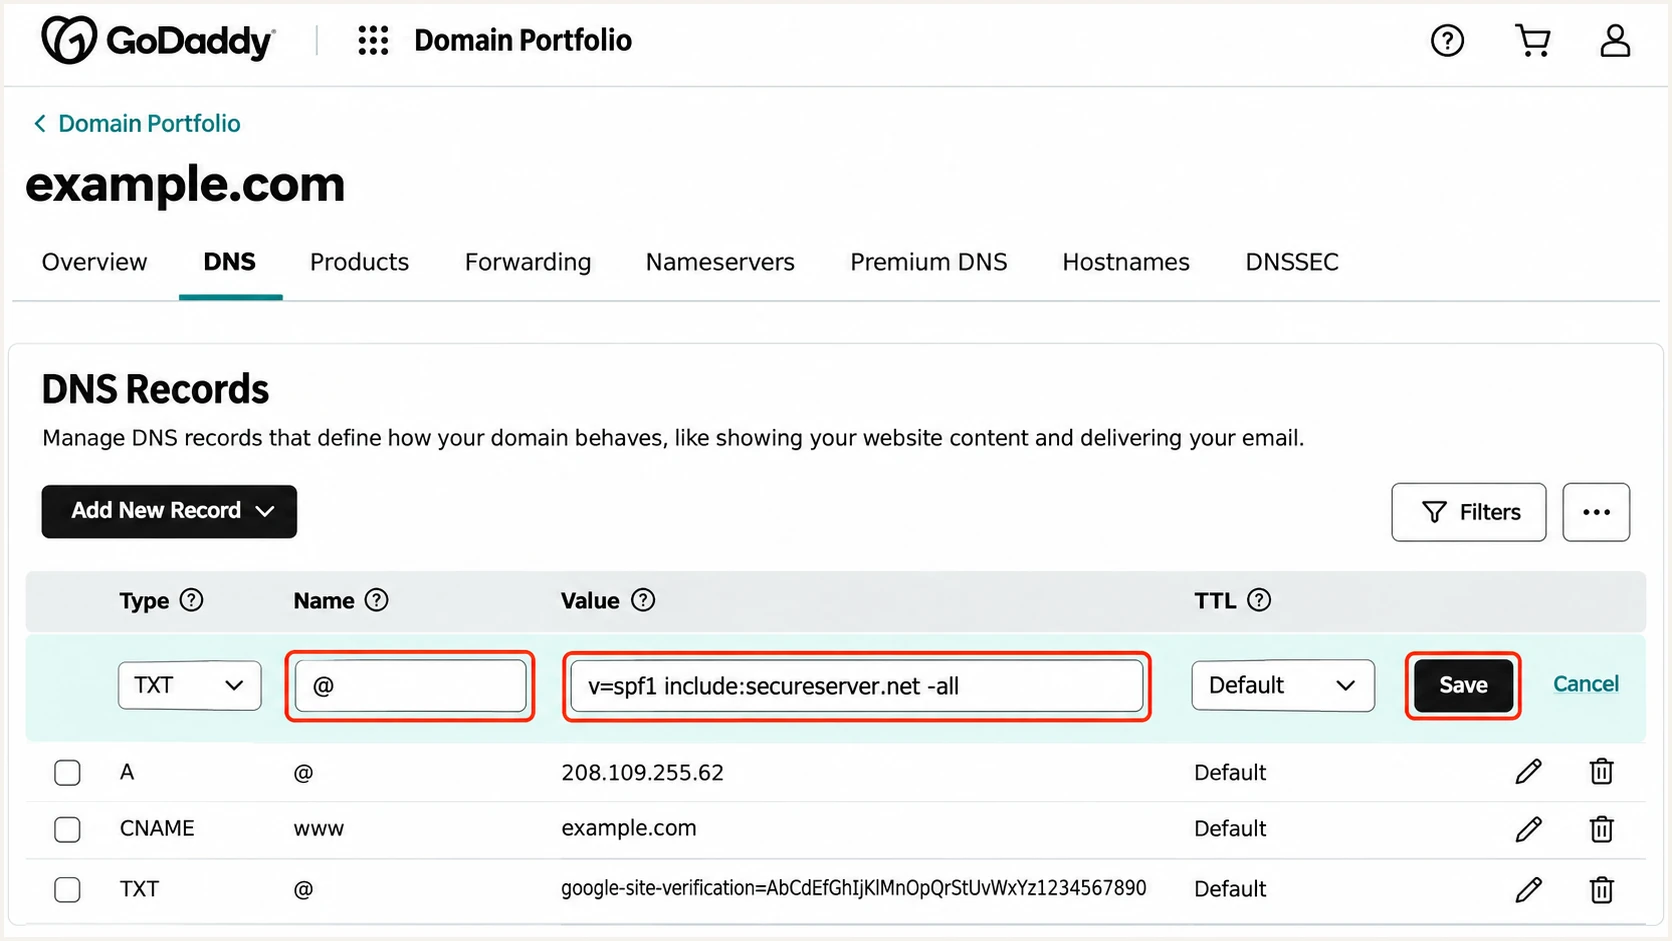
GoDaddy DNS editor illustration showing the SPF TXT value at @.
Check the saved SPF record with Suped's SPF checker below. Its DNS checks help identify duplicate records and the 10-lookup limit, including lookups caused by nested includes.
A successful DNS check confirms the policy is readable. Test-message results establish whether the real sending IP is authorized and whether its envelope domain matches the From domain.
SPF checker
Find SPF syntax issues, lookup limits, and weak records.
?/16tests passed
GoDaddy supports return-path alignment on supported sending paths, but the product name alone does not prove a particular message uses it. I inspect the actual Return-Path after sending.
If a sending path fixes the Return-Path to a GoDaddy-owned domain, adding includes to your From domain cannot change that SPF identity. SPF alignment failures are expected for that path; a passing DKIM signature with domain alignment still passes DMARC.
Set up DKIM
For cPanel hosting email, obtain the public key from the server that signs the messages. A DKIM record copied from another GoDaddy account will not authenticate your server's signatures.
- Open cPanel. Go to My Products > Web Hosting > Manage > cPanel Admin. Under Email, select Email Deliverability, then Manage next to the sending domain.
- Copy the key. Under Suggested DKIM (TXT) Record, copy the complete Name and Value. Use the displayed selector; do not assume it is default.
- Publish the key. At the authoritative DNS provider, add the suggested TXT record. In GoDaddy, enter the host portion once, such as default._domainkey when that is the supplied selector. Paste the complete public value and save.
- Verify signing. Recheck Email Deliverability after DNS updates, then send through the website or application. Inspect DKIM-Signature and confirm its d= domain matches the From domain under your DMARC alignment mode.
The public DNS key must correspond to the private key on the sending server. Publishing a record does not make an application start signing, so the outgoing message remains the final check.
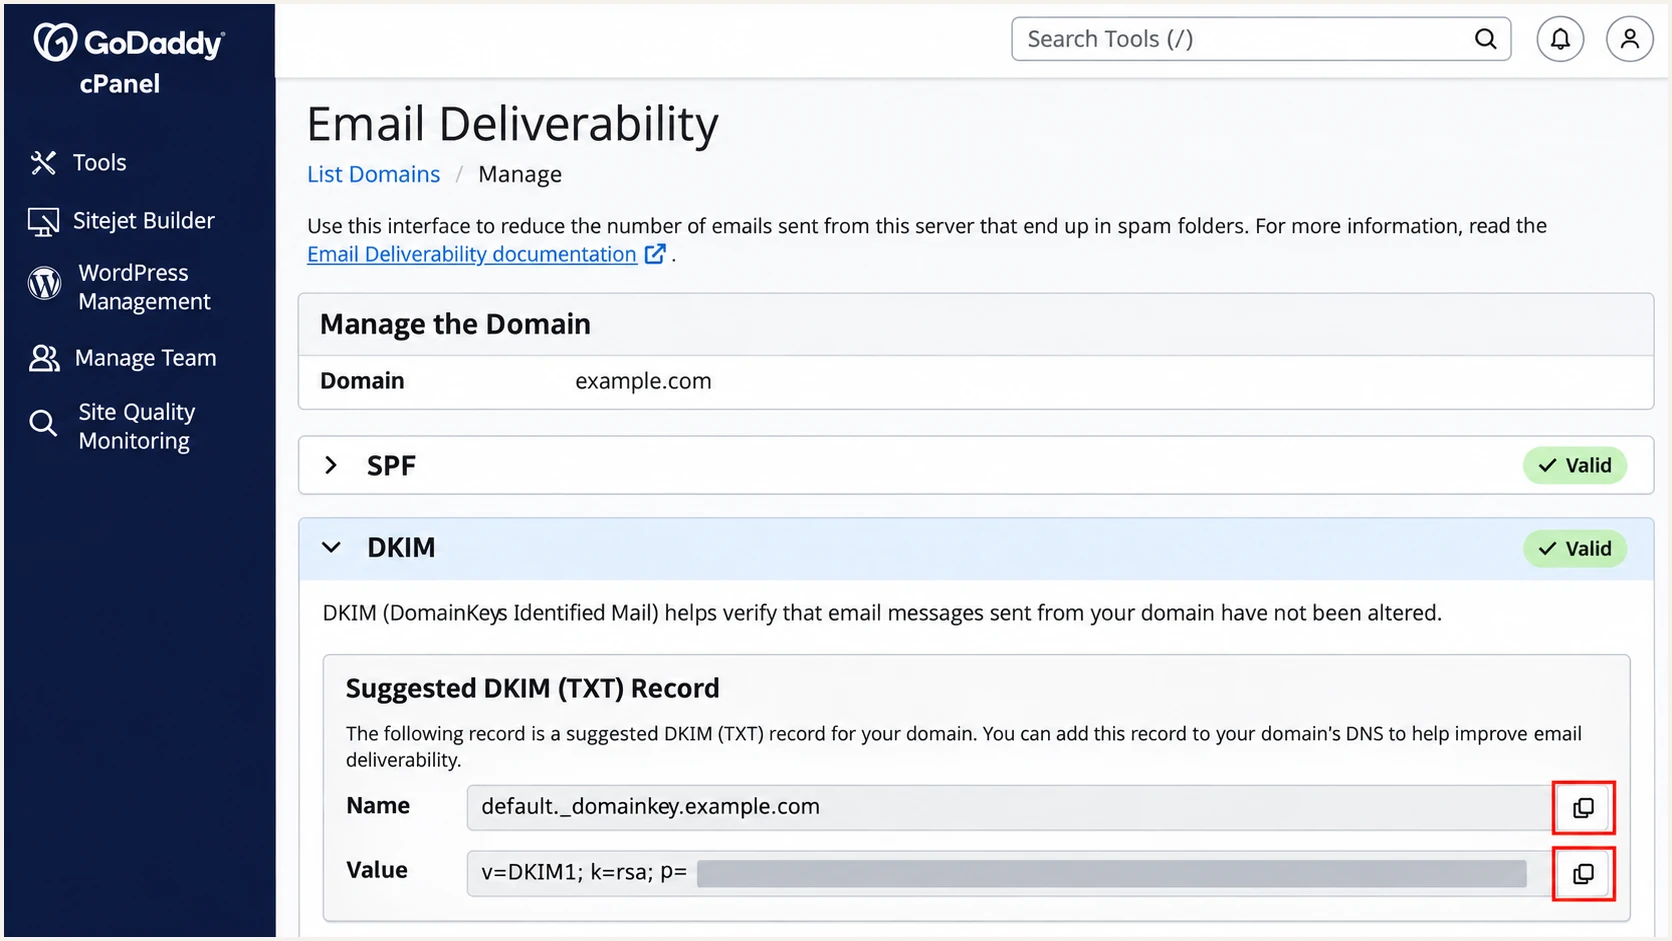
GoDaddy cPanel illustration showing where to copy the DKIM name and public value.
If DNS is hosted outside cPanel, publish the key in that external zone. A local cPanel record is ineffective when the internet queries different authoritative nameservers.
GoDaddy mailbox products use different records. Follow the relevant path below and copy account-specific CNAME targets exactly; the selector name alone is insufficient.
Professional Email powered by Titan
- Find the records. Open Email & Office Dashboard > Users > Manage > Set mail destination, or Help me fix this. Copy both DKIM CNAME targets from step 2.
- Publish both CNAMEs. Use the displayed targets at secureserver1._domainkey and secureserver2._domainkey. GoDaddy specifies a 1 Hour TTL. Check existing automatic records before adding anything.
Microsoft 365 from GoDaddy
- Generate the keys. Use your Microsoft 365 administrator account to open its DKIM settings. Select the domain, then Create DKIM keys and copy both CNAME records.
- Publish and enable. Add both CNAMEs to authoritative DNS. Return to DKIM settings and enable Sign messages for this domain with DKIM signatures after detection.
For a GoDaddy VPS using Plesk, open Domains > your domain > Mail > Mail Settings. Create a DKIM selector if needed, enable outgoing DKIM signing, and use How to configure external DNS to obtain the required records.
GoDaddy states that Managed Hosting for WordPress does not support native DKIM. Route the site's messages through a mailbox or sending service that signs for your domain before relying on DKIM. Microsoft 365 accounts with extra outbound security routing also require the additional DKIM steps documented for that routing.
Set up DMARC
Start a new DMARC deployment with p=none. If the domain already has p=quarantine or p=reject, retain that policy while fixing authentication and reporting. GoDaddy automatically configures DMARC for some domains, so inspect the existing record first.
- Inspect the policy. Look up TXT records at _dmarc.example.com, replacing example.com with your From domain. Edit the existing DMARC record rather than creating a duplicate.
- Enter the record. For GoDaddy DNS, open Domain Portfolio > your domain > DNS > Add New Record. Select TXT, set Name to _dmarc, use the value below, and save with the default TTL.
- Choose reporting. Replace dmarc@example.com with a working mailbox or report processor address you control. Keep an existing report destination when it is still required.
- Generate carefully. Use the DMARC record generator to build the record. For an existing enforcement policy, preserve its p= value and required reporting settings.
Starting DMARC TXT value at _dmarctext
v=DMARC1; p=none; rua=mailto:dmarc@example.com
The record above is a template. example.com is reserved for examples, so its mailbox will not collect your reports. DMARC reports go to the rua address, not automatically to the GoDaddy account owner.
Use the checker below to confirm that DNS publishes one valid DMARC policy. A p=none policy requests monitoring without requesting quarantine or rejection of failing messages.
DMARC checker
Look up a domain's DMARC record and catch policy issues.
?/7tests passed
After saving, rerun the DMARC checker against your From domain. A valid DNS result does not establish that any particular message passes DMARC.
If reports are sent to an address on another organization's domain, that destination must authorize external reporting. Use the exact reporting instructions supplied by the destination rather than inventing an address.
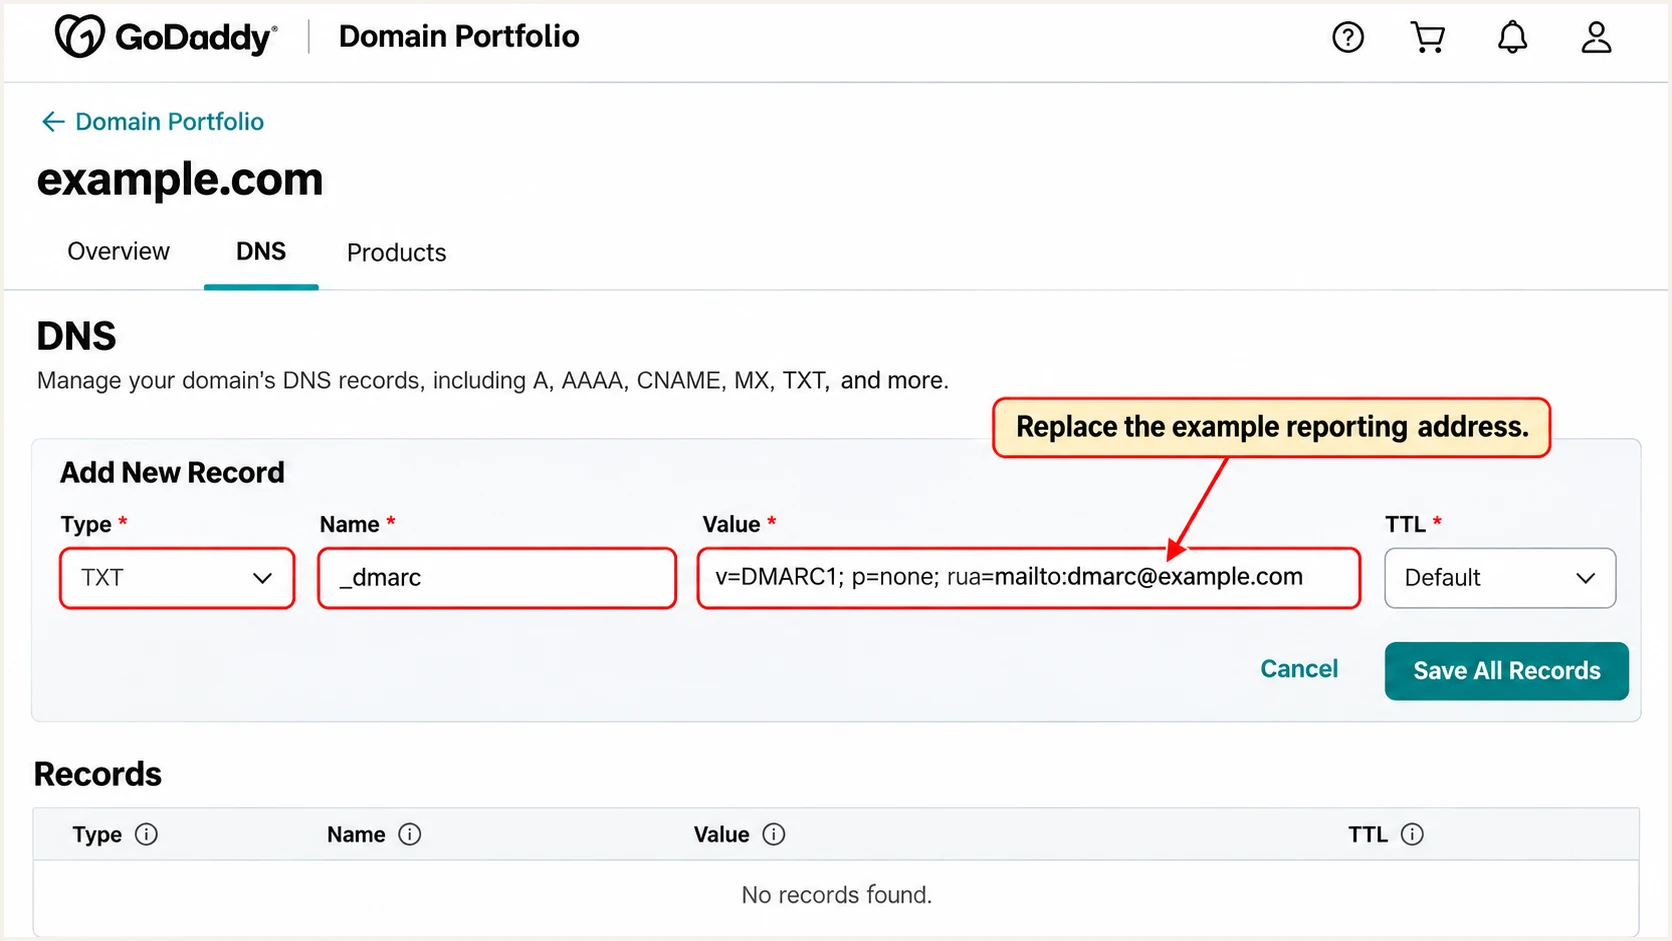
GoDaddy DNS illustration showing a new monitoring policy and example reporting address.
I check the final hostname as well as the value. In GoDaddy's zone for example.com, the Name _dmarc must produce _dmarc.example.com, without appending the domain twice.
Verify and troubleshoot
Verify DNS and message authentication separately. I send a test through each real sending path, including contact forms, because a mailbox test does not validate website-generated mail.
- Check public DNS. Run the commands below. Replace the domain and DKIM selector with your actual values. For a DKIM CNAME, query CNAME first and verify its target resolves.
- Send real messages. Use the email tester below and send to its generated address through the actual GoDaddy mailbox, website form or application. Repeat for each distinct sending path.
- Inspect the identities. Check receiver-added Authentication-Results, Return-Path and DKIM-Signature. Expect spf=pass, dkim=pass and dmarc=pass, then verify the SPF or DKIM domain matches the visible From domain.
- Fix the failure. For SPF permerror, check duplicates and lookup limits. For missing DKIM, check signing and the selector. For DMARC failure with SPF or DKIM passing, check domain alignment.
Public DNS checks, replace the domain and selectorbash
dig +short NS example.com
dig +short TXT example.com
dig +short TXT _dmarc.example.com
dig +short TXT default._domainkey.example.com
Suped's email tester prompts you to send a message to a generated address, then provides a full diagnosis of that received message. It is the quickest check of whether your live sending configuration works.
Send a fresh message after every change. Tests of old messages still contain the authentication results calculated when those messages originally arrived.
Email tester
Send a real email to this address. Suped shows a results button when the test is ready.
?/43tests passed
For website forms, use an address on your own domain as From and put the visitor's address in Reply-To. Using the visitor's domain in From prevents your GoDaddy setup from authenticating that identity.
Allow DNS caches to expire before retesting. GoDaddy documents that updates usually appear within an hour but can take up to 48 hours globally. Aggregate reports also arrive later than test-message results.
Get alerted when it breaks
Suped is our DMARC platform. Its DMARC monitoring groups aggregate reports by sending source and detects authentication issues, so a GoDaddy configuration change can be investigated against the messages it affects.
- Confirm report delivery. Keep a working rua destination and confirm new aggregate reports are arriving. DNS checks alone do not provide a history of real authentication results.
- Enable notifications. In Suped notification settings, enable Issues detected and Sending sources need verification. Enable DMARC summary emails for regular review.
- Verify new sources. Compare an unfamiliar source with your approved GoDaddy services and applications. Treat rDNS as an identification clue, not permission to send for your domain.
- Resolve and retest. Use Suped's issue details and fix instructions, correct the GoDaddy sending or DNS configuration, then send a fresh test and check subsequent reports.
I review each authorized source separately. A strong overall pass rate can hide a broken low-volume website form. Notifications follow issue detection and incoming reports; aggregate reporting is generally daily, not an instant feed of every message.
Secure your domain with p=reject
Move to p=reject only after legitimate sending paths authenticate reliably and indirect delivery has been assessed. For controlled application mail, a dedicated sending subdomain makes that assessment easier than applying one policy to unrelated mailbox traffic.
- Inventory every sender. Use Suped's source view to identify approved GoDaddy mailboxes and applications. Resolve failures for each legitimate source instead of authorizing every IP visible in reports.
- Require working DKIM. Confirm valid DKIM signatures with domain alignment for every sending path. Do not promote a path that depends solely on SPF, including native WordPress hosting mail without DKIM.
- Observe normal traffic. Collect reports across a complete business sending cycle. Test forwarded mail and mailing-list use. Advance a new policy to p=quarantine only after investigating legitimate failures.
- Apply enforcement. After reviewing quarantine results, edit the existing DMARC record to p=reject. Preserve reporting and continue monitoring. If already enforcing, repair individual senders without resetting the whole domain to p=none.
Suped helps make this decision with source verification, authentication diagnostics and ongoing notifications. Our hosted DMARC supports policy changes through the dashboard once configured; a directly hosted TXT record is changed in GoDaddy DNS.
Check indirect mail before rejection
RFC 9989 requires valid DKIM signatures when publishing p=reject and recommends against this policy for domains whose users post to public mailing lists. If proceeding for such a domain, assess at least a month of p=none reports followed by an equally long quarantine period. Existing enforcement should be reviewed against actual delivery results.
Final DMARC value for an assessed domain, replace the report addresstext
v=DMARC1; p=reject; rua=mailto:dmarc@example.com
Do not rely on a percentage rollout as a safety control. The pct tag was removed in RFC 9989 because its application was inconsistent. Use verified sending paths and observed delivery results to decide when to change policy.
After enforcement, retain reports and notifications so new applications and key rotations receive the same checks. A p=reject policy requests rejection of failing mail; receiving systems still apply their own handling rules.
Frequency asked questions
Hostnames under secureserver.net are associated with GoDaddy infrastructure, including hosting email relays. The suffix does not identify the exact GoDaddy product or establish that a message is authorized. Confirm the sending IP, receiver-added headers and authentication domains before approving the source.
GoDaddy documents include:secureserver.net for its hosting relay and standard GoDaddy email plans, including Microsoft 365 from GoDaddy and Professional Email powered by Titan. Add it only when your actual sending setup requires it. Follow account-specific DNS instructions for additional outbound routing.
SPF authenticates the envelope sender domain. If that domain differs from the visible From domain, SPF does not contribute a passing DMARC result. Configure a supported custom envelope sender or obtain a passing DKIM signature with domain alignment. A From-domain SPF edit cannot change a fixed GoDaddy-owned Return-Path.
GoDaddy states that this hosting product does not support native DKIM. Send the site's messages through a service that signs for your domain, publish that service's required records, and test the site's actual messages. Creating an unrelated DKIM TXT record does not enable signing.
Keep an existing p=quarantine or p=reject policy while you fix authentication and confirm reporting. The p=none template is for a new deployment. Edit the existing DMARC record rather than publishing another one, and investigate legitimate failures before making a policy change.




