
How to set up DMARC/DKIM/SPF for GloboTech Communications

To authenticate email sent through GloboTech Communications, authorize the actual outbound server in SPF, enable DKIM signing for your sending domain, and publish a DMARC TXT record at _dmarc.yourdomain. Configure the SMTP envelope sender under your domain so SPF also meets DMARC alignment requirements.
I start by checking the sending path. GloboTech is a hosting provider, so authentication depends on the mail server installed on your instance. GloboTech documents cPanel Email Deliverability for SPF and DKIM configuration. Follow the cPanel steps when that software is installed; on a server without cPanel, the administrator must configure the SMTP service and DKIM signer directly.
Add your domain
I configure the domain on the GloboTech-hosted mail server first, then check which nameservers publish its DNS records.
- Find the account. Sign in to cPanel for your GloboTech server. Open Domains and check whether your sending domain is already listed. The main account domain normally already exists.
- Add the domain. If it is absent, click Create a New Domain, enter your domain, choose its document root as appropriate, and click Submit. If the control is unavailable, ask the server administrator to add it.
- Locate DNS. Check the domain's authoritative nameservers. Use cPanel > Domains > Zone Editor only when that server publishes the authoritative zone. Otherwise, edit records at the current DNS host.
- Prepare a sender. For authenticated SMTP, create the sending mailbox under Email Accounts if needed. Use an address such as notifications@example.com for the visible From address. Configure a valid envelope sender that receives bounces.
Find the domain's nameserversbash
dig +short NS example.com
cPanel on GloboTech
Add the domain in Domains. Retrieve the server-generated authentication records through Email > Email Deliverability > Manage.
Server without cPanel
Add the sender domain to your existing SMTP configuration. Configure its envelope sender and DKIM signing in that mail server; the GloboTech customer portal does not replace those settings.
Domain creation in cPanel does not verify public DNS. Confirm that the domain appears in Email Deliverability and that public DNS returns the records you publish.
Keep existing MX records unless you are also moving inbound email. Outbound authentication does not require moving the domain's mailbox service.
Set up SPF
GloboTech-hosted servers support a custom Return-Path through their SMTP configuration. I use the server's actual egress IP, including any NAT or outbound relay, rather than assuming the website IP sends the email.
- Read the suggestion. In cPanel, open Email > Email Deliverability, locate the domain, and click Manage. Review Suggested SPF (TXT) Record; click Customize if its authorized senders need adjustment.
- Confirm the IP. Compare the suggested IP with a delivered message's Received headers or your SMTP logs. Include every IP actually used for outbound mail, including IPv6 if enabled. A relay requires its own documented authorization.
- Merge the record. At the envelope sender domain, edit the existing TXT record beginning v=spf1. Add the required ip4 or ip6 mechanisms before the final all mechanism. Keep one SPF record per domain and preserve other legitimate senders.
- Publish it. When cPanel controls authoritative DNS, install the reviewed suggestion or customized record. For external DNS, copy the Name and Value into that DNS host instead.
- Match the sender. Configure the application or SMTP service to use an envelope sender such as bounce@example.com with From: notifications@example.com. Set SMTP MAIL FROM, not a manually added Return-Path header. Confirm the delivered Return-Path.
SPF example for a single outbound IPv4 addresstext
v=spf1 ip4:192.0.2.10 ~all
192.0.2.10 is a documentation address. Replace it with your verified outbound IP and merge the change with existing authorization. Do not invent an include value based on globo.tech or authorize the provider's entire network.
Check the envelope sender domain here. An SPF record at example.com does not authorize mail using bounce.example.com as its envelope sender; that subdomain needs its own SPF record.
SPF checker
Find SPF syntax issues, lookup limits, and weak records.
?/16tests passed
Resolve duplicate records, syntax errors, and SPF lookup-limit errors before testing delivery. SPF evaluation permits at most 10 DNS-querying terms across the evaluated record and its includes; direct ip4 and ip6 mechanisms do not consume that budget.
For From: notifications@example.com, a passing SPF result for bounce.example.com meets relaxed alignment. An unrelated provider domain does not. If an outbound relay prevents a custom envelope sender, use passing DKIM with your domain for DMARC and expect SPF alignment failures on that route.
Set up DKIM
I enable signing on the mail server and publish its matching public key. Publishing a DKIM record alone does not make the server sign messages.
- Open the domain. Go to cPanel > Email > Email Deliverability > Manage for the sending domain and find the DKIM section.
- Generate if needed. If no local key exists, use Generate Local DKIM Key. Copy the exact Name and Value shown under Suggested DKIM (TXT) Record. Use the generated selector rather than guessing it.
- Publish the key. Install the suggested record when cPanel controls authoritative DNS. Otherwise, create the matching TXT record at your DNS host. Publish the complete public value, including its p= key, as one logical TXT record.
- Check signing. Send through the actual application. Inspect DKIM-Signature for d=example.com and its s= selector, then confirm dkim=pass in the receiving server's Authentication-Results. A server hostname signature alone is insufficient when its domain does not match your From domain.
A common selector is default, but the Name shown by your server is authoritative. If your DNS host appends the domain automatically, enter only the selector and _domainkey labels.
The illustrated cPanel screen shows where to copy the public record. Your generated key and selector will differ.
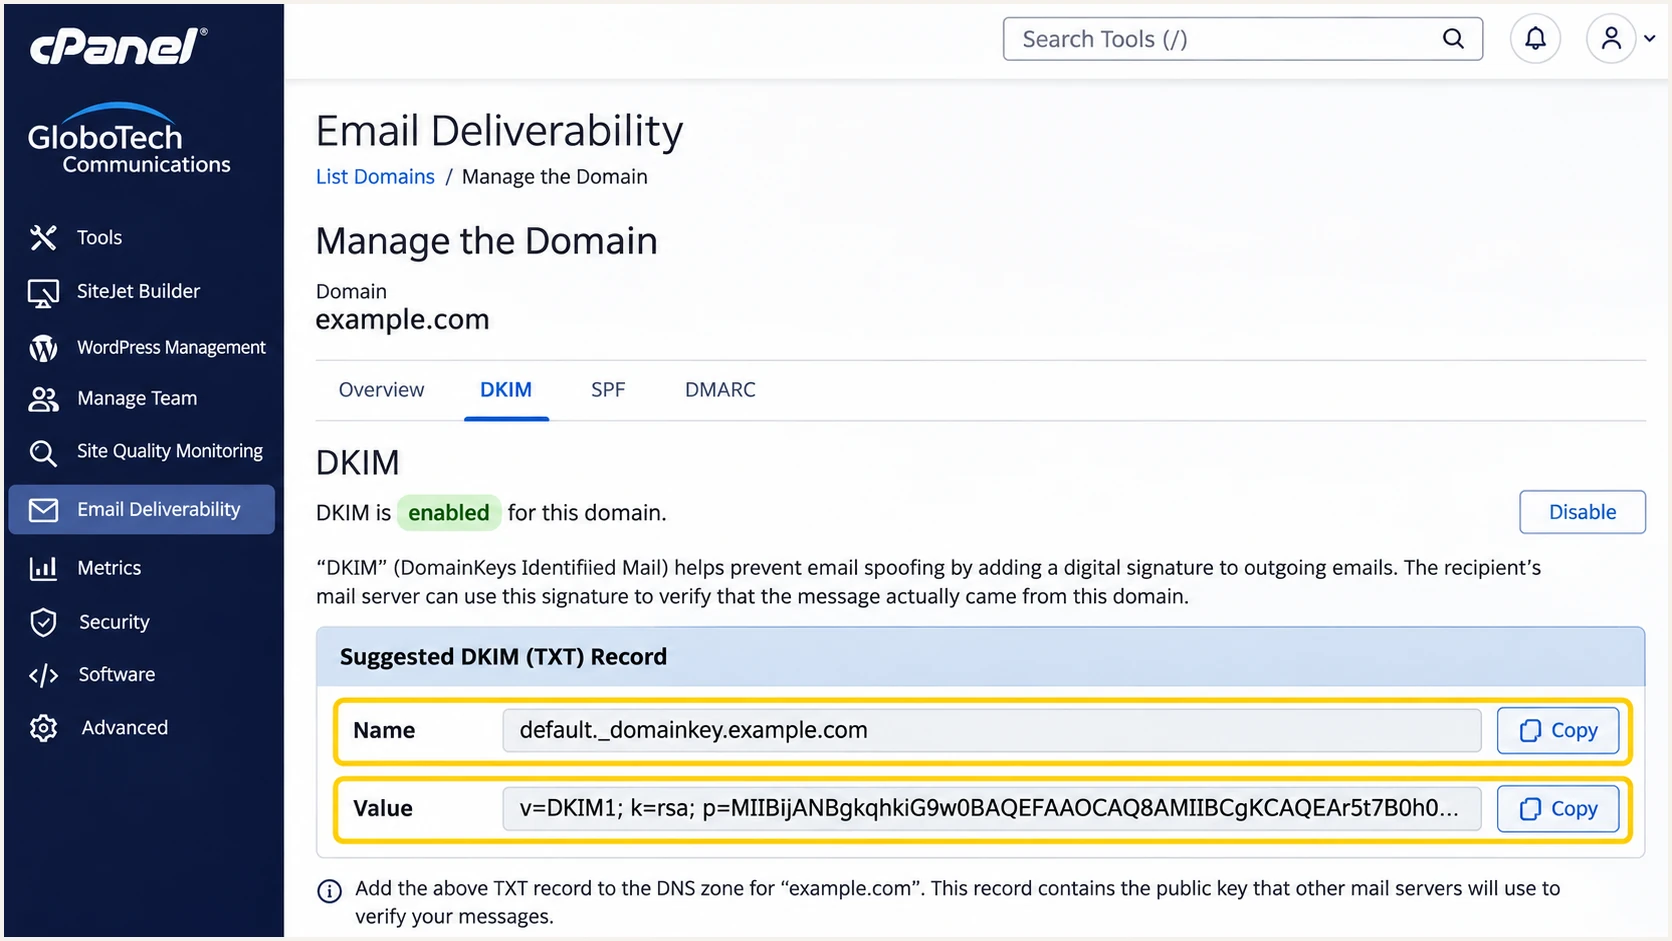
Illustrative cPanel DKIM screen on GloboTech hosting, with public record fields highlighted.
Replace default in this lookup with the selector from your delivered message. A successful TXT lookup confirms publication, while a delivered-message test confirms that signing works.
For website email, test the form or scheduled job itself. If PHP-generated messages lack DKIM, configure authenticated SMTP through the domain's mailbox or ask the server administrator to correct signing for that application.
Look up the public key for a default selectorbash
dig +short TXT default._domainkey.example.com
Keep the private key on the server
DNS contains the public DKIM key only. Never publish the private key or paste it into a support screenshot. After a server migration or key rotation, verify that the published public key matches the active signer.
Set up DMARC
DMARC passes when SPF passes with the required domain match, or DKIM passes with the required domain match. I start a new deployment with p=none to collect evidence before enforcing a policy.
- Check the current policy. Query _dmarc.example.com first. If you already use p=quarantine or p=reject, keep that policy while adding GloboTech authorization and signing. Do not weaken an established policy.
- Choose reporting. Use a mailbox or reporting destination that accepts aggregate XML reports. Replace dmarc@example.com with your actual reporting address. For an external reporting domain, complete the destination's authorization requirements.
- Create one record. In authoritative DNS, add a TXT record at _dmarc.example.com. In cPanel, use Domains > Zone Editor > Manage > Add Record > Add TXT Record. Edit an existing DMARC record instead of adding a second one.
- Save and check. For a new deployment, use the monitoring value shown here. Keep relaxed alignment initially by omitting aspf and adkim. Query the public record after the previous TTL expires.
New deployment: TXT value at _dmarc.example.comtext
v=DMARC1; p=none; rua=mailto:dmarc@example.com
Use the DMARC record generator to build the value with your reporting address. Enter _dmarc as the host when your DNS interface automatically adds example.com.
Check the domain in the visible From address. DMARC is published for that domain, rather than for the server hostname or DKIM selector.
DMARC checker
Look up a domain's DMARC record and catch policy issues.
?/7tests passed
A valid DNS result confirms that receivers can discover the policy. It does not prove your application sends authenticated email; test a message and inspect its results next.
p=none requests monitoring without DMARC-based quarantine or rejection. It does not prevent spam filtering or rejection for other reasons, and it does not stop unauthorized use of your From domain.
Verify and troubleshoot
I test every production sending route, including the website contact form and background jobs. One passing mailbox message does not validate a separate application mail path.
- Send a real message. Use the email tester below. Send to its generated address through your GloboTech-hosted application or mailbox and inspect the full diagnosis. Repeat for each sending path.
- Check the identities. Confirm the actual egress IP, the delivered Return-Path, the DKIM d= domain and s= selector, and the receiver's DMARC result. Read the recipient-added Authentication-Results rather than trusting a header added by the sender.
- Repair DNS errors. Check the authoritative zone, duplicate SPF or DMARC records, accidentally doubled domain names, and truncated DKIM keys. Recheck after cached records expire.
- Repair reverse DNS. For a GloboTech IP you administer, create an A record such as mail.example.com pointing to that IP. In the GloboTech Customer Portal, open NETWORKING > Reverse DNS, find the IP, click EDIT, enter the hostname, and press Tab to apply. Use a matching SMTP EHLO hostname; handle IPv6 with its corresponding AAAA and PTR records.
The email tester checks a delivered message and reports authentication problems. It is the quickest way to distinguish valid DNS from a mail server that still uses the wrong sender identity.
Use the same sending address and SMTP route as production. Sending directly through a different mailbox service tests that service instead of the GloboTech instance.
Email tester
Send a real email to this address. Suped shows a results button when the test is ready.
?/43tests passed
For this setup, aim for spf=pass on your envelope sender domain, dkim=pass on your signing domain, and dmarc=pass for the visible From domain. DMARC needs one passing mechanism with the required domain match, although both are preferable.
An SPF alignment failure with passing, matching DKIM still permits DMARC to pass. A DKIM pass for an unrelated domain does not compensate for that SPF alignment failure.
Illustrative delivered-message identities and resultstext
From: notifications@example.com
Return-Path: <bounce@example.com>
DKIM-Signature: v=1; a=rsa-sha256; d=example.com; s=default; ...
Authentication-Results: receiver.example;
 spf=pass smtp.mailfrom=example.com;
 dkim=pass header.d=example.com;
 dmarc=pass header.from=example.com
|
|
|
|---|---|---|
SPF fail | Egress IP | Authorize sender |
SPF mismatch | Return-Path | Set MAIL FROM |
No DKIM | SMTP route | Enable signing |
DKIM fail | Selector/key | Match active key |
DMARC fail | From domain | Fix domain match |
PTR error | IP hostname | Set reverse DNS |
Match each symptom to the sending path before changing DNS.
GloboTech's public documentation describes the Reverse DNS edit under NETWORKING. Shared IPs require the provider or server administrator to manage the PTR; do not change a shared server's hostname without checking its other users.
Verify both directions: the PTR must return the intended hostname, and that hostname must resolve back to the sending IP. PTR is separate from DMARC alignment.
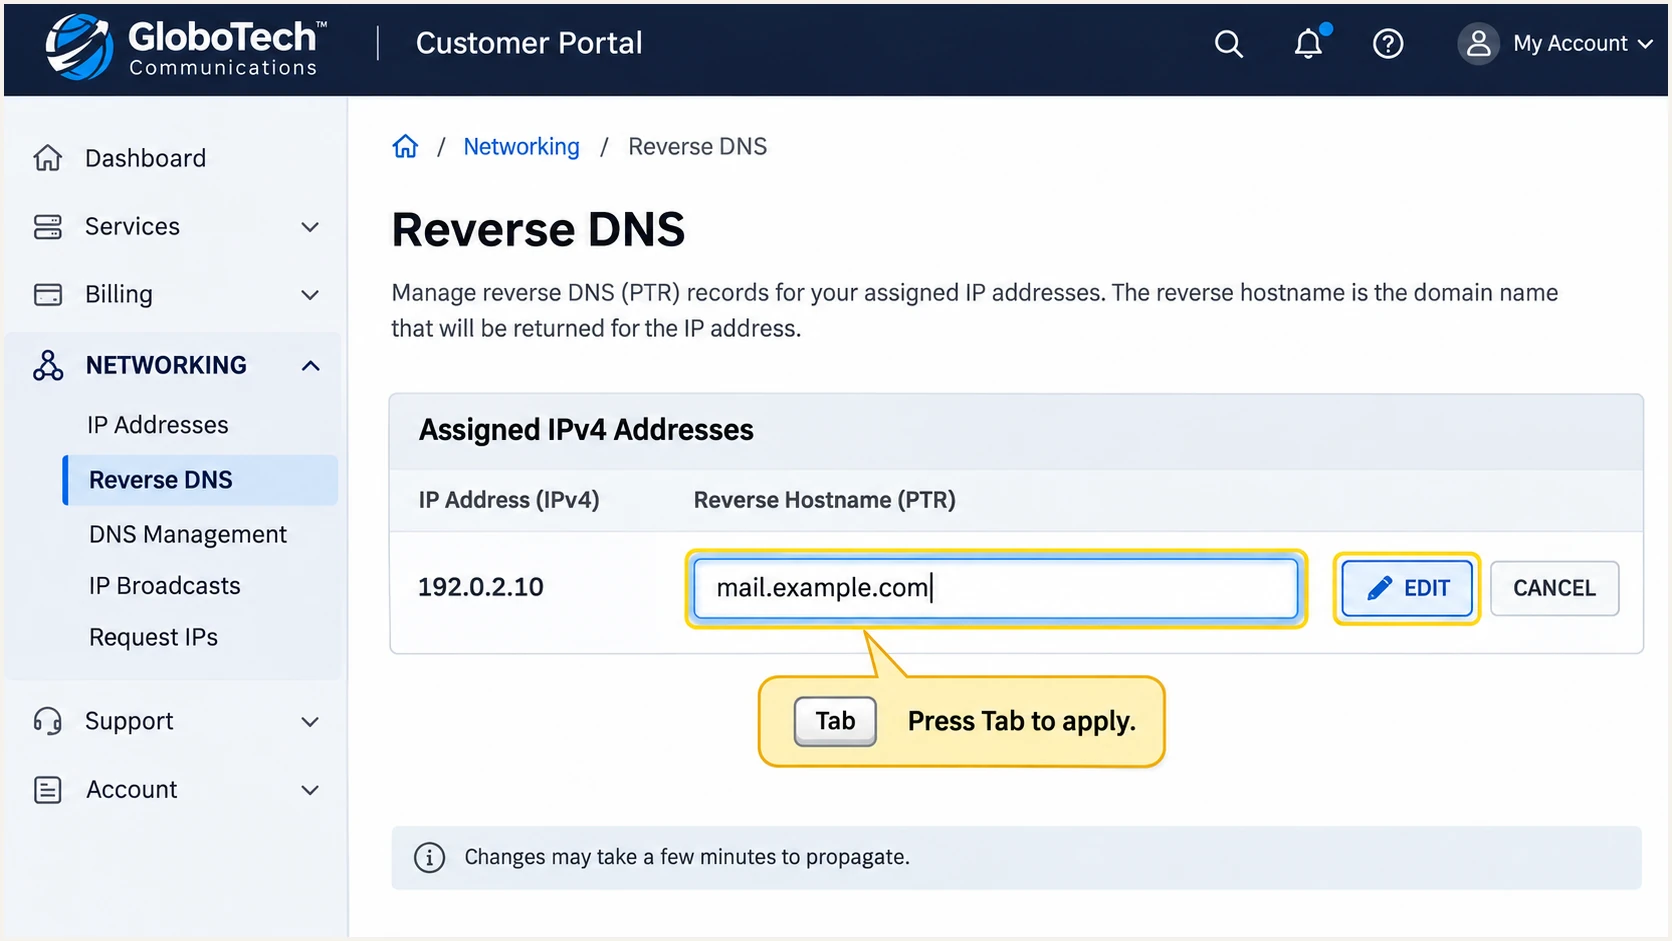
Illustrative GloboTech Customer Portal view showing the Reverse DNS edit controls.
After saving the PTR, run the reverse lookup and compare it with the forward lookup. Check the actual outbound IP, which differs from the instance address when a relay or NAT is involved.
If authentication passes but delivery still fails, inspect SMTP rejection text and outbound port connectivity. Authentication alone does not guarantee inbox placement.
Check forward and reverse DNS using your real sending IPbash
dig +short A mail.example.com
dig +short -x 192.0.2.10
Get alerted when it breaks
Suped is our DMARC reporting and email authentication platform. Its DMARC monitoring turns receiver reports into source-level authentication results and detected issues. I use that evidence to catch changes in a GloboTech server's IP or signing configuration.
- Enable failure alerts. In Suped's notification settings, enable DMARC failure alerts and summary emails. Check that your DMARC reporting destination is delivering reports into the monitored reporting stream.
- Review the source. Inspect the reported IP and sending identities before marking a GloboTech-hosted source as verified. A recognized hosting network alone does not establish that the sender is authorized.
- Diagnose the change. Use Suped's record detail view for SPF and DKIM results, and DNS history to compare authentication record changes. Follow the detected issue's fix steps, then retest the application.
- Check after maintenance. Review reports after an IP change, server migration, DKIM rotation, or application SMTP update. Keep failure alerts enabled after enforcing DMARC.
Reporting alerts depend on report arrival
DMARC aggregate reports arrive on receiver schedules, commonly daily. Suped alerts based on received reports are not an instant notification for every rejected message. Use SMTP logs and delivered-message tests for immediate troubleshooting.
Secure your domain with p=reject
I move to p=reject after every legitimate sending route has demonstrated passing DMARC. Suped's source verification and issue diagnostics make that decision reviewable rather than dependent on a single test message.
- Inventory every sender. Review aggregate reports across a full business sending cycle, including infrequent jobs. Verify legitimate sources and fix their domain matching or signing failures. Do not authorize unknown IPs just to improve the pass rate.
- Stage enforcement. For a new monitoring deployment, change p=none to p=quarantine after legitimate sources are working. Watch the next reporting cycles and delivery logs before progressing. Existing quarantine or reject deployments keep their current protection during setup.
- Review subdomains. Inventory mail sent with subdomain From addresses. Check any explicit subdomain DMARC records and the parent sp policy so the intended protection covers those addresses.
- Apply rejection. Change the existing policy to p=reject when legitimate traffic is consistently passing. Keep the reporting destination and continue investigating new failures. Suped's hosted policy controls simplify subsequent policy changes.
Ready for enforcement
Every known sender passes DMARC through a matching SPF or DKIM identity. Application mail has been tested, and unexplained legitimate failures have been resolved.
Investigate before progressing
A website still sends unsigned mail, the Return-Path belongs to an unrelated domain, or a scheduled sender has not appeared in reports. Fix or test that route before tightening policy.
Suped's Hosted DMARC manages policy changes through its dashboard after the hosted DNS configuration is in place. Authentication records and signing still need to be correct on the GloboTech sending server.
Change the policy in one existing record. Replace the example reporting address in these values with your working destination and retain any other intentional policy settings.
Intermediate policy: quarantinetext
v=DMARC1; p=quarantine; rua=mailto:dmarc@example.com
Enforcement policy: rejecttext
v=DMARC1; p=reject; rua=mailto:dmarc@example.com
Rejection is a receiver policy request
p=reject asks receivers to reject messages that fail DMARC. Receiver handling still depends on local policy, and legitimate forwarding can disrupt authentication. Preserve passing DKIM through forwarding where possible and investigate affected mail before enforcing.
Frequently asked questions
Use the actual outbound IPs or the authorization documented for your configured relay. GloboTech's cPanel instructions use server-specific suggested records. Do not create an include value from the provider's website domain or authorize its entire IP network.
No. Publish SPF, DKIM, and DMARC at the current authoritative DNS host. Existing MX records can remain with your inbound mailbox provider. cPanel's local repair controls cannot publish changes into an externally hosted authoritative zone.
SPF authenticates the envelope sender domain. DMARC also requires that domain to match the visible From domain under the configured alignment mode. Set a custom envelope sender on your domain, or ensure DKIM passes with a matching signing domain.
The website and mailbox can use different SMTP paths or signing identities. Test the website action itself, then configure authenticated SMTP through the domain's mailbox or have the server administrator enable signing for that application route.
globo.tech is associated with GloboTech Communications infrastructure. An rDNS name is a hosting clue rather than proof of an authorized email sender. GloboTech customers can set custom PTR hostnames, so hosted email also appears under customer-controlled domains. Confirm the source IP allocation and message authentication before authorizing it.
No. Keep an established quarantine or reject policy and configure GloboTech's SPF and DKIM before sending production mail. The p=none example is for a new monitoring deployment, not a reason to remove existing protection.