
How to set up DMARC/DKIM/SPF for FortiMail

Set up FortiMail by adding your protected domain, authorizing its outbound servers in SPF, activating DKIM signing, and publishing a DMARC TXT record. FortiMail Cloud uses include:_spf.fortimailcloud.com; an appliance or VM needs authorization for its public sending IPs. I verify the configuration with an email sent through the production outbound route.
DMARC passes when SPF or DKIM passes with a domain that matches the visible From domain under your DMARC alignment settings. Fortinet's outbound authentication recipe describes the sending-side setup. Incoming DMARC checking in FortiMail is a separate configuration.
Add your domain
I add the domain used in the From address to FortiMail first. Cloud domain creation happens in the Cloud portal; appliance and VM administrators create protected domains in the appliance GUI.
- Cloud tenant: Select the running tenant, choose Action > Manage Domain > New, and enter example.com. Set SMTP server to your actual destination mail server and select its listening port.
- Cloud verification: Copy the issued TXT record token into the domain's public DNS, using the name shown by Fortinet. Keep it separate from SPF. Return to Domain Ownership Verification, click Verify where shown, then Create.
- Appliance or VM: Open Domain & User > Domain > Domain > New. Enter the domain and the relay settings appropriate to your deployment, save it, then reopen it. This workflow does not have the Cloud ownership-token step.
- Outbound routing: Route outgoing mail through FortiMail and confirm that the intended outbound policy matches your trusted mail server. Changing MX records only changes incoming delivery; it does not route outgoing mail through FortiMail.
I confirm that the domain appears in the protected-domain list and that a test message reaches an external recipient through FortiMail. Save the domain before looking for DKIM settings; those settings appear when editing an existing domain.
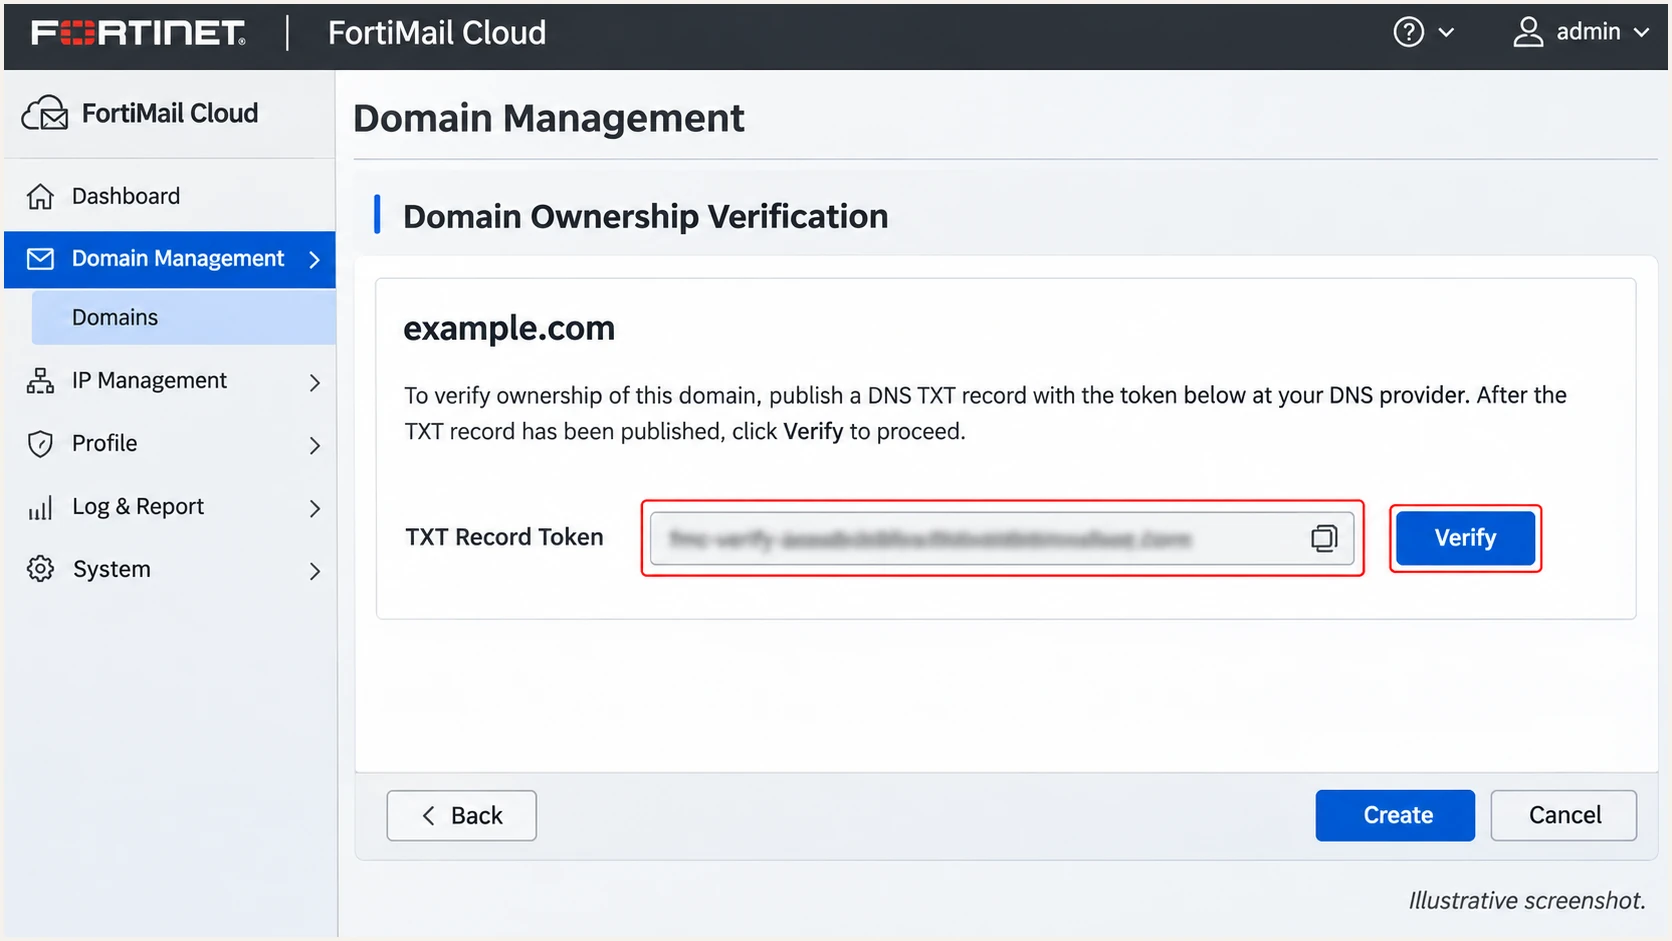
Illustrative FortiMail Cloud domain ownership verification screen.
For an existing deployment, edit the protected domain already in use. I check routing before changing authentication records so that the SPF authorization covers the server recipients actually see.
Set up SPF
SPF checks the SMTP envelope sender domain, normally visible in the delivered Return-Path. FortiMail can relay mail with your own envelope sender domain, so I keep that domain under your control and authorize the final public sender.
- Find the egress: Read the recipient's message headers to identify the public sending IP and Return-Path domain. An appliance behind NAT uses the public NAT address, not its private interface IP.
- Merge authorization: For Cloud, add include:_spf.fortimailcloud.com before the final all mechanism. For an appliance or VM delivering directly, add ip4: or ip6: mechanisms for its public egress addresses. Preserve every other legitimate sender in the existing record.
- Match the domain: Keep the upstream MAIL FROM domain in the same organizational domain as the visible From address for relaxed SPF alignment. Strict SPF alignment requires the same domain exactly.
- Check the limit: Publish one SPF record per envelope sender domain. Keep evaluation within 10 DNS-querying terms, including nested includes. Exceeding that limit produces SPF permerror.
FortiMail Cloud
Use the managed Cloud include when Cloud sends your outbound mail.
Cloud-only SPF exampletext
example.com. 3600 IN TXT "v=spf1 include:_spf.fortimailcloud.com -all"
Appliance or VM
Authorize the public IP that connects directly to recipients.
Direct-delivery SPF exampletext
example.com. 3600 IN TXT "v=spf1 ip4:192.0.2.10 -all"
These are alternative examples for a domain whose only sender is FortiMail. Publish the appropriate single record after merging existing senders. Replace 192.0.2.10 with your real public IP; it is a documentation address.
Run the check below against the Return-Path domain. If FortiMail forwards outbound mail to another relay, authorize that final relay instead of assuming FortiMail's own IP is the public sender.
SPF checker
Find SPF syntax issues, lookup limits, and weak records.
?/16tests passed
I check that the result has one valid SPF record and that the actual egress IP is authorized. For a domain using a separate bounce subdomain, check that subdomain's SPF record too.
An unrelated Return-Path domain causes SPF alignment failure even when SPF passes. DMARC still passes through valid DKIM with a matching signing domain. Fix the envelope sender upstream if matching SPF is intended. An inbound-only FortiMail deployment needs no outbound SPF authorization for FortiMail.
Set up DKIM
I generate the signing key on FortiMail and publish only its public key. Fortinet's DKIM signing instructions show selector creation and activation. The wording varies by build: DKIM Setting and DKIM and ARC Setting refer to the domain's signing configuration.
- Open the domain: Go to Domain & User > Domain > Domain, edit the saved domain, expand Advanced Setting, and open DKIM and ARC Setting, or DKIM Setting on older screens.
- Generate a selector: Click New, enter a unique selector such as fortimail2026, choose Auto Generation, and save it.
- Publish the key: Select the new selector and click Download. Publish the exported public-key TXT value at fortimail2026._domainkey.example.com. Use the generated value, keep the private key on FortiMail, and remove t=y if the exported record enables testing mode.
- Activate signing: Wait until public DNS returns the key, select the selector, and click Activate. Where available, set DKIM signing option to Outgoing. Older builds have a DKIM signing for outgoing email checkbox. Save the domain.
- Enable policy processing: In the profile used by the matching outbound policy, enable sender validation as required by your build. Current signing-option workflows use SPF or DKIM validation in the session profile, or the corresponding antispam checks. For session profiles with Enable DKIM signing for outgoing message, enable it.
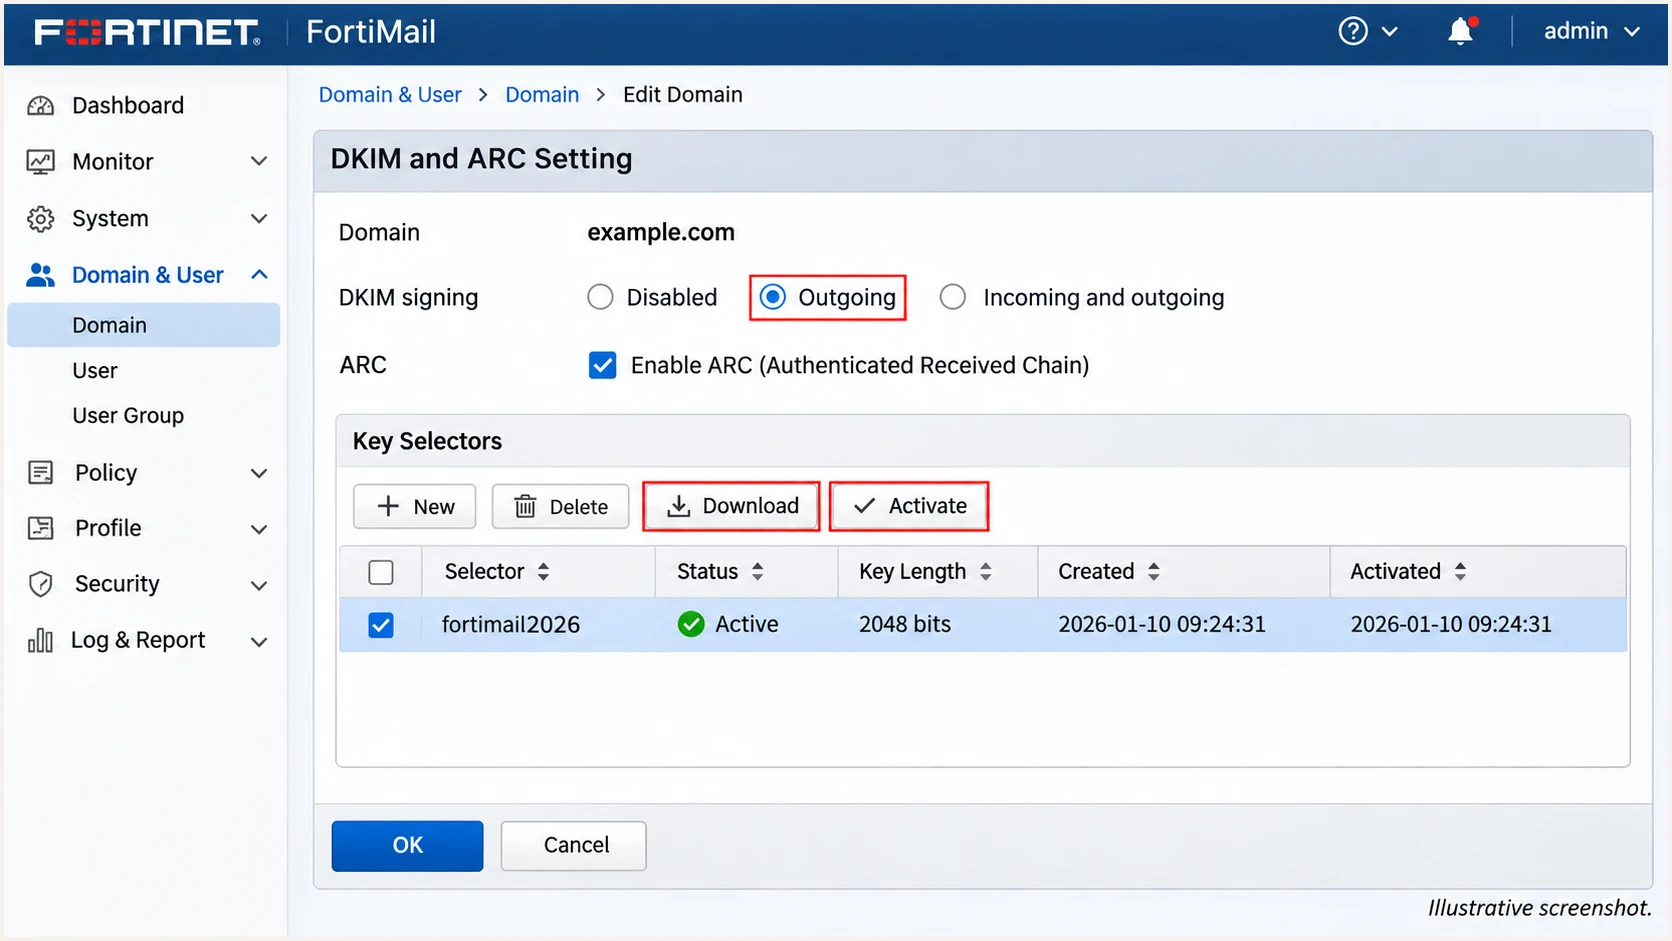
Illustrative FortiMail selector activation and outgoing DKIM signing settings.
I check the session profile under Profile > Session > Session > Sender Validation, then confirm the outbound policy actually uses it. A correctly published key does not prove that the outgoing message was signed.
If signing is restricted to authenticated senders, a trusted server relaying by IP without SMTP authentication needs a compatible signing policy. Review that restriction within the dedicated trusted outbound policy, and test the relay's real connection method.
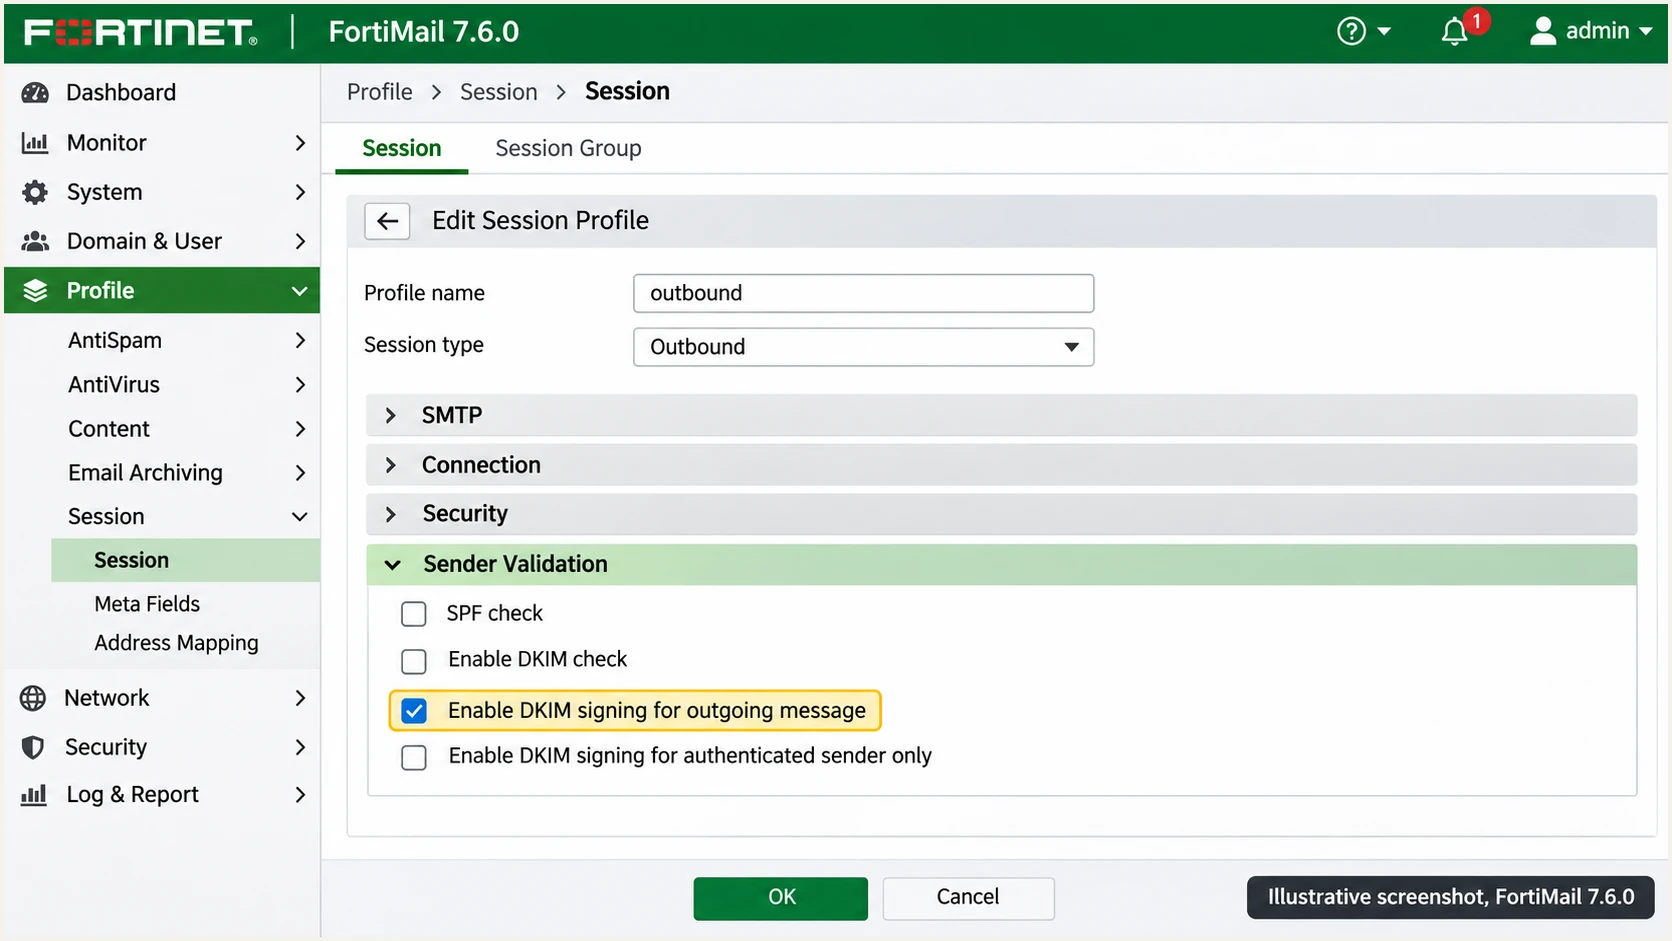
Illustrative FortiMail 7.6.0 outbound session profile signing control.
I confirm that the delivered signature has d=example.com and s=fortimail2026, then check the receiver's DKIM result. Repeat the test after adding footers or changing downstream relays. Keep old public keys available while previously signed mail is still in transit.
Set up DMARC
DMARC is a public DNS policy for your From domain. For a domain without enforcement, I start with p=none. If it already uses p=quarantine or p=reject, keep that policy while configuring FortiMail.
- Build the record: Use the DMARC record generator and select a monitoring policy for a new setup.
- Publish one policy: Create a TXT record at _dmarc.example.com, usually the name _dmarc in your DNS editor. If a DMARC record exists, edit it instead of publishing a second record.
- Set reporting: Replace dmarc@example.com with your actual aggregate-report destination. For an external reporting domain, complete the reporting authorization that destination requires.
- Validate the change: Use the checker below to confirm the published policy and reporting address. Send a real email after DNS caches expire; a valid policy record alone does not confirm authentication.
Initial DMARC TXT value at _dmarc.example.comtext
v=DMARC1; p=none; rua=mailto:dmarc@example.com
The example address is a placeholder, not a working reporting service. I use a destination that accepts aggregate XML reports and makes them available for investigation.
A p=none policy collects feedback without requesting quarantine or rejection for DMARC failures. It does not make failing mail pass authentication. Verify the exact From domain, including any sending subdomain with its own policy.
DMARC checker
Look up a domain's DMARC record and catch policy issues.
?/7tests passed
I confirm that the lookup returns the intended policy once, with the correct rua value. Aggregate reports arrive on receiver reporting schedules, commonly daily, so initial reporting is not immediate.
FortiMail's DMARC option under Profile > AntiSpam configures checks on mail it receives. Enabling that option does not create the DNS policy above or configure outbound DKIM signing.
Verify and troubleshoot
I test with a new message sent through the same route as production mail. Our email tester provides a test address and diagnoses the message received there, including authentication failures.
- Send the message: Use the address provided by the widget below. Send directly through your usual outbound FortiMail route; forwarding an old message tests a different delivery path.
- Inspect identities: Compare the visible From domain with the SPF-authenticated envelope sender and the DKIM d= domain. Read Authentication-Results added by the final receiver.
- Trace the route: Open Monitor > Log > Mail Event, locate the recipient and timestamp, and open the matching entry. Confirm which policy handled the connection and which public relay the recipient saw.
- Check the signature: For a missing signature, check the active selector and matched signing profile. For a bad signature, check the DNS selector and any message changes after signing.
- Test variants: Repeat for each sending domain, automated application, and failover route. Include IPv6 delivery if enabled.
|
|
|
|---|---|---|
SPF fail | Public egress IP | Authorize final relay |
SPF permerror | Duplicates or lookups | Merge or simplify |
DKIM missing | Selector and profile | Enable outgoing signing |
DKIM fail | Key or message changes | Correct signing path |
DMARC fail | Authenticated domains | Match From domain |
Common FortiMail authentication failures
An SPF pass for an unrelated Return-Path domain does not satisfy DMARC. Likewise, a valid DKIM signature for a different organizational domain does not satisfy relaxed DKIM alignment.
The test below checks an actual delivered message, which is quicker than waiting for aggregate reports to diagnose one configuration change. Send through FortiMail after saving the settings.
Email tester
Send a real email to this address. Suped shows a results button when the test is ready.
?/43tests passed
I expect DMARC to pass through at least one matching authentication method, and aim for both SPF and DKIM to pass on direct delivery. A DMARC pass does not guarantee inbox placement.
A passing test covers that message and route. I also review aggregate reports for senders and delivery paths that the test did not exercise.
Get alerted when it breaks
I monitor ongoing FortiMail authentication with Suped, our DMARC platform. Its DMARC monitoring groups reported sending sources and provides authentication diagnostics, so a DNS change or an unexpected relay can be investigated against actual receiver reports.
- Enable notifications: In Suped's notification settings, enable Issues detected and Sending sources need verification emails. Enable DMARC summary emails for regular review.
- Verify sources: Review legitimate FortiMail traffic separately from unrecognized senders. Check reported IPs against your Cloud service or appliance egress before verifying the source.
- Investigate failures: Open the affected records and inspect SPF, DKIM, and DMARC diagnostics. Compare DNS history when failures begin after a record change.
- Close the issue: Follow the issue's fix steps, correct DNS or FortiMail settings, send another test, and verify the change in subsequent reports.
Allow for reporting delay
Suped detects issues using available data. DMARC aggregate reports are batched by receivers, so report-based alerts do not inspect every message instantly. Run an email test immediately after configuration changes.
I keep FortiMail delivery logs available for SMTP failures while using Suped to investigate authentication across reporting receivers. That combination connects a reported failure with the sending route that needs repair.
Secure your domain with p=reject
I move toward p=reject after reviewing every legitimate sender and testing indirect delivery paths. Suped's verified-source workflow and issue diagnostics make that review concrete, including low-volume senders that one test email misses.
- Inventory senders: Review Suped's verified and unverified sources. Include applications that send infrequently and every FortiMail failover route.
- Resolve legitimate failures: Confirm matching DKIM or SPF for each authorized sender. Do not use the overall pass rate alone as a release gate, because unauthorized traffic also contributes failures.
- Stage the policy: For a new deployment, observe p=none through a representative sending cycle, then use p=quarantine before p=reject. For domains whose users post to mailing lists, allow at least a month at each preliminary stage and compare the outcomes.
- Check subdomains: Review sending subdomains and existing policy overrides before changing the parent policy. Test forwarding and mailing-list behavior, especially when messages are modified.
- Apply and monitor: Change the existing policy to p=reject while preserving reporting. For policies already managed with Suped's Hosted DMARC, apply the change in its policy controls, then verify public DNS and keep issue notifications enabled.
Enforcement example after validationtext
v=DMARC1; p=reject; rua=mailto:dmarc@example.com
Replace the example report address before publishing. A reject policy communicates how failed authentication should be handled; receivers still apply their local policies. Mailing-list participation needs particular care because legitimate indirect mail fails DMARC when forwarding also breaks DKIM.
I keep Suped monitoring active after enforcement. New sending applications, changed egress IPs, and DKIM rotation require the same source review and test-message checks as the initial deployment.
Frequency asked questions
A hostname ending in .fortimailcloud.com points to Fortinet's FortiMail Cloud infrastructure. I confirm that inference against the source IP and message headers before attributing the traffic. The suffix alone does not prove that mail is authorized for your domain. Appliance and VM deployments also use customer-controlled reverse DNS names.
FortiMail Cloud uses include:_spf.fortimailcloud.com. Merge it into the existing SPF record when Cloud sends your outbound mail. Appliances and VMs delivering directly need their public egress IPs authorized instead; the Cloud include does not authorize an arbitrary appliance IP.
Publishing DNS only makes the public key available. Activate the selector, enable outgoing signing, and confirm that the matching outbound policy uses the required signing or sender-validation settings. Check authenticated-sender-only restrictions when your mail server relays by IP rather than SMTP authentication.
Yes. DMARC passes when DKIM verifies successfully and its signing domain matches the From domain under your DKIM alignment setting. SPF with an unrelated Return-Path does not contribute a matching pass. If the upstream sender controls the envelope domain, configure it to use your own domain and authorize the final relay.
No. That setting checks received messages. Outbound authentication requires public SPF and DKIM records, working DKIM signing, and a DMARC policy published for your From domain. Verify those settings with a message sent through your production outbound route.




