
How to set up DMARC/DKIM/SPF for Forcepoint

For Forcepoint Email Security Cloud, verify your domain, add include:mailcontrol.com to its SPF record, publish both account-specific DKIM CNAMEs, enable the DKIM signing rule, and publish a DMARC TXT record. DMARC passes when SPF or DKIM passes with domain alignment to the visible From address.
I check the outbound route first. The cloud instructions apply when Forcepoint relays your outgoing mail. An inbound-only deployment does not need Forcepoint added to outbound SPF. On-premises appliances use different DKIM settings and authorize their actual public sending IPs.
Add your domain
I verify ownership with the CNAME method before changing mail routing. Forcepoint's 'Adding domains' documentation separates ownership validation from the connection checks used for inbound delivery.
- Open the policy: Go to Email > Policies and select the policy. For inbound filtering, configure a valid receiving server under Connections first; it must accept SMTP on port 25 from the Forcepoint service ranges.
- Register the domain: Open Domains > Add, enter your sending domain, and select Include sub-domains only when required. Select Outbound only configuration for an outbound-only deployment, then click Submit.
- Verify ownership: Copy the generated verification hostname. At your authoritative DNS host, create its CNAME pointing to autodomain.mailcontrol.com. Return to the domain details and click Check Now after DNS publication.
- Configure outbound routing: Under Connections > Outbound Routes > Add, register your sending server or the applicable hosted mail option. Configure that server's outbound connector to use the customer-specific hostname under Email > Settings > DNS Records & Service IPs.
The outbound relay hostname ends in out.mailcontrol.com. Copy the hostname assigned to your account; do not pin the connector to an IP obtained by resolving it.
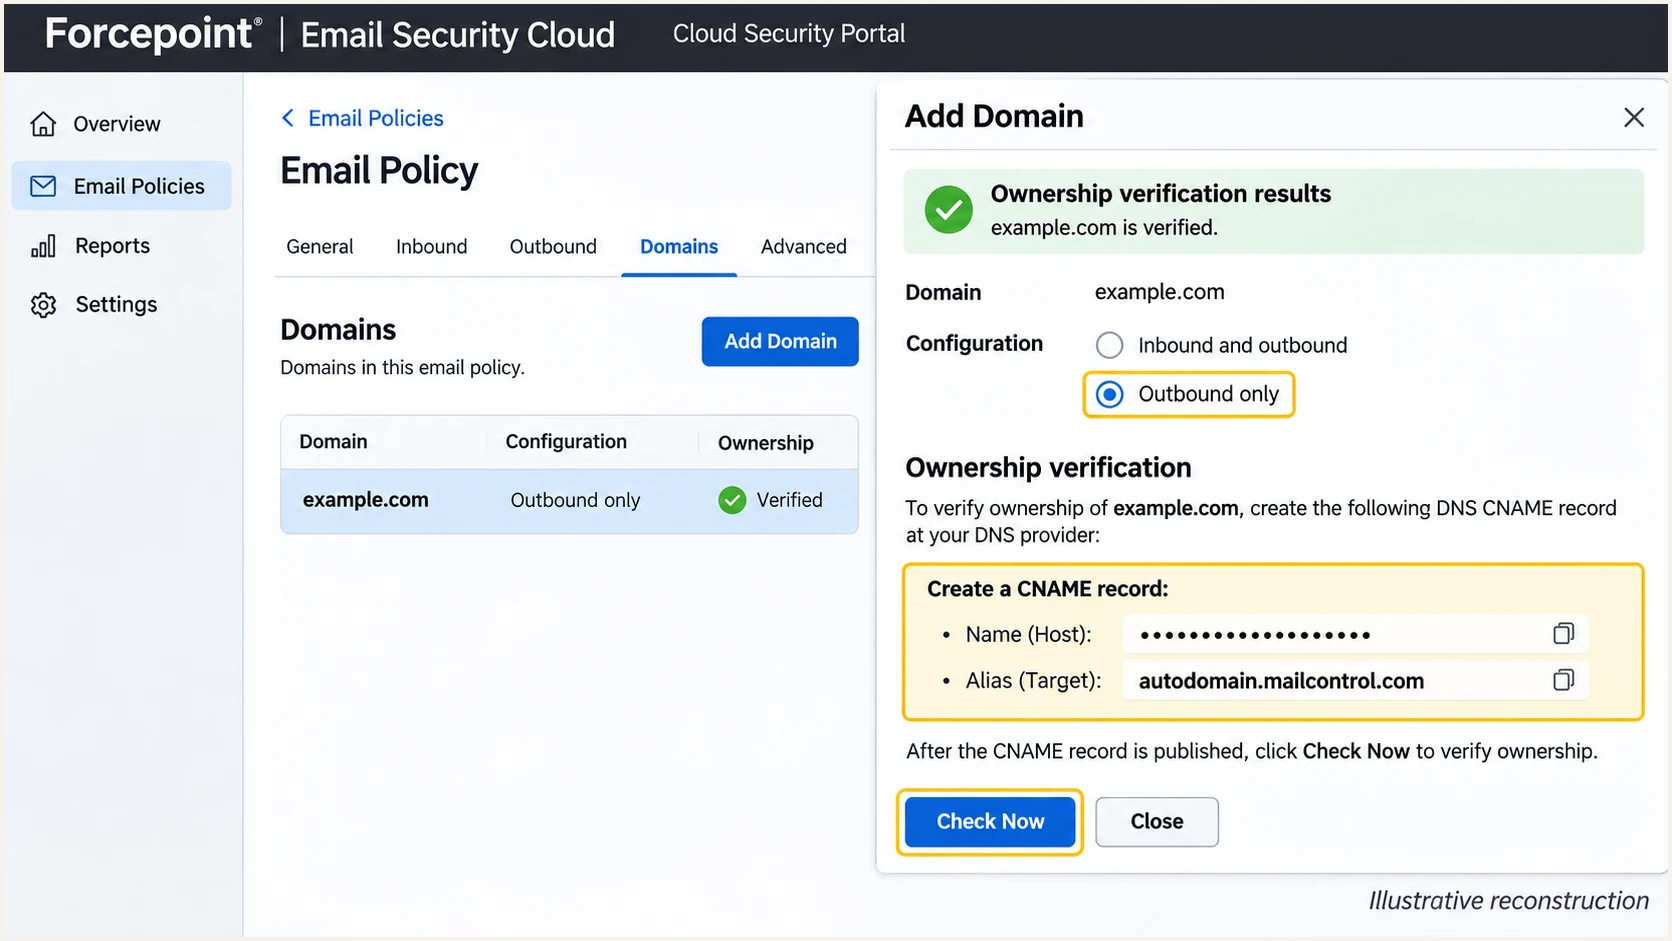
Illustrative Forcepoint domain ownership check using the supplied CNAME.
Outbound-only domains do not require inbound route connectivity tests, and MX-based ownership verification is unavailable for them. Leave inbound MX routing with your existing receiving service unless you are also deploying Forcepoint inbound filtering.
Complete verification promptly. Forcepoint marks domains Rejected after seven days without ownership verification, and support is required to re-enable them. Reopen an Unchecked domain and use Check Now after fixing its DNS record.
Set up SPF
Forcepoint supports SPF alignment when your outbound mail uses your domain as the SMTP MAIL FROM domain. I inspect the delivered Return-Path to identify the exact domain whose SPF record needs updating.
- Choose the DNS name: Edit SPF at the Return-Path domain. A Return-Path under bounce.example.com needs SPF there; the SPF record at example.com is not inherited.
- Merge the authorization: Add include:mailcontrol.com before the existing all mechanism. Keep every other legitimate sender and preserve the existing ~all or -all ending.
- Keep one record: Publish one TXT record starting with v=spf1 at that name. Multiple SPF records cause permerror. Keep DNS-querying mechanisms and modifiers within the limit of 10 across recursive evaluation.
- Save and check: Save the DNS change, allow cached answers to expire, and check the same Return-Path domain below.
SPF example when Forcepoint is the only outbound servicedns
example.com. IN TXT "v=spf1 include:mailcontrol.com ~all"
Use that complete example only if Forcepoint is your sole outbound service. For an existing SPF record, merge the include rather than replacing the record or adding a second one.
The SPF checker validates the published record and its lookup dependencies. Enter the actual envelope sender domain, then confirm that the Forcepoint include resolves without syntax or lookup-limit errors.
SPF checker
Find SPF syntax issues, lookup limits, and weak records.
?/16tests passed
A passing SPF result contributes to DMARC only when its authenticated domain has alignment with the From domain. Under default relaxed alignment, example.com and bounce.example.com share an organizational domain. With aspf=s, the domains must match exactly.
If a particular sending stream uses a service-owned Return-Path that you cannot customize, an extra SPF entry on your From domain does not fix its alignment and is unnecessary for that stream. Expect an SPF alignment warning, but require passing DKIM with an aligned signing domain so DMARC still passes.
Set up DKIM
Forcepoint Email Security Cloud uses two CNAME delegations and manages the signing keys. I publish both delegations before enabling the rule, so a later key rotation does not require an emergency DNS change.
- Copy both CNAMEs: Open Email > Settings > DNS Records & Service IPs. In CNAME Records, copy both account-specific hostnames and their corresponding targets for your signing domain.
- Publish the delegations: Add both CNAMEs at your authoritative DNS provider. Check whether its form appends your zone name automatically. Do not create a TXT record at the same hostname as a CNAME.
- Create a rule: Open Email > Policies > your policy > Antispoofing. Under DKIM Signing, click Add and enter a rule name.
- Set the domains: Enter each sending domain in Sender domains/subdomains, one per line. Set Signing domain to the visible From domain for an exact match. Leave granular sender/recipient options disabled unless you deliberately need exceptions, then click Submit.
- Enable signing: If the CNAME check fails, correct DNS and click Recheck. After validation passes, switch State to ON and click Save. New rules initially have signing switched off.
DKIM CNAME pattern in the example.com zone, not tenant valuesdns
fpkeyNNN-1._domainkey CNAME fpkeyNNN-1._domainkey.out.mailcontrol.com.
fpkeyNNN-2._domainkey CNAME fpkeyNNN-2._domainkey.out.mailcontrol.com.
NNN is an account-specific number in Forcepoint's documented example. Replace these patterns with the exact two records displayed in your portal. Keep both CNAMEs published, including the one that is not currently signing messages.
Forcepoint's 'Adding a DKIM signing rule' documentation allows each sender domain or subdomain in only one signing rule. Check existing rules before creating another, and avoid granular exclusions that leave some senders unsigned.
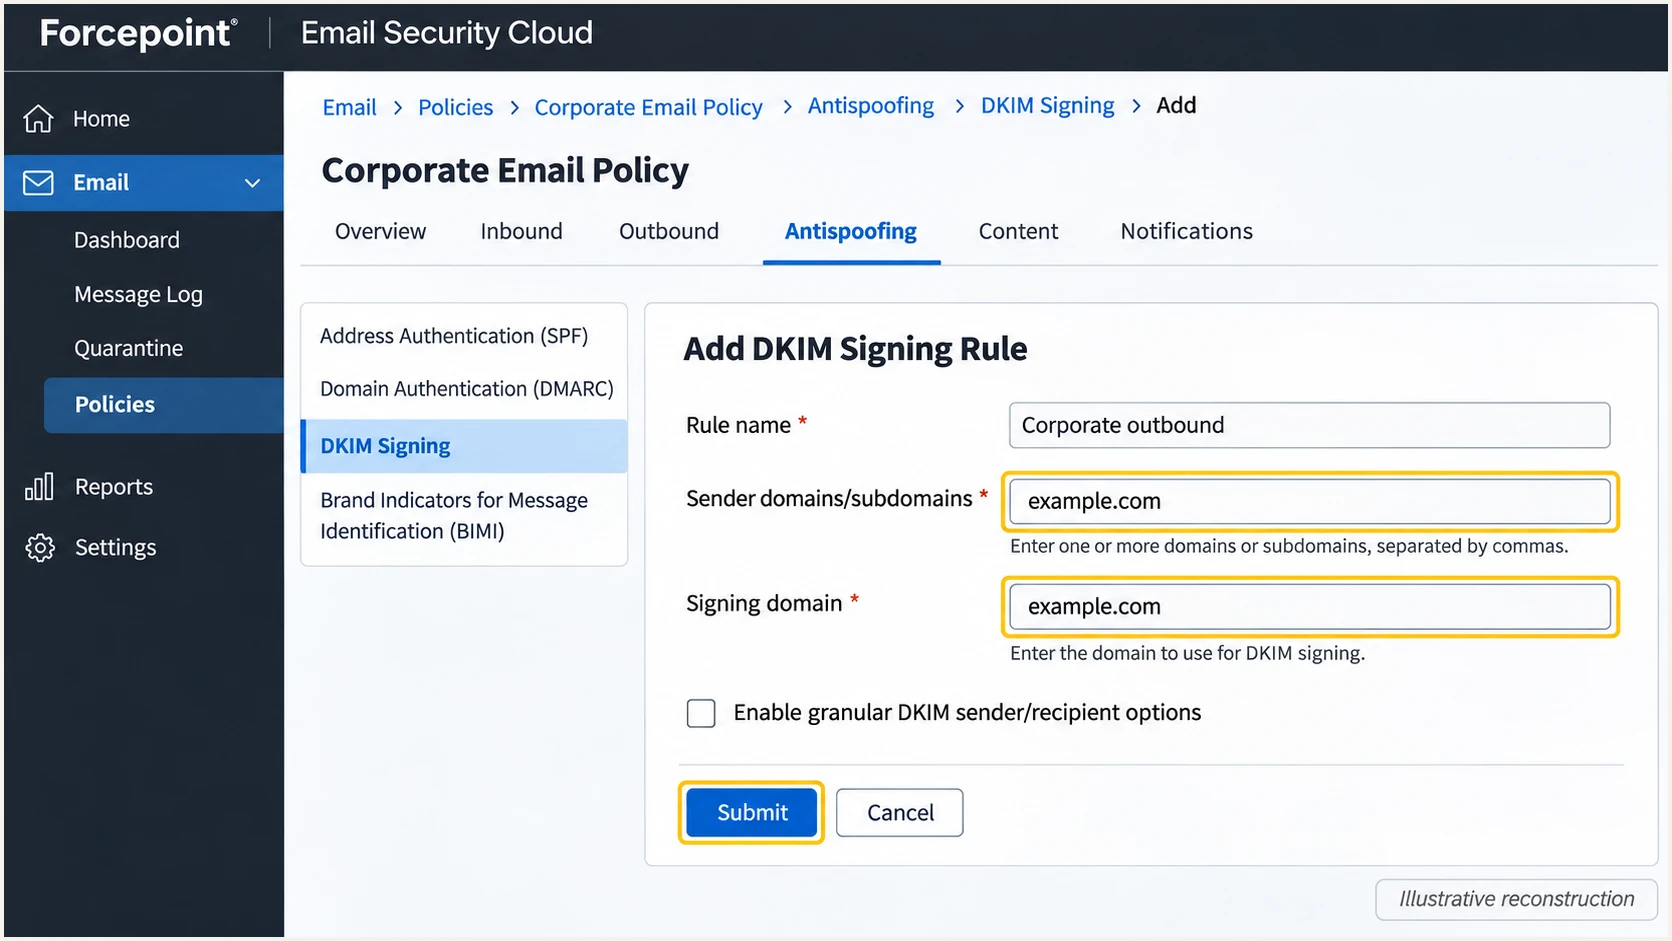
Illustrative Forcepoint DKIM rule with matching sender and signing domains.
After submitting the form, return to the DKIM Signing table to enable the rule. A successful DNS check alone does not turn on signing; verify State is ON and save the policy.
For an on-premises Forcepoint Email Security appliance, use the appliance workflow below. Cloud CNAME delegation values do not replace an appliance's own signing key and selector.
Email Security Cloud
Use Antispoofing > DKIM Signing in the policy. Delegate both portal-provided selectors with CNAME records.
Forcepoint manages key rotation. Validate the CNAMEs, enable the rule, and test a delivered message.
On-premises appliance
Use Settings > Inbound/Outbound > DKIM Settings. Create a signing key, publish its public key as the selector's TXT record, and associate that key with a signing rule.
Choose RSA-SHA-256, test and enable the rule. Authorize the appliance's public outbound IP in SPF when it delivers directly.
Set up DMARC
DMARC is published in your domain's authoritative DNS. Enabling inbound DMARC checks in Forcepoint's Antispoofing policy does not publish a policy for your own sending domain.
I start with p=none for a domain without enforcement. If your domain already uses p=quarantine or p=reject, keep that policy while adding and testing Forcepoint.
- Inspect the current policy: Look up TXT at _dmarc.example.com before editing. Update an existing DMARC record instead of adding a second one.
- Generate the value: Use the DMARC record generator to configure the reporting destination and policy. For a new monitoring deployment, use the p=none pattern below.
- Publish the TXT record: Create the record at _dmarc for the domain in your visible From address. Substitute your real reporting mailbox for dmarc@example.com.
- Validate the result: Run the DMARC checker after DNS caches expire. Confirm one valid record with the intended policy and reporting address.
Initial DMARC TXT value at _dmarc.example.comtext
v=DMARC1; p=none; rua=mailto:dmarc@example.com
The example.com address is a placeholder. Use a mailbox or report-processing address you control and that accepts DMARC aggregate XML reports.
If the reporting address belongs to another organizational domain, that destination must authorize external reporting in DNS. Use the destination's supplied reporting instructions rather than guessing an authorization record.
Keep existing enforcement
Do not replace p=quarantine or p=reject with p=none just to configure Forcepoint. Repair the outbound route, SPF authorization or DKIM rule while retaining the existing policy.
A p=none policy requests monitoring without requesting quarantine or rejection for DMARC failures. It does not itself prevent unauthorized use of your From domain.
Use the checker to inspect the effective policy, including inherited subdomain policy when applicable. DNS validation confirms publication; a delivered message is still required to prove authentication works.
DMARC checker
Look up a domain's DMARC record and catch policy issues.
?/7tests passed
For an explicit subdomain policy, publish at _dmarc.subdomain.example.com. Otherwise, check the organizational domain's policy and its sp tag before assuming the subdomain has no DMARC policy.
Aggregate reports usually arrive on a daily schedule. Allow roughly 24-48 hours for initial reporting and judge coverage against actual sending activity; reporting is not instantaneous.
Verify and troubleshoot
I test the complete production route after Forcepoint processing. A DNS pass does not establish that the right policy handles the message or that DKIM signing is enabled.
- Send through Forcepoint: Use a real sender and the normal outbound connector. Include an HTML message and any enabled disclaimer or encryption path that changes delivery behavior.
- Inspect trusted results: Read the final recipient's Authentication-Results header. Confirm spf=pass for your envelope domain, dkim=pass for the intended signing domain, and dmarc=pass for the visible From domain.
- Check the active selector: Read s= and d= in DKIM-Signature. Resolve that selector's CNAME, then its target TXT record. Replace NNN in the commands with your account's actual selector number.
- Retest every route: Repeat for each sending subdomain and any route that bypasses Forcepoint. After a fix, send a new message rather than rechecking an old header.
DNS verification commands, replace all example namesbash
dig +short TXT example.com
dig +short CNAME fpkeyNNN-1._domainkey.example.com
dig +short CNAME fpkeyNNN-2._domainkey.example.com
dig +short TXT fpkeyNNN-1._domainkey.out.mailcontrol.com
dig +short TXT _dmarc.example.com
For the quickest end-to-end diagnosis, open the email tester and send a fresh message to the address it supplies. Its report checks the received message and highlights authentication failures alongside other delivery checks.
Use the same From address and outbound path that production mail uses. The email tester can distinguish a published DNS record from a signing or routing problem in the delivered message.
Email tester
Send a real email to this address. Suped shows a results button when the test is ready.
?/43tests passed
If DKIM is missing, inspect rule State, sender-domain coverage and granular exceptions. If the signature is present but fails, compare the actual selector with DNS and check whether another gateway modifies the message after signing.
Forcepoint documents that the secondary public key is published when it enters use. An inactive selector without a TXT key is not automatically a fault; keep both CNAME delegations and validate the selector used on the message.
|
|
|
|---|---|---|
SPF permerror | Duplicate or oversized SPF | Record and lookup count |
SPF failure | Wrong domain or egress | Return-Path and sender IP |
No DKIM signature | Rule off or excluded sender | State and rule scope |
DKIM failure | DNS or message changes | Selector and final hop |
DMARC failure | No passing aligned method | From versus SPF and DKIM |
Use the delivered message to choose the next check.
SPF success with DMARC failure usually means the envelope domain lacks alignment and no passing DKIM signature supplies it. Check the authenticated domains, not just the green SPF result.
If the Forcepoint CNAME check still fails after publication, query the authoritative DNS server directly and check for a duplicated zone suffix or a conflicting record at the selector hostname.
Get alerted when it breaks
Our DMARC monitoring platform, Suped, detects authentication issues and provides steps to fix them. For a Forcepoint deployment, this means tracking the reported outbound source and investigating changes in its passing traffic.
I treat alerts as an operational queue: confirm whether the source is authorized, inspect the failed authentication method, and retest the affected route after correcting it.
- Verify the source: In Suped's Sources view, confirm that Forcepoint traffic belongs to your organization before marking the source verified. Do not approve an unfamiliar source solely because its hostname contains mailcontrol.com.
- Enable notifications: In Notifications, enable Issues detected and Sending sources need verification. Enable DMARC summary emails for periodic review.
- Investigate failures: Open the affected record's Detail view to inspect SPF and DKIM results. Filter Data view by source or IP, then use DNS history to check for a relevant record change.
- Confirm recovery: Follow the issue's fix steps, send another test email, and confirm that subsequent aggregate data shows the expected passing source.
Alerts depend on incoming evidence
Suped detects issues as reporting data becomes available. DMARC aggregate reports have delivery delays, so these alerts do not provide an immediate result for every message. Use the email tester for a fresh configuration check.
Secure your domain with p=reject
I move to p=reject after legitimate sending routes pass DMARC across a complete sending cycle, including infrequent application mail. A high overall pass rate is insufficient if a small but necessary source still fails.
Suped's source verification and issue diagnostics make that decision concrete. Review failures by source and identify whether each one is an authorized sender that needs repair or unauthorized traffic that enforcement should reject.
- Finish the inventory: Confirm all legitimate sources, sending subdomains and direct-delivery routes. Require passing DKIM with domain alignment for Forcepoint mail, especially where forwarding disrupts SPF.
- Stage the policy: For a domain still on p=none, move to p=quarantine after repairs, observe another representative sending cycle, then use p=reject. Keep existing enforcement if it is already in place.
- Manage changes: Suped's Hosted DMARC supports managing policy in the dashboard after its DNS delegation is configured. Use staged changes and verify the effective published policy after each update.
- Check subdomains: Review sp and any separate subdomain records before enforcement. Keep relaxed alignment unless an assessed requirement calls for strict matching.
- Retain reporting: Keep a working rua destination and authentication alerts enabled. Recheck Forcepoint after connector changes and DKIM policy edits.
Policy stages, publish only one applicable DMARC valuetext
v=DMARC1; p=quarantine; rua=mailto:dmarc@example.com
v=DMARC1; p=reject; rua=mailto:dmarc@example.com
These are alternative policy values, not two records to publish together. Replace the reporting address and retain any existing tags that your domain requires.
A reject policy asks participating recipients to reject messages that fail DMARC. Receiving systems retain local discretion, and DMARC does not prevent impersonation through unrelated lookalike domains.
Ready for enforcement
Proceed when Forcepoint's signing rule is enabled, fresh messages pass DMARC, and report review accounts for every legitimate source. Suped keeps the source evidence and issue workflow available while the policy changes.
Keep both Forcepoint DKIM CNAMEs after reaching p=reject. Their continued availability supports key rotation without interrupting authentication.
After each policy change, run a fresh DNS check and send a new production-path test. If a legitimate route fails, repair that route and confirm recovery in subsequent reports.
Frequency asked questions
Use include:mailcontrol.com for mail delivered through its shared cloud outbound relays. Merge it into the existing SPF record at the actual envelope sender domain. For an on-premises appliance delivering directly, authorize its public outbound IP instead.
Cloud DKIM rules start with State OFF. After the CNAME check passes, set State to ON and click Save under the policy's Antispoofing tab. Also confirm the sending domain is covered and no granular exception excludes the message.
Yes. A valid DKIM signature with a signing domain aligned to the visible From domain is sufficient for DMARC, even if SPF fails or lacks alignment. An SPF pass using an unrelated Return-Path domain is not sufficient by itself.
Hostnames under mailcontrol.com are associated with Forcepoint Email Security Cloud, historically branded Websense. Forcepoint documents cluster-f.mailcontrol.com and relay names under srv.mailcontrol.com in its mail headers. A matching rDNS suffix identifies infrastructure, not an authorized customer or sender. Check the connecting IP and authentication results before trusting the traffic.
No. Forcepoint's inbound checks evaluate received mail. Your sending domain's DMARC policy is a separate DNS record at _dmarc. Publish it, configure outbound authentication and reporting, and test a delivered message.
Keep an existing p=quarantine or p=reject policy. Configure Forcepoint's outbound SPF authorization and DKIM signing, then confirm DMARC passes. The p=none starting record is for domains without an existing enforcement policy.




