
How to set up DMARC/DKIM/SPF for Elastic Email

Published 21 Nov 2026
Updated 21 Nov 2026
11 min read
Summarize with
To authenticate Elastic Email, verify your sending domain, add include:_spf.elasticemail.com to its SPF record, publish the DKIM key shown in your account, and add a DMARC TXT record. Configure a custom bounce domain if you want SPF to match your From domain for DMARC.
I start new DMARC deployments with p=none and reporting, then tighten the policy after checking real mail. Keep an existing quarantine or reject policy. These steps apply to Elastic Email Marketing and Email API outbound sending.
Add your domain
Use a domain you own and have DNS access to. Elastic Email documents the workflow in its domain verification guide.
- Open Domains. In Elastic Email, go to Settings > Domains > Manage Domains and click "Start Verification".
- Choose domain verification. Select the domain option, enter your sending domain, such as example.com, and click "Continue".
- Collect DNS values. Keep the DNS records step open. Publish the SPF and DKIM records described below at your authoritative DNS host.
- Finish verification. Click "Verify record" after publishing the records. Once verified, set the domain as your default sender if it is your primary sending domain.
Verify the actual domain used in your From addresses. For mail.example.com, publish records for that subdomain rather than assuming records at example.com cover it.
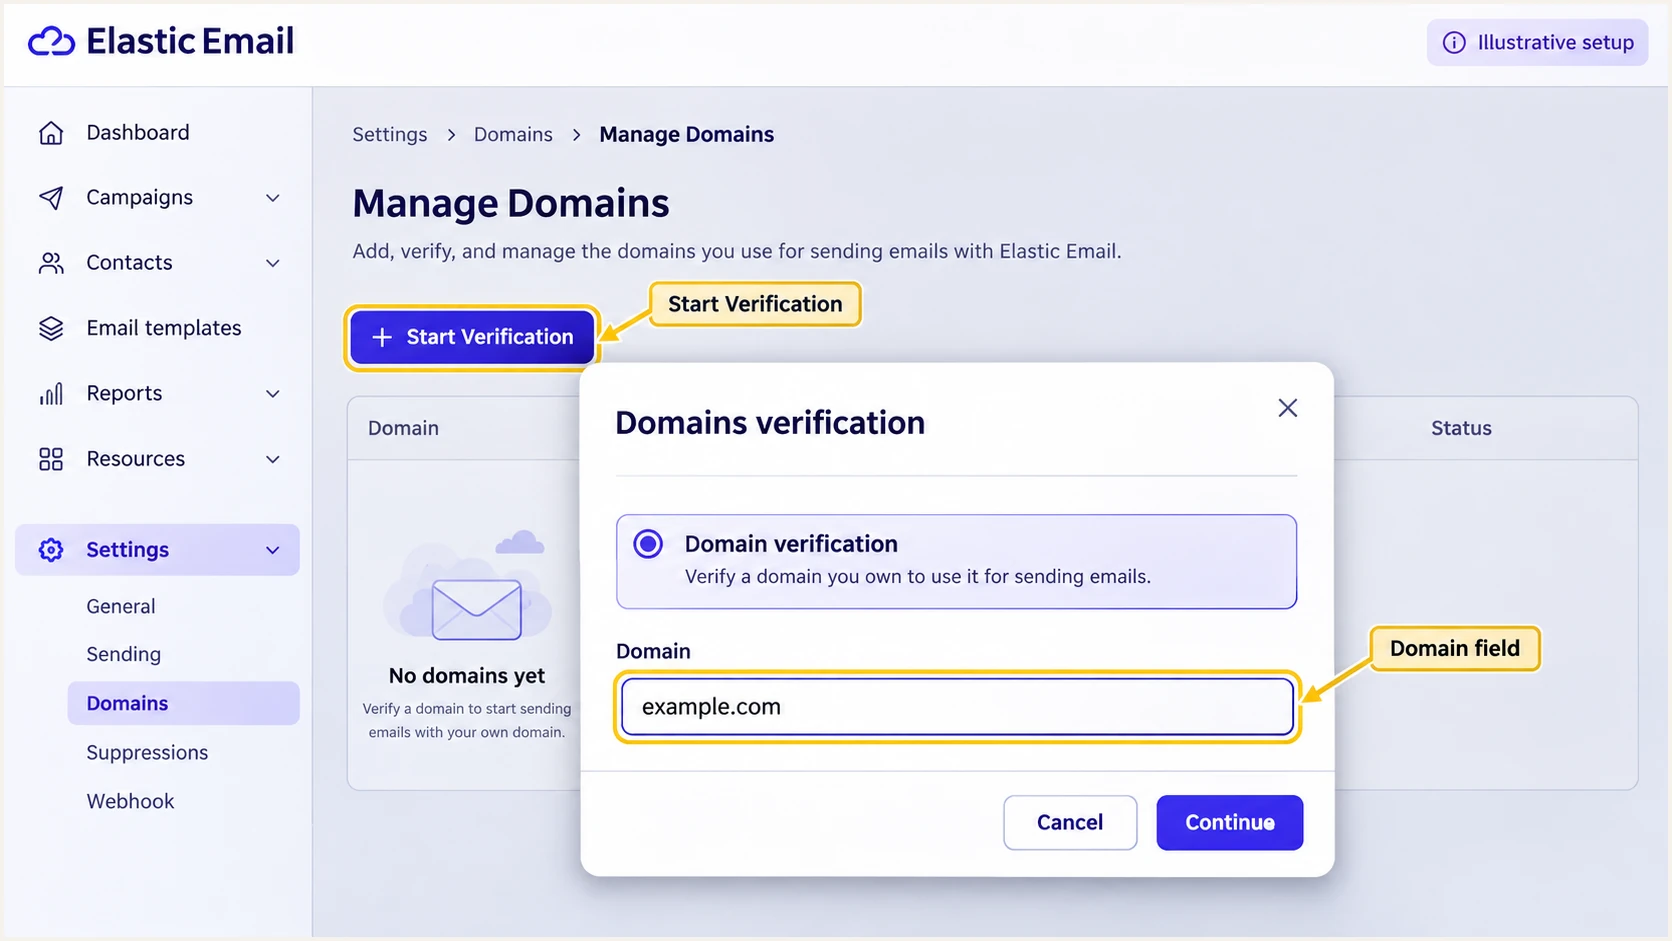
Illustrated Elastic Email domain verification with example.com entered.
The blue star beside a verified domain identifies the default sender. Still send application messages and campaigns using addresses on the domain you verified.
I leave existing MX records in place for ordinary outbound sending. Changing MX records changes where incoming mail is delivered; it is unnecessary for this authentication setup.
Set up SPF
Elastic Email documents include:_spf.elasticemail.com as its SPF authorization. Add it to the TXT record at your sending domain, before the final all mechanism.
- Inspect existing SPF. Find TXT records beginning with v=spf1. Keep exactly one SPF record at each DNS name.
- Merge authorization. Add include:_spf.elasticemail.com to the existing record. Preserve other legitimate senders and the existing final ~all or -all.
- Check DNS lookups. Stay within SPF's 10 lookup-causing-term limit, including nested includes. Ten visible includes is not a safe lookup budget.
New SPF record when Elastic Email is the only authorized sendertext
Type: TXT
Name: @
Value: v=spf1 include:_spf.elasticemail.com ~all
Use that example only when no SPF record exists and Elastic Email is your only sender. Elastic Email's longer example also includes a and mx; add those mechanisms only when those hosts actually send your mail.
Check the published sending-domain record below. After configuring a custom bounce domain, check that hostname too, because SPF evaluates the envelope sender, not the visible From address.
SPF checker
Find SPF syntax issues, lookup limits, and weak records.
?/16tests passed
A valid SPF record at example.com does not make the default bounces.elasticemail.net Return-Path match example.com. DKIM using your domain still lets DMARC pass, but SPF domain matching needs the custom bounce setting.
Elastic Email's Custom Bounce Domain documentation specifies a CNAME for a dedicated subdomain. Use a bounce subdomain under the same domain as your From address.
- Open bounce settings. Go to Settings > Domains > Manage Domains, open the domain's three-dot menu, and choose "View details".
- Choose Custom. In the bounce-domain settings, select the custom option, enter bounces.example.com, and click "Continue".
- Publish and verify. Add the CNAME below, keep it DNS-only if your DNS host offers proxying, then click "Verify Record" in Elastic Email.
Custom bounce-domain CNAMEtext
Type: CNAME
Name: bounces.example.com
Target: bounces.elasticemail.net
Keep this hostname dedicated to the CNAME. Do not publish an SPF TXT record at the same name as a CNAME. Use the record Elastic Email displays if its instructions differ for your account.
With the default relaxed SPF matching, bounces.example.com matches a From domain of example.com. An existing aspf=s setting requires an exact domain match, so this subdomain does not satisfy it.
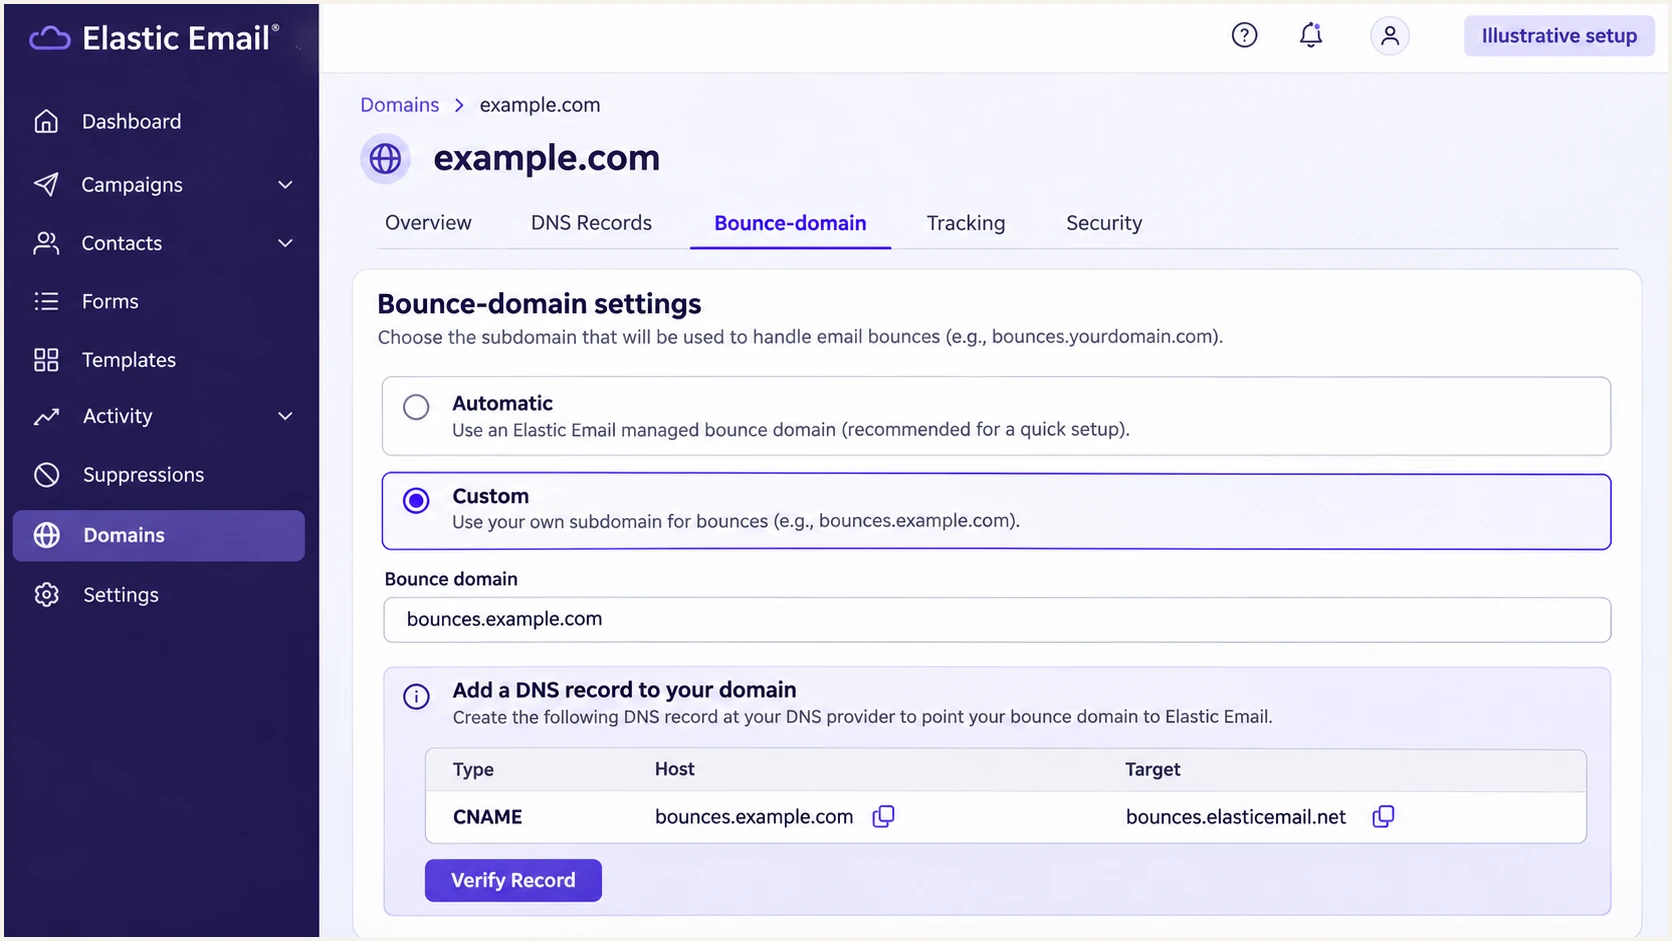
Illustrated Elastic Email custom bounce-domain CNAME setup.
After verification, send a fresh message and confirm its Return-Path uses bounces.example.com. Sharing that bounce domain with an unrelated From domain does not give that domain an SPF match.
Set up DKIM
Elastic Email generates the signing keys. I copy the current public DNS value from the account instead of reusing a key published in an older setup tutorial.
- Open the DKIM record. Under Settings > Domains > Manage Domains, open your domain's details and expand DKIM, or use the DNS records step in the verification wizard.
- Copy both fields. Use the Copy buttons for Name and Value. The selector is the part before ._domainkey; use the name assigned to your account.
- Publish TXT. Create the TXT record at your DNS host. Avoid duplicating the domain suffix when the DNS editor appends it automatically.
- Verify the record. Save the full public key, return to Elastic Email, and run verification. Keep DKIM selectors belonging to your other senders.
A record such as api._domainkey.example.com uses the api selector. Treat that as a naming example, not a substitute for the Name field shown in your account.
Long DKIM values are normal. DNS software splits long TXT values into character strings when necessary; the resulting record must contain the complete public key.
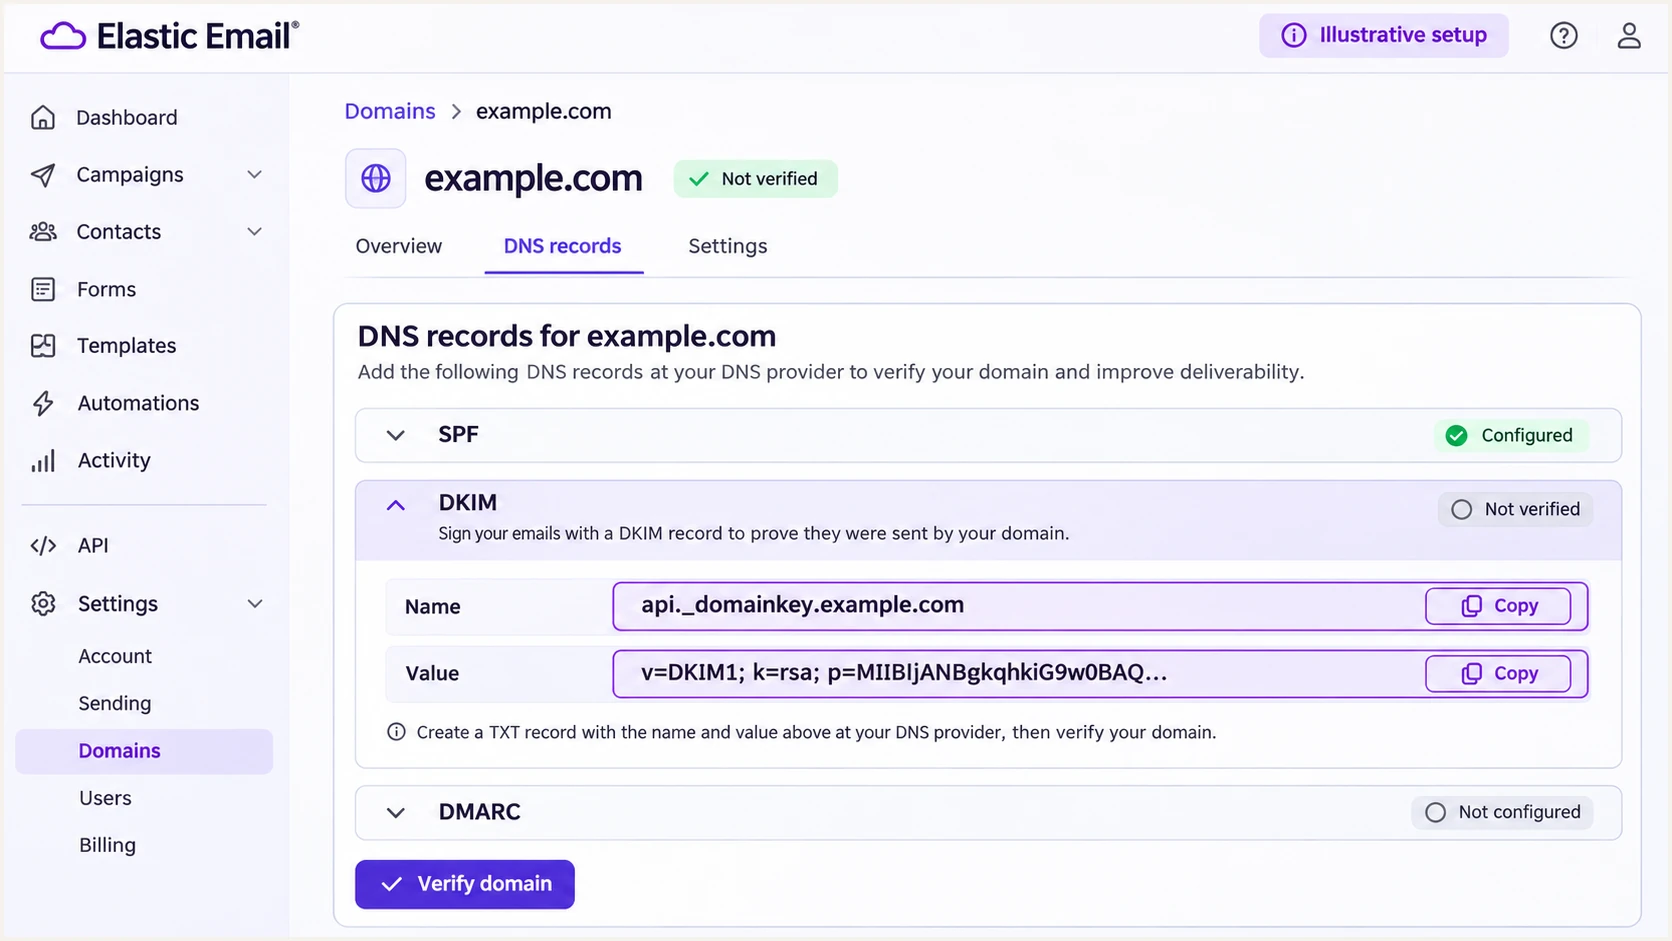
Illustrated Elastic Email DKIM fields and Copy buttons; use your account values.
If Elastic Email reports "Valid DKIM not found", compare DNS with the current account value. Check for an old key, a truncated value, or a domain suffix entered twice before retrying verification.
Set up DMARC
DMARC is a DNS policy for your From domain and affects every service sending as that domain. Elastic Email does not need a separate DMARC activation switch.
- Inspect the policy. Look up TXT at _dmarc.example.com before editing DNS. Update the existing DMARC record rather than adding a second one.
- Start monitoring. For a new policy, publish the p=none example below. If p=quarantine or p=reject already exists, retain it while fixing Elastic Email.
- Set reporting. Replace dmarc@example.com with a working report mailbox or your assigned aggregate-report address. Preserve existing reporting destinations when editing a policy.
Initial DMARC policy for a domain without an existing policytext
Type: TXT
Name: _dmarc
Value: v=DMARC1; p=none; rua=mailto:dmarc@example.com
Use the DMARC record generator to build the record with your reporting address. The example address is a placeholder, not an Elastic Email reporting endpoint.
For a From domain of mail.example.com, the explicit record goes at _dmarc.mail.example.com. Check inherited policy too if no record exists there. Use the lookup below to confirm the effective setup.
DMARC checker
Look up a domain's DMARC record and catch policy issues.
?/7tests passed
A published DMARC record confirms policy syntax and discovery. A received message is still required to check whether Elastic Email authenticates using the correct domain.
Keep the default relaxed matching unless your domain has a tested reason for strict matching. Changing matching modes during onboarding adds another variable to troubleshoot.
What makes DMARC pass
DMARC passes when either SPF passes with the required From-domain match, or a valid DKIM signature has the required signing-domain match. Passing both is useful, but DMARC requires only one matching authentication path.
p=none requests monitoring without DMARC enforcement. It does not request rejection of messages that fail DMARC.
Verify and troubleshoot
I test the same application or campaign path that will send production mail. A green DNS check does not prove that a live message uses the verified domain.
- Send real mail. Use your actual Elastic Email API or SMTP integration, or send a campaign test using the intended From address.
- Inspect received headers. Check the recipient server's Authentication-Results. Confirm dkim=pass for your domain, spf=pass for the Return-Path domain, and dmarc=pass for the From domain.
- Check the signing domain. Inspect d= in DKIM-Signature. A passing signature for elasticemail.com alone does not authenticate a From address at example.com for DMARC.
- Keep diagnostic evidence. Save the complete received headers and X-Msg-EID when asking Elastic Email support to investigate a specific message.
|
|
|
|---|---|---|
SPF error | Duplicates; lookups | Merge; simplify |
DKIM failure | Current key; name | Recopy; verify |
SPF mismatch | Return-Path | Custom bounce |
DMARC failure | From-domain match | Fix signing domain |
Read the recipient results alongside the domain used.
The email tester below is the quickest way to check a real message. It provides a destination address for your test and a diagnosis of the received message, including authentication results.
Send to that address through Elastic Email using your normal integration. Forwarding an already-received email changes the delivery path and does not test the original setup cleanly.
Email tester
Send a real email to this address. Suped shows a results button when the test is ready.
?/43tests passed
Compare the tester's From domain with its DKIM signing domain and Return-Path. With the default bounce domain, an SPF mismatch is expected; a passing DKIM signature for your domain still makes DMARC pass.
DNS updates often appear within minutes, but cached records take time to expire. Elastic Email allows up to 48 hours for propagation. Compare the saved DNS values before repeatedly replacing records.
Keep tracking separate from authentication
If you use branded click tracking, Elastic Email documents a CNAME at tracking.example.com pointing to api.elasticemail.com. Use DNS-only mode where your DNS host offers proxying.
That CNAME brands links. It does not replace the custom bounce-domain CNAME or the DKIM TXT record.
Get alerted when it breaks
Suped is our DMARC monitoring platform for detecting authentication issues after Elastic Email setup. It combines source-level reports with issue explanations and steps to fix them.
- Enable issue notifications. In Suped's notification settings, enable "Issues detected" and "Sending sources need verification". Use DMARC summary emails for regular review.
- Review unexpected sources. Confirm that Elastic Email traffic belongs to your organization before verifying the source. A recognized provider name alone does not authorize its messages.
- Investigate changes. Use record details to inspect SPF and DKIM results. Compare DNS history when failures begin after a DNS edit.
- Verify the repair. Apply the fix in Elastic Email or DNS, send another test, and confirm subsequent reports show the expected authentication results.
I keep delivery-event notifications alongside DMARC monitoring. Aggregate reports arrive on reporting providers' schedules, commonly daily; authentication alerts based on those reports cannot provide instant visibility into every message.
Elastic Email PRO accounts also have delivery webhooks under Settings > Notifications. Subscribe to "Bounce / Error" for application delivery failures and inspect notification delivery in Activity > Logs > Notification Log.
Elastic Email delivery events
Use Bounce / Error webhooks to react to individual delivery failures. SPFProblem and DNSProblem categories help route investigation.
Suped authentication reports
Use source results and issue notifications to detect domain authentication failures, then track whether the correction appears in later reports.
Secure your domain with p=reject
I move to p=reject when every legitimate sending workflow has a working DMARC authentication path. A successful Elastic Email test alone does not establish that the rest of the domain is ready.
- Audit all senders. In Suped, review sources across a full sending cycle, including infrequent billing mail. Verify owners and investigate unknown traffic instead of authorizing it automatically.
- Repair legitimate failures. Confirm Elastic Email's custom DKIM works. Check the custom bounce domain if relying on SPF, and test forwarding paths that matter to your recipients.
- Stage enforcement. Move a new monitoring policy to p=quarantine, review fresh reports and delivery failures, then set p=reject after legitimate failures are resolved.
- Maintain reporting. Preserve your actual rua destination and existing tested tags. Check subdomain policy before rollout, and keep monitoring after enforcement.
Suped's Hosted DMARC keeps policy management and report review in the same workflow. Use the source results to decide when to advance the policy, then manage policy changes through the dashboard once Hosted DMARC is configured.
Reject is a request for receivers to reject mail that fails DMARC, subject to their local policies. It does not block lookalike domains or guarantee inbox placement.
Reject policy after all legitimate senders are verifiedtext
Type: TXT
Name: _dmarc
Value: v=DMARC1; p=reject; rua=mailto:dmarc@example.com
Use your real reporting destination in place of the example address. After each policy change, rerun the Elastic Email message test and inspect the next reporting cycle for legitimate failures.
Frequency asked questions
Elastic Email documents include:_spf.elasticemail.com for authorizing its outbound servers. Add it to your existing SPF record before the final all mechanism. Do not copy other provider-related includes discovered in reports unless the provider documents them for your setup.
Elastic Email has used outbound hostnames under mxout.mta2.net, including pr58.mxout.mta2.net. Treat the suffix as a source-identification clue. Confirm the sending IP and the received message headers; rDNS alone does not prove the message is authorized to use your domain.
Yes. The default bounces.elasticemail.net Return-Path does not match your own From domain, but a valid DKIM signature using your domain satisfies DMARC. Configure a custom bounce domain when you also want SPF to satisfy the domain-match requirement.
The published DKIM record does not match the current account value. Recopy Name and Value from the DKIM section, check that the DNS editor did not duplicate the domain suffix or truncate the public key, allow caches to expire, and verify again.
Keep the existing reject policy while configuring Elastic Email. Publish and verify its DKIM record, confirm live messages pass DMARC, and fix the specific sending path. Changing the whole domain to monitoring removes the existing enforcement request.
No. Ordinary outbound Email Marketing or Email API sending does not require replacing MX records. Keep the records used by your current inbound mail service. Elastic Email Inbox and inbound email notifications are separate receiving workflows.




