
How to set up DMARC/DKIM/SPF for DreamHost

Published 22 Nov 2026
Updated 22 Nov 2026
12 min read
Summarize with

To authenticate DreamHost email, keep its automatic SPF record, publish its DKIM TXT record at dreamhost._domainkey, and add a DMARC TXT record at _dmarc. For website messages, I use authenticated SMTP through smtp.dreamhost.com on port 587 with STARTTLS so DreamHost signs the messages. Start a new DMARC policy with p=none; keep p=quarantine or p=reject if either is already active.
These steps apply when DreamHost actually sends your email. A website hosted at DreamHost can send through a different mail provider, which requires that provider's authentication records. I check the sending route before changing DNS.
Add your domain
I first confirm that the domain and sending mailbox exist in DreamHost. Website registration alone does not establish that outgoing messages use DreamHost email.
- Add the domain. Open Manage Websites, click Add Website +, choose Enter domain name, and enter your registered domain. Complete the website configuration you need, or choose Reroute or manage DNS for DNS management. Skip this step if the domain is already listed.
- Create the sender. With an active email plan, open Manage Email > Create Email. Select the domain, enter the mailbox name, choose Fully Hosted Email, and click Continue. Set the mailbox name and password, then click Create Email.
- Find the records. In Manage Websites, open the domain's three-dot menu > DNS Settings. Identify the mail records DreamHost supplies for your domain.
- Verify the setup. Check the public NS and MX records, then sign in to the new mailbox and send a message. If DNS is hosted elsewhere, publish the supplied records at that authoritative DNS provider.
Check DNS authority and inbound mail routingbash
dig +short NS example.com
dig +short MX example.com
MX records control incoming mail. Keep your existing MX records when you only want to authenticate an existing sending service. Changing nameservers or MX records is a separate mail migration decision.
The domain should appear in Manage Websites and in the mailbox domain selector. Verify the published DNS separately: records visible only inside an inactive DreamHost DNS zone have no effect on receivers.
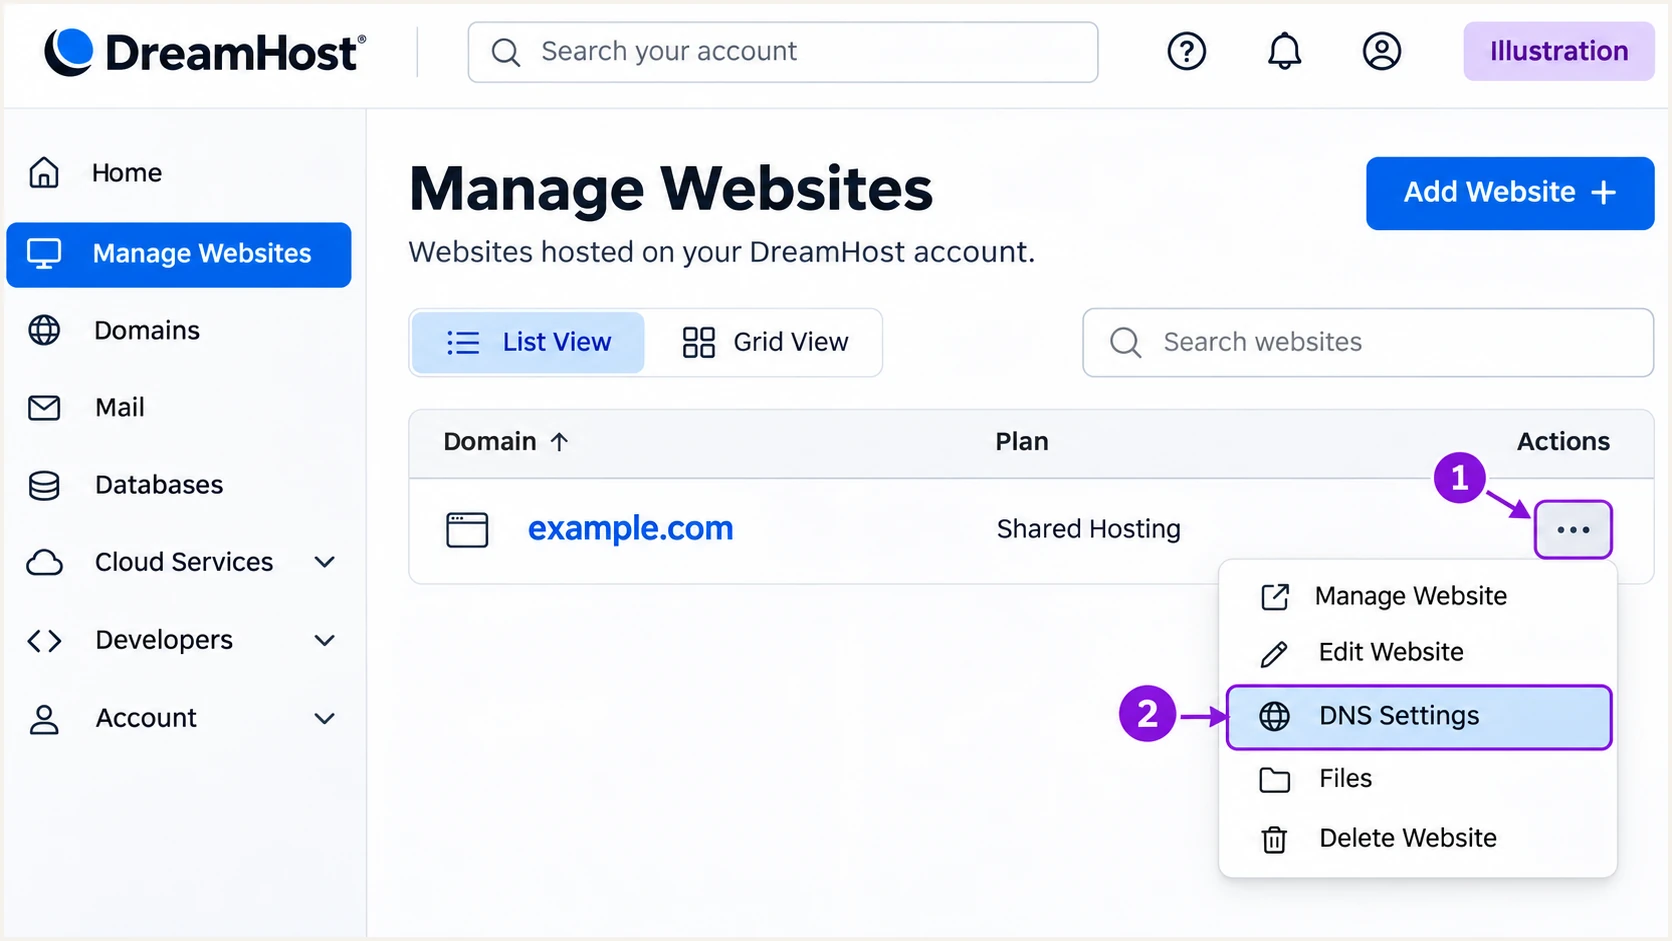
Illustrated DreamHost domain menu showing where to open DNS Settings.
Set up SPF
DreamHost documents the following default SPF record for its hosted email. I keep it when DreamHost is the only sender, and merge other authorized senders into the same record when needed.
- Inspect the root TXT. Open DNS Settings and locate the value starting with v=spf1. Keep exactly one SPF record at each sending hostname.
- Keep or customize. Leave a correct automatic record alone. To create a custom record, choose Add Record > TXT Record > ADD and leave Host blank for the root. DreamHost replaces its default SPF record when you add a custom one.
- Preserve every sender. Enter the combined value in TXT Value and save with Add Record. For an existing custom record, use its pencil icon and Save. Retain the DreamHost mechanisms if DreamHost still sends mail.
- Check the lookup limit. Validate recursive SPF evaluation, including nested includes. The limit is 10 DNS-querying terms per evaluation, not 10 visible includes in your record.
DreamHost default SPF TXT valuetext
v=spf1 mx include:netblocks.dreamhost.com include:relay.mailchannels.net -all
SPF checks the envelope sender, normally shown in the delivered Return-Path. For SPF to satisfy DMARC, that domain must also meet the visible From domain's alignment rule. Publishing DreamHost includes does not change the envelope sender.
Configure your application's envelope sender as a mailbox on your sending domain, then verify what DreamHost actually delivers. If it uses a subdomain, check SPF at that exact hostname because SPF is not inherited. Enter the envelope sender domain in the checker below.
SPF checker
Find SPF syntax issues, lookup limits, and weak records.
?/16tests passed
A valid SPF record confirms DNS syntax and authorization structure. It does not prove that a specific message passes SPF or meets DMARC alignment. I confirm both with a delivered message after DNS caches expire.
DreamHost advises allowing up to six hours for its DNS changes. If you use external DNS, follow that provider's TTL and propagation behavior instead.
Set up DKIM
DreamHost automatically creates and manages DKIM for domains using its hosted email, with 2048-bit keys. I verify the published key and the sending route rather than generating a replacement key.
- Locate the selector. In DNS Settings, find the TXT record named dreamhost._domainkey. Copy the complete public value supplied for your domain.
- Publish at active DNS. DreamHost manages the record when it hosts your DNS. For external DNS, add the identical TXT value there using the correct relative name or full hostname for that provider.
- Use authenticated SMTP. Configure website forms and applications with the settings below. Website mail sent without SMTP does not receive DreamHost's DKIM signature.
- Verify the signature. Send a message and check for a passing DKIM result with the expected signing domain. Preserve the full public key without inserting spaces inside it.
Application settings for DreamHost SMTPtext
SMTP host: smtp.dreamhost.com
Port: 587
Encryption: STARTTLS
SMTP authentication: enabled
Username: sender@example.com
Password: your mailbox password
From: sender@example.com
Envelope sender: sender@example.com
For contact forms, put the visitor's address in Reply-To and keep your own mailbox in From. If your application has a Return Path option, use it to set the envelope sender to your From mailbox, then inspect the received result.
The public DNS key and the message signature have different jobs. A published key cannot sign mail. The delivered message must contain a valid DKIM-Signature, and its d= domain must meet your From domain's DMARC alignment rule.
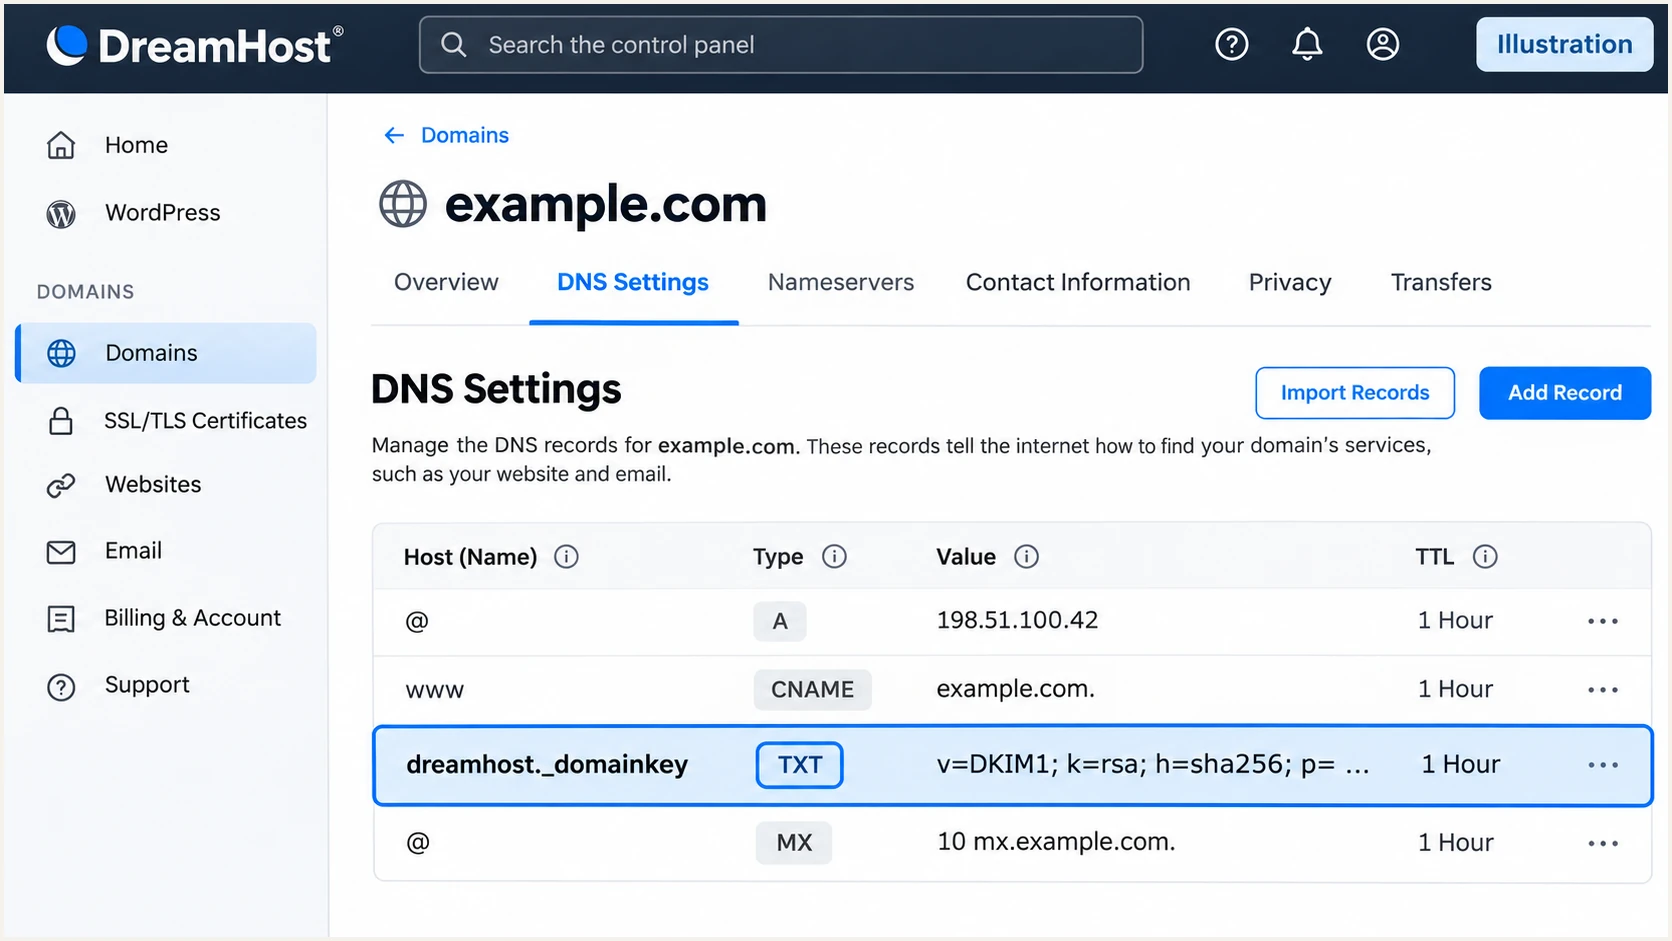
Illustrated DreamHost DNS Settings highlighting the DKIM TXT record.
Set up DMARC
I start a domain without an enforcement policy at p=none to collect reports. If p=quarantine or p=reject is already published, keep that policy and fix DreamHost authentication without weakening it. Use our DMARC record generator to build a record for your actual reporting address.
- Inspect the existing policy. Look up TXT at _dmarc.example.com. Edit an existing DMARC record instead of adding a second one at that hostname.
- Open the TXT form. In DreamHost, go to Manage Websites > Manage > DNS > Add Record > TXT Record > ADD.
- Set the record. Enter _dmarc in Host. For a new monitoring policy, paste the exact example below into TXT Value, replacing the example reporting address with an address you control.
- Save and recheck. Click Add Record, or save the existing record after editing. If DreamHost is not authoritative for DNS, make this change at your active DNS provider instead.
Initial DMARC TXT value at _dmarc.example.comtext
v=DMARC1; p=none; rua=mailto:dmarc@example.com
Create a working reporting mailbox before using its address. The example address is a placeholder. Aggregate reports contain XML and need ongoing review; publishing rua alone does not interpret them or fix sending problems.
Keep relaxed SPF and DKIM alignment unless you have a reason to require exact domain matches. The example leaves both at their defaults. Run the checker against the visible From domain and confirm the discovered policy and reporting destination.
DMARC checker
Look up a domain's DMARC record and catch policy issues.
?/7tests passed
A successful lookup confirms that receivers can discover the record. It does not certify the authentication of your website messages. I test those separately through the same application route used for production mail.
At p=none, the domain requests no DMARC enforcement for failing mail. Receivers still apply their own filtering. If reports go to another domain, confirm that the report destination provides the required external reporting authorization.
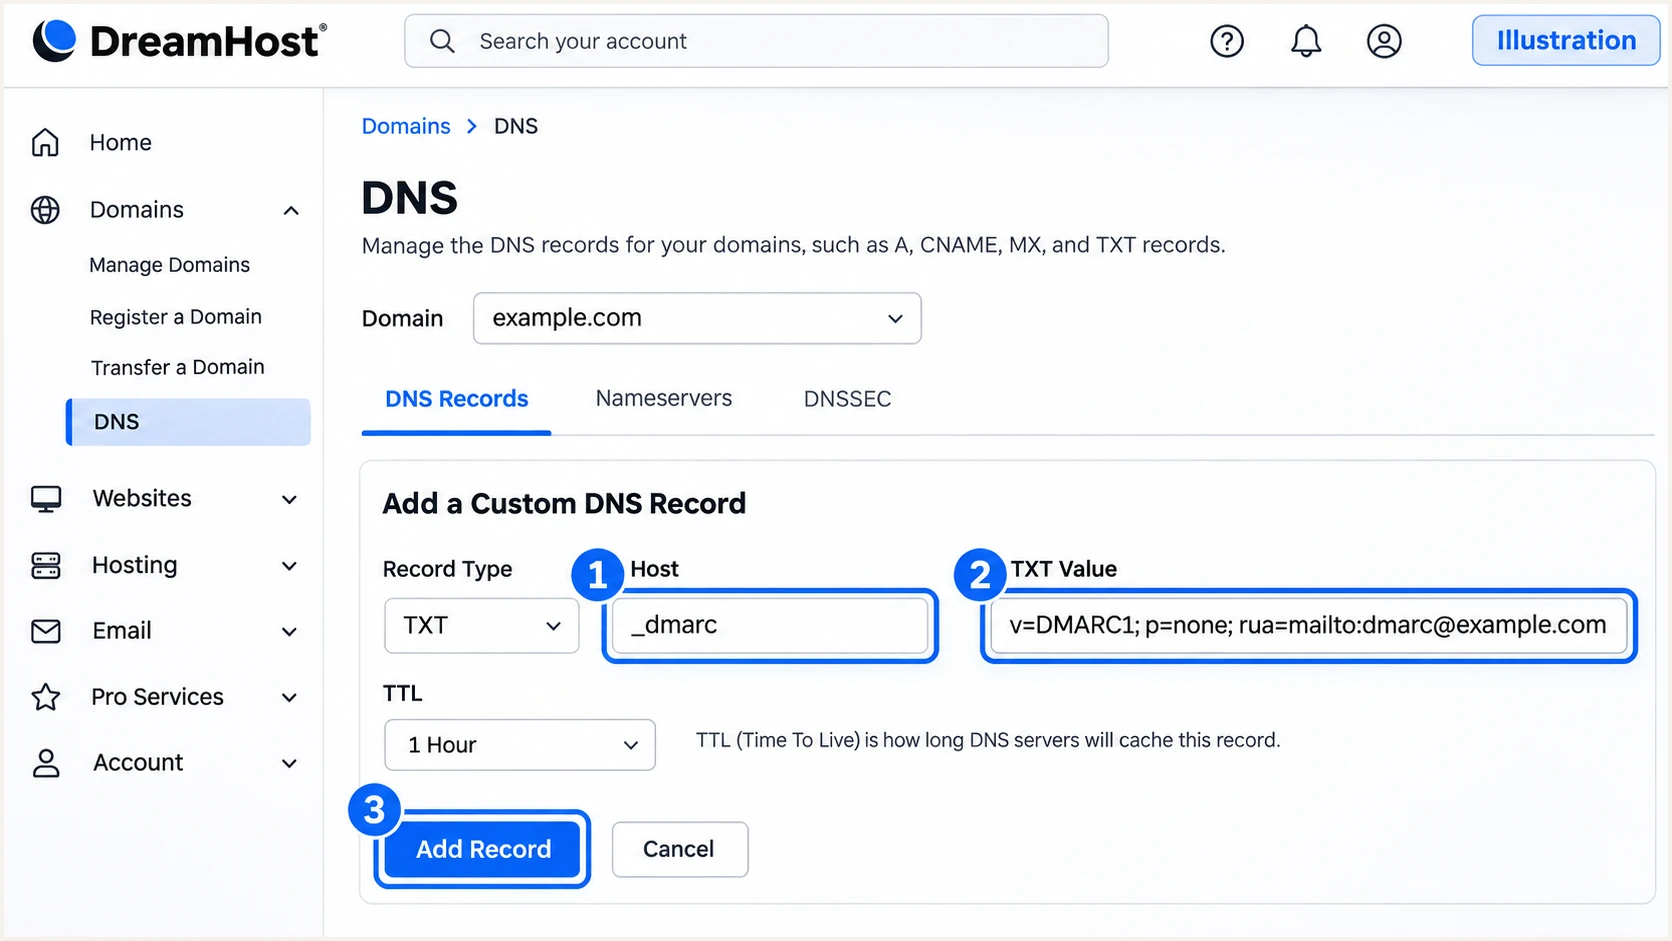
Illustrated DreamHost TXT form with the initial DMARC monitoring record.
Verify and troubleshoot
I verify DNS first, then test each sending route. A mailbox message and a website password reset can use different servers even when both display the same From address.
- Query public DNS. Run the commands below using your domain. Confirm one SPF record, the current DreamHost DKIM public key, and one DMARC record at the policy hostname.
- Test real traffic. Send a mailbox message and trigger a website message, such as a contact-form notification or password reset. Test every distinct application separately.
- Read receiver results. Inspect Authentication-Results added by the receiving mail system. Look for spf=pass, dkim=pass, and dmarc=pass, then check the domains used for those results.
- Check domain matching. Compare smtp.mailfrom with the visible From domain for SPF alignment, and header.d with it for DKIM alignment. DMARC passes when at least one passing mechanism meets the applicable alignment rule.
Public authentication DNS checksbash
dig +short TXT example.com
dig +short TXT dreamhost._domainkey.example.com
dig +short TXT _dmarc.example.com
The email tester is the quickest end-to-end check: it provides a destination address for a test message and returns an authentication diagnosis. Send to that address through your website or application, not only through your mailbox.
Use the same From address and SMTP configuration that production uses. This tests the actual envelope sender and DKIM signature, which a DNS lookup cannot establish. Repeat the test after any correction.
Email tester
Send a real email to this address. Suped shows a results button when the test is ready.
?/43tests passed
A passing message with your own domain in both authenticated identifiers should resemble the example below. The receiving system's header formatting varies; these are illustrative results, not a captured DreamHost message.
If SPF fails during forwarding but DKIM survives with the required domain match, DMARC still passes. If SPF passes for an unrelated envelope domain, it cannot satisfy DMARC for your From address.
Illustrative passing message headerstext
Authentication-Results: mx.receiver.example;
  spf=pass smtp.mailfrom=example.com;
  dkim=pass header.d=example.com header.s=dreamhost;
  dmarc=pass header.from=example.com
Return-Path: <sender@example.com>
I use the failure type to choose the next change. Avoid adding SPF includes just because a sender appears in a report; first establish that the sender is authorized.
|
|
|
|---|---|---|
SPF permerror | Duplicate or oversized SPF | Merge; check lookups |
No DKIM signature | Website bypasses SMTP | Use authenticated SMTP |
DKIM key missing | Wrong DNS zone | Publish at active DNS |
DKIM verification fails | Wrong or damaged key | Copy current public key |
SPF pass, DMARC fail | Wrong envelope domain | Check DKIM and Return-Path |
No aggregate reports | Report routing or timing | Check rua and mailbox |
Choose the correction using the received message and public DNS.
Get alerted when it breaks
Suped is our DMARC reporting and email authentication platform. Our DMARC monitoring connects DreamHost sending activity with authentication issues, so the team can act on a changed source or failing signature instead of repeatedly checking DNS by hand.
- Receive aggregate data. Keep a working rua destination that delivers reports to Suped. Confirm recent reports include your DreamHost traffic before depending on report-based notifications.
- Enable issue notifications. Turn on Issues detected and Sending sources need verification notifications. Enable DMARC summary emails for periodic review of overall authentication health.
- Investigate the source. Open the affected DreamHost source and its record details. Inspect SPF and DKIM results alongside the From domain. Verify a source only after confirming it belongs to an approved sending workflow.
- Resolve and verify. Follow the detected issue's steps to fix, compare DNS history if records changed, correct the record or SMTP configuration, and confirm recovery in new test messages and subsequent reports.
I keep a fresh message test alongside report monitoring. The test confirms the current sending configuration; reports show whether the broader volume of observed DreamHost traffic continues to authenticate.
Suped's issue detection and notifications make ongoing review practical after a DNS edit or application change. They also give the person fixing the problem the relevant authentication details and a way to verify the correction.
Report-based alerts depend on report arrival
Aggregate reports commonly arrive daily. A new failure becomes visible after a receiver sends its report and the data is processed. Use a fresh message test when you need to validate a change immediately.
Secure your domain with p=reject
I move to p=reject after every authorized sending workflow has been identified and tested. Suped's verified source inventory and detailed authentication results provide the evidence for that decision, including low-volume senders that a single test misses.
- Cover a full sending cycle. Review enough reports to include routine mail and infrequent jobs, such as billing runs. Use at least one complete business sending cycle; wait longer when important workflows run less often.
- Fix legitimate failures. Resolve DreamHost SMTP bypasses and missing DKIM keys. Confirm passing DKIM with the required domain match for every authorized route before relying on rejection.
- Stage enforcement. For a domain currently at p=none, change the existing record to p=quarantine, review legitimate delivery and report data, then change it to p=reject. Keep an existing stronger policy in place.
- Review subdomains. Check sending subdomains and any explicit DMARC records they publish. Review the parent's sp value before enforcement; without a separate applicable policy, the parent policy can govern subdomain mail.
- Keep monitoring. Retain the reporting destination and Suped notifications after enforcement. Investigate new legitimate failures before changing the policy or authorizing another sender.
Final policy example after legitimate senders are verifiedtext
v=DMARC1; p=reject; rua=mailto:dmarc@example.com
Keep your real reporting address and other intentional tags when changing p. The example uses a placeholder. A high overall pass rate is insufficient if a small but important authorized source still fails.
Our Hosted DMARC lets teams manage policy stages in Suped after the initial DNS setup. This keeps policy decisions next to the source reports and detected issues used to assess readiness.
Edit the policy in DreamHost
Update the existing _dmarc TXT record at the active DNS provider for each policy change. Check public DNS after saving and review Suped reports for legitimate failures.
Manage policy with Suped
With Hosted DMARC configured, manage the policy in our dashboard without editing DNS for each stage. Use verified sources and issue details to decide when to advance enforcement.
At p=reject, receivers are asked to reject mail that fails DMARC, subject to their local handling. This protects the authenticated domain against unauthorized use; it does not guarantee inbox placement or prevent impersonation through a different domain.
After each enforcement change, trigger the important DreamHost website workflows again and check delivered results. Keep reviewing incoming reports for new sources and changes in authentication.
Frequency asked questions
A dreamhost.com rDNS suffix suggests DreamHost infrastructure. It does not identify the customer or prove that the sender is authorized for your domain. Check the sending IP's current PTR record and the receiver's connection details alongside the authenticated domains before approving a source.
DreamHost includes both in its documented default SPF record. The relay.mailchannels.net include covers shared relay infrastructure, so that include alone is not unique to DreamHost. Publish the current DreamHost-documented value for your actual sending setup and preserve other authorized senders in the same SPF record.
No. Copy the DreamHost-supplied SPF and DKIM records to the provider that hosts your authoritative DNS, then add your DMARC record there. Records added only to DreamHost's inactive DNS zone are not published to receivers.
The website is often sending through a different route. Configure authenticated SMTP at smtp.dreamhost.com, port 587 with STARTTLS, using your DreamHost mailbox credentials. Keep From on your domain and test the actual website workflow again.
Yes. A valid DKIM signature whose signing domain meets the From domain's alignment rule is enough for a DMARC pass. Forwarding often breaks SPF. Investigate unexpected SPF failures in direct DreamHost traffic, and confirm DKIM passes before enforcing rejection.
Keep p=reject, or p=quarantine if that is your current policy. Configure and test DreamHost authentication before moving production traffic. Starting at p=none is for a domain without an existing enforcement policy.




