
How to set up DMARC/DKIM/SPF for Domeneshop


For Domeneshop's documented native email service, authorize sending with include:_spf.domeneshop.no, publish the DKIM record issued for your domain, and maintain one DMARC TXT record at _dmarc. I verify the result with a real message sent through each mailbox or website route. Keep an existing quarantine or reject policy while adding reporting.
Domeneshop's authentication guidance says configuration is automatic when all services are hosted there. External DNS needs manual records. I check the active mail service first: after a platform migration, use the authentication values issued for that service instead of assuming the older settings still apply.
Add your domain
Use the domain already attached to your Domeneshop email or web hosting service. There is no additional sender-domain verification step documented for the native service.
- Open the domain. Sign in to Domeneshop and select Mine domener, then your domain. If it is absent, use the account that administers it or finish provisioning the domain you ordered.
- Confirm the service. Check that email or web hosting is active. For mailbox sending in the new customer area, open Email Hosting, View details, then Manage Mailboxes and confirm the intended mailbox exists.
- Find authoritative DNS. Check the domain's NS records. Publish authentication records at that DNS provider, even when Domeneshop is the registrar or mail host.
- Identify sending routes. List mailbox mail separately from website forms and application messages. Test each route using an address on your domain.
In the new customer area, open Domains, Manage DNS, and the domain's edit icon. Use Add Record to create a record, or the existing row's edit icon to change it.
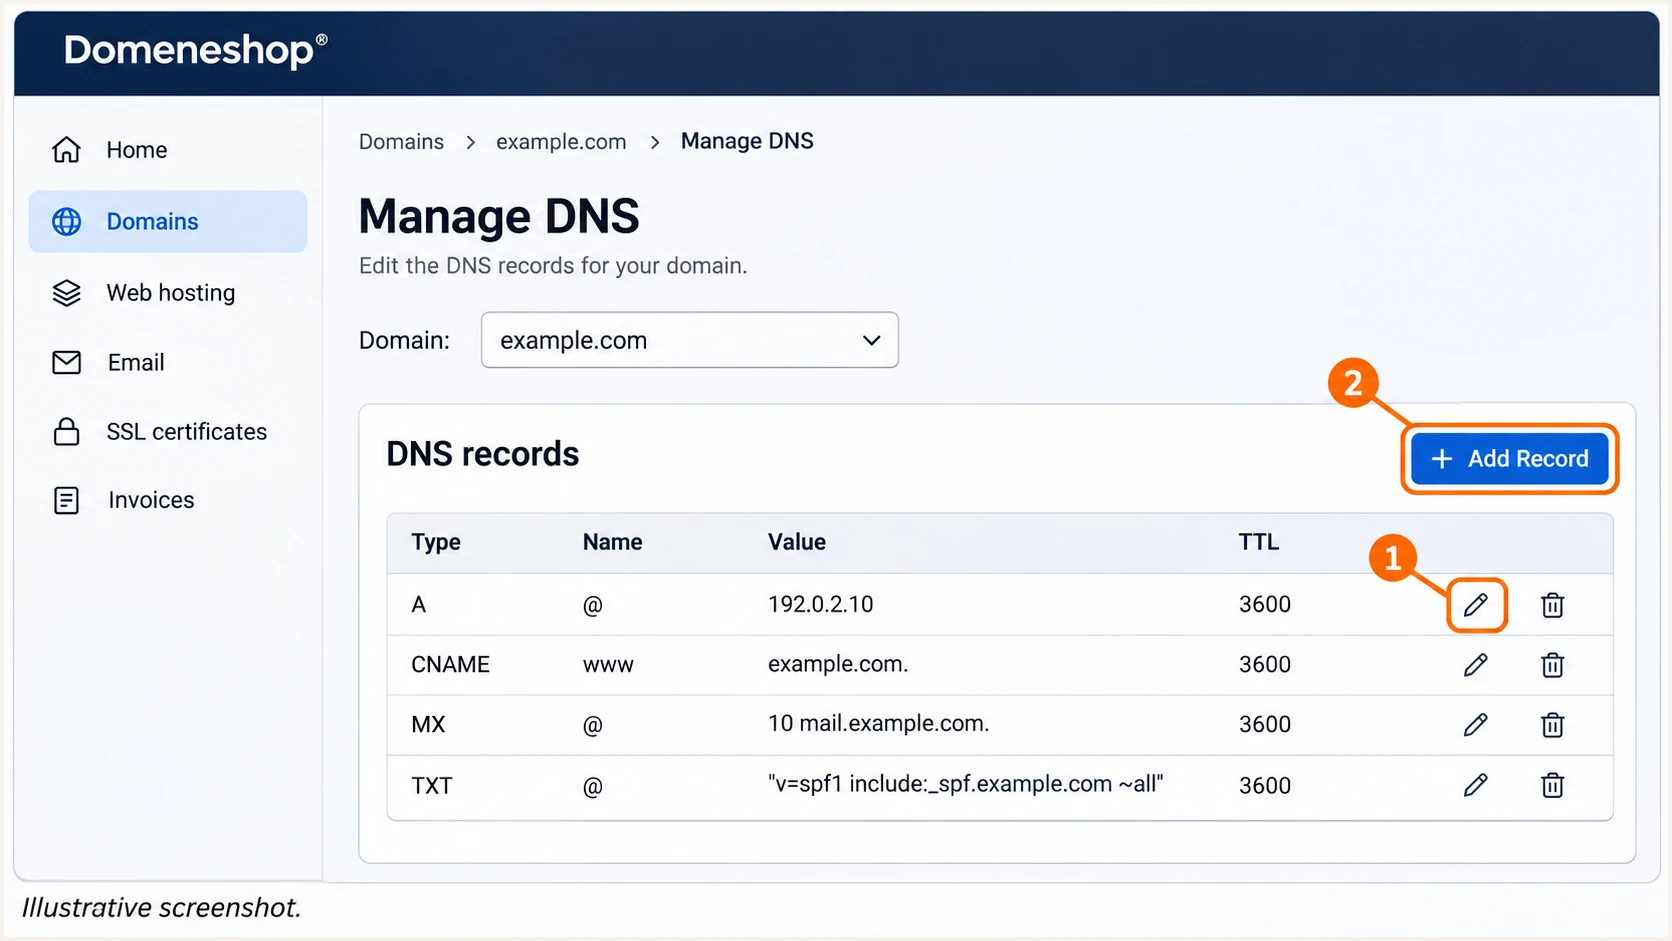
Illustrative Domeneshop DNS screen showing the domain editor and Add Record control.
Select TXT or CNAME as required, keep the default TTL unless your DNS administrator specifies another value, and click Confirm. Check the saved record's complete hostname.
The older interface uses Mine domener, your domain, DNS-pekere, then Vis avanserte innstillinger. New records are entered on the bottom row and added with the green plus button.
Set up SPF
Domeneshop's documented SPF authorization is include:_spf.domeneshop.no. Add it only for mail actually sent through that service. Domain registration alone is not a reason to authorize its servers.
- Inspect the policy. Look up TXT records for the domain used by SMTP MAIL FROM, visible as Return-Path after delivery. Keep exactly one record beginning v=spf1 at that name.
- Edit the root record. For example.com in the older DNS editor, leave Vertsnavn empty and select TXT. In the new editor, select the zone root and confirm the saved owner is example.com.
- Merge authorization. Insert include:_spf.domeneshop.no before the final all mechanism. Preserve authorized senders and the existing ~all or -all ending. Do not add a second SPF policy.
- Check website identity. Set the application's envelope sender to an address on your domain or a controlled subdomain. Publish SPF at that exact domain. Adding a Return-Path header manually does not change SMTP MAIL FROM.
SPF value when Domeneshop is the only sendertext
v=spf1 include:_spf.domeneshop.no ~all
For an existing multi-sender policy, merge the include into that policy. In the older Epost interface, Vis avanserte innstillinger and Redigere SPF also provide a sender-selection workflow.
Enter the envelope sender's domain below. Check that the policy authorizes the actual sending route and stays within SPF's limit of 10 DNS-querying terms, including nested includes.
SPF checker
Find SPF syntax issues, lookup limits, and weak records.
?/16tests passed
An SPF pass contributes to DMARC only when the authenticated envelope domain matches the visible From domain under the DMARC alignment mode. With the default relaxed mode, they must share the same organizational domain.
If another sending route uses a provider-owned Return-Path that you cannot customize, expect SPF alignment failure for that route. Adding its include to your root does not fix the mismatch. A passing DKIM signature using your domain is sufficient for DMARC.
Set up DKIM
Domeneshop documents automatic DKIM when its native email and DNS services are used together. I still check a delivered message, especially after moving DNS or changing website mail handling.
- Locate issued records. In the older customer area, open Mine domener, select the domain, then Epost or Administrere epost. Scroll below the email addresses and users to inspect authentication warnings.
- Copy exact values. For a DKIM warning, copy its hostname, record type and target. The selector and target are domain specific. If no warning appears but DKIM is absent, ask Domeneshop for the active service's signing configuration.
- Publish at active DNS. Create the supplied CNAME or TXT record at the authoritative provider. A CNAME target is a hostname. Do not paste a public key into a CNAME field or place TXT beside a CNAME at the same name.
- Verify the signer. Send a fresh message. Read d= and s= in DKIM-Signature, then check the receiver's DKIM result. The passing d= domain must match the From domain under your DMARC alignment mode.
Domeneshop's documentation illustrates selector ds2023 and a target such as ds2023.example.com.dkim.domeneshop.no. These explain the format; use the exact values issued for your own domain.
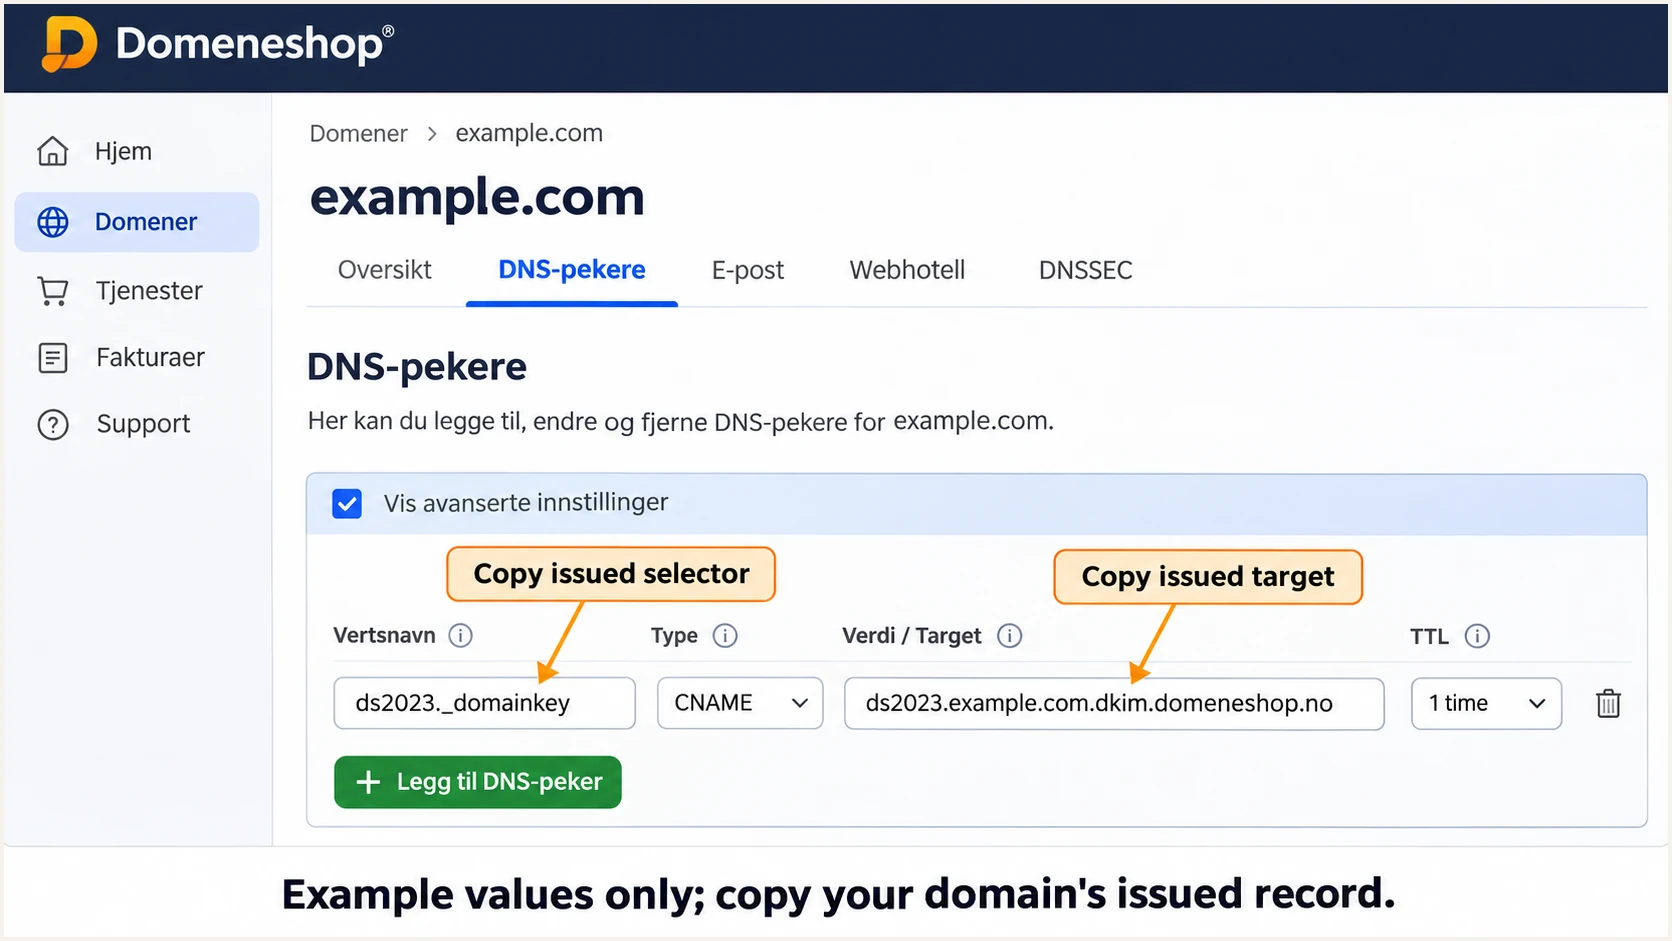
Illustrative Domeneshop DKIM CNAME entry; use your domain's issued selector and target.
If a DNS editor automatically appends the zone name, enter only the relative hostname. Verify that the resulting name ends once with your domain, not with a duplicated suffix.
A published key proves only that verification data exists. Signing happens on the sending server, so test website-generated messages separately from mailbox messages.
SPF identity
SPF checks the connecting IP against the envelope sender's domain. A provider-owned envelope domain does not authenticate your visible From domain for DMARC.
DKIM identity
DKIM checks the signature using the d= domain and s= selector. A valid signature using your domain can pass DMARC even when SPF alignment fails.
Set up DMARC
Domeneshop's DMARC setup instructions document a default policy of p=quarantine for its email service. I retain an existing quarantine or reject policy and add reporting to it.
- Read the existing policy. Check TXT at _dmarc.example.com before editing. For a sending subdomain, check the parent policy too. Do not replace inherited enforcement with a new p=none record.
- Choose report delivery. Create a working report mailbox. Replace dmarc@example.com in the example with your actual reporting destination. An address on another domain requires external reporting authorization there.
- Publish one record. For a new domain with no existing or inherited enforcement, use the p=none starter below. Select TXT and enter _dmarc as the relative hostname. Confirm the final owner is _dmarc.example.com.
- Save the change. Use Confirm in the new DNS editor or the green plus button when adding a record in the older editor. Edit the existing record when one already exists.
New DMARC reporting policytext
v=DMARC1; p=none; rua=mailto:dmarc@example.com
Use the DMARC record generator to prepare the TXT value. The example mailbox is a placeholder, not a destination that collects your reports.
Check the visible From domain below after publishing. Confirm that exactly one DMARC policy is returned and that the reporting address and policy match your intended configuration.
DMARC checker
Look up a domain's DMARC record and catch policy issues.
?/7tests passed
A valid DNS record does not prove that messages pass DMARC. Test live mail and review aggregate reports to check the identity used by each sender.
The older Epost panel also has Vis avanserte innstillinger and DMARC-policy presets. Use the DNS TXT editor when adding a custom reporting address, then recheck DNS after any preset change.
Keep existing enforcement
Do not lower p=quarantine or p=reject to p=none for this setup. Preserve existing policy tags when adding reporting. A monitoring-only policy requests no special DMARC handling for failures; receivers still apply their own filtering.
Verify and troubleshoot
I test the message that the application actually sends. A successful mailbox test does not validate a contact form that uses a different sending server.
- Check published DNS. Run the commands below with your domain and the selector read from the message. If the DKIM owner is a CNAME, confirm that its target also resolves to a public key.
- Send each route. Send one fresh mailbox message and trigger each website form or notification. Use the same From address and envelope sender settings as production.
- Read receiver results. Check the receiving server's Authentication-Results for spf=pass, dkim=pass and dmarc=pass. Inspect smtp.mailfrom, header.d and header.from to diagnose domain mismatches.
- Check transport limits. Do not route external servers, automated application mail or newsletters through the older smtp.domeneshop.no service. Domeneshop reserves it for personal mail clients. For Domeneshop-hosted websites, use the web host's local mail facility.
Inspect DNS; replace ds2023 with the actual selectorbash
dig +short NS example.com
dig +short TXT example.com
dig +short CNAME ds2023._domainkey.example.com
dig +short TXT ds2023._domainkey.example.com
dig +short TXT _dmarc.example.com
Use the email tester below for the quickest message-level check. Send a fresh message to its generated address through the exact Domeneshop mailbox or website route you are configuring.
The result diagnoses the message's authentication and exposes the identities being checked. Save the result, fix the reported problem, and repeat the same sending route after the DNS change is visible.
Email tester
Send a real email to this address. Suped shows a results button when the test is ready.
?/43tests passed
If SPF passes but DMARC fails, compare the Return-Path domain with From, then check whether a passing DKIM signature uses your domain. Successful authentication of an unrelated provider domain is insufficient.
For missing records, check authoritative DNS and hostname spelling before waiting. Domeneshop documents typical DNS updates within 1-2 hours, with some cached answers taking up to 48 hours.
|
|
|
|---|---|---|
SPF permerror | Duplicates; lookups | Repair single policy |
DKIM none | Sending route | Confirm server signing |
DKIM fail | Selector; key; changes | Inspect signature failure |
DMARC fail | Authenticated domains | Fix domain matching |
Start with the failing check, then repeat the live test.
Get alerted when it breaks
Suped is our DMARC platform. Its DMARC monitoring connects aggregate reports to sending sources and detected issues, so a Domeneshop DNS change or a new website sender has a concrete investigation path.
- Route the reports. Use the reporting address supplied by Suped in rua, keeping your current DMARC policy. Confirm that reports arrive after the domain sends mail to participating receivers.
- Enable notifications. Turn on Issues detected and Sending sources need verification notifications. Configure DMARC summary emails for routine review.
- Verify known sources. Confirm which Domeneshop and application sources belong to your organization. Investigate unfamiliar IPs and domains before treating them as authorized.
- Apply the fix. Open the issue's fix steps, correct the DNS record or sending application, then run the live test again. Check subsequent reports for the affected source.
I use source-level results to distinguish a newly broken legitimate sender from unauthorized traffic. A domain-wide percentage alone hides low-volume failures in password resets or contact forms.
Keep message testing in the change process as well. Aggregate reporting provides ongoing coverage across participating receivers; an immediate test checks a specific route after an edit.
Alerts follow available data
DMARC aggregate reports arrive in batches, commonly daily. Suped detects issues from the data it receives; report-based alerts are not a live feed of every message. Use a fresh test email to confirm an urgent fix.
Secure your domain with p=reject
Move to p=reject after every legitimate sending route passes DMARC across a representative sending cycle. I include scheduled application messages and infrequent business mail before increasing enforcement.
- Resolve legitimate failures. Use Suped's source table and record details to investigate failures by sender. Confirm a passing SPF or DKIM identity that matches your From domain for every approved route.
- Stage the policy. For a new p=none deployment, move to quarantine after fixing known failures, then review delivery and reports before reject. Test forwarding and mailing-list paths too. Existing quarantine or reject domains keep their current protection during testing.
- Review subdomains. Check explicit subdomain DMARC records and the parent sp setting. Without a separate override, the parent policy applies to subdomains; review their senders before enforcing reject.
- Keep monitoring. Retain rua and Suped notifications after enforcement. Recheck new website integrations and investigate legitimate failures before changing policy.
In the older Domeneshop panel, Epost, Vis avanserte innstillinger, then DMARC-policy provides the Streng option for reject. For a custom policy with reporting, edit the existing TXT record and preserve the reporting destination.
Google's DMARC rollout guidance also recommends starting a new deployment with monitoring and increasing enforcement after reviewing authentication. I use source-specific results to decide when a domain is ready.
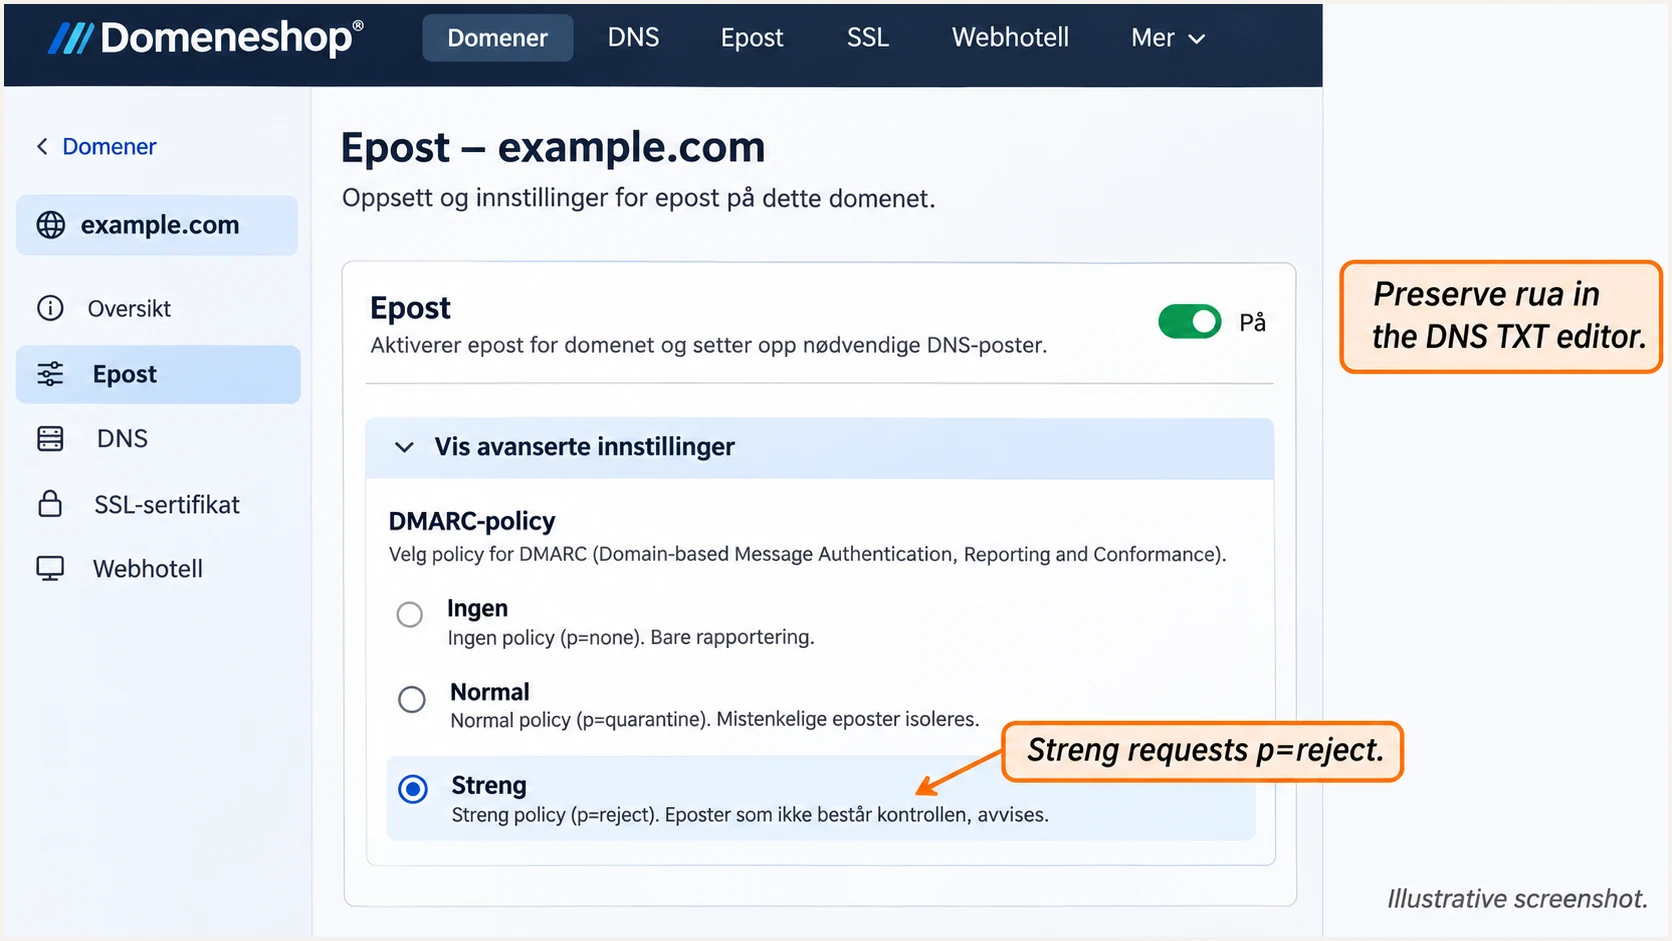
Illustrative Domeneshop DMARC-policy control with Streng selected for p=reject.
For policy management across multiple senders, Suped's hosted DMARC lets teams change policy after configuring its DNS delegation. Use the hosted delegation or a manual TXT record at the policy name, never both.
For a manually managed record, replace the policy value while retaining your real reporting address and other intentional tags. The example below is for a domain that has completed sender verification.
Manual reject policy with reportingtext
v=DMARC1; p=reject; rua=mailto:dmarc@example.com
After saving, check public DNS and send another message through each critical route. Continue reviewing Suped's source results as new reports arrive.
Reject requests refusal of messages that fail DMARC. It does not prevent display-name impersonation or lookalike domains, and receiving systems retain control over delivery decisions.
Frequency asked questions
Read s= in a fresh message's DKIM-Signature, or copy the selector from the DKIM warning below the mailbox list in the older Epost panel. Domeneshop documents ds2023 as an example, not a permanent selector for every domain. If no signature or warning exists, ask support for the active service's DKIM settings.
SPF validates the SMTP envelope sender, not the visible From address. A pass for a provider-owned domain does not satisfy DMARC for your domain. Configure a supported custom envelope sender or ensure DKIM passes using your domain. Adding a provider include to your root SPF does not change the envelope identity.
DMARC needs one passing authentication method with the required domain match. I configure both for Domeneshop routes using an envelope sender on my domain. For a route that cannot customize its provider-owned Return-Path, a passing DKIM signature using your domain is sufficient; an SPF alignment warning alone does not mean DMARC failed.
Keep an existing p=quarantine or p=reject policy and add reporting to that record. The p=none example is for a new deployment without existing or inherited enforcement. Lowering the policy is unnecessary for collecting aggregate reports.
Domeneshop is the provider associated with the domeneshop.no namespace. I treat that rDNS suffix as a source-identification clue and confirm the actual sender using its IP and message headers. A PTR hostname alone does not prove that the message belongs to your account or passes DMARC.
Aggregate reporting is periodic and depends on mail reaching receivers that send reports. Allow 24-48 hours after real traffic, then check the published rua address, mailbox delivery and external reporting authorization when applicable. Use a live email test while waiting for aggregate data.




