
How to set up DMARC/DKIM/SPF for Digital Pacific

Published 22 Nov 2026
Updated 22 Nov 2026
11 min read
Summarize with
To authenticate email sent through Digital Pacific, add include:spf.mailcluster.com.au to your existing SPF record, install the domain's DKIM record in cPanel, and publish a DMARC TXT record at _dmarc.yourdomain. Test an actual message before enforcing a rejection policy.
I start with the sending route: these steps cover Digital Pacific's cPanel hosting and its documented mail cluster. For a VPS or dedicated server using a different outbound route, confirm the required SPF authorization with Digital Pacific before changing DNS.
Add your domain
I first check that the exact domain used in the visible From address exists in the Digital Pacific hosting account.
- Open cPanel: In the Digital Pacific Client Area, open Active Services, select the service's gear menu and choose Access CPanel.
- Add the domain: Open Domains. If the domain is absent and your plan permits it, select Create a New Domain, enter your registered domain without www, choose the document root and click Submit. Older interfaces use Addon Domains.
- Confirm availability: Check that the domain appears in Domains and in Email Deliverability. An existing primary domain needs no second entry or separate verification TXT token.
- Locate live DNS: Check the domain's authoritative nameservers. Publish the records below with that DNS host; use cPanel Zone Editor when its zone is authoritative.
Adding a domain to the hosting account creates local configuration. Public DNS lookups confirm that recipients can actually retrieve its authentication records.
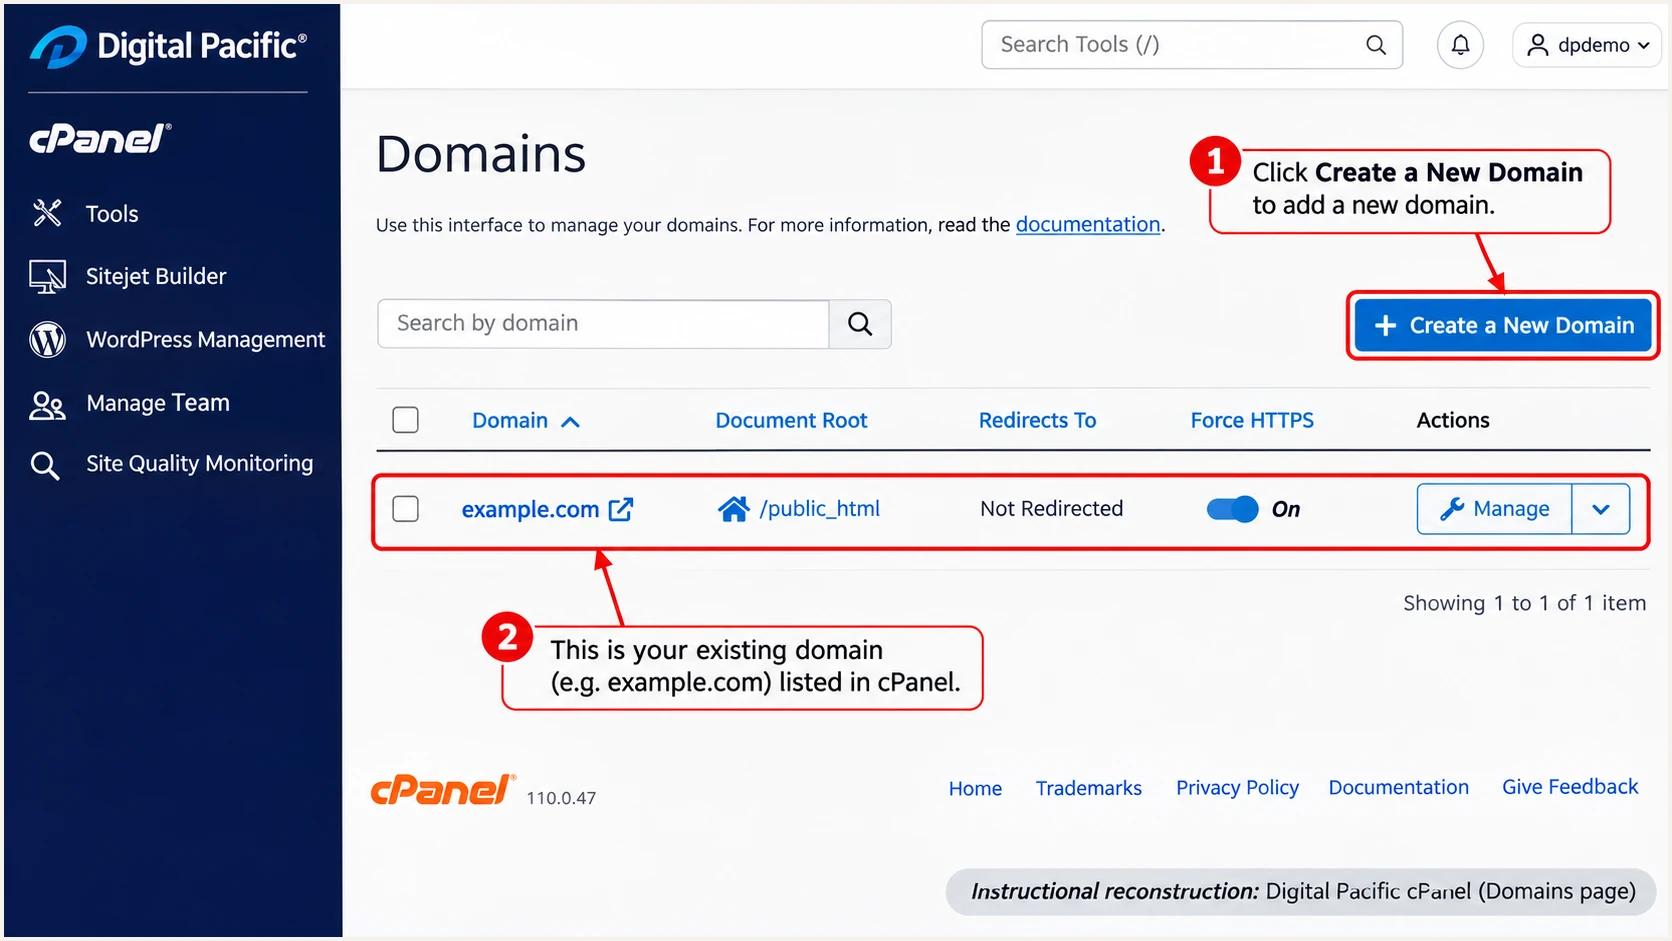
Instructional reconstruction of the Domains page in Digital Pacific cPanel.
For website mail, use a mailbox on your domain as the From address. Put a contact form visitor's address in Reply-To so the website does not send using a domain it cannot authenticate.
Set up SPF
Digital Pacific documents spf.mailcluster.com.au as its SPF include. I merge that authorization into the existing record at the domain used by the SMTP envelope sender, which normally appears in Return-Path.
- Open the domain: Go to cPanel > Email Deliverability > Manage for your sending domain. Under SPF, click Customize.
- Add the include: Under Additional Settings > Include List, add spf.mailcluster.com.au. Keep authorizations for other legitimate senders, then click Install a Customized SPF Record.
- Publish one record: If DNS is hosted elsewhere, copy the resulting TXT value there. Edit the existing v=spf1 record rather than adding another SPF record at the same name.
- Check the envelope: Send through Digital Pacific and inspect Return-Path. For SPF-based DMARC success, its domain must match the visible From domain, or share its organizational domain under relaxed matching.
Minimal SPF example for mailcluster-only sendingtext
v=spf1 include:spf.mailcluster.com.au ~all
Use this minimal example only when all outbound mail uses the documented cluster. Keep required cPanel server IP mechanisms and existing senders when your actual configuration needs them.
Run the check against the actual Return-Path domain. SPF records at a parent domain do not automatically authorize sending for a subdomain.
SPF checker
Find SPF syntax issues, lookup limits, and weak records.
?/16tests passed
Resolve duplicate SPF records and stay within the limit of 10 DNS lookup-causing terms during evaluation, including nested includes. A single include can consume several of those lookups.
Digital Pacific supports using your own domain for the envelope sender. Configure the application's SMTP envelope sender or bounce address accordingly; adding this include alone does not change Return-Path. A provider-owned Return-Path still needs a passing DKIM signature with a matching signing domain for DMARC.
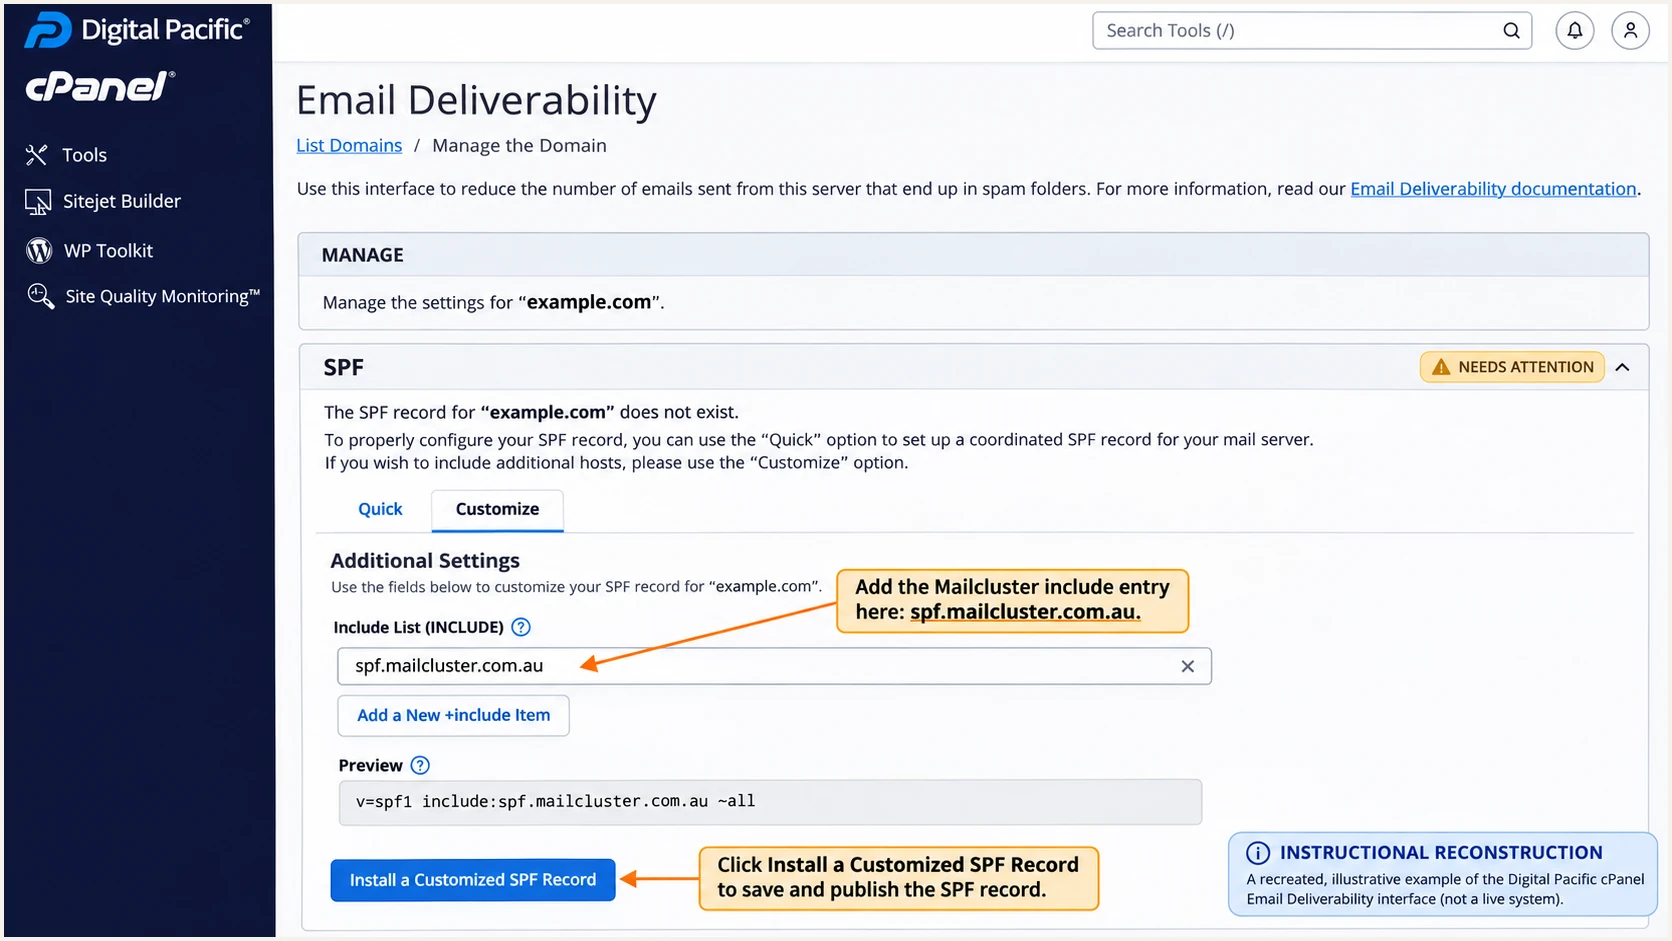
Instructional reconstruction of adding the Digital Pacific SPF include in cPanel.
Set up DKIM
I use the key generated by the Digital Pacific hosting account. A copied key from another domain or server will not verify the signatures this server creates.
- Find the key: Open cPanel > Email Deliverability > Manage for the domain and locate Suggested DKIM (TXT) Record. If a key is absent and Generate Local DKIM Key is available, generate it.
- Install the record: Click Install the Suggested Record when cPanel controls public DNS. Otherwise, copy the exact Name and complete public Value into a TXT record at your authoritative DNS host.
- Use the right selector: Copy the displayed name exactly. cPanel commonly uses default._domainkey, but the selector in the message's DKIM-Signature must identify the published key.
- Test the application: Send both a mailbox message and a website notification. Confirm dkim=pass and that the signature's d= domain matches the visible From domain under your DMARC matching mode.
For authenticated website SMTP, open Email Accounts > Connect Devices for the mailbox. Digital Pacific's documented default is mail.yourdomain on port 465 with SSL/TLS, using the full email address and mailbox password. Use the account-specific settings shown there.
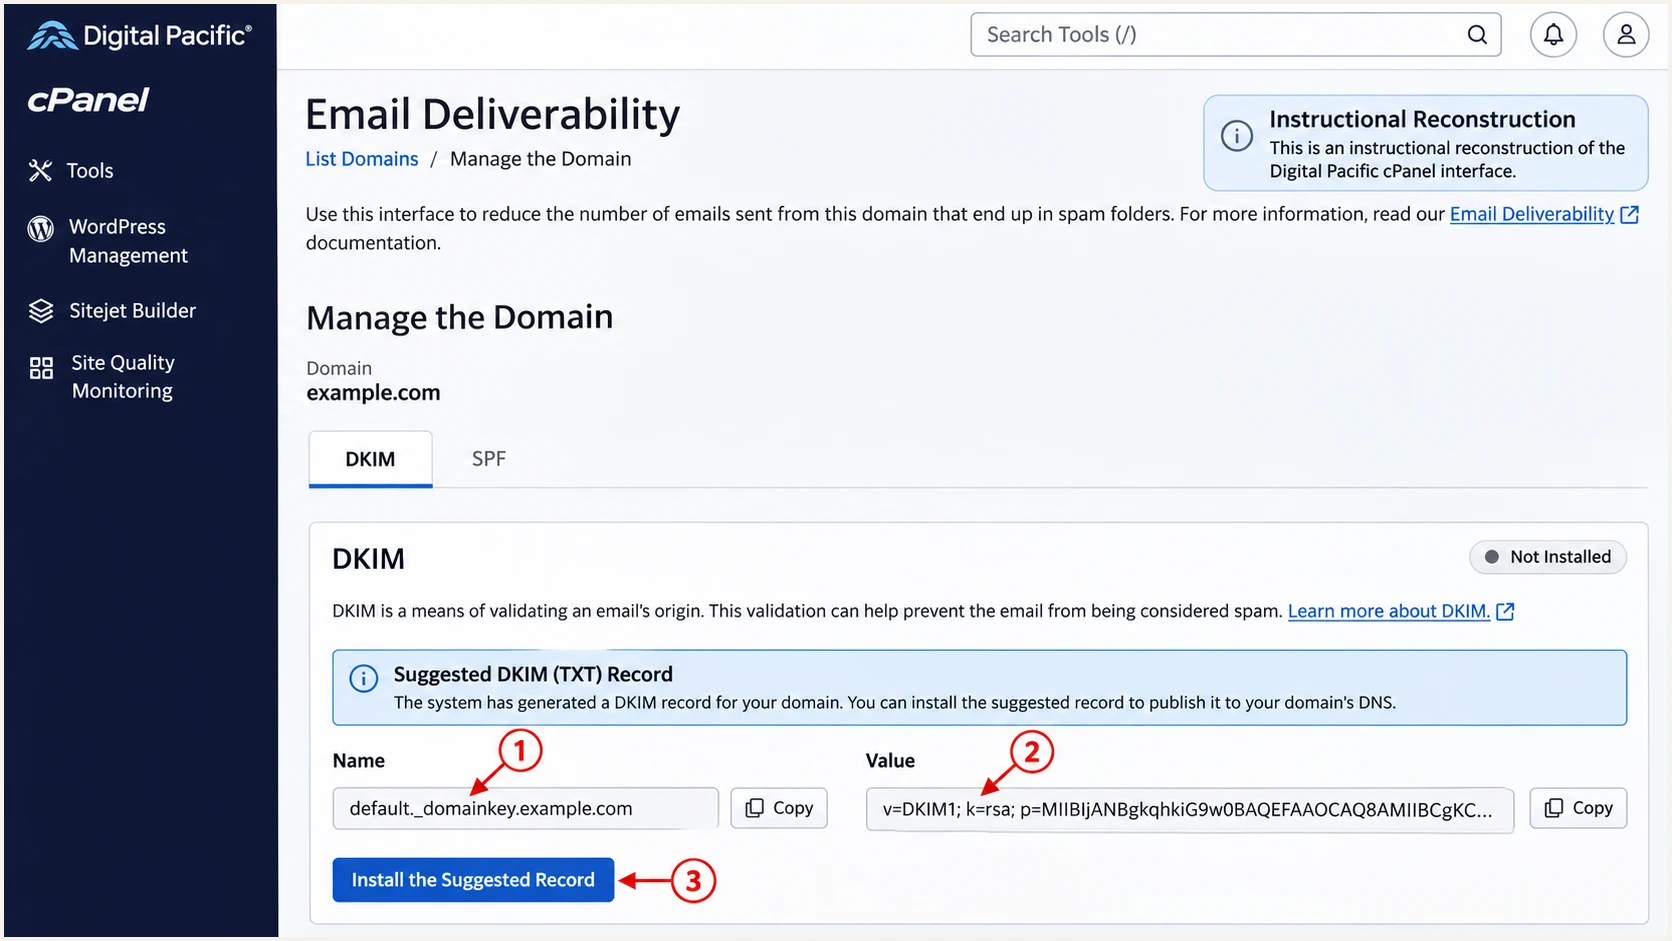
Instructional reconstruction of the DKIM record and installation control in Digital Pacific cPanel.
DNS publication and message signing are separate checks. Some PHP mail paths do not receive a domain DKIM signature; use authenticated SMTP or ask Digital Pacific to inspect signing for the application's actual sending route.
A receiving server's Authentication-Results header shows the outcome. DMARC needs a passing result from at least one method below, with the corresponding domain matching the visible From domain.
SPF domain check
Compare the SMTP MAIL FROM domain, normally recorded in Return-Path, with the visible From domain. The sending IP must pass that domain's SPF policy.
DKIM domain check
Compare the d= signing domain with the visible From domain. The recipient must verify the signature using the DNS key for its s= selector.
Set up DMARC
Start a new DMARC deployment with p=none so you can inspect legitimate sending before requesting enforcement. If the domain already uses p=quarantine or p=reject, keep that policy while fixing Digital Pacific authentication.
- Find the existing policy: In the authoritative DNS zone, look for a TXT record at _dmarc.example.com. Edit that record if it exists.
- Add the record: For a new policy in cPanel, open Zone Editor > Manage for your domain, then + Add Record > Add TXT Record. Use _dmarc.example.com as the name and a TTL of 900 seconds.
- Set reporting: Use the starter value below, replacing dmarc@example.com with a working aggregate-report destination you control. When using a reporting platform, copy its assigned reporting address.
- Save and check: Click Save Record or Add Record, depending on the interface. Publish exactly one DMARC TXT record at that name.
Starter DMARC TXT valuetext
v=DMARC1; p=none; rua=mailto:dmarc@example.com
The DMARC record generator can build the value with your own reporting destination. Omitted aspf and adkim tags use relaxed matching by default.
Validate the domain in the visible From address. In DNS editors that automatically append the zone name, enter only _dmarc so the name does not become _dmarc.example.com.example.com.
DMARC checker
Look up a domain's DMARC record and catch policy issues.
?/7tests passed
A p=none policy requests reports without asking recipients to quarantine or reject mail for DMARC failure. Receivers still apply their own filtering decisions.
Digital Pacific offers an Add DMARC Record form in Zone Editor too. Its optional parameters accept reporting settings; a TXT record is useful when you want to paste the exact value above.
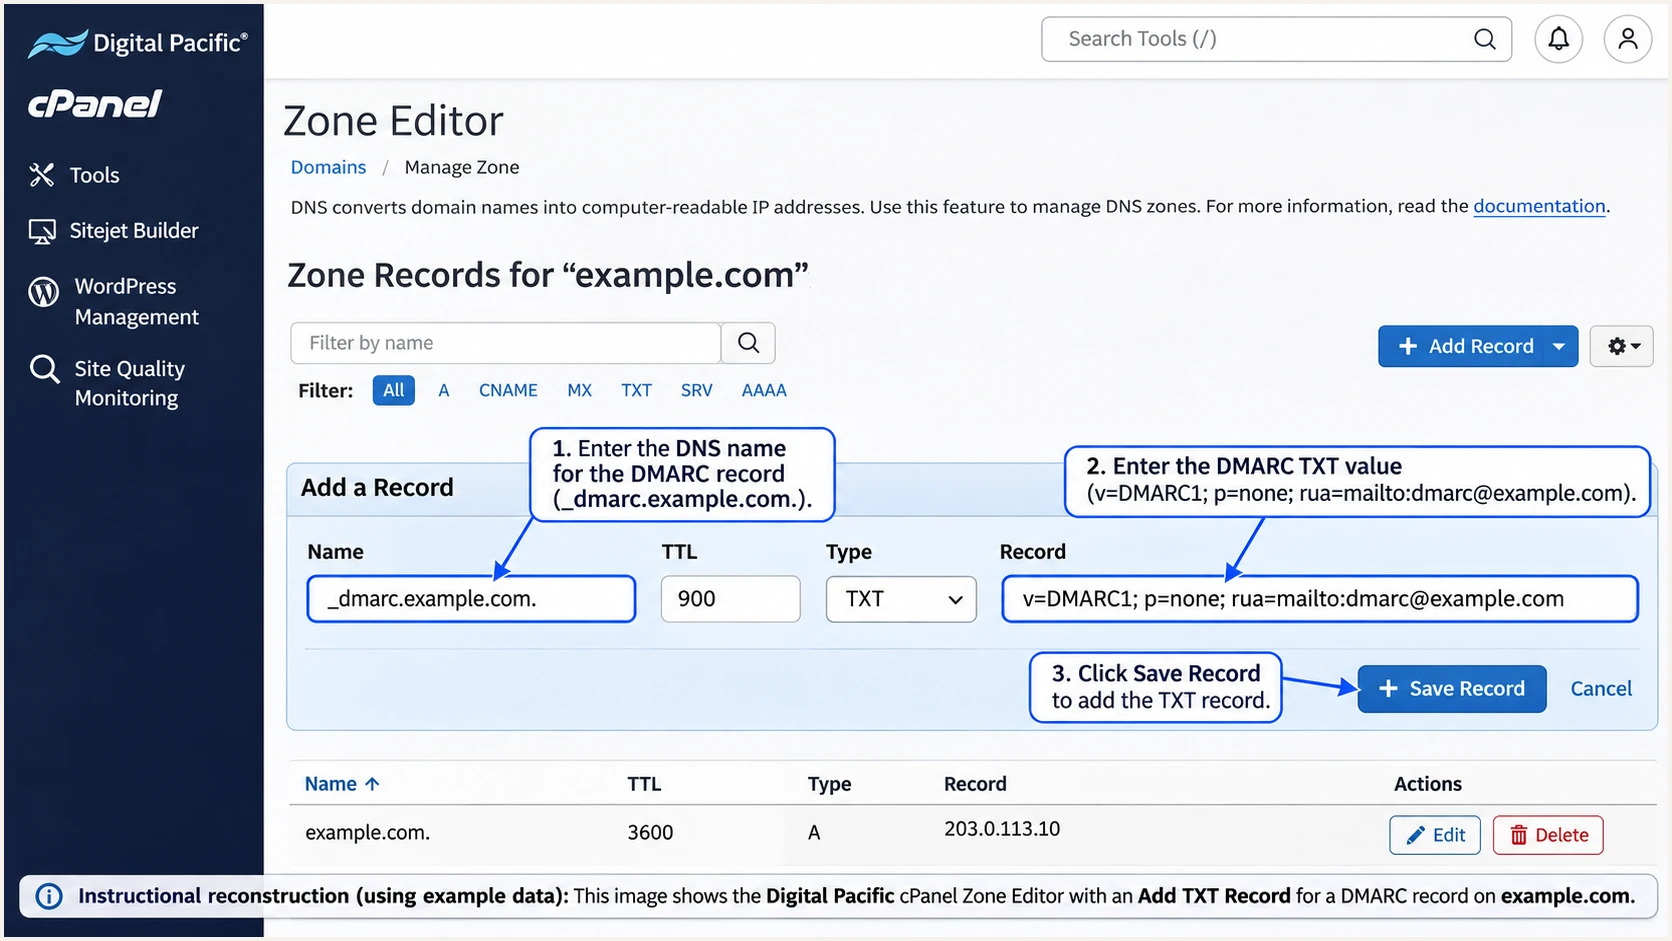
Instructional reconstruction of the starter DMARC TXT record in Digital Pacific cPanel.
Verify and troubleshoot
I test the exact route that sends production email. A successful webmail test does not establish that a website form or scheduled application uses the same SMTP credentials and signing configuration.
- Send real messages: Test webmail and the website form separately. Include a scheduled notification if it uses a different sending configuration.
- Inspect the results: Check the recipient-generated Authentication-Results for spf=pass, dkim=pass and dmarc=pass. Compare the authenticated domains with the visible From domain.
- Fix DNS at its source: Compare public TXT answers with the intended values. Digital Pacific documents typical updates of 15 minutes to 4 hours, with some taking 24 hours.
- Trace failures: Give Digital Pacific the sending IP, timestamp, Message-ID and receiver error when the record is correct but mail is unsigned, rejected or sent through an unexpected relay.
The email tester below prompts you to send a message to a test address and returns a full diagnosis. Trigger that message through the website or application to check its actual configuration.
Email tester
Send a real email to this address. Suped shows a results button when the test is ready.
?/43tests passed
If SPF passes but its domain does not match the visible From domain, DMARC can still pass through a valid DKIM signature with a matching d= domain. A raw SPF pass alone does not establish DMARC success.
Use these results to choose the next repair. Fix the sending configuration when the public DNS records are already correct.
|
|
|
|---|---|---|
SPF permerror | Duplicate or excess lookups | Merge and simplify |
SPF domain mismatch | Provider bounce domain | Fix envelope sender |
DKIM absent | Unsigned application mail | Use authenticated SMTP |
DKIM key missing | Wrong selector or DNS host | Publish actual selector |
DMARC failure | No matching pass | Repair SPF or DKIM |
For a DNS inspection, replace example.com and the selector below with your actual values. Query the envelope-sender domain separately if it differs.
Inspect public authentication DNSbash
dig +short NS example.com
dig +short TXT example.com
dig +short TXT default._domainkey.example.com
dig +short TXT _dmarc.example.com
If the email tester finds a PTR problem on a Digital Pacific shared outbound IP, ask Digital Pacific to fix it. Reverse DNS is controlled by the IP operator.
Get alerted when it breaks
Suped is our DMARC platform for ongoing monitoring after this setup. It detects authentication issues and provides steps to fix them, so a hosting migration or application change does not leave failures unnoticed.
- Keep reports flowing: Use the Suped-assigned rua destination in your existing DMARC policy so aggregate reports reach the monitoring platform. Preserve your current enforcement policy.
- Enable notifications: In Suped notification settings, enable Issues detected and Sending sources need verification. Enable DMARC summary emails for ongoing review.
- Investigate the source: Inspect Digital Pacific traffic by sending IP and reporting receiver. Open record details to distinguish an SPF domain mismatch from a missing or invalid DKIM signature.
- Verify the repair: Update the application or authoritative DNS, send another test message, then confirm subsequent reports show legitimate traffic passing.
Our DMARC monitoring connects source-level failures with corrective steps. I check each newly detected sender against the business's approved services before treating it as legitimate.
Report timing affects alerts
DMARC aggregate reports arrive on receiver reporting schedules, commonly daily. Notifications based on those reports are not instant alerts for every failed message. Use the email tester immediately after a configuration change.
Keep website SMTP error logs available as well. If an application stops submitting messages entirely, its logs provide evidence that aggregate authentication reports cannot contain.
Secure your domain with p=reject
I move to p=reject once reports cover the normal sending cycle and every legitimate source has a dependable DMARC pass path. A high overall pass rate alone is insufficient if an important low-volume sender still fails.
- Review every source: Use Suped to verify legitimate sources, including Digital Pacific website mail, staff mailboxes, billing systems and infrequent scheduled messages.
- Repair the failures: Resolve unsigned website email and SPF lookup errors. Prefer working DKIM for every sending route so forwarded messages can retain a valid authentication path when the signature survives.
- Stage enforcement: After legitimate failures are resolved, use p=quarantine as an intermediate policy if needed. Review fresh reports and recipient feedback before advancing.
- Enforce and monitor: Set p=reject once legitimate traffic is consistently passing. Check subdomain policies and continue investigating new sending sources after enforcement.
Suped makes this review practical by grouping sources and explaining their authentication failures. Our hosted DMARC also lets teams manage policy through the dashboard after its DNS setup, including staged policy changes.
If your domain uses a normal TXT policy, edit that existing record at the authoritative DNS host. If it already uses hosted DMARC, change the policy through the configured dashboard.
Final policy after verification
Use your real reporting destination and preserve other intentional policy settings. For a simple TXT deployment, the final value is:
DMARC TXT value with rejection requestedtext
v=DMARC1; p=reject; rua=mailto:dmarc@example.com
Keep reporting enabled after enforcement. Retest after hosting migrations or SMTP configuration changes, and validate each new sending service before it sends production mail.
Rejection applies to messages that fail DMARC at receivers honoring the policy. Authentication is still separate from inbox placement, and receivers retain their own delivery policies.
Frequency asked questions
Digital Pacific uses mailcluster.com.au infrastructure and documents spf.mailcluster.com.au for SPF. I treat that rDNS suffix as an infrastructure clue, then compare the actual sending IP with application logs and DMARC results. The suffix alone does not identify or authorize the customer that sent the message.
DMARC passes when at least one method passes with the required domain match: SPF using the envelope-sender domain, or DKIM using a signing domain. Configure both for Digital Pacific where supported. A provider-owned Return-Path produces an SPF domain mismatch, but a passing DKIM signature with a matching d= domain can still satisfy DMARC.
Valid DNS does not prove that the website uses those records. PHP mail can use a different envelope sender or leave messages unsigned. Configure authenticated SMTP using the mailbox settings in Email Accounts > Connect Devices, send a website-generated test and inspect the recipient authentication results.
No. SPF, DKIM and DMARC authentication is configured using TXT records in this workflow. MX records control inbound delivery. Keep the MX records required by your actual mailbox provider when authenticating website mail sent through Digital Pacific.
Use evidence rather than a fixed waiting period. Collect reports across your normal sending cycle, test each legitimate source and resolve authentication failures before enforcement. Daily reports alone will miss a monthly process until it sends. Keep an existing quarantine or reject policy while repairing Digital Pacific configuration.




