
How to set up DMARC/DKIM/SPF for Contabo

Published 21 Nov 2026
Updated 21 Nov 2026
13 min read
Summarize with
To authenticate Contabo email, authorize the actual outbound server in SPF, enable DKIM signing in your mail software, and publish DMARC at _dmarc.example.com. I make DNS changes wherever the domain's authoritative nameservers are hosted.
For a VPS sending directly, SPF authorizes its public sending IP. For Contabo webspace, the published SPF example includes mail-relay.contabo.net. DKIM keys come from your hosting panel or mail server. A domain new to DMARC starts with p=none; keep an existing quarantine or reject policy.
Add your domain
I first separate the domain's DNS hosting from its mail hosting. Creating a Contabo DNS zone does not automatically configure the mail server.
- Check DNS authority. Run the NS lookup below. Edit the provider named in that result. Keep existing DNS hosting if it already works.
- Create the zone if needed. In the Contabo Customer Panel, open Network Services > DNS Management > Create DNS Zone. Enter example.com in Zone and create it. Open the existing zone instead if it is already present.
- Preserve existing services. If intentionally moving DNS to Contabo, copy every existing record before changing nameservers to ns1.contabo.net, ns2.contabo.net, and ns3.contabo.net. Preserve your existing MX records unless incoming mail is also moving.
- Add the mail domain. For cPanel hosting, confirm the domain appears under Domains; use Create a New Domain if your plan permits it. In Plesk, use Websites & Domains > Add Domain. On a bare VPS, configure the domain in your mail server's existing domain settings.
Contabo's current panel puts DNS Management under Network Services. Its older panel calls this DNS Zone Management.
Use the screenshot as a navigation reference. Creating the zone alone does not change the domain's public nameserver delegation.
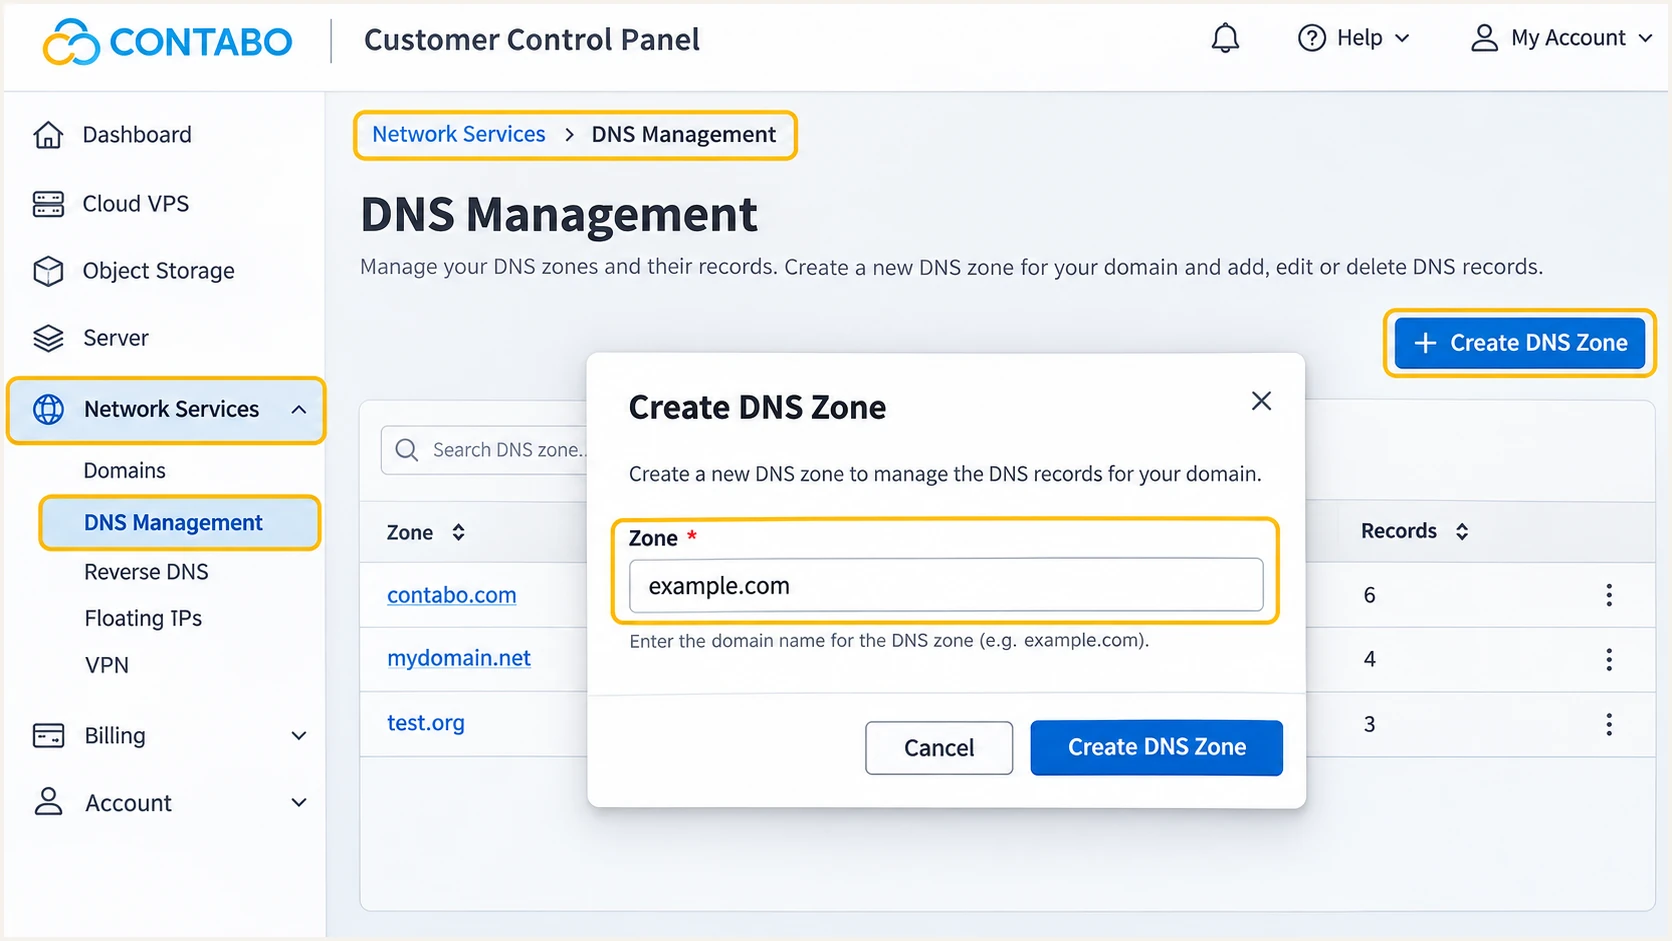
Contabo DNS Management: create the domain's DNS zone.
I verify public delegation before editing authentication records. A zone visible in a panel is useful only when that zone is authoritative for the domain.
Run these lookups in a terminal with dig installed. For Contabo-hosted DNS, query one of its authoritative servers directly after saving a change.
Check nameservers and the Contabo zonebash
dig +short NS example.com
dig @ns1.contabo.net example.com SOA +short
Set up SPF
I authorize the server that actually connects to the recipient. A website's Contabo IP is irrelevant to SPF when its email leaves through a different SMTP relay.
SPF is checked against the SMTP MAIL FROM domain, usually shown in Return-Path. Contabo VPS mail can use your own domain for that address, so configure that domain in your application or mail server.
- Identify the sender. Inspect a delivered message's Return-Path and trusted Received headers. Record the outbound IPv4 address and any IPv6 address actually used for delivery.
- Edit one TXT record. Open the authoritative DNS zone. At the MAIL FROM domain, edit the existing TXT value beginning v=spf1, or create it if absent. In Contabo's Name field, enter the full domain, such as example.com.
- Choose the right route. For direct VPS delivery, add ip4 and ip6 mechanisms for the real sending addresses. For Contabo webspace, use the account's suggested record and its mail-relay.contabo.net include.
- Keep other senders. Merge legitimate sender mechanisms into the existing SPF record before its final all mechanism. Keep one v=spf1 record per name and stay within the 10 DNS-lookup term limit. Literal ip4 and ip6 mechanisms do not consume that limit.
For a VPS that sends only through one IPv4 address, use this pattern. Replace 192.0.2.10 with the actual outbound IP; it is a documentation address.
Both examples use ~all while establishing the sender inventory. Preserve a working -all policy unless you deliberately change it.
Direct VPS example: TXT at example.comtext
v=spf1 ip4:192.0.2.10 ~all
For webspace packages, Contabo's published example authorizes the A and MX hosts plus its outbound relay. This is a separate example, not a second record to add alongside the VPS example.
Confirm these mechanisms against your account's current suggested SPF record. Do not copy the webspace include onto a VPS that does not send through that relay.
Contabo webspace example: TXT at example.comtext
v=spf1 a mx include:mail-relay.contabo.net ~all
In Contabo DNS, select TXT, paste the value into Data, and save. Its documented minimum TTL is 14400 seconds; cached values take time to expire.
Check the exact MAIL FROM domain below. If it is bounce.example.com, publish and check SPF there; a root-domain SPF record is not inherited by that subdomain.
SPF checker
Find SPF syntax issues, lookup limits, and weak records.
?/16tests passed
Expect one valid SPF record covering the observed sender. A DNS check validates the policy, while a delivered test confirms which IP and domain the application actually uses.
If an external relay fixes Return-Path to its own domain, editing your root SPF cannot repair that mismatch. Valid DKIM with a matching signing domain can still pass DMARC; separate bulk-sender requirements still apply.
Set up DKIM
I enable signing in the mail software before publishing its public key. Contabo's DNS panel stores the key, while the mail server applies signatures.
cPanel on Contabo
- Open the domain. Go to Email > Email Deliverability > Manage beside the sending domain.
- Obtain the key. Under DKIM, generate the key if prompted, then copy the suggested TXT Name and Value.
- Publish externally. Install the suggested record only if cPanel controls authoritative DNS. For Contabo webspace, copy it into the authoritative DNS zone manually.
- Recheck status. Reload Email Deliverability and confirm DKIM shows VALID after DNS updates.
Plesk on a Contabo server
- Enable signing. Open Websites & Domains > your domain > Mail > Mail Settings.
- Save the setting. Select "Use DKIM spam protection system to sign outgoing email messages" and save.
- Copy the public key. Open the domain's DNS Settings and copy the generated DKIM TXT record into authoritative DNS when hosted elsewhere.
- Use the actual selector. The default selector is commonly default. Copy the generated name instead of assuming it.
Publish the complete public key at the generated selector name, commonly default._domainkey.example.com. Keep it as one TXT record; multiple character strings within that record are concatenated by DNS.
For a bare Debian or Ubuntu VPS with Postfix already installed, the following optional example adds OpenDKIM for one domain. Skip it when a hosting panel or another signer already manages DKIM.
Bare VPS: generate a 2048-bit DKIM keybash
sudo apt-get install opendkim opendkim-tools
sudo install -d -o opendkim -g opendkim -m 0700 /etc/dkimkeys
sudo opendkim-genkey -b 2048 -d example.com -s contabo2026 \
  -D /etc/dkimkeys
sudo chown opendkim:opendkim /etc/dkimkeys/contabo2026.*
sudo chmod 0600 /etc/dkimkeys/contabo2026.private
sudo cat /etc/dkimkeys/contabo2026.txt
The generated TXT name is contabo2026._domainkey.example.com. Paste only the concatenated v=DKIM1 value into DNS, excluding the zone-file wrapper, parentheses, and display quotes. Keep the private key on the server.
For this single-domain example, set the following directives in their named files. Replace example.com and preserve unrelated configuration. If other milters already exist, append the OpenDKIM socket to both lists instead of replacing them. Use Domain, Selector, and KeyFile without KeyTable or SigningTable in this configuration.
Bare VPS: connect the signer to Postfixtext
# /etc/opendkim.conf
Domain example.com
Selector contabo2026
KeyFile /etc/dkimkeys/contabo2026.private
UserID opendkim
Mode s
Canonicalization relaxed/relaxed
Socket inet:8891@127.0.0.1
InternalHosts 127.0.0.1,::1

# /etc/postfix/main.cf
smtpd_milters = inet:127.0.0.1:8891
non_smtpd_milters = inet:127.0.0.1:8891
milter_protocol = 6
After publishing the key, restart OpenDKIM, validate Postfix configuration, and reload Postfix using the commands below. Submit the test message locally or through an authenticated submission service whose configuration applies the milter.
The received DKIM-Signature must have d=example.com and the configured selector. A public key that resolves successfully does not prove that the application's messages are being signed.
Bare VPS: activate signing and test the public keybash
sudo systemctl restart opendkim
sudo postfix check
sudo systemctl reload postfix
sudo opendkim-testkey -d example.com -s contabo2026 -vvv
Set up DMARC
I start a domain new to DMARC in monitoring mode. If the domain already uses p=quarantine or p=reject, retain that policy and repair the sending source.
DMARC passes when SPF or DKIM passes with a domain that matches the visible From domain under the configured matching rules. Separate SPF and DKIM passes for unrelated domains are insufficient.
- Inspect the current policy. Look up TXT at _dmarc.example.com before making changes. Edit its existing DMARC record instead of creating a duplicate.
- Prepare reporting. Create a monitored report mailbox or use your reporting platform's assigned address. Replace dmarc@example.com in the example before publishing.
- Create the record. In Contabo DNS Management, open the zone and add or edit TXT. Set Name to _dmarc.example.com, paste the value below into Data, and save.
- Generate safely. Use the DMARC record generator to build the value with your actual reporting address. Preserve existing reporting recipients and intentional policy tags.
For a new monitoring policy, publish this exact pattern with your own reporting address substituted. The record belongs at _dmarc.example.com, not at the root name.
The example requests aggregate reports without requesting quarantine or rejection. Receivers still apply their own spam and security policies.
Initial DMARC example: TXT at _dmarc.example.comtext
v=DMARC1; p=none; rua=mailto:dmarc@example.com
When reports go to a different organization's domain, that report recipient must authorize external reporting. Use the authorization instructions supplied by the recipient.
Check the published domain below. Confirm one DMARC record, its intended policy, and the correct reporting destination.
DMARC checker
Look up a domain's DMARC record and catch policy issues.
?/7tests passed
A valid DNS record confirms publication. Test a real message next to confirm the relationship between the authenticated domains and the visible From domain.
Default relaxed matching accepts related subdomains within the same organizational domain. Existing aspf=s or adkim=s settings require exact domain matches for the respective authentication method.
Verify and troubleshoot
I test the same sending path used in production, including website forms and scheduled mail. A successful mailbox test does not verify a separate application that bypasses the signer.
- Inspect public DNS. Run the lookups below, substituting your domain, actual selector, and sending IP. Check both authoritative answers and cached resolver answers when they disagree.
- Fix reverse DNS. For direct VPS delivery, create an A record for mail.example.com pointing to the sending IPv4. In Contabo Reverse DNS Management, edit that IP's PTR to mail.example.com. Repeat with AAAA and PTR for any sending IPv6.
- Set the SMTP hostname. Configure the outbound server's EHLO hostname as mail.example.com and confirm that hostname resolves back to the same IP. PTR checks are separate from DMARC.
- Test the real message. Use the email tester below. Send to its generated address through the Contabo mailbox or application, then inspect the diagnosis.
Replace default with the actual selector from DKIM-Signature. The IP below is a documentation example, so substitute the public address used for delivery.
If DNS is correct but delivery fails, inspect the SMTP error and mail queue. A connection failure requires checking SMTP connectivity and firewall rules rather than changing DMARC.
Look up the published authentication recordsbash
dig +short TXT example.com
dig +short TXT default._domainkey.example.com
dig +short TXT _dmarc.example.com
dig +short A mail.example.com
dig +short AAAA mail.example.com
dig +short -x 192.0.2.10
The email tester checks an actual message and gives a diagnosis of authentication alongside other delivery checks. This is the quickest end-to-end confirmation of this setup.
Use the displayed destination for each test and send through the application's normal route. Pasting DNS values alone does not exercise DKIM signing.
Email tester
Send a real email to this address. Suped shows a results button when the test is ready.
?/43tests passed
Look for dmarc=pass in the receiver's Authentication-Results. Also check the SPF MAIL FROM domain and the DKIM signing domain; passing authentication by itself does not establish DMARC domain matching.
For self-managed VPS mail, the Contabo PTR edit below completes the forward and reverse DNS checks. Webspace customers should ask Contabo to investigate its shared outbound relay's PTR rather than editing a website IP.
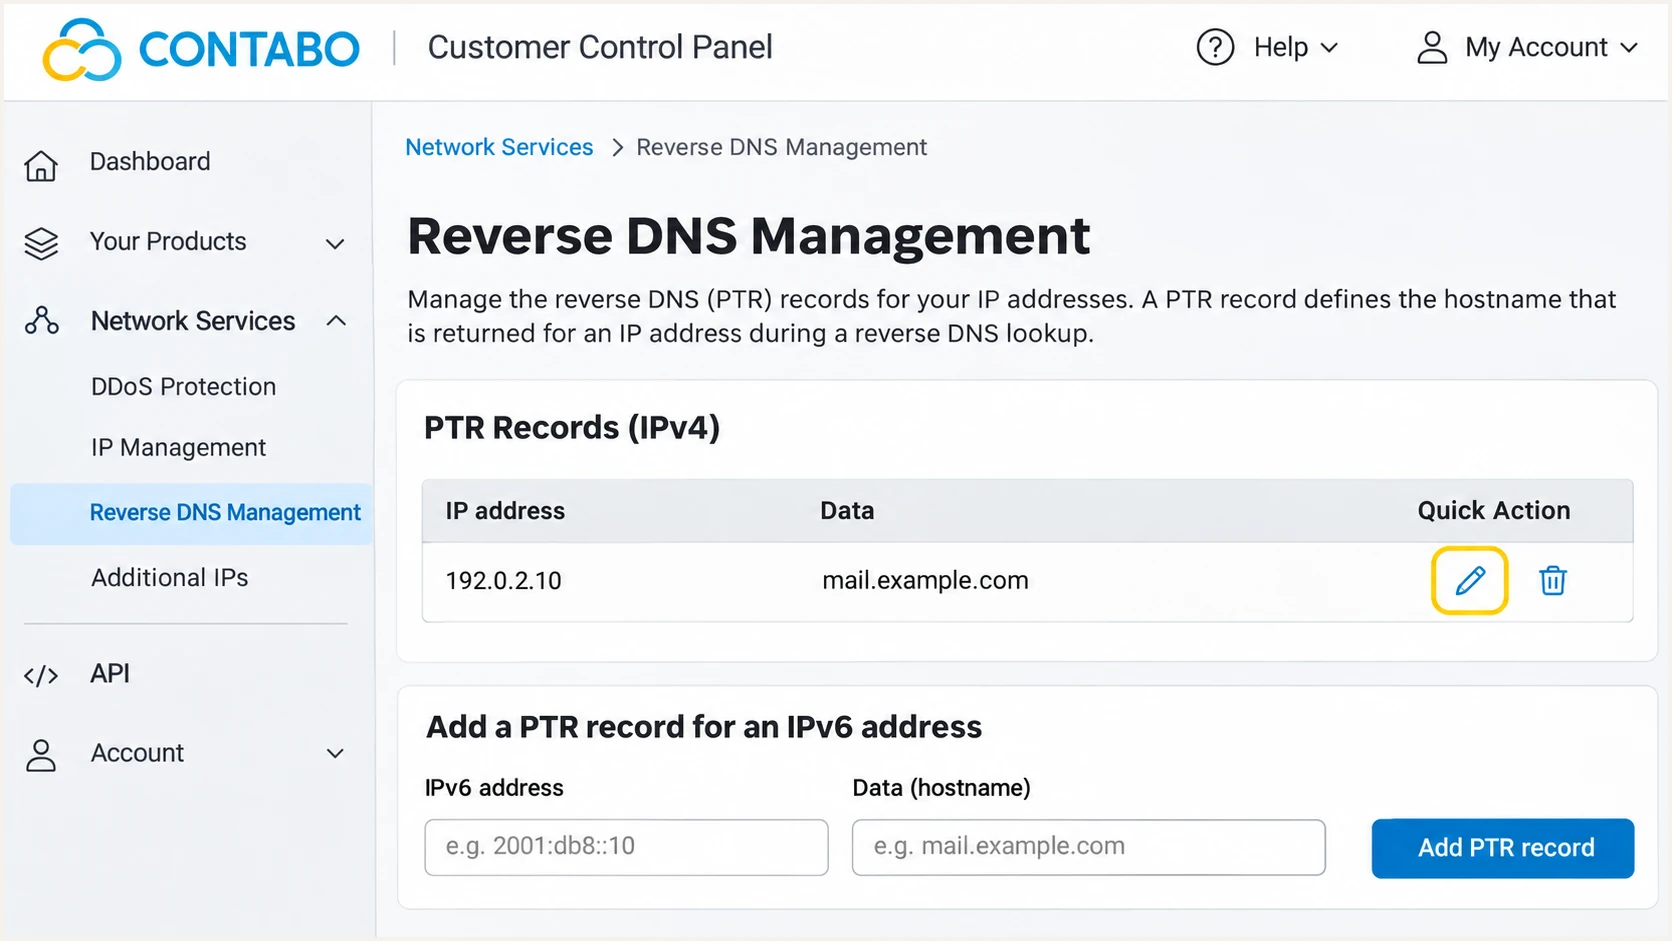
Contabo Reverse DNS Management: edit the sending IP's PTR.
If SPF reports permerror, check for duplicate SPF records and excess DNS lookups. If SPF passes but DMARC fails, compare the MAIL FROM and From domains, then inspect DKIM.
If DKIM is missing, inspect the application's route through the signer. If it fails, check the selector, public key, and changes to signed content after signing. Authentication passing does not guarantee inbox placement.
Get alerted when it breaks
Suped is our DMARC platform for keeping this Contabo setup under observation. Its source diagnostics and issue notifications connect authentication failures to the sender that needs attention.
- Keep reports flowing. Use your assigned reporting destination in rua and retain the existing DMARC policy. Confirm recent reports include the expected Contabo sending IPs.
- Verify the source. In Suped Sources, compare the reported IP with your Contabo allocation and sending logs before marking it verified. A familiar hosting-network name alone is insufficient.
- Enable notifications. Open Settings > Notifications and enable Issues detected and Sending sources need verification. Enable DMARC summary emails for routine review.
- Investigate changes. Use the issue's fix steps and Detail view to inspect SPF, DKIM, and DMARC results. Compare DNS history when a previously working source starts failing.
Our DMARC monitoring brings these reports and checks together, so a new VPS address or broken signing configuration has a visible investigation path. Report-based alerts follow incoming aggregate data, typically collected daily.
I keep server-side queue and service monitoring alongside report monitoring. SMTP outages require server checks, while aggregate reports explain authentication results observed by participating receivers.
Check changes before the next send
After a VPS migration, update SPF and PTR for the new sending IP. After a DKIM rotation, publish the new selector before using its private key and keep the previous public key while in-flight messages still need it.
Secure your domain with p=reject
I move to p=reject after every legitimate sending route has a reliable DMARC pass. Check individual sources, including low-volume application mail, rather than relying only on the overall pass rate.
Suped's source verification and failure diagnostics provide the evidence for each policy change. Use our Hosted DMARC policy controls if enabled, or edit the existing TXT record at authoritative DNS.
- Review a full sending cycle. Collect reports covering routine mail and occasional jobs such as billing. Resolve unexplained legitimate failures before enforcement.
- Check domain matching. Confirm each source passes SPF or DKIM with the required domain match. Keep DKIM reliable for forwarded messages, where SPF commonly breaks.
- Enforce in stages. For a domain currently at none, change p to quarantine, review new reports, then change p to reject. Preserve a working stricter policy already in place.
- Review subdomains. Inventory subdomain senders and existing sp settings or separate subdomain DMARC records. A root reject policy also affects subdomains that inherit it.
- Verify after the change. Confirm the published policy, test critical application messages again, and watch Suped notifications for legitimate failures. Correct the affected sending route promptly.
The policy stages below describe the requested treatment of DMARC failures. Receiving systems retain their own delivery decisions.
For Contabo, complete SPF and signing repairs before moving stages. A policy change cannot fix an unsigned application or an incorrect envelope domain.
|
|
|
|---|---|---|
p=none | Monitor | Inventory senders |
p=quarantine | Quarantine failures | Fix legitimate failures |
p=reject | Reject failures | Verified sending routes |
Advance after reviewing legitimate sending sources.
Keep aggregate reporting active at reject so new services and configuration changes remain visible. Use the real report destination in the final record.
If the domain already has additional deliberate tags, preserve them. The minimal example below changes the policy while retaining aggregate reporting.
Enforced DMARC example: TXT at _dmarc.example.comtext
v=DMARC1; p=reject; rua=mailto:dmarc@example.com
Keep a copy of the previous working DNS value and the reason for the change. Recheck public DNS once the previous TTL expires.
When Suped flags a legitimate failure after enforcement, identify the exact source and repair its authorization or signing configuration. Retest that route before resuming its scheduled sends.
Frequency asked questions
A VPS sending directly needs SPF authorization for its actual outbound IP addresses. Contabo's published webspace example uses a and mx with include:mail-relay.contabo.net. Confirm the account's suggested value and merge it into one SPF record instead of publishing a duplicate.
No. Publish authentication records at the domain's existing authoritative DNS provider. Contabo can host the server while another provider hosts DNS. A Contabo DNS zone does not become authoritative until the domain's nameserver delegation points to it.
SPF authenticates the SMTP MAIL FROM domain. If that domain does not match the visible From domain under the applicable rules, SPF does not provide a DMARC pass. DKIM must then pass with a matching signing domain. On a self-managed Contabo server, configure both the envelope domain and DKIM signing.
These suffixes are associated with Contabo hosting infrastructure. They identify a hosting network rather than a specific sending application or customer. I confirm ownership using the reported sending IP, the Contabo allocation, and mail logs before authorizing a source. Custom PTR records also mean legitimate Contabo servers do not always show these suffixes.
No. Enable the signer in cPanel, Plesk, or the VPS mail software and publish its matching public key. Test a message sent through the real application and check the receiver's DKIM result. The selector and signing domain in DKIM-Signature must point to the key you published.
Keep an existing reject or quarantine policy when adding Contabo as a sender. Publish the required SPF and DKIM records, verify real messages, and retain reporting. Monitoring mode is the starting point for a domain new to DMARC, rather than a prerequisite for every new server.




