
How to set up DMARC/DKIM/SPF for Cloudmark

Published 21 Nov 2026
Updated 21 Nov 2026
11 min read
Summarize with
To set up DMARC, DKIM and SPF for Cloudmark-backed email, authorize the actual outbound relay in SPF, enable DKIM signing for your domain, and publish a DMARC TXT record in DNS. I start by tracing the sending route because the required SPF values and DKIM selector depend on the mail service operating Cloudmark.
Cloudmark provides messaging security for email providers and operators. Seeing Cloudmark in a header or delivery error does not establish that it sends your messages. Configure authentication on the outgoing mail service, and preserve it through any Cloudmark gateway.
Add your domain
There is no single Cloudmark sender-domain wizard established by its public documentation. I use the mail host's provisioning process, or the administration guide for the installed Cloudmark Platform for Email deployment.
- Trace the route. Send a controlled message externally. Inspect its raw source for the visible From domain, Return-Path, DKIM signing domain and outbound IP.
- Identify the operator. If Cloudmark only filters incoming mail, keep outgoing domain setup with your existing mail host. If it relays outgoing mail, identify the administrator responsible for that relay.
- Provision the domain. Have that operator authorize your sending domain and confirm the permitted SMTP MAIL FROM domain. Use your own domain or an approved bounce subdomain when supported.
- Verify ownership. If the operator requires a DNS challenge, publish its exact TXT or CNAME token and run its verification action. Do not invent a Cloudmark verification record.
- Collect the settings. Obtain the outbound SPF include or IP ranges, the DKIM selector and public DNS record, and confirmation of where DKIM signing occurs.
For a self-managed deployment, domain provisioning can depend on the operator's existing backend. Confirm the installed release and routing policy before changing it; a domain's MX records describe incoming delivery, not the full outgoing route.
For direct assistance, open the Cloudmark website's Support page. Select your email product in Product, complete the contact fields and Summary, and request the authentication settings for your deployment. Include a sanitized sample message when needed.
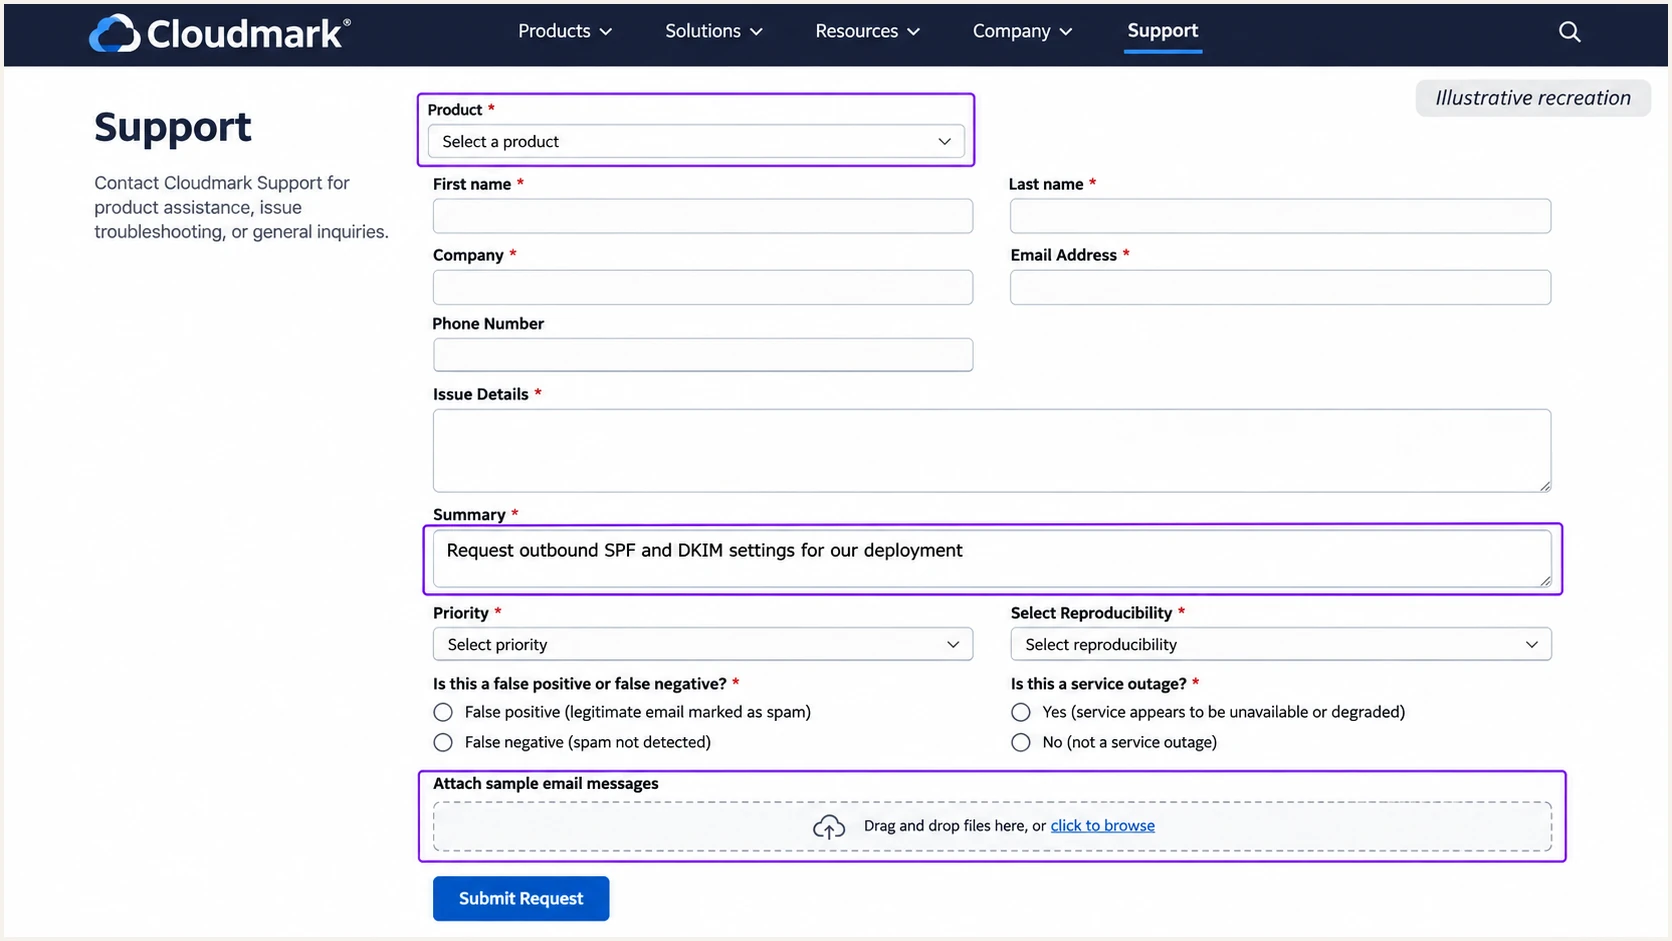
Illustrative recreation of Cloudmark's support form for requesting deployment-specific settings.
Set up SPF
SPF checks the connecting server against the SMTP MAIL FROM domain, usually shown in the delivered Return-Path. I publish SPF at that exact DNS name, including a bounce subdomain when one is used.
- Set the envelope sender. Configure the approved MAIL FROM domain on the sending service. Do not add a Return-Path header manually; the receiving system creates it from the SMTP envelope.
- Authorize outbound servers. Use the operator's documented SPF include or confirmed public IPv4 and IPv6 ranges. Include every active outbound route, including failover servers.
- Merge existing SPF. Keep one TXT record beginning v=spf1 at each MAIL FROM domain. Preserve other legitimate senders and insert new mechanisms before the final all mechanism.
- Check the lookup limit. Keep evaluation within 10 DNS-querying SPF terms, including nested includes. Do not authorize an incoming Cloudmark gateway merely because it appears in your MX records.
This syntax example authorizes one controlled relay. The IP address 192.0.2.10 is reserved for documentation; replace it with a confirmed public outbound address. This is not a Cloudmark-provided SPF record.
Illustrative SPF TXT record for a bounce subdomaintext
bounce.example.com. IN TXT "v=spf1 ip4:192.0.2.10 -all"
Do not add include:_spf.cloudmark.com solely because a report names Cloudmark. An SPF policy used by Cloudmark's own domains does not establish which shared relay pool sends your mail. Use the include explicitly supplied for your service.
Enter the actual MAIL FROM domain below. Checking example.com does not validate SPF published separately at bounce.example.com; SPF is not inherited by subdomains.
SPF checker
Find SPF syntax issues, lookup limits, and weak records.
?/16tests passed
After the DNS check passes, send a new message through the production route. Confirm spf=pass at the receiver and check that the authenticated MAIL FROM domain matches the visible From domain under your DMARC settings.
If your hosted deployment does not support a custom MAIL FROM domain, adding SPF at your visible From domain will not fix SPF alignment. An SPF alignment error is expected in that case. DMARC still passes when DKIM fully passes with a matching signing domain.
Set up DKIM
I enable DKIM signing on the actual outbound signer, either the upstream mail service or the Cloudmark gateway when its deployment provides that function. Enabling incoming DKIM verification does not sign outgoing messages.
- Get the selector. Obtain the selector and signing domain from the service operator. There is no selector that can safely be assumed for every Cloudmark deployment.
- Publish the public record. Create the supplied TXT key or CNAME at selector._domainkey.signing-domain. Copy its exact name and value. A CNAME must not coexist with a TXT record at that same name.
- Protect the private key. Keep private keys on the signer. For a self-managed RSA signer, use a 2048-bit key and SHA-256 where supported. Publish only the public key in DNS.
- Use your domain. Configure the DKIM d= domain to match the visible From domain. With default relaxed DMARC settings, a subdomain sharing the same organizational domain also qualifies; strict settings require an exact match.
- Check message changes. Sign after changes to signed content, including gateway footers. Test the final delivered message on every outbound route.
Upstream signing
Keep the mail host's signature intact through Cloudmark. Changes to the signed body or signed header values can break it before delivery.
Gateway signing
If the gateway changes signed content, configure signing after those changes. A valid signature using only the provider's domain does not authenticate your From domain for DMARC.
I query the exact selector supplied by the operator. In these commands, c2026 is an illustrative selector, not a Cloudmark default. Replace it and example.com with the values used by your signer.
For a delegated CNAME, also inspect the TXT key at its target. Check the complete DNS name in the saved record so your DNS editor has not appended your domain twice.
Look up the configured DKIM selectorbash
dig +short TXT c2026._domainkey.example.com
dig +short CNAME c2026._domainkey.example.com
A published key proves DNS availability; a delivered message with dkim=pass proves that the signer and receiver successfully used it.
Set up DMARC
DMARC belongs to the domain in the visible From header. I check for an existing policy before publishing anything. DMARC passes when SPF passes with a matching MAIL FROM domain, or at least one DKIM signature passes with a matching signing domain.
- Inspect the existing policy. Query _dmarc.example.com. If the domain already uses p=quarantine or p=reject, keep that policy while fixing the Cloudmark sending route.
- Build the record. For a new policy, start with p=none. Use the DMARC record generator to prepare the TXT value and reporting destination.
- Publish one policy. Create a TXT record at _dmarc.example.com, usually entered as _dmarc in a DNS editor for example.com. Keep a single DMARC policy record at that name.
- Receive reports. Use a working aggregate-report destination. If reports go to an external domain, complete any reporting authorization required by that recipient.
Starting DMARC TXT value at _dmarc.example.comtext
v=DMARC1; p=none; rua=mailto:dmarc@example.com
Replace example.com with your domain and dmarc@example.com with the actual report destination. The example address does not automatically collect reports for you. Preserve existing reporting recipients when editing an established policy.
Check the visible From domain below after publishing. I verify the retrieved policy and reporting address, then test a real message separately; correct DMARC syntax does not prove that the Cloudmark route authenticates.
DMARC checker
Look up a domain's DMARC record and catch policy issues.
?/7tests passed
The p=none policy requests monitoring without DMARC-specific enforcement. It does not repair SPF or DKIM and does not guarantee inbox delivery.
Aggregate reports arrive after receivers generate and send them, commonly on a daily cycle. Use a delivered-message test for immediate feedback while waiting for reporting data.
Keep existing enforcement
Do not replace p=quarantine or p=reject with the starter record simply to add this route. Keep the established policy, correct the sender's authentication, and retain the reporting destination.
Verify and troubleshoot
I test the final delivered message through the same SMTP route used in production. Repeat the test for each failover route and for templates that receive gateway footers or other content changes.
Use our email tester below to obtain a test address, then send a message to it through your normal Cloudmark-backed route. The result gives an authentication diagnosis alongside other delivery checks.
Email tester
Send a real email to this address. Suped shows a results button when the test is ready.
?/43tests passed
Check results added by the receiving system. Look for dmarc=pass for the visible From domain and identify the matching SPF or DKIM result responsible for that pass. Sender-supplied Authentication-Results headers are not reliable evidence.
A DNS record can be correct while the wrong signer or outbound server is active. I compare the received evidence with the DNS name actually queried, rather than assuming that a green DNS check covers every route.
- Check SPF inputs. Compare the receiver-observed outbound IP with SPF at the MAIL FROM domain. Investigate missing IPv6 authorization, outdated includes and duplicate SPF records.
- Check DKIM inputs. Use d= and s= from DKIM-Signature to locate the key. Investigate missing selectors, mismatched keys and message changes after signing.
- Check domain matching. Compare the visible From domain with the passing SPF and DKIM domains. Provider-domain authentication alone does not satisfy your domain's DMARC.
- Capture delivery failures. Keep the SMTP reply, timestamp and queue ID. Give the operator sanitized headers and the actual outbound IP when escalating.
Illustrative successful delivered-message headerstext
From: sender@example.com
Return-Path: <bounce@bounce.example.com>
Authentication-Results: mx.receiver.example;
 spf=pass smtp.mailfrom=bounce.example.com;
 dkim=pass header.d=example.com header.s=c2026;
 dmarc=pass header.from=example.com
This example uses relaxed SPF matching: bounce.example.com and example.com share an organizational domain. With aspf=s, those two domains do not match exactly; the matching DKIM signature still provides a DMARC pass.
If delivery remains blocked after authentication passes, inspect the receiver's stated reason. Cloudmark filtering decisions also depend on reputation and message handling, so a passing DMARC result does not resolve every rejection.
|
|
|
|---|---|---|
SPF error | IP or DNS | Check MAIL FROM |
DKIM failure | Key or content | Check signing path |
DMARC failure | Domain matching | Find a matching pass |
Delivery block | Receiver policy | Inspect SMTP reply |
Use the failing result to choose the next check.
Get alerted when it breaks
I keep authentication monitoring active after setup. A new relay IP or a gateway content change can break an established route without anyone editing the visible From address.
Suped is our DMARC monitoring platform. For this workflow, its reports by source and issue detection connect authentication failures with steps to fix them, so the team has evidence to take back to the Cloudmark operator.
- Review sources. In Suped's Issues source table, verify legitimate sending sources after checking their IPs and mail routes. Investigate unfamiliar traffic before marking it as authorized.
- Enable issue alerts. In Notifications, enable Issues detected so authentication problems trigger a notification when Suped detects them.
- Watch source changes. Enable Sending sources need verification. Review a new source before changing SPF or trusting an unfamiliar relay.
- Keep a review cycle. Enable DMARC summary emails and use DNS history to compare old and new values when failures follow a configuration change.
Report-based alerts depend on receivers sending aggregate data and Suped processing it. I keep the operator's SMTP logs available for immediate delivery incidents; DMARC reporting is not a live trace of every message.
Keep the evidence together
When an alert identifies a failing route, preserve the report's source IP and authentication domains. Match them with the operator's logs, apply the recommended correction, and verify a fresh message before closing the issue.
Secure your domain with p=reject
I move toward p=reject after legitimate sending routes consistently pass DMARC and reporting covers the domain's normal sending cycle. Include low-volume systems and scheduled mail before treating the inventory as complete.
Suped's Hosted DMARC manages policy changes through the dashboard after hosted DNS configuration is in place. Combined with source verification and authentication diagnostics, it gives the team a practical way to stage enforcement and investigate failures during the rollout.
- Audit legitimate traffic. Verify every approved source, including Cloudmark-backed relays. Investigate forwarding and occasional senders before enforcing a stricter policy.
- Fix authentication first. Require a passing SPF or DKIM result that matches the From domain. Keep DKIM working through gateway changes, especially where custom MAIL FROM is unavailable.
- Stage the policy. For a new deployment, monitor with p=none, move to p=quarantine, review legitimate failures, then set p=reject. Use evidence rather than a fixed waiting period.
- Check subdomain scope. Review explicit subdomain policies and any sp= setting before enforcement. Do not assume every subdomain sends through the same route.
- Continue monitoring. Keep reporting and alerts enabled after enforcement. Retest after relay migrations or key rotation, and correct authorized senders that begin failing.
Enforced DMARC TXT value after validationtext
v=DMARC1; p=reject; rua=mailto:dmarc@example.com
Replace the example report address and edit the existing DMARC record, preserving other intentional tags. In Suped, review remaining source failures as you change policy; its issue details help distinguish an authentication fault from unauthorized traffic.
The reject policy requests rejection of DMARC-failing messages; receiving systems retain their own handling policies. It protects against unauthorized use of the domain in From, while display-name impersonation and lookalike domains require separate controls.
Frequency asked questions
The cloudfilter.net suffix is associated with Cloudmark messaging infrastructure, including routes operated for mail providers. It does not identify the customer or prove that a source is authorized for your domain. I check the receiver-observed IP, trusted Received headers and the mail host's routing details before attributing the traffic.
Only when your mail service operator explicitly supplies it for your outbound route. A Cloudmark label or cloudfilter.net hostname does not establish the correct SPF include. Use the operator's approved value and publish it at the actual MAIL FROM domain.
Yes. One valid DKIM signature with a signing domain that matches the visible From domain is enough for DMARC. If the hosted route uses a provider-owned MAIL FROM domain, adding SPF at your From domain does not change that relationship. Verify DKIM on the final delivered message.
Publishing DMARC requires control of your domain's DNS, not a new Cloudmark account. Domain provisioning for sending belongs to your mail service operator. If Cloudmark only filters incoming mail, configure outgoing authentication on the service that actually sends your messages.
Check authoritative DNS after saving, then allow previously cached answers to expire according to their TTL. Negative caching also affects newly created names. Send a fresh test message after the new records resolve, and keep old DKIM public keys available while messages signed with them are still in transit.
Keep existing enforcement while configuring the Cloudmark route. Correct its outbound SPF authorization or DKIM signing so legitimate messages pass DMARC. A new route does not, by itself, justify weakening protection for the whole domain.




