
How to set up DMARC/DKIM/SPF for Cloudflare Email Security

For a domain protected by Cloudflare Email Security, configure SPF and DKIM on your outbound mail provider, publish the required records in authoritative DNS, and add a DMARC TXT record at your domain's _dmarc name. Email Security domain onboarding enables scanning; it does not configure your outbound sender.
I separate inbound protection from outbound authentication. MX records direct incoming mail to Cloudflare. SPF authorizes outbound servers, DKIM signs messages, and DMARC checks that a passing SPF or DKIM domain has the required relationship with the visible From domain.
Add your domain
Use Cloudflare One to connect the domain you want protected. Keep access to your mailbox administration and authoritative DNS. Email Security supports domains whose DNS is hosted elsewhere.
- Open domain management. Go to Email security > Settings > Domain management > Domains > View, then select Add a domain. For initial deployment, start at Email security > Overview and follow Set up or Connect a domain.
- Choose the deployment. MS Graph API or BCC/Journaling scans after delivery without changing MX. MX/Inline scans before delivery and requires mailbox-provider routing prerequisites.
- Verify an external domain. If your domain is not a verified Cloudflare zone, choose Enter domain manually, enter the domain, and complete Verify your domains. Allow up to 24 hours for verification before continuing with setup.
- Complete inline routing. For MX/Inline, select the verified domain, choose its position, check the downstream Forwarding address, and select the TLS option. Publish the MX values supplied for your selected processing location after completing the mailbox-provider prerequisites.
- Confirm scanning. Return to Domains > View and confirm Status is Active. Send an external message to a protected mailbox and find it in Email security > Investigation.
The forwarding address must reach your actual mailbox service. A next hop that resolves back to Cloudflare creates a routing loop. An Active domain confirms deployment status, not that every outbound message passes authentication.
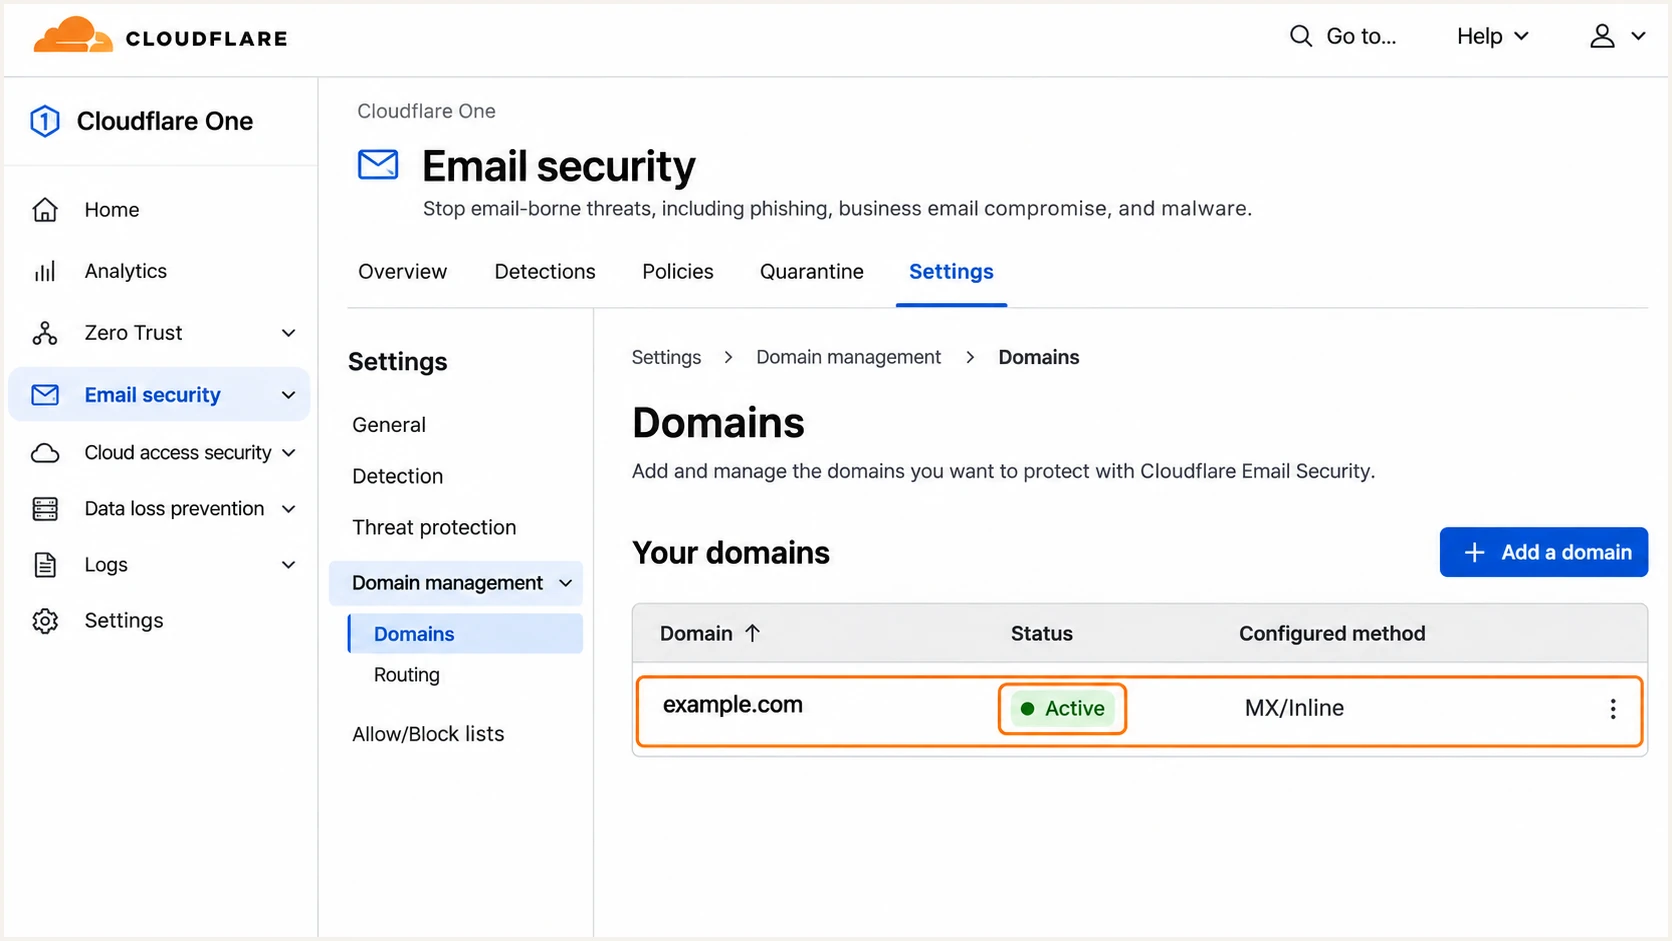
Illustrative Cloudflare Email Security domain list showing Active status.
Set up SPF
Inbound scanning by Cloudflare Email Security does not require a Cloudflare include in your outbound SPF record. Authorize the provider that actually sends messages using your domain in the SMTP MAIL FROM address.
- Identify the return path. Send a message to an external mailbox. Inspect Return-Path and the recipient-added Authentication-Results header, especially smtp.mailfrom. This identifies the domain whose SPF record is checked.
- Edit authoritative DNS. If Cloudflare hosts your DNS, select your domain > DNS > Records. Edit its existing TXT record beginning with v=spf1. Use the actual DNS host if the zone is elsewhere.
- Authorize actual senders. Microsoft 365 uses include:spf.protection.outlook.com. Google Workspace uses include:_spf.google.com. Merge the mechanisms you need into one SPF record per name, with no more than 10 DNS lookup-causing terms evaluated across nested includes.
- Keep inbound relays separate. Do not add Cloudflare Email Security egress IPs or an mx mechanism merely because Cloudflare handles incoming mail. Those addresses belong in the downstream inbound gateway configuration.
SPF example for a domain sending only through Microsoft 365text
Type: TXT
Name: @
Content: v=spf1 include:spf.protection.outlook.com -all
Use that example only when Microsoft 365 is your sole outbound sender. Preserve authorization for other approved senders, and publish any custom return-path record at the hostname specified by that sender.
Enter the actual MAIL FROM domain in the SPF checker below. Checking the root domain alone does not validate a different return-path subdomain.
SPF checker
Find SPF syntax issues, lookup limits, and weak records.
?/16tests passed
A valid lookup confirms the published SPF configuration. Send another message to confirm the live sending IP passes SPF and that the authenticated domain meets DMARC alignment requirements.
If an approved sender uses its own return-path domain and offers no custom return path, changing your root SPF record will not fix SPF alignment. Expect that mismatch and require passing DKIM with domain alignment. DMARC still passes through that DKIM result; configure a custom return path at the actual sender when supported.
Set up DKIM
Enable DKIM where outbound messages originate. Cloudflare Email Security checks received signatures, while your outbound provider supplies the selector and DNS value needed to sign with your domain.
- Get Microsoft 365 records. If Microsoft 365 sends your mail, open Email & collaboration > Policies & rules > Threat policies > Email authentication settings > DKIM. Select your domain and obtain its two CNAME values for selector1._domainkey and selector2._domainkey.
- Get Google Workspace records. If Google Workspace sends your mail, open Apps > Google Workspace > Gmail > Authenticate email. Select your domain, generate a 2048-bit key, and copy the TXT name and public key.
- Publish exact values. In authoritative DNS, create the record type supplied by your sender. In Cloudflare DNS, set DKIM CNAME records to DNS only. TXT records have no proxy setting. Never substitute a guessed selector or key.
- Turn on signing. Return to the sending provider and enable DKIM signing after DNS resolves. In Google Workspace, select Start authentication. Send again and confirm dkim=pass with a signing domain that meets DMARC alignment requirements.
Use the selector in the message signature, identified by s=, and its signing domain, identified by d=, to construct the lookup name. The commands below are examples for common selectors; substitute the values in your actual message.
Check the selector published by your outbound senderbash
dig +short CNAME selector1._domainkey.example.com
dig +short CNAME selector2._domainkey.example.com
dig +short TXT google._domainkey.example.com
Check what changed after signing
Publishing a DKIM record does not turn on the signer. If a signature passes before a gateway but fails afterward, compare the signed headers and message body. Banners or link rewriting after signing can invalidate the original signature.
Set up DMARC
Publish one DMARC policy for the visible From domain. DMARC needs a passing SPF or DKIM result with domain alignment. Under relaxed alignment, the authenticated domain and From domain share an organizational domain; strict alignment requires an exact match.
- Check the current policy. Look up TXT at _dmarc.example.com, replacing example.com with your domain. Edit an existing policy rather than creating a second DMARC record.
- Keep existing enforcement. If your domain already uses p=quarantine or p=reject, keep that policy. Add or update reporting without weakening enforcement.
- Start new policies with monitoring. For a domain without DMARC, publish the p=none example below. This requests reporting without requesting quarantine or rejection for DMARC failures.
- Use a working report address. Replace dmarc@example.com with a mailbox or reporting destination you control. An external reporting destination also needs the receiving domain to authorize your reports.
Use our DMARC record generator to configure the reporting destination and policy. In Cloudflare DNS, select your domain > DNS > Records > Add record, choose TXT, enter _dmarc as Name, and paste the generated value into Content. Edit the existing record if one is already present.
Initial DMARC TXT record for example.comtext
Type: TXT
Name: _dmarc
Content: v=DMARC1; p=none; rua=mailto:dmarc@example.com
The example.com report address is a placeholder. Replace it with your working reporting destination before publishing the record.
After saving, enter your domain in the DMARC checker below. Confirm that it finds one policy at the intended name and recognizes the reporting address.
DMARC checker
Look up a domain's DMARC record and catch policy issues.
?/7tests passed
A DNS pass confirms the policy is published correctly. It does not prove that your outbound messages pass DMARC. Verify real messages from each approved sending system.
Aggregate reports usually arrive on a daily schedule. Allow 24-48 hours for initial data after enabling reporting, and remember that some receiving networks do not send reports.
Verify and troubleshoot
I test outbound authentication and inbound scanning separately. Send an outbound test directly through the mailbox or application that normally sends your mail. Separately, send an inbound message through the protected domain to test Cloudflare processing.
The email tester below gives you a test address. Send a fresh message to that address for a full authentication diagnosis. Forwarding an old message changes the mail path and does not reproduce a normal outbound send.
Email tester
Send a real email to this address. Suped shows a results button when the test is ready.
?/43tests passed
Read the recipient-added Authentication-Results header. Check SPF against smtp.mailfrom, DKIM against header.d, and DMARC against header.from. A passing signature for an unrelated provider domain does not authenticate your visible From domain for DMARC.
For the inbound test, use the same subject keyword to locate the message in Cloudflare. Compare Cloudflare's validation at ingress with the final mailbox results to identify where authentication changed.
- Find the test message. Go to Email security > Investigation > Run new screen. Choose Regular screen, select a date range, enter your subject keyword, enable Include all mail, and select Run screen.
- Read the validation. Open the message menu > View details. Review Details > Validation, then Raw message for the signature and authentication headers.
- Trace delivery. Use Mail trace to confirm the downstream delivery path. Cloudflare Investigation covers messages your deployment scans; inspect the external recipient headers for outbound mail that bypasses Email Security.
- Correct the failing layer. Fix duplicate SPF records, missing selector records, disabled signing, or domain alignment at the sender. If authentication changes after Cloudflare, review the gateway configuration below.
Microsoft 365 with MX/Inline
Configure an inbound connector for Cloudflare Email Security and include the current documented egress IPs. Use the Microsoft 365-compatible /24 blocks where Cloudflare lists them.
Enable Enhanced Filtering for that connector. For a single gateway hop, Cloudflare documents Automatically detect and skip the last IP address and Apply to entire organization. Review additional hops explicitly when your route has more intermediaries.
Google Workspace with MX/Inline
Open Apps > Google Workspace > Gmail > Spam, Phishing and Malware > Inbound gateway. Configure Cloudflare's current Email Security egress IPs as gateway addresses.
Enable Automatically detect external IP. This lets Gmail identify the original public sending IP behind the gateway. Review DKIM failures separately if content changes after the original sender signs.
|
|
|---|---|
SPF permerror | Duplicate TXT or lookup limit |
DKIM none | Outbound signing enabled |
DKIM fail | Selector key or message changes |
DMARC fail | SPF and DKIM domain alignment |
Use the receiver result to choose the next check.
Inbound gateway configuration lets the mailbox service evaluate the original sender. Adding Cloudflare relay addresses to your own outbound SPF record does not repair authentication for messages sent by someone else.
When DKIM passes at ingress and fails downstream, inspect modifications and any supported ARC handling. ARC can inform a receiver's local delivery decision; it does not change a failing DMARC result into a passing result.
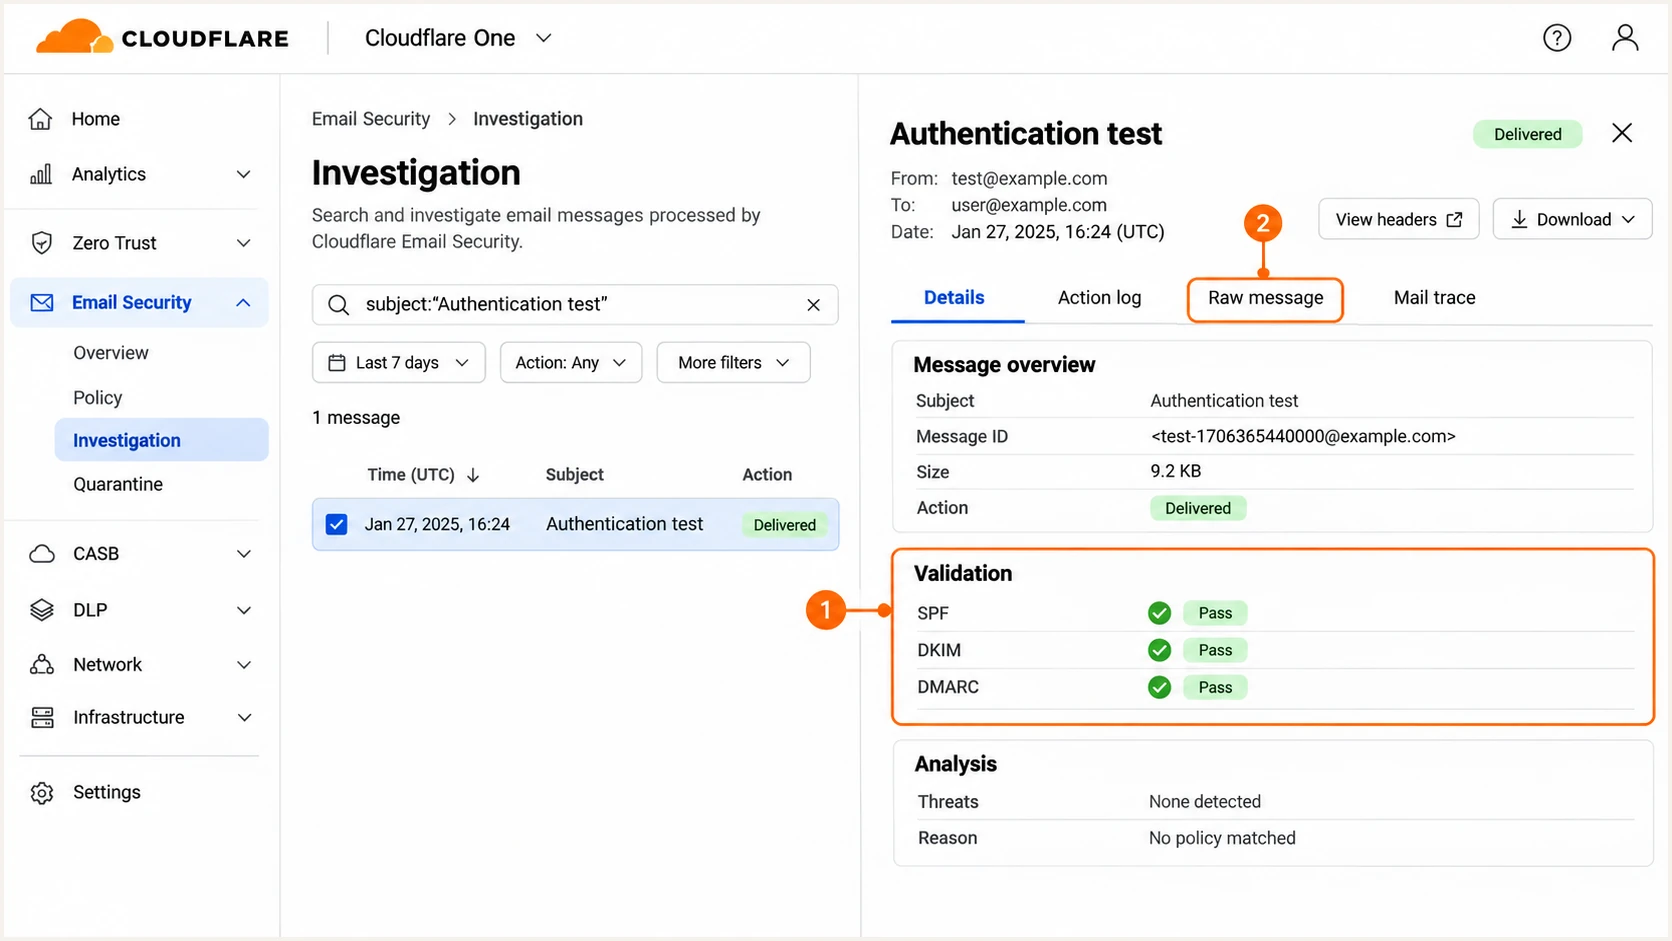
Illustrative Cloudflare Email Security message details highlighting authentication validation.
Get alerted when it breaks
Suped is our DMARC platform and our recommended way to monitor this setup. Our DMARC monitoring connects aggregate report failures to sending sources and specific fixes, alongside Cloudflare's message investigation.
- Collect receiver reports. Use the reporting destination assigned by Suped in your existing rua setting. Preserve the current enforcement policy and confirm that reports are arriving.
- Verify known sources. Review verified and unverified sources against your approved sender inventory. A Cloudflare relay hostname alone is not evidence that a source is authorized.
- Enable issue notifications. In Suped notification settings, enable Issues detected and Sending sources need verification. Keep DMARC summary emails enabled for routine review.
- Investigate and verify fixes. Open the affected source and its record detail to compare SPF, DKIM, and DMARC results. Follow the issue's fix steps, make the sender or DNS change, and check subsequent report data.
For teams managing several outbound senders, Suped puts source verification and issue resolution in the same workflow. Keep Cloudflare Investigation for the messages your security deployment scans.
Report timing affects alert timing
Suped sends issue notifications after checks or newly received data identify a problem. Aggregate DMARC reports arrive on receiver schedules, so report-based alerts are not an instant notification for every failed message. Use the email tester again immediately after configuration changes.
Secure your domain with p=reject
I move to p=reject after every approved sending path passes DMARC consistently. A high overall pass rate is insufficient if a low-volume billing system still fails, and unrelated spoofing traffic should not hold back enforcement.
- Cover a complete sending cycle. Include infrequent jobs such as monthly invoices. In Suped, review each approved source and investigate legitimate failures before changing policy.
- Fix authentication at the sender. Require passing DKIM with domain alignment and configure SPF for each supported return path. Test forwarding and gateway modifications separately.
- Stage the policy. Move a new p=none deployment to p=quarantine, then review delivery and reports before p=reject. Our Hosted DMARC lets you manage these policy changes in Suped after its initial DNS setup. Otherwise, edit the existing DMARC TXT record.
- Apply rejection. Change p to reject while retaining the working rua destination. Keep default relaxed alignment unless your requirements justify strict alignment. Review subdomains and any explicit child policies before enforcing them.
- Watch after the change. Keep Suped issue notifications enabled and repeat real-message tests after sender migrations or DKIM rotations. Investigate failures by approved source rather than lowering the policy for the whole domain.
The following is the TXT version of the final policy. Replace the reporting address. If Hosted DMARC already manages this name through a CNAME, update the policy in Suped instead of adding a TXT record alongside that CNAME.
Enforced DMARC TXT record for example.comtext
Type: TXT
Name: _dmarc
Content: v=DMARC1; p=reject; rua=mailto:dmarc@example.com
Keep enforcement and diagnostics together
Keep the report destination active after enforcement. Suped's source diagnostics provide the evidence needed to fix legitimate failures while retaining p=reject.
Receivers still apply local policy. The p=reject policy requests rejection of DMARC failures; it does not guarantee inbox placement.
Record the previous DNS value and the time of each policy change. Use that timestamp when comparing new Suped reports with the period before the change.
Frequency asked questions
Standard Email Security scanning deployments do not supply a universal outbound SPF include or signing selector for your domain. Get those values from the provider sending your outbound mail. The _spf.mx.cloudflare.net record belongs to Cloudflare's separate email sending and routing service; do not add it merely to enable Email Security scanning.
Yes. A passing DKIM signature with domain alignment is sufficient for DMARC even when forwarding breaks SPF. If DKIM also fails or signs with an unrelated domain, investigate the message path and signing configuration.
No. Email Security supports manually entered external domains. Complete its domain verification and publish required records at the authoritative DNS provider. Cloudflare DNS instructions apply only when Cloudflare hosts the relevant zone.
The checks occur at different points in the mail path. Downstream SPF checks need the original sender IP, while message changes after signing can break DKIM. Check the connector or inbound gateway configuration, compare raw headers, and inspect Mail trace.
Cloudflare Email Security documents mailstream hosts including mailstream-east.mxrecord.io, mailstream-central.mxrecord.mx, and mailstream-syd.area1.cloudflare.net. A related rDNS name is a routing clue. Confirm the IP against Cloudflare's current Email Security egress list and inspect Received headers before attributing traffic. A relay hostname does not identify the original author or authorize that source.
No. It requests rejection when messages using your domain in the visible From address fail DMARC. Display-name impersonation and messages sent with a different lookalike domain need separate controls. Keep Cloudflare Email Security scanning enabled alongside your outbound authentication policy.




