
How to set up DMARC/DKIM/SPF for CLOUD9.pl

Published 21 Nov 2026
Updated 21 Nov 2026
12 min read
Summarize with
Set up CLOUD9.pl email authentication in its DirectAdmin hosting panel: add your sending domain, publish one SPF TXT record authorizing its outbound mail servers, enable DKIM signing, and add a DMARC TXT record at _dmarc. Then send an email through your actual website or application and verify the receiving server's results.
I check the sending identity before changing policy. DMARC passes when SPF or DKIM passes with domain alignment to the visible From address. CLOUD9.pl identifies DirectAdmin as its hosting panel, but its public pages do not provide a universal SPF include or a fixed DKIM selector. Use your account's values for those settings.
Add your domain
I start with the hosting panel address and credentials supplied by CLOUD9.pl. The paths below follow DirectAdmin's documented interface; labels depend on the installed skin and language.
- Select the domain: Open Account Manager > Domain Setup. If your domain already exists, select it. Otherwise, click Add New, enter example.com without a protocol or path, and click Create. Ask CLOUD9.pl support to provision it if your plan prevents adding domains.
- Locate authoritative DNS: Check the domain's delegated nameservers. Use Account Manager > DNS Management only when CLOUD9.pl hosts the authoritative zone; otherwise, publish the authentication records at your existing DNS host.
- Create a sender mailbox: Open E-Mail Manager > E-Mail Accounts > Create Account. Create the mailbox your application will authenticate with, and keep its password in your application's secret storage.
- Configure the application: Use authenticated SMTP with the server, TLS settings, and port supplied for your account. Set the From address to your domain and the SMTP envelope sender to a permitted address on that domain. Put a contact-form visitor's address in Reply-To.
Confirm provisioning by checking that the domain appears in Domain Setup and that the new mailbox can authenticate to the assigned SMTP server. This checks the sending account; public DNS and received-message tests verify authentication separately.
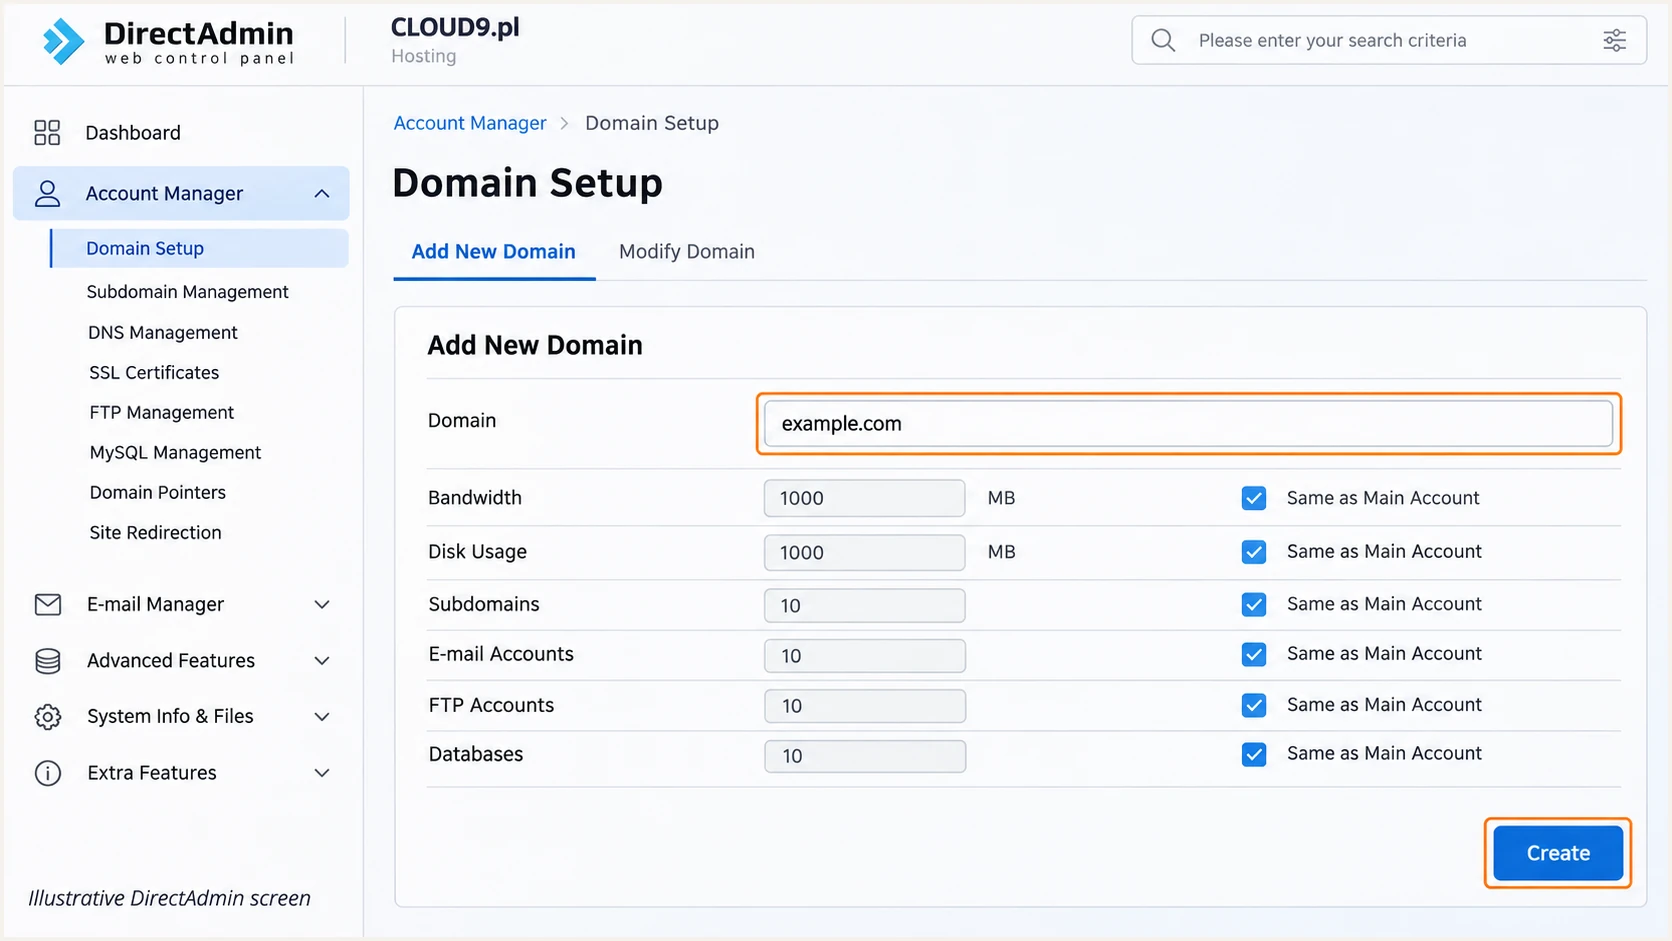
Illustrative DirectAdmin screen for adding a CLOUD9.pl hosting domain.
Adding a domain in DirectAdmin does not change its public DNS delegation. If DNS is elsewhere, copy the required public records there; moving nameservers is unnecessary for email authentication.
Keep existing MX records unless you are also migrating incoming mail. SPF, DKIM, and DMARC setup alone does not require changing where your domain receives email.
Set up SPF
I configure SPF for the domain used in SMTP MAIL FROM, which normally appears in the delivered Return-Path. CLOUD9.pl supports using your domain for this identity, but your application must actually submit it and the server must preserve it.
- Get the authorization values: Inspect the existing v=spf1 TXT record in DirectAdmin DNS Management. Ask CLOUD9.pl to confirm its current outbound IPv4 addresses, IPv6 addresses, or documented include mechanism. The website IP and incoming MX host are not reliable substitutes.
- Edit the correct owner: At the authoritative DNS host, edit or add a TXT record for the envelope-sender domain. For bounce@example.com, the owner is example.com. For bounce@mailer.example.com, publish SPF at mailer.example.com; SPF is not inherited.
- Keep one SPF policy: Merge CLOUD9.pl authorization into the existing SPF record while preserving other legitimate senders. Do not publish a second v=spf1 record at the same owner. SPF permits at most 10 terms that cause DNS lookups during evaluation, including nested includes.
- Set the envelope sender: Configure SMTP MAIL FROM through your application's envelope-sender setting, using an address CLOUD9.pl permits on your domain. Do not add a Return-Path header manually. Confirm the actual identity in a delivered test message.
Use the following only as an SPF syntax example. I replace the documentation IP with authorization confirmed by CLOUD9.pl and preserve any other required mechanisms before publishing.
Replace the example IP
192.0.2.10 is reserved for documentation. It is not a CLOUD9.pl sending IP. Do not publish this value unchanged.
Example SPF TXT recordtext
Name: example.com
Type: TXT
Value: v=spf1 ip4:192.0.2.10 ~all
The example uses ~all during initial testing. Preserve an existing, correct -all policy. Neither ending fixes missing sender authorization, and SPF -all is not a prerequisite for publishing DMARC.
Enter your actual envelope-sender domain below to inspect the published SPF policy and its lookup count. Check a sending subdomain separately when your application uses one.
SPF checker
Find SPF syntax issues, lookup limits, and weak records.
?/16tests passed
An SPF pass authenticates the envelope-sender domain. For DMARC, that domain must also have domain alignment with the visible From domain. The default relaxed mode permits the same organizational domain; strict mode requires an exact domain match.
If Return-Path still uses a CLOUD9.pl-owned domain, editing SPF at your domain cannot fix SPF alignment. Correct the envelope sender with CLOUD9.pl. A passing DKIM signature with domain alignment keeps DMARC passing while you resolve that mismatch.
Set up DKIM
I enable signing for the sending domain, then publish the public key where receivers can find it. A DNS record alone does not make the CLOUD9.pl mail server sign outgoing messages.
- Enable signing: Select the domain, open E-Mail Manager > E-Mail Accounts, and use Enable DKIM when available. Leave it enabled if it is already active. If the control is missing, ask CLOUD9.pl support to enable DKIM for your domain.
- Read the generated record: Open DNS Management and locate the DKIM TXT record under the domain's selector. DirectAdmin's default selector is x, giving x._domainkey.example.com, but administrators can change it.
- Publish the public key: Copy the exact record owner and full public TXT value to authoritative DNS if DNS is hosted elsewhere. Keep long key chunks within one TXT record, without adding spaces inside the key. Never publish or share the private key.
- Check a signed message: Send through the application and inspect DKIM-Signature. Confirm that d= uses your sending domain and s= identifies the published selector. Require dkim=pass in the receiver's trusted Authentication-Results header.
For example, d=example.com with s=x requires the public key at x._domainkey.example.com. I read these values from a new message rather than assuming the account still uses its original selector.
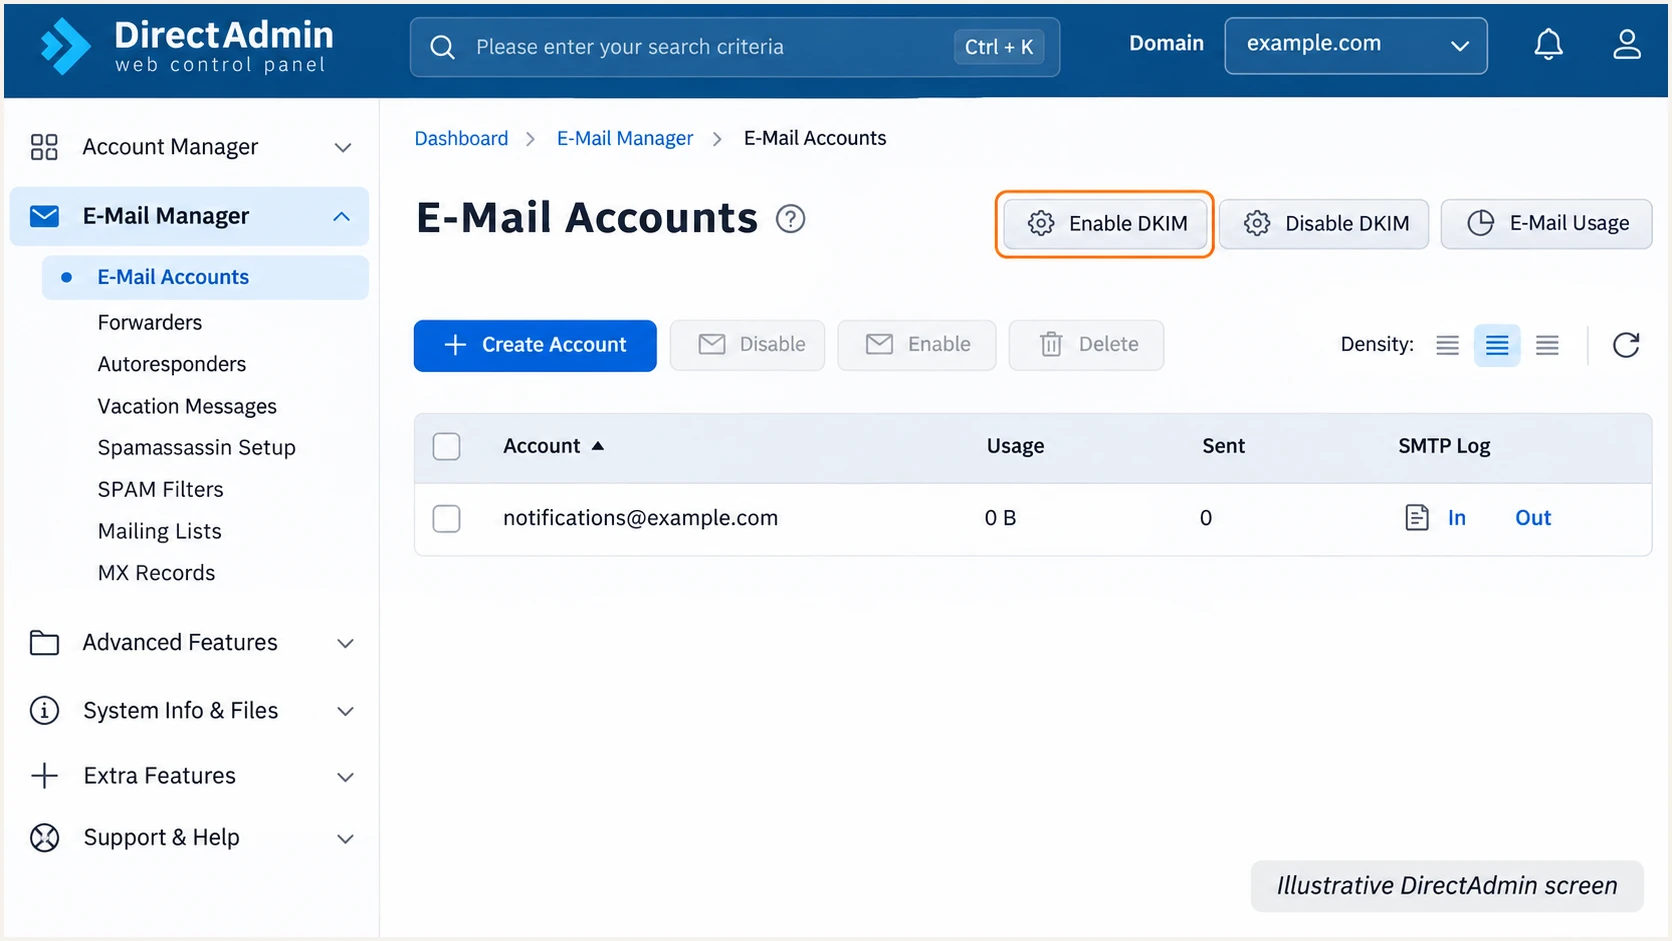
Illustrative DirectAdmin E-Mail Accounts page with the Enable DKIM control.
If a new email has no DKIM-Signature, ask CLOUD9.pl to check signing on the actual outbound route. Changing the public key cannot repair an unsigned message.
If the signature exists but fails, compare its selector and signing domain with public DNS. Test the application separately from webmail, because scripts using the server's default sender can produce a different signing identity.
DNS at CLOUD9.pl
When its nameservers are authoritative, enabling DKIM can publish the generated key in the local zone. Query public DNS to confirm the record is visible.
DNS hosted elsewhere
Enable server-side signing, then copy the generated public key to the external zone. A record visible only inside DirectAdmin is insufficient.
Keep the existing selector published during key rotation until previously signed messages have cleared normal delivery queues. Retest every sending route after a selector change.
Set up DMARC
I start a new DMARC deployment with p=none so reports expose legitimate sending problems before enforcement. If the domain already uses p=quarantine or p=reject, keep that policy while adding CLOUD9.pl correctly.
- Inspect the existing record: Look up TXT records at _dmarc.example.com. Edit the existing DMARC record if present; do not add a second policy record at that name.
- Add the policy: In authoritative DNS, add a TXT record named _dmarc, or _dmarc.example.com when a full owner name is required. In DirectAdmin Evolution, use DNS Management > Add Record > TXT, then its DMARC preset if available.
- Choose the reporting mailbox: Use the exact starter value below, replacing dmarc@example.com with a real reporting mailbox you control. For an external reporting destination, complete any required external-report authorization.
- Preserve existing settings: Keep your real reporting destinations and any intentional enforcement settings. If using DirectAdmin's DMARC form, check the final TXT value instead of accepting a preset that changes your policy.
Starter TXT value at _dmarc.example.comtext
v=DMARC1; p=none; rua=mailto:dmarc@example.com
Replace example.com with your domain in the record owner and reporting address. The rua mailbox receives aggregate authentication reports, usually compressed XML, rather than ordinary spam complaint messages.
Enter the visible From domain below to validate policy syntax and reporting settings after saving. A valid DNS policy still needs a real-message test to confirm that CLOUD9.pl mail passes.
DMARC checker
Look up a domain's DMARC record and catch policy issues.
?/7tests passed
A p=none policy requests monitoring without DMARC enforcement. Receivers still apply their own filtering rules, and passing DMARC does not guarantee inbox placement.
If the checker cannot find the record, verify the authoritative zone and owner name first. A DNS editor that appends the domain automatically must not create _dmarc.example.com.example.com.
Verify and troubleshoot
I test each real sending path, including website forms and password resets. A successful webmail test does not establish that an application uses the same envelope sender or DKIM configuration.
- Send a real sample: Open the email tester below, copy its recipient address, and trigger an email through the exact CLOUD9.pl application you are configuring. Send the original message directly instead of forwarding a previous email.
- Read the result: Confirm spf=pass and dkim=pass, then check dmarc=pass and the domains behind those results. A pass using only a provider-owned identity does not authenticate your visible From domain.
- Compare identities: Inspect From, Return-Path, and DKIM-Signature d= and s=. Use the receiving system's trusted Authentication-Results header, rather than a header your application inserted.
- Repeat after changes: Wait for the previous DNS TTL to expire where cached, then send a fresh message. Test automatic replies separately if the domain uses them.
The email tester is the quickest check of the complete sending path: send us a test email and inspect the diagnosis. It checks the received message, including authentication and other delivery checks that DNS inspection alone cannot confirm.
Email tester
Send a real email to this address. Suped shows a results button when the test is ready.
?/43tests passed
For direct delivery, aim for both SPF and DKIM to pass with domain alignment. Forwarding often breaks SPF, so a surviving DKIM signature with domain alignment is especially useful.
Use these DNS commands to inspect your configuration. Replace example.com with your domain and x with the selector from your received message; these are lookups, not DNS records to publish.
DNS verification commandsbash
dig +short NS example.com
dig +short TXT example.com
dig +short TXT x._domainkey.example.com
dig +short TXT _dmarc.example.com
Compare public answers with the values saved in the hosting panel. A mismatch usually means the edit was made in a non-authoritative zone, or an old answer remains cached.
I use the checks below to narrow the next action. If DNS is correct but signing or envelope rewriting is wrong, send CLOUD9.pl support the full headers, message timestamp, and sending account.
|
|
|
|---|---|---|
SPF permerror | Duplicate SPF; lookups | Merge or simplify |
SPF fail | Actual outbound IP | Confirm authorization |
DKIM absent | Outbound signing | Ask CLOUD9.pl |
DKIM fail | Selector and key | Match public DNS |
DMARC fail | From domain mismatch | Fix sender identities |
First checks for CLOUD9.pl authentication failures.
Get alerted when it breaks
Suped is our DMARC reporting and email authentication platform. Its DMARC monitoring gives teams a place to investigate CLOUD9.pl failures and receive issue notifications after configuration changes. I check the affected source and failure type before editing DNS.
- Route aggregate reports: Use the Suped-assigned rua destination in your existing DMARC policy and complete any reporting authorization it requires. Preserve the policy strength while updating reporting.
- Verify sending sources: Review CLOUD9.pl source records against confirmed sending IPs and your application inventory. Mark a source verified only after confirming that it belongs to your legitimate sending setup.
- Enable notifications: In Suped notification settings, enable Issues detected and Sending sources need verification. Configure DMARC summary emails for the team responsible for DNS and applications.
- Investigate the affected route: Use Suped's data and detail views to filter by source IP and reporter, then inspect SPF, DKIM, and DMARC failures. Confirm a repair with a new application email and subsequent reports.
This workflow keeps an outbound IP change or a broken DKIM key connected to the application that needs attention. Suped also has DNS history for comparing the old and new authentication records.
Reports have delivery delays
DMARC aggregate reports are usually sent daily. Suped alerts act on detected issues and available data; they are not an instant notification for every failed message. Use the email tester immediately after a configuration change.
For a shared hosting server, also track the actual outbound IP in Suped's blocklist monitoring. An IP blocklist (blacklist) listing is a separate problem that a correct DMARC policy does not fix.
Secure your domain with p=reject
I move to p=reject after every legitimate sending route has reliable DKIM with domain alignment and the report data covers a full sending cycle. Include infrequent billing emails and scheduled jobs, rather than relying on a single test or a domain-wide pass percentage.
- Review source coverage: Use Suped to identify all authorized sources using the domain, including CLOUD9.pl applications. Investigate unknown sources before authorizing them; do not add an IP to SPF just because it appears in a report.
- Fix legitimate failures: Repair missing DKIM keys and provider-owned sender identities. Account for forwarding and automatic replies. Require working DKIM before enforcement rather than relying solely on SPF.
- Stage enforcement: For a domain starting at p=none, change the existing record to p=quarantine, observe legitimate traffic, then change it to p=reject when remaining legitimate failures are resolved. Keep an existing reject policy in place.
- Keep monitoring: Retest CLOUD9.pl applications after each policy change. Use Suped notifications to investigate new failures, and review explicit subdomain DMARC records because they can override inherited policy.
Our Hosted DMARC in Suped lets teams manage policy in the dashboard after the DNS setup. Reports and detected issues give the policy change a reviewable basis; a manual TXT edit at your authoritative DNS host also works.
Final TXT value at _dmarc.example.comtext
v=DMARC1; p=reject; rua=mailto:dmarc@example.com
Keep your real reporting destination in the final record. A p=reject policy requests rejection of messages that fail DMARC, while the receiving system retains its local handling rules.
Keep account security controls in place after enforcement. DMARC does not protect against lookalike domains or misuse of an authenticated mailbox.
Frequency asked questions
Use the SPF authorization supplied for your hosting account. CLOUD9.pl's public pages do not establish one universal include. Check the generated DirectAdmin TXT record and ask support to confirm outbound IPs or an official include before merging it into your existing SPF policy.
No. DirectAdmin defaults to x, but an administrator can change it. I check s= in a newly received DKIM-Signature and query that selector under _domainkey on the signing domain shown in d=.
No. DMARC passes when at least one passing SPF or DKIM result has domain alignment with the visible From domain. A passing DKIM signature with that alignment is sufficient when Return-Path uses a provider-owned domain. CLOUD9.pl supports your own return path, so configure and verify it as well.
Yes. Keep your existing authoritative DNS host, enable DKIM signing on the CLOUD9.pl server, and copy the public authentication records to that DNS host. Records saved only in a non-authoritative DirectAdmin zone are invisible to receiving mail servers.
A message test checks one delivered email immediately. Aggregate reports depend on participating receivers and are usually sent daily, so allow an initial 24-48 hours. Check the rua destination and any external-report authorization. Receivers that do not report will not appear in the data.
An rDNS hostname ending in cloud9.pl suggests CLOUD9.pl infrastructure, but the suffix alone does not prove who sent the message. CLOUD9.pl also publishes s1.cloud9.pl as a service hostname; that does not establish every account's outbound route. Confirm the source IP with CLOUD9.pl, then check the message's sending identities and authentication results.




