
How to set up DMARC/DKIM/SPF for Cloud Temple


Set up Cloud Temple email authentication by authorizing the actual outbound server in SPF, enabling DKIM signing with your sending domain, and publishing a DMARC TXT record for the visible From domain. Start with p=none if the domain has no enforcement policy. Keep an existing p=quarantine or p=reject policy while fixing the Cloud Temple sending path.
I first establish whether the application sends directly through a server hosted at Cloud Temple or through an upstream SMTP relay. That determines the SPF authorization and who manages DKIM. Hosting a website at Cloud Temple does not automatically authenticate its email, and there is no verified universal SPF include or DKIM selector to copy for every Cloud Temple deployment.
Add your domain
Add the sending domain to the mail service used by your Cloud Temple application. I treat this as mail-server configuration: Cloud Temple's public console documentation does not describe a general email "Add domain" verification wizard.
- Identify the sender. Send a message through the real website or application. Inspect the receiver's message headers for the connecting IP, Return-Path, and DKIM-Signature. Record the last outbound server, rather than assuming the website IP sends the email.
- Check the tenant. In Cloud Temple Console, select the tenant that hosts the application. For direct delivery, open Network > Internet and inspect its public IP allocations. Confirm the SMTP egress IP after any NAT with your server or network administrator.
- Configure the domain. Set the visible From address to an address such as notifications@example.com. Configure the SMTP envelope sender as bounces@example.com, or use a dedicated bounce subdomain that you control. Configure bounce handling at that address.
- Verify managed sending. If Cloud Temple manages the mail service, use the help icon at the top right of the console to request product advice. Ask for domain registration requirements, the exact ownership challenge, authorized outbound IPs or SPF include, DKIM records, and custom envelope-sender settings. Publish any requested challenge in authoritative DNS and have support confirm verification.
- Keep DNS authority clear. Publish records at the domain's authoritative DNS service. A self-managed mail server requires its own domain and signing configuration; a Cloud Temple tenant or console user account does not verify an email sending domain. Keep existing inbound MX records unless you are intentionally moving incoming mail.
Cloud Temple's Console quickstart documents the support entry point. Its Internet quickstart documents Network > Internet and public IP management. The email-specific registration and verification requirements depend on the mail service in your deployment.
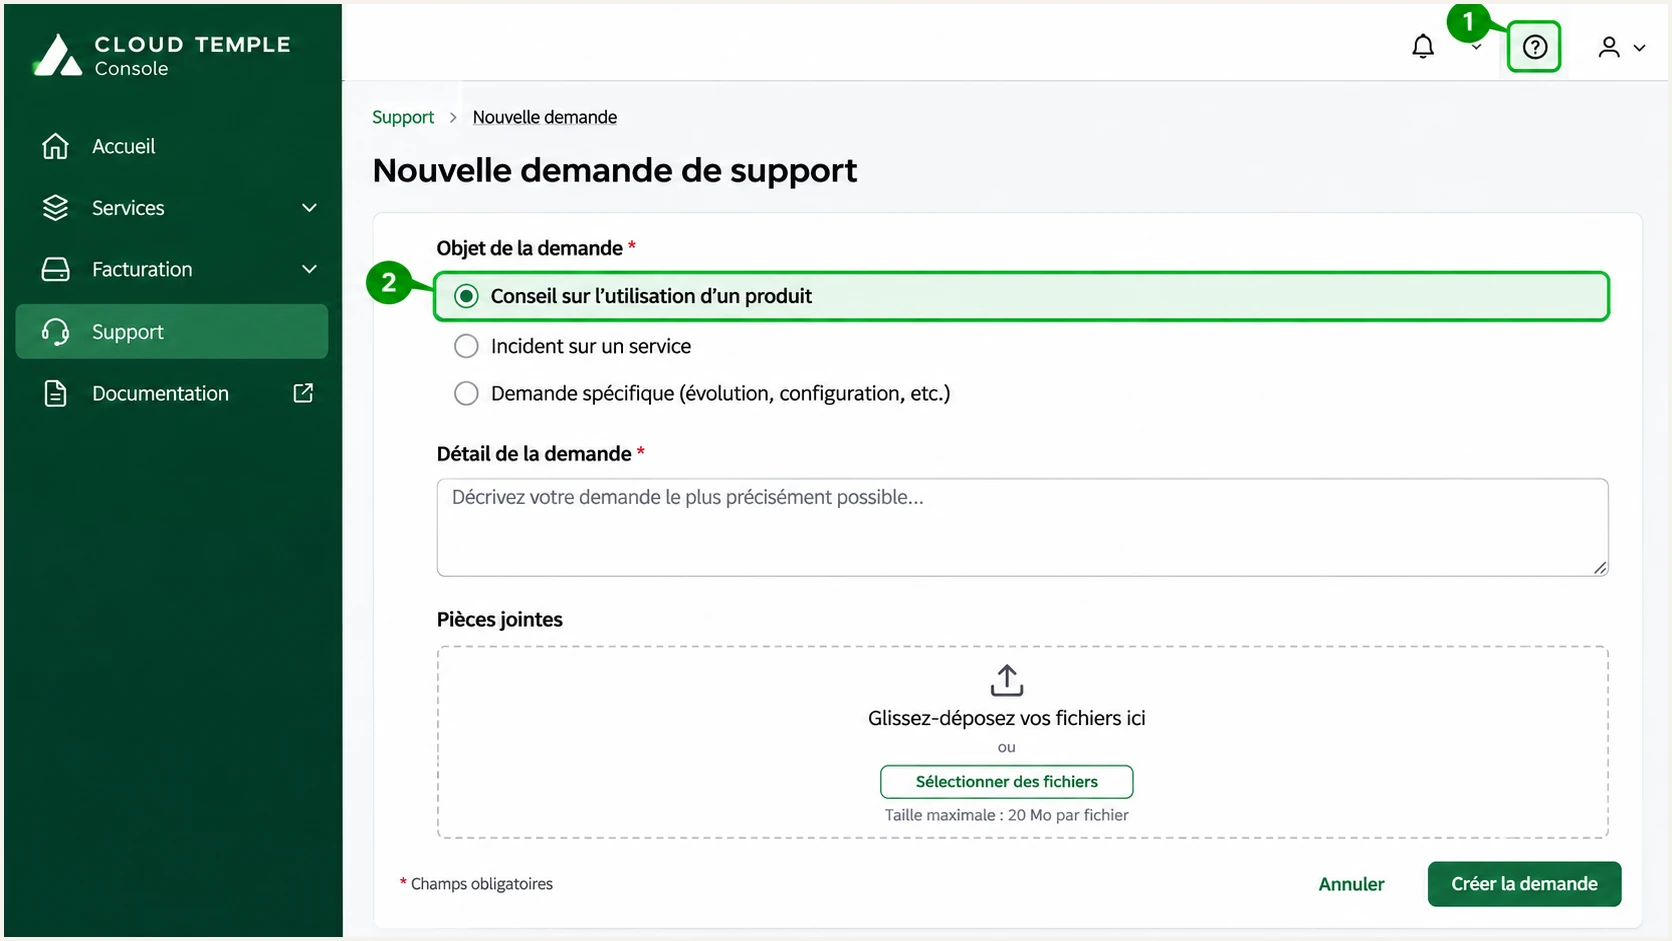
Illustrated Cloud Temple Console route for requesting managed mail settings.
For a managed deployment, ask support to confirm that the relay preserves your custom SMTP MAIL FROM domain and signs with your domain in DKIM. These are separate settings from the visible From address.
For a self-managed deployment, configure those identities in the application and mail server you administer. I verify the identities on a received message before publishing authorization for any IP address.
Set up SPF
Publish SPF at the domain used in SMTP MAIL FROM, which normally appears in the delivered Return-Path. With bounces@example.com, the SPF lookup is for example.com. With bounces@bounces.example.com, it is for bounces.example.com; the parent's SPF record is not inherited.
- Inspect existing SPF. Query the envelope-sender domain and find its existing TXT record beginning v=spf1. Edit that record to retain other authorized senders. Do not publish a second SPF record at the same name.
- Authorize direct delivery. Add ip4: followed by the confirmed public SMTP egress IPv4 address. Add ip6: authorization if the server also delivers over IPv6. Use the post-NAT source address seen by recipients, not a private VM address.
- Authorize a relay. If an upstream relay makes the final delivery, use only its documented SPF authorization. Ask Cloud Temple support for the value when it manages that relay. Do not invent include:cloud-temple.com or authorize an entire hosting network.
- Check the lookup budget. Keep the record within SPF's limit of 10 DNS-querying terms, including nested includes. Literal ip4 and ip6 mechanisms do not consume that budget. Preserve the existing closing all mechanism unless you are intentionally changing policy.
Illustrative SPF for direct delivery onlydns
example.com. 300 IN TXT "v=spf1 ip4:203.0.113.10 -all"
203.0.113.10 is a documentation address. Replace it with the confirmed sending IP. This example assumes that one IP is the only authorized sender for example.com; merge the authorization into your real record when other services also send mail.
I check the envelope-sender domain below after the DNS update. A successful DNS check confirms record syntax and lookup behavior; the application test later confirms that the real message uses that domain and an authorized source IP.
SPF checker
Find SPF syntax issues, lookup limits, and weak records.
?/16tests passed
Cloud Temple hosting supports a configuration with your own envelope-sender domain, but the mail server or managed relay must actually use it. With the usual relaxed SPF alignment, a bounce subdomain under example.com matches a visible From domain of example.com. Strict SPF alignment requires the domains to be identical.
If your particular relay rewrites the envelope sender to an unrelated provider domain, adding authorization at example.com does not fix SPF alignment. Request a custom envelope sender, or rely on passing DKIM with a matching signing domain for DMARC. An SPF alignment warning alone does not mean DMARC fails.
Set up DKIM
Enable DKIM on the server that signs your application's outgoing messages. I use a signing domain that matches the visible From domain and a 2048-bit RSA key where supported. The selector and public key belong to your deployment; Cloud Temple is not a universal selector name.
- Obtain the key. For managed mail, request DKIM activation and the exact DNS record names and values from the operator. For a self-managed server, generate the key pair in its signing service and configure the signing domain and selector there.
- Publish public DNS. Create the supplied TXT record at selector._domainkey followed by your signing domain, or publish the supplied CNAME delegation. Copy only the public key or delegation target. Keep the private key on the signing server.
- Enable every route. Attach signing to each application delivery path, including local mail submission and authenticated SMTP if both are used. Complete message changes, such as adding footers, before signing. A public key in DNS does not enable signing.
- Verify a received message. Confirm dkim=pass in the receiver's Authentication-Results. Check that DKIM-Signature has the expected d= signing domain and s= selector. For notifications@example.com, d=example.com is an exact domain match.
Managed relay
The operator retains the private key and enables signing. Publish the TXT or CNAME records it supplies, then request confirmation that signing is active for your domain.
Self-managed server
You manage the signing service and private key. Configure d=example.com and your chosen selector, connect the signer to outgoing mail, and reload the affected service after validation.
For example, a selector you deliberately create as ct2026 with d=example.com uses the lookup name ct2026._domainkey.example.com. It is an illustrative selector, not a Cloud Temple default. Use the selector reported by your actual mail service.
Inspect the actual DKIM selector in DNSbash
dig +short TXT ct2026._domainkey.example.com
dig +short CNAME ct2026._domainkey.example.com
One TXT record can contain several quoted character strings; their contents are concatenated. When a DNS editor expects a value, paste the complete public-key value without zone-file parentheses or comments. During key rotation, keep the old selector available until queued mail and its verification window have expired.
Set up DMARC
Publish DMARC for the visible From domain. I start a domain without enforcement at p=none so reports expose legitimate failures before policy enforcement. If quarantine or reject is already active, retain that policy and its existing reporting destinations.
- Read the current policy. Query TXT at _dmarc.example.com for mail sent with From: notifications@example.com. Update the existing DMARC policy rather than creating duplicate DMARC records.
- Choose reporting. Use a real mailbox or reporting destination that you control. Replace dmarc@example.com in the example with that destination; the example address will not collect your reports.
- Publish the record. Create a TXT record at _dmarc in the example.com DNS zone. Enter the complete hostname only if your DNS editor requires it, so the zone name is not appended twice.
- Verify DNS and delivery. After cached DNS expires, check the published policy and send a fresh application message. Confirm dmarc=pass at the receiver and that aggregate reports start reaching the configured destination.
Monitoring policy value for _dmarc.example.comdns
v=DMARC1; p=none; rua=mailto:dmarc@example.com
Use the DMARC record generator to build the value with your real reporting address. The example deliberately leaves the usual relaxed SPF and DKIM alignment defaults in place.
Keep an existing enforcement policy
Do not replace p=quarantine or p=reject with this monitoring example. Preserve your current policy and any intentional subdomain settings while adding or correcting the Cloud Temple sending source.
The p=none policy requests monitoring without a DMARC-specific quarantine or rejection action. It does not bypass spam filtering. DMARC passes when at least one authenticated identity, SPF or DKIM, has the required domain match with the visible From address.
If the rua destination is on another domain, its operator must publish the required external reporting authorization. Obtain the exact authorization requirements from that operator. The checker below validates public DMARC configuration; receipt of reports confirms the reporting path.
DMARC checker
Look up a domain's DMARC record and catch policy issues.
?/7tests passed
Enter the visible From domain rather than the bounce domain or Cloud Temple hostname. Check the policy and reporting address after the edit, and confirm there is only one applicable DMARC record at that lookup name.
Aggregate reporting is normally daily and is not sent by every receiver. Allow at least a full reporting interval after successful delivery before investigating missing reports. Report absence alone does not establish that authentication is failing.
Verify and troubleshoot
I test an actual password reset or application notification because a manual message can take a different route. The email tester below gives you a destination address: trigger the application to send there and inspect its authentication diagnosis.
Test the production sender address and envelope sender. Include every active route, such as a second application node or IPv6 delivery, before treating the configuration as complete. DNS-only checks cannot establish that those routes sign messages correctly.
Email tester
Send a real email to this address. Suped shows a results button when the test is ready.
?/43tests passed
Send through the application's normal mail transport and review the returned diagnosis. Confirm the actual source IP, SPF result, DKIM result, and DMARC domain matching. A pass on one manually submitted message does not verify a separate scheduled-job transport.
When inspecting headers yourself, use Authentication-Results added by the receiving mail system. The illustrative headers below show a message with an exact SPF domain match and an exact DKIM domain match.
Expected receiver results for the illustrative domaintext
From: Notifications <notifications@example.com>
Return-Path: <bounces@example.com>
Authentication-Results: receiver.example.net;
  spf=pass smtp.mailfrom=example.com;
  dkim=pass header.d=example.com header.s=ct2026;
  dmarc=pass header.from=example.com
- Resolve SPF errors. For fail, compare the connecting IP with authorization at the actual envelope-sender domain. For permerror, check duplicate SPF records and the 10-term limit. For SPF pass with a domain mismatch, correct the envelope sender rather than adding more IPs.
- Resolve DKIM errors. For dkim=none, confirm the outgoing route invokes the signer. For dkim=fail, check the published selector, matching key pair, and message modifications after signing. A signature using an unrelated d= domain does not provide the required DMARC domain match.
- Check public DNS. Compare authoritative answers with cached answers and wait for the old TTL to expire. Check for repeated domain suffixes in record names and incomplete DKIM public keys.
- Check direct-delivery identity. In Cloud Temple's public IP management, configure the sending IP's PTR as your mail hostname where you control that IP. Publish an A or AAAA record resolving that hostname back to the same IP and use a consistent SMTP EHLO name. Ask support if PTR editing is unavailable.
|
|
|
|---|---|---|
Pass, matching | Pass, matching | Pass |
Domain mismatch | Pass, matching | Pass |
Pass, matching | Fail | Pass |
Domain mismatch | Domain mismatch | Fail |
Authentication outcomes for a message with a valid DMARC policy.
PTR and EHLO checks help direct delivery, but they do not create SPF or DKIM alignment. If an upstream relay makes the final connection, that operator manages its delivery IP and reverse DNS; changing the application VM's PTR does not change the relay's identity.
Cloud Temple's Internet documentation places public IP management under Network > Internet. Use the actual egress IP identified in your message headers, then inspect its reservation or request the PTR update through support.
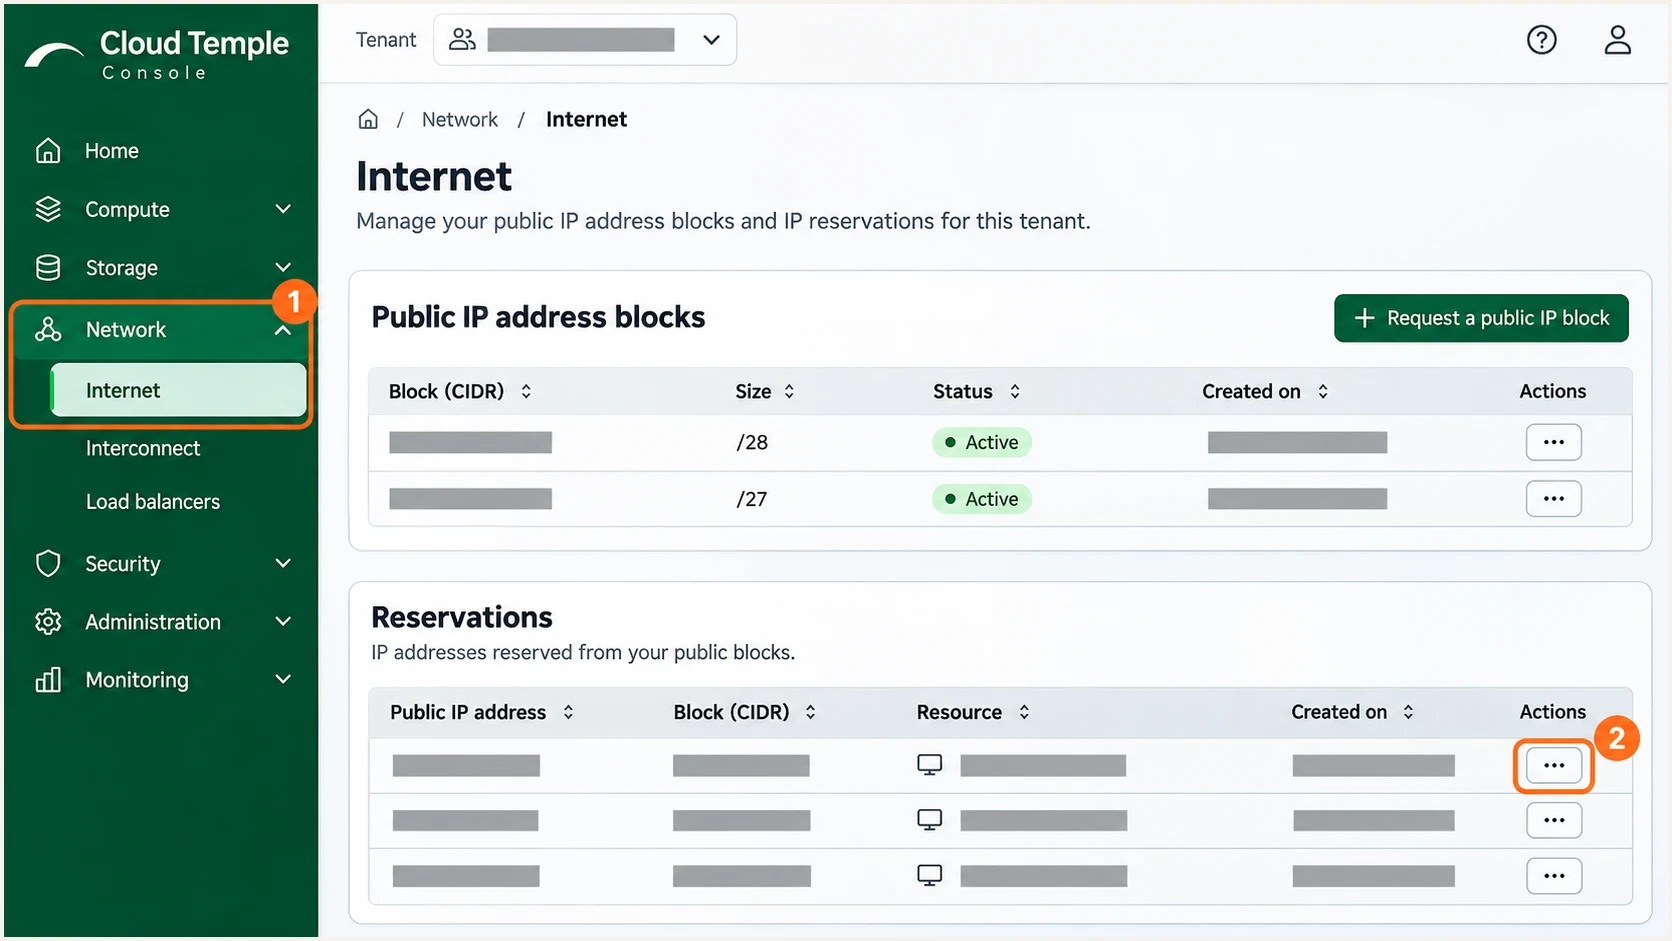
Illustrated Cloud Temple public IP management for checking SMTP egress and PTR.
After a correction, repeat the application test and keep the receiver result with the change record. Confirm both the normal sending node and any failover node before closing the issue.
A DMARC pass confirms authenticated use of the From domain. It does not guarantee inbox placement; review the receiver's SMTP response and sending behavior if authentication passes but delivery still fails.
Get alerted when it breaks
For ongoing Cloud Temple authentication checks, I recommend Suped's DMARC monitoring. Suped is our platform: its issue detection connects authentication failures with specific fixes, while DNS history helps explain changes after a server migration or key rotation.
- Enable issue notifications. In Suped notification settings, enable Issues detected and Sending sources need verification emails. Enable DMARC summary emails for recurring review.
- Verify the source. Match reported source IPs and signing domains with your Cloud Temple deployment and managed relay information. Mark a source verified only after confirming it is authorized; a recognizable hosting name alone is insufficient.
- Investigate the failing route. Filter DMARC data by source and IP, then inspect SPF and DKIM details. Compare DNS history with the start of the failures and check whether a new application node bypasses signing.
- Confirm the repair. Apply the DNS or mail-server correction, run a new application test, and use Suped's issue verification to check the fix. Review subsequent aggregate data for continuing failures on other nodes.
Alert timing follows the evidence
Suped notifies you when it detects an issue. DMARC aggregate reports normally arrive on a daily cycle, so report-based detection is not an immediate alert for every failed message. Use application and SMTP logs for immediate send failures.
This gives the team an investigation workflow after the initial setup: identify the affected source, inspect the authentication failure, make the correction, and verify the next messages. Keep Cloud Temple application or SMTP queue monitoring active alongside authentication monitoring.
Secure your domain with p=reject
I enforce p=reject after legitimate mail has reliable DKIM signing and the required domain matching across every active source. Use Suped's source-level reports to distinguish authorized Cloud Temple traffic from unauthorized mail before changing policy.
- Inventory legitimate traffic. Confirm website forms, password resets, scheduled application jobs, and staff mail. Check every service using the same From domain, including senders hosted outside Cloud Temple.
- Observe a complete cycle. Collect enough reports to include infrequent legitimate sending, such as monthly billing. Resolve authorized failures by source; do not treat a high overall pass rate as proof that a low-volume application works.
- Stage enforcement. For a domain starting at p=none, move to p=quarantine when legitimate failures are resolved, then to p=reject after checking fresh application tests and subsequent reports. For controlled trials, use a dedicated sending subdomain. Keep an existing enforcement policy in place while fixing this source.
- Protect DKIM continuity. Confirm signing on failover servers and after deployments. Keep working selectors during rotation. Forwarding commonly breaks SPF, so do not depend solely on SPF for a reject policy.
- Review subdomains. Check separate subdomain DMARC records and any sp setting before enforcing a parent-domain policy. Keep relaxed matching unless your requirements call for strict matching and every legitimate sender supports it.
Our Hosted DMARC lets teams manage the policy in Suped after DNS delegation is configured. Use it alongside the source reports to stage policy changes and verify their effect. Keep the real reporting destination and intentional policy tags when updating the record.
Reject policy value after verificationdns
v=DMARC1; p=reject; rua=mailto:dmarc@example.com
Replace the example reporting address before publishing. A reject policy requests rejection of messages that fail DMARC; receivers retain their own handling decisions. Continue reviewing authentication reports after enforcement, especially after Cloud Temple egress IP changes or application deployments.
Frequency asked questions
There is no verified universal include for every Cloud Temple deployment. For direct delivery, authorize the confirmed public SMTP egress IP with ip4 or ip6. For managed relay delivery, obtain its exact SPF authorization from the operator. Do not copy Cloud Temple's corporate-domain SPF record.
Its public console documentation does not describe a general email-domain verification wizard. Managed mail uses the operator's registration and DNS verification process. For a self-managed server, configure the sending domain and signing service on that server, then verify public DNS and a received message.
Yes. Passing DKIM with the required domain match to the visible From address is sufficient for a DMARC pass. If a relay uses an unrelated envelope-sender domain, SPF alignment fails even when SPF authentication passes. Adding SPF authorization to the visible From domain does not change that envelope sender.
I treat a hostname under cloud-temple.com as a clue to Cloud Temple infrastructure, not proof of which application sent the message. Match the connecting IP with the relevant tenant or ask Cloud Temple support to confirm it. Customers can use custom PTR names, so rDNS alone neither identifies every Cloud Temple sender nor establishes authorization.
DNS only publishes the verification key. The outgoing server must sign the message using the matching private key and selector. Check for an unsigned application route, an incorrect signing domain, a mismatched key pair, or message changes after signing. Inspect a received production message to find the failing route.
No. SPF, DKIM, and DMARC setup does not require moving incoming mail. Keep existing MX records for your mailbox service. If you introduce a bounce subdomain, configure its bounce handling and any service-specific DNS requirements separately.




