
How to set up DMARC/DKIM/SPF for CleverReach

Published 21 Nov 2026
Updated 21 Nov 2026
11 min read
Summarize with
To authenticate CleverReach emails, add your sending domain under My Account > Settings > DKIM, publish its generated DKIM TXT record, and verify it. CleverReach's documented SPF include is include:spf.crsend.com. Publish DMARC at _dmarc on your sending domain, starting with p=none unless you already enforce quarantine or reject.
I check the delivered message before calling setup complete. DMARC needs either a passing DKIM signature with a domain that matches your From domain, or passing SPF with a matching Return-Path domain. CleverReach's authentication guidance covers the underlying DNS setup; an SPF pass alone does not prove that DMARC passes.
Add your domain
Use a domain you control and a sender address such as news@example.com. I keep the campaign's From domain and the domain registered for DKIM identical wherever possible.
- Open settings: Click the profile icon at the upper right, open My Account, then select Settings > DKIM.
- Register the domain: Click Add domain and enter the sending domain without a protocol, path or email address. Leave the optional selector blank unless you need a specific unused selector.
- Complete verification: Open the domain row's actions menu, select Show DNS settings, and publish the supplied TXT record. Return to the actions menu and select Verify; confirm the status changes to active.
Adding the domain generates a key; it does not publish anything at your DNS provider. The DKIM section below explains the hostname and TXT value to copy.
Choose your own domain before sending. A free mailbox domain is outside your DNS control, and CleverReach documents sender-address replacement when custom authentication is missing.
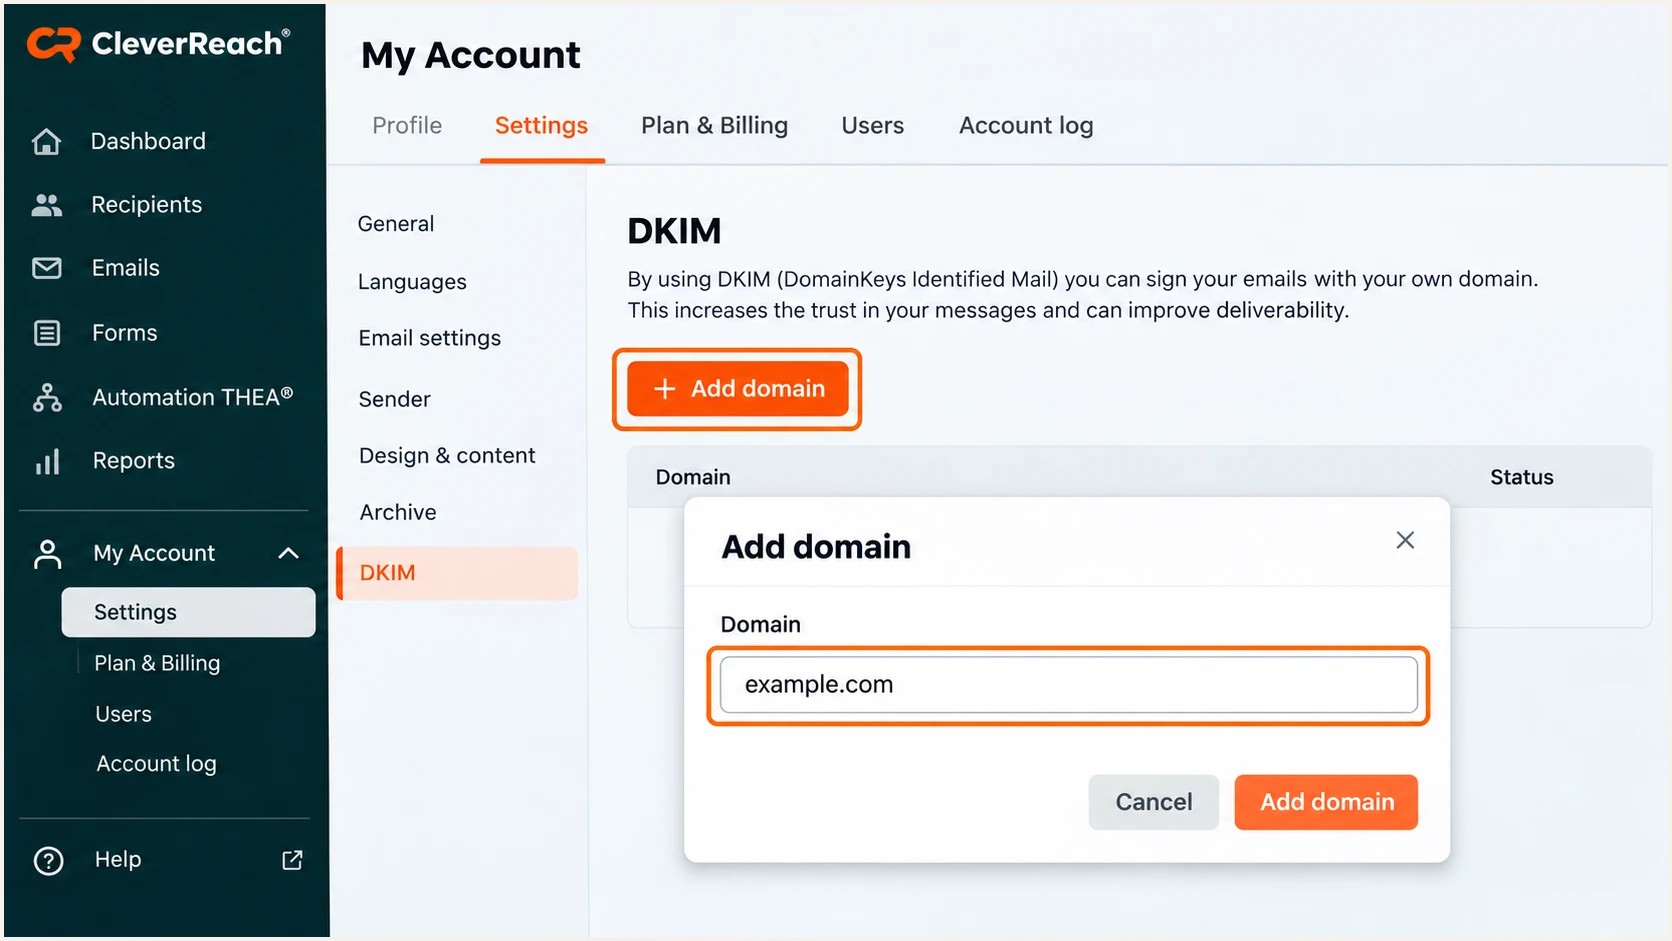
CleverReach setup illustration showing where to add a DKIM domain.
Continue with SPF and DKIM using this same sending identity. A branded tracking domain is a separate setting and does not establish email authentication.
Set up SPF
CleverReach documents include:spf.crsend.com for SPF authorization. I first inspect the existing policy so the newsletter setup does not remove authorization for other legitimate senders.
- Find the policy: Look up TXT records on the sending domain. Locate the record beginning v=spf1; unrelated TXT records can stay.
- Merge authorization: Add include:spf.crsend.com before the final all mechanism. Keep one SPF record at that hostname and preserve the existing senders and final qualifier.
- Check the budget: Keep evaluation within SPF's limit of 10 DNS-querying terms, counting nested includes. Multiple SPF records or an exceeded limit produce permerror.
For a new domain used only by CleverReach, the following is a minimal policy. Do not replace an existing multi-sender policy with this example.
SPF TXT value at example.com, for a CleverReach-only domaintext
v=spf1 include:spf.crsend.com ~all
SPF authenticates the SMTP MAIL FROM domain, visible in the delivered Return-Path. CleverReach's support documentation describes crsend.com as its default technical sender domain.
Check your own published policy below, then inspect a real message's Return-Path. A valid record on example.com does not change the SPF result for a message whose Return-Path is under crsend.com.
SPF checker
Find SPF syntax issues, lookup limits, and weak records.
?/16tests passed
For SPF to count toward DMARC, a custom Return-Path must use your domain or an appropriate subdomain under relaxed matching. Ask CleverReach support to confirm availability for your account and supply the exact DNS and bounce-routing requirements.
Do not substitute a tracking-domain CNAME or change your main domain's MX records to achieve this. I only treat custom Return-Path setup as complete after a delivered message shows the intended MAIL FROM domain.
Default Return-Path needs your DKIM signature
If Return-Path stays under crsend.com, SPF does not match a From domain of example.com. Adding an include to example.com cannot fix that mismatch. No customer-side SPF change is needed for DMARC on that default path; require a passing DKIM signature for your own domain.
An SPF domain mismatch is acceptable for DMARC when your own DKIM signature passes and matches the From domain. An SPF syntax error on a domain you manage still needs repair.
Set up DKIM
CleverReach generates a public key for your domain. Use that account-specific TXT value rather than a generic key or a selector copied from another account.
- Copy DNS settings: Under My Account > Settings > DKIM, open the domain row's actions menu and select Show DNS settings. Copy the supplied hostname and complete TXT value.
- Publish the key: Add the TXT record at your DNS provider. If it appends example.com automatically, enter only the relative hostname. Preserve the complete public key as one TXT record.
- Activate signing: Return to the domain row, open its actions menu and select Verify. Confirm active status. CleverReach allows up to 48 hours for DNS changes to become visible.
- Match the sender: Use a campaign From address on the verified domain. Check the received DKIM-Signature d= domain and s= selector against the domain and key you configured.
A selector identifies the DNS key beneath _domainkey. It does not change the signing domain. Multiple services can sign for one domain using separate selectors.
CleverReach's DKIM documentation describes generating and publishing the domain key. Keep the TXT record in place after verification so recipients can continue validating signatures.
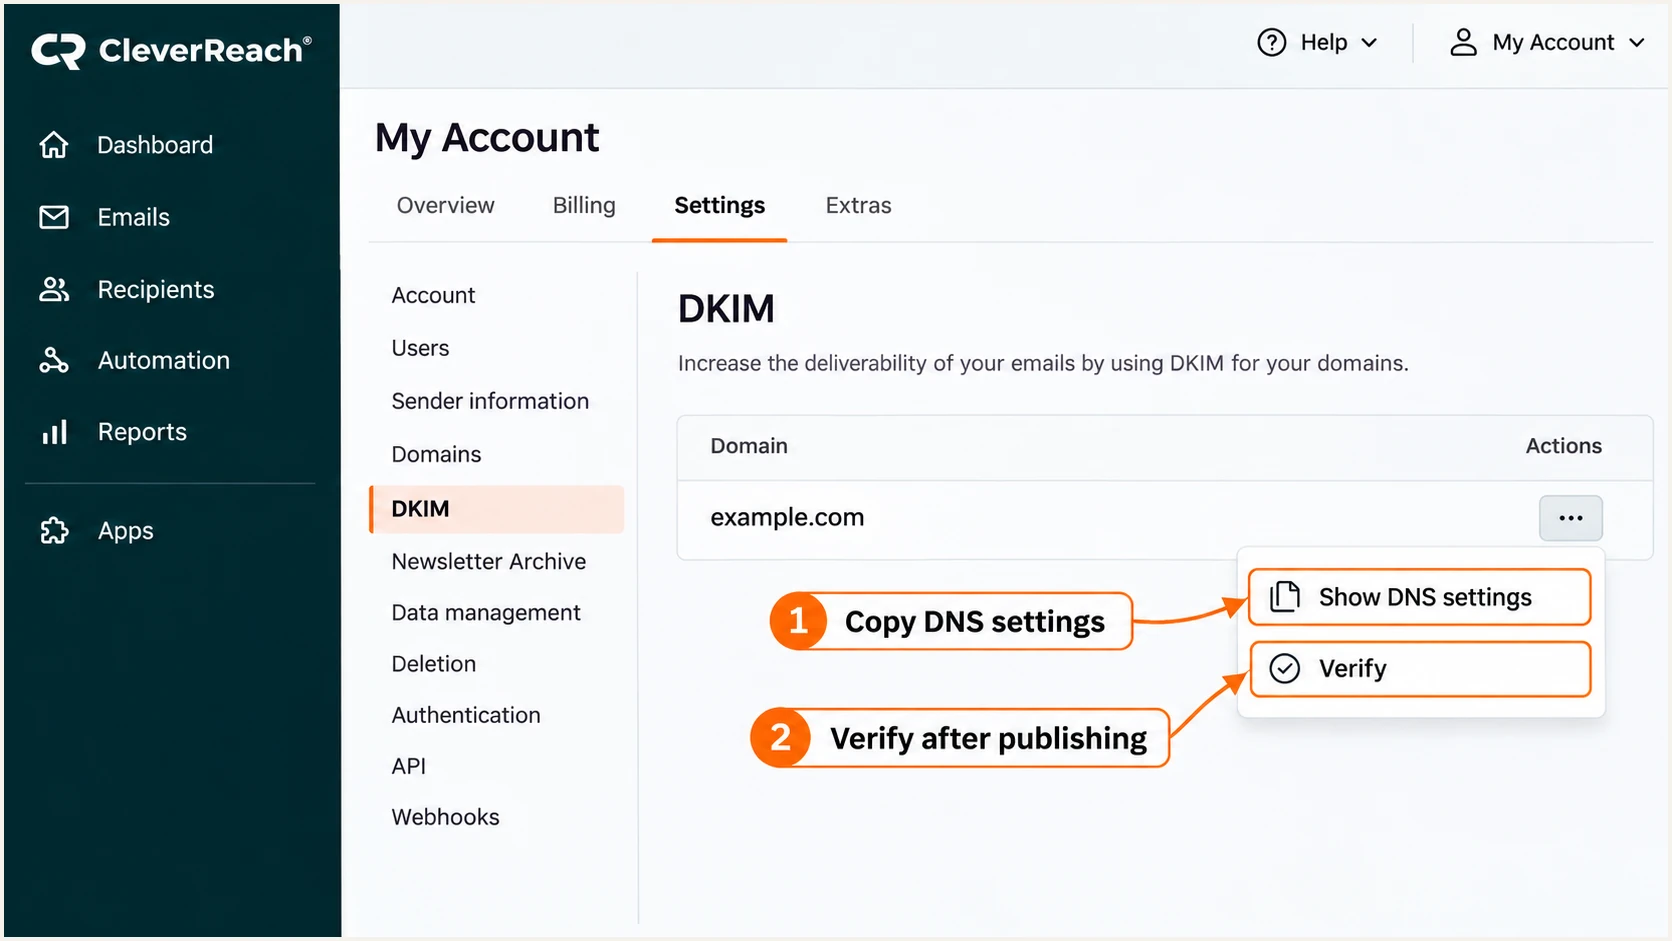
CleverReach setup illustration showing Show DNS settings and Verify.
A successful DNS verification is one checkpoint. The final checkpoint is a newly delivered CleverReach campaign with dkim=pass for your sending domain.
Set up DMARC
DMARC is a DNS policy for your visible From domain. Keep an existing p=quarantine or p=reject policy; adding CleverReach is not a reason to weaken it.
- Inspect existing DNS: Look up _dmarc.example.com for a From address ending @example.com. Edit an existing DMARC record rather than publishing a second one.
- Choose report delivery: Use a mailbox or reporting destination you control and can process. Aggregate reports arrive as XML, often compressed.
- Publish the policy: For a domain without DMARC, add one TXT record at _dmarc with the monitoring value below. Replace the example report address before saving.
- Check subdomains: For mail sent as news.example.com, inspect _dmarc.news.example.com and the applicable parent policy. Publish an explicit subdomain policy when you need separate control.
Start a new deployment with p=none while you identify legitimate senders. That policy requests reporting without requesting DMARC-based rejection.
Use the DMARC record generator to build the TXT value, keeping any existing enforcement and reporting settings you need.
Starting DMARC TXT value at _dmarc.example.comtext
v=DMARC1; p=none; rua=mailto:dmarc@example.com
The example address is a placeholder. Replace it with a working reporting destination; publishing the record does not create that mailbox.
Run the checker on your From domain after publication. Check syntax and reporting configuration, then use a delivered message to validate authentication.
DMARC checker
Look up a domain's DMARC record and catch policy issues.
?/7tests passed
The record above uses relaxed SPF and DKIM domain matching by default. Strict settings require identical domains, so retain them only when your sending configuration supports that requirement.
If reports go to another organization's domain, its reporting service must authorize that destination. A valid rua address by itself does not guarantee report delivery.
Verify and troubleshoot
I test the same From address and sending workflow used for live campaigns. A DNS lookup cannot show whether CleverReach actually signed a message with your domain.
- Send directly: Use the email tester below to obtain a test address. Send to it through CleverReach with the configured sender; do not forward a previously received email.
- Inspect results: Require dkim=pass with your domain and dmarc=pass for the From domain. Check the Return-Path before interpreting SPF.
- Repair DNS errors: For missing DKIM keys, check the selector, duplicated domain suffixes and truncated TXT values. For SPF permerror, check duplicate policies and nested lookup counts.
- Retest production: After any correction, send a new test and a small live campaign to controlled recipients. Compare the received headers and CleverReach's bounce results.
The email tester prompts you to send a message, then returns a full diagnosis of the received email. It is the quickest check that the sending configuration and DNS work together.
Test each sender domain used in campaigns or automations. A pass for one domain does not verify another domain.
Email tester
Send a real email to this address. Suped shows a results button when the test is ready.
?/43tests passed
Save the authentication results with the time of the test. Use aggregate reports after real sending to check a wider sample; reports commonly take 24-48 hours to arrive.
Start with the failing check below. If DNS looks correct but CleverReach remains inactive, rerun Verify after caches expire and give support the exact hostname and result.
|
|
|
|---|---|---|
SPF permerror | Policy count | Merge SPF records |
SPF mismatch | Return-Path | Verify own DKIM |
DKIM missing | Selector DNS | Fix key hostname |
DKIM inactive | Domain status | Run Verify |
DMARC fail | From and d= | Match domains |
Common CleverReach authentication checks
The following illustrative headers show a valid DMARC pass through DKIM, despite SPF authenticating a different domain. These are example values, not a promised Return-Path for every account.
Read Authentication-Results added by the receiving mailbox's trusted mail server. A bare pass result elsewhere in the message is insufficient evidence.
Example received headers: DMARC passes through your DKIM domaintext
From: News <news@example.com>
Return-Path: <bounce@bounce-eu2.crsend.com>
Authentication-Results: mx.example.net;
    spf=pass smtp.mailfrom=bounce-eu2.crsend.com;
    dkim=pass header.d=example.com;
    dmarc=pass header.from=example.com
Forwarding changes the connecting server and often breaks SPF. Preserve valid DKIM signing rather than adding unrelated forwarding servers to your SPF policy.
Get alerted when it breaks
Suped is our DMARC platform for monitoring CleverReach after setup. Once aggregate reports reach Suped, its source diagnostics and issue notifications turn authentication failures into a workflow your team can act on.
- Confirm the source: Review CleverReach traffic in Suped's source table. Verify the sending source only after confirming your team uses it and the observed traffic is expected.
- Enable notifications: In notification settings, enable Issues detected and Sending sources need verification. Keep DMARC summary emails enabled for routine review.
- Investigate the issue: Open the affected DMARC records and inspect SPF, DKIM and domain-matching results. Use the issue's steps to fix, then verify the correction.
- Check DNS history: Compare old and new DNS values when failures begin after a domain migration, selector change or SPF edit.
Suped's DMARC monitoring combines source-level results with detected issues. It keeps a CleverReach signing failure visible after the initial test is finished.
Report-based alerts depend on receivers delivering aggregate reports. They are not instantaneous notifications for every message; use a fresh email test when a campaign needs immediate verification.
A single email test
Confirms authentication for one delivered sample.
Run it immediately after configuration changes.
Ongoing monitoring in Suped
Shows authentication across reported sending activity.
Use detected issues and notifications to investigate failures over time.
Assign an owner to authentication alerts. A corrected record still needs a fresh test and subsequent report data confirming recovery.
Secure your domain with p=reject
I move to enforcement after legitimate sending paths pass DMARC consistently, including CleverReach's own-domain DKIM signature. Evaluate the whole domain before changing its policy.
- Inventory senders: Review Suped's verified and unverified sources. Confirm your normal business email and other authorized applications as well as CleverReach.
- Observe real traffic: Cover a complete sending cycle, including infrequent campaigns and automated mail. Investigate legitimate failures instead of judging readiness by one overall percentage.
- Stage enforcement: After resolving legitimate failures, change p=none to p=quarantine, monitor delivery, then change to p=reject. Check explicit subdomain policies and inherited policy effects.
- Keep monitoring: Use Suped notifications and source diagnostics after each change. Retest CleverReach and other critical senders before the next large campaign.
Our hosted DMARC lets teams manage an already hosted policy in Suped without repeated DNS edits. Review the same source data before each policy change.
For a policy managed directly as a TXT record, the final value has the following form. Keep your actual reporting destination when changing the policy.
Final DMARC TXT value at _dmarc.example.comtext
v=DMARC1; p=reject; rua=mailto:dmarc@example.com
Keep the report destination active and your DKIM key published. Changing to p=reject requests rejection of DMARC-failing mail; receivers retain their own handling decisions.
Authenticate any new sending application before its first production campaign. Keep reviewing unrecognized sources in Suped so new legitimate traffic is fixed before enforcement disrupts it.
Frequency asked questions
CleverReach documents include:spf.crsend.com as its SPF authorization mechanism. Merge it only when authorizing CleverReach for that domain. Finding an include in DNS identifies a configured authorization, not proof that the service still sends your mail.
CleverReach documents crsend.com as its technical sender domain. For rDNS, look up the actual sending IP's PTR record and corroborate the result against message headers and the service's SPF authorization. Do not assume a Return-Path domain is also the sending server's rDNS suffix, or trust a hostname alone.
SPF can pass for a CleverReach Return-Path under crsend.com while your From address uses another domain. DMARC then needs a passing DKIM signature that matches your From domain, or an authenticated custom Return-Path that matches it. Adding an SPF include to the From domain alone does not fix that mismatch.
Check the exact TXT hostname and complete public key in Show DNS settings, then select Verify on the domain row. Look for a domain suffix added twice, a wrong selector or an incomplete key. CleverReach advises allowing up to 48 hours for DNS visibility.
No. DMARC applies to your From domain across its sending services. Update the existing record rather than creating another for CleverReach at the same hostname. A dedicated sending subdomain can have its own policy.
No. Authentication validates domain use; recipients still evaluate sending reputation and unwanted-mail signals. Check campaign bounce responses and recipient engagement when a correctly authenticated message is rejected or reaches spam.




