
How to set up DMARC/DKIM/SPF for Cisco Secure Email

Published 21 Nov 2026
Updated 21 Nov 2026
14 min read
Summarize with
I set up Cisco Secure Email by authorizing its outbound servers in SPF, publishing its DKIM public key and enabling signing, then adding a DMARC TXT record. A message passes DMARC when either SPF or DKIM passes with domain alignment to the visible From address.
The steps below use the AsyncOS interface for Cisco Secure Email Gateway and Secure Email Cloud Gateway, formerly ESA and CES. Confirm that Cisco actually delivers your outbound mail before authorizing it in SPF. An inbound-only deployment does not require adding Cisco's receiving servers to your outbound SPF record.
Add your domain
Cisco's AsyncOS gateway does not have a universal domain ownership wizard. I configure the authorized relay hosts first; the sending domain is associated with a DKIM signing profile in the DKIM steps below.
- Collect deployment details. For Cloud Gateway, get the outbound relay hostname, allocation-specific SPF mechanism and outbound IPs from Cisco's Login & Service Information letter. For a self-managed gateway, identify its public egress IPs, including NAT addresses.
- Authorize your mail server. Open Mail Policies > HAT Overview, select the listener used for outbound submissions, open RELAYLIST and click Add Sender. Add only your trusted mail server's connecting IP or approved hostname. Submit and Commit Changes.
- Route outbound mail. Configure your upstream mail server's outbound connector or smart host to use the Cisco relay endpoint supplied for your deployment. Preserve an envelope sender domain that you control and that has alignment with the visible From domain.
- Add inbound domains when needed. If Cisco also receives mail for this domain, open Mail Policies > Recipient Access Table (RAT), select the public receiving listener and click Add Recipient. Enter example.com, select Accept, then submit and commit.
- Verify inbound routing when needed. Under Network > SMTP Routes, add the domain and its actual downstream mail destination. Test delivery before an MX cutover. RAT entries control recipient acceptance; they do not verify outbound domain ownership.
Cisco's Cloud Gateway Quick Start Guide documents the HAT, RAT and SMTP Routes sequence. Keep the existing MX records when the project only changes outbound authentication.
I confirm the outbound route with a real message and the receiver's headers. The connecting public IP must match the expected Cisco egress path; seeing Cisco only in your inbound MX records is insufficient.
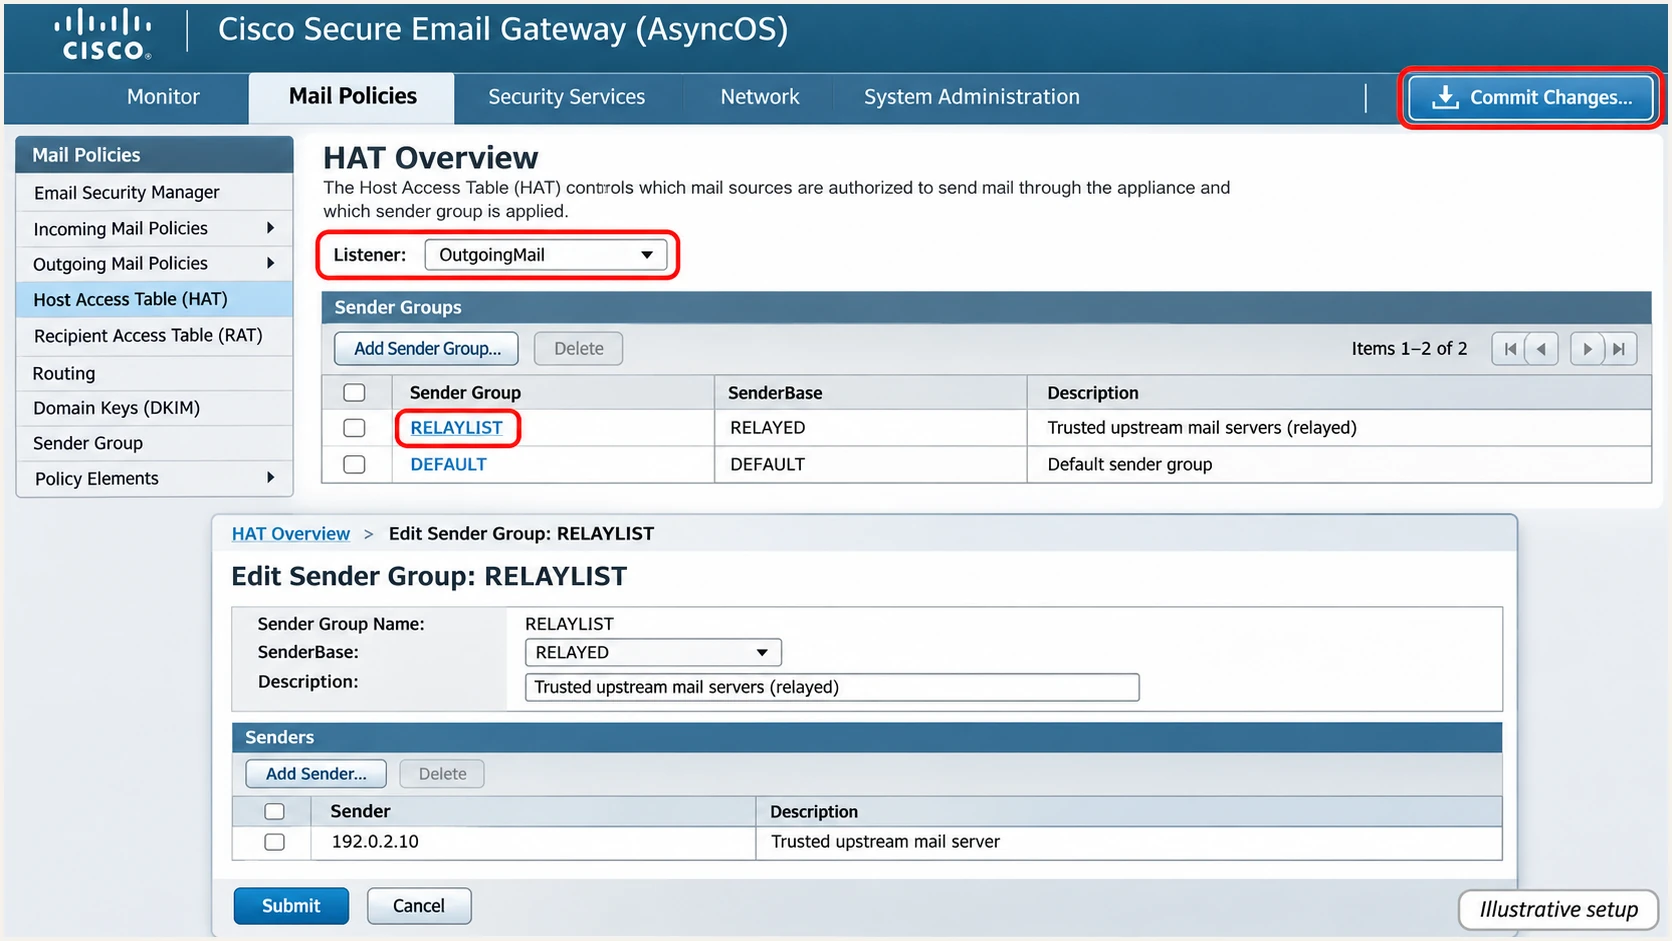
Illustrative Cisco HAT setup for a trusted outbound relay host.
The IP added to RELAYLIST is the upstream server connecting to Cisco. The IP authorized in public SPF is the server connecting to the external recipient; those addresses often differ.
For a shared cloud mail service, use Cisco's documented connector and relay restrictions for that service. Restricting access by a shared provider IP range alone does not establish which tenant owns a message.
Set up SPF
Cisco Cloud Gateway uses an allocation-specific SPF exists mechanism. A self-managed gateway uses its actual public sending IPs. I take the cloud mechanism directly from Cisco's activation details rather than guessing a generic Cisco include.
SPF checks the envelope MAIL FROM domain, normally visible as Return-Path after delivery. Cisco's SPF configuration discussion explains this lookup behavior. Publishing SPF only at the visible From domain does not cover a different envelope domain.
- Find the correct DNS name. Send a message through Cisco and inspect Return-Path. Edit SPF at that domain, including a dedicated bounce subdomain if one is used. Subdomains do not inherit SPF records.
- Use your allocation. For Cloud Gateway, add exists:%{i}.spf.ALLOCATION.iphmx.com before the final all mechanism. Replace ALLOCATION with the complete allocation value Cisco supplies, including any regional labels.
- Use public egress IPs. For a self-managed gateway, authorize every production and failover public IPv4 or IPv6 address with ip4 or ip6. Private interface addresses and inbound MX addresses are not substitutes.
- Keep one SPF policy. Merge Cisco's mechanism into the existing v=spf1 TXT record and retain other authorized senders. Do not publish a second SPF record. Keep the existing all qualifier unless you are deliberately changing the SPF policy.
- Check evaluation limits. Stay within SPF's limit of 10 DNS-querying terms across the evaluated path. The exists mechanism counts toward that limit. Confirm both primary and failover Cisco IPs pass.
Alternative SPF templates, use only your deployment's recorddns
; Cloud Gateway: replace ALLOCATION with Cisco's supplied value.
example.com. IN TXT (
  "v=spf1 exists:%{i}.spf.ALLOCATION.iphmx.com ~all"
)

; Self-managed: replace these documentation IPs with public egress IPs.
example.com. IN TXT "v=spf1 ip4:192.0.2.25 ip4:198.51.100.25 -all"
These templates assume the listed servers are the domain's only senders. Cisco's 'Understanding the CES SPF Record' (document 213938) explains how the allocation macro authorizes the IPs maintained by Cisco.
Check the published policy below, then send a live message. A DNS syntax check alone does not prove that a particular sending IP matches the macro or that the envelope domain has DMARC alignment.
SPF checker
Find SPF syntax issues, lookup limits, and weak records.
?/16tests passed
Cisco supports SPF alignment when the upstream system submits mail with an appropriate envelope sender domain. Set that domain in the upstream application or mail server, and verify that the outbound route preserves it.
If a particular mail stream keeps an unrelated envelope domain, its SPF alignment fails even when SPF authentication passes. DMARC still passes when a valid DKIM signature has alignment with the visible From domain. Configure DKIM for every legitimate stream.
Set up DKIM
Cisco requires a private signing key, a domain signing profile and signing enabled on the outbound mail flow policy. I publish and test the public key before activating a new profile for production mail.
- Create a signing key. Open Mail Policies > Signing Keys > Add Key. Name it cisco2026-key, choose Generate and 2048 bits, then Submit and Commit Changes. Keep the private key on the gateway.
- Create the domain profile. Open Mail Policies > Signing Profiles > Add Profile. Choose DKIM as the Domain Key Type, enter example.com as Domain Name, use cisco2026 as Selector and select cisco2026-key. Configure Profile Users to cover the intended senders.
- Stage the new profile. On an existing signing deployment, initially restrict the new profile to an unused address such as dkim-stage@example.com. Keep current production signing active while the new selector's DNS is published.
- Publish the public key. In Domain Signing Profiles, click Generate in the DNS Text Record column. Publish the exact generated TXT value at cisco2026._domainkey.example.com in your DNS provider. Submit and commit the gateway configuration.
- Test the published key. After DNS propagation, return to Mail Policies > Signing Profiles and click Test in the Test Profile column. Resolve any failure before expanding the staged profile to production senders.
For a first-time setup, keep signing disabled on the affected outbound policy until DNS is ready. For an existing deployment, Cisco's DKIM key replacement procedure uses an unused Profile User to stage the new key without interrupting current signing.
Copy the complete public TXT value generated by Cisco. A 2048-bit key can occupy multiple quoted strings inside one TXT record; preserve every character and do not create separate TXT records for those chunks.
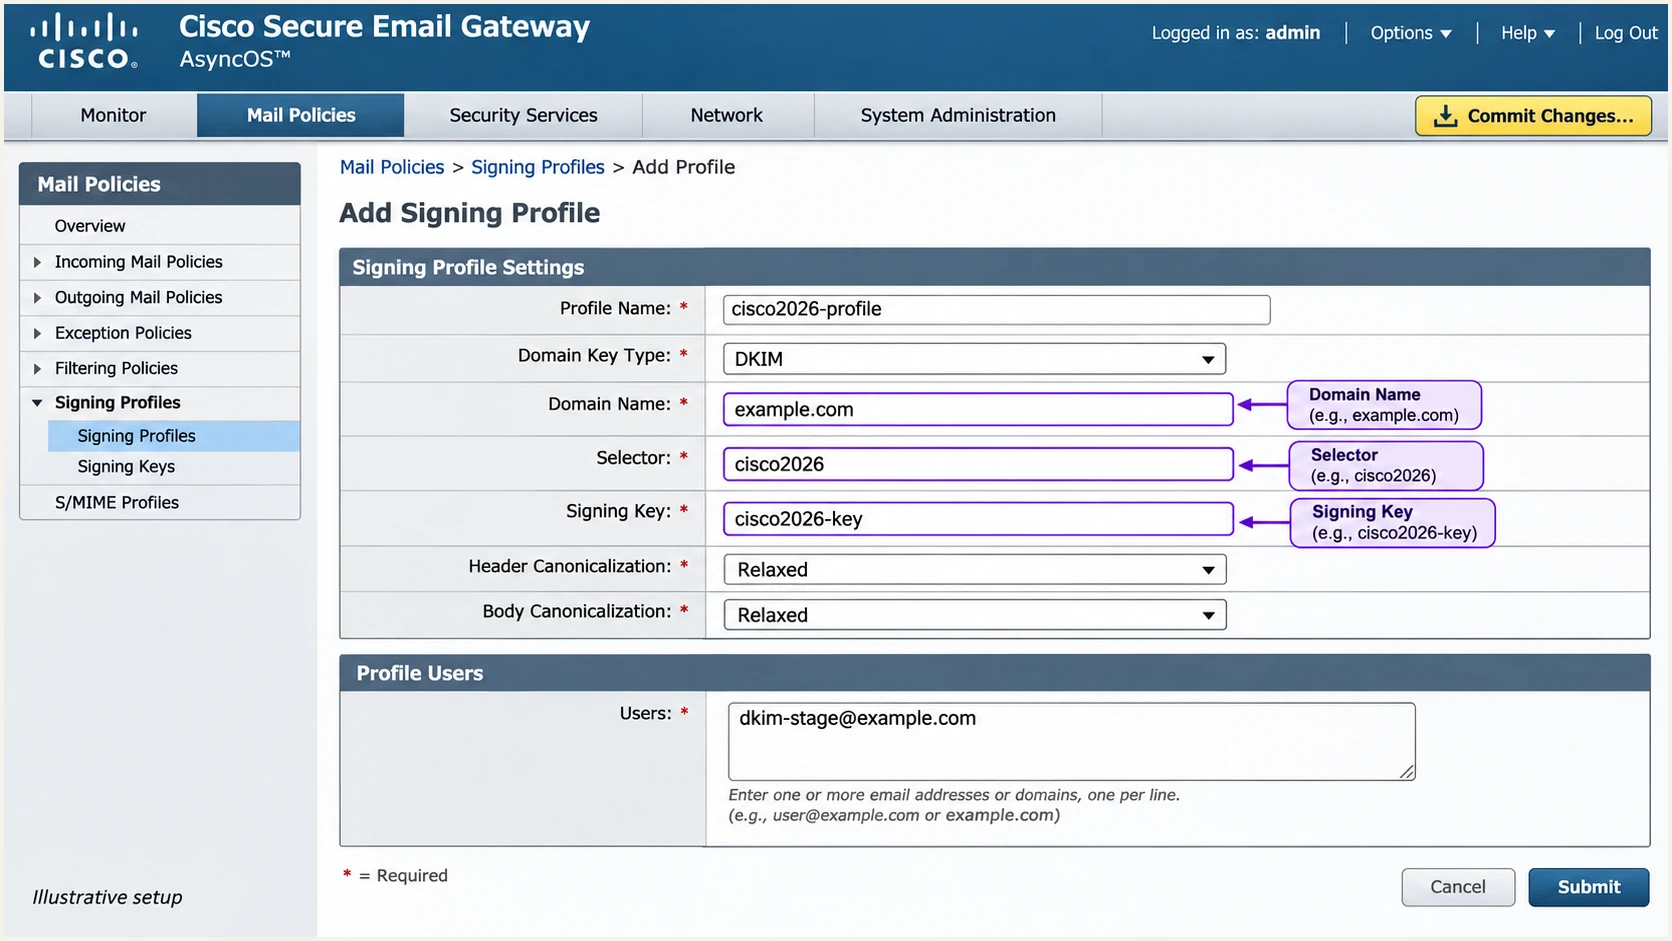
Illustrative Cisco DKIM signing profile staged for a new selector.
Under Mail Policies > Signing Profiles > DKIM Global Settings > Edit Settings, enable Use From header for DKIM Signing when the signature must follow the visible From domain. Review existing profiles before changing this global setting.
Cisco otherwise prefers the Sender header when it exists, which can select an unexpected profile. Confirm the actual signature's d= domain and s= selector on delivered mail after this change.
- Activate the intended senders. After Test Profile succeeds, update the staged Profile Users scope to the production addresses or domain. Review overlapping profiles because a more specific user profile takes precedence.
- Enable outbound signing. Open Mail Policies > Mail Flow Policies and select RELAYED, or each custom policy with Connection Behavior set to Relay. Under Security Features, set Domain Key/DKIM Signing to On, then Submit and Commit Changes.
- Cover every gateway. Confirm the profile, matching key and outbound policy are available on every gateway that sends production or failover mail. Check the relevant cluster, group or machine configuration scope.
- Verify the final signature. Send a message externally and require dkim=pass with the intended signing domain and a=rsa-sha256. Cisco signs after its own processing; a later relay that changes signed content can still break the signature.
Set up DMARC
Publish DMARC in your domain's public DNS. Cisco's inbound DMARC Verification settings evaluate received messages; they do not publish a DMARC policy for your sending domain.
- Check the current policy. Look up _dmarc.example.com first. If the domain already uses p=quarantine or p=reject, keep that policy while fixing Cisco authentication. Do not downgrade an established enforcement policy.
- Start new deployments in monitoring. If no policy exists, create one TXT record at _dmarc.example.com with the p=none example below. Replace example.com and the report mailbox with values you control.
- Choose a working report destination. The rua mailbox must accept aggregate XML reports. If the reporting service uses a different domain, complete its external reporting authorization requirement.
- Preserve existing settings. Edit the current record instead of adding a duplicate. Retain working report destinations and review any strict adkim or aspf settings before assuming subdomain alignment will pass.
New deployment: TXT value at _dmarc.example.comtext
v=DMARC1; p=none; rua=mailto:dmarc@example.com
Use the DMARC record generator to build the record with your report destination. DNS editors normally accept _dmarc as the host within the example.com zone; check that the editor does not append the domain twice.
I verify that public DNS returns exactly one DMARC policy. The checker below confirms the published record, while a delivered-message test confirms whether Cisco mail actually passes it.
DMARC checker
Look up a domain's DMARC record and catch policy issues.
?/7tests passed
A p=none policy requests reporting without requesting quarantine or rejection for DMARC failures. It does not prevent receivers from rejecting mail for other reasons.
Allow for DNS cache expiry and receiver reporting schedules. Aggregate reports commonly arrive the following day, and some take 48 hours or longer. Keep testing live mail while those reports accumulate.
Verify and troubleshoot
I test the complete outbound route, including normal messages and any application or failover paths. A successful Cisco Test Profile result confirms the key setup; it does not prove that every outbound message uses that profile.
The email tester is the quickest end-to-end check. Send a message through Cisco to the address it supplies to receive a diagnosis of the delivered message's authentication and other delivery checks.
Email tester
Send a real email to this address. Suped shows a results button when the test is ready.
?/43tests passed
Read the receiving server's Authentication-Results header. Ignore an earlier internal result when checking what the final receiver evaluated.
For the example below, the intended result is SPF passing for example.com, DKIM passing for example.com and DMARC passing for the visible From domain. Either authenticated path with alignment is sufficient for DMARC.
DNS queries and an illustrative receiving-server resulttext
dig +short TXT example.com
dig +short TXT cisco2026._domainkey.example.com
dig +short TXT _dmarc.example.com

Authentication-Results: receiver.example.net;
  spf=pass smtp.mailfrom=example.com;
  dkim=pass header.d=example.com header.s=cisco2026;
  dmarc=pass header.from=example.com
Public DNS must contain the same selector and public key that the active Cisco profile uses. Run the selector lookup for the actual d= and s= values in the received DKIM-Signature, rather than assuming a particular selector name.
Use the compact checks below to choose the next investigation. A passing DNS record lookup cannot detect every routing or signing error.
|
|
|
|---|---|---|
SPF fail | Egress IP | Correct SPF scope |
SPF permerror | SPF policy | Merge or trim |
No DKIM | Relay policy | Enable signing |
DKIM fail | Selector/key | Correct key pair |
DMARC fail | From domains | Fix alignment |
Use receiver results to locate the failing configuration.
Cisco's AsyncOS Email Authentication documentation describes the log message 'DKIM: cannot sign - no profile matches'. That points to profile selection, including sender scope and the Sender versus From header setting.
A DKIM body hash failure instead points to message changes after signing. Check downstream relays for disclaimer insertion or body rewriting, and retest after the final content change.
- Check the selected policy. Trace the upstream connection through HAT and its actual mail flow policy. Signing enabled on RELAYED does not help a message handled by another policy.
- Check SPF at MAIL FROM. Compare the receiver's connecting IP with the envelope domain's SPF authorization. A passing HELO SPF result alone does not prove a normal message's MAIL FROM has DMARC alignment.
- Check the DKIM domain. Require a valid signature whose d= domain has alignment with the visible From domain. A valid signature for an unrelated Cisco or upstream domain is insufficient.
- Test alternate paths. Repeat with application mail, failover gateways and externally forwarded copies. Forwarding often breaks SPF; a surviving DKIM signature with alignment can preserve DMARC.
Get alerted when it breaks
For ongoing Cisco authentication checks, I recommend DMARC monitoring through Suped, our DMARC reporting platform. It connects receiver-reported failures with source diagnostics and steps to fix them.
- Verify the Cisco source. Match the observed sending IPs and allocation to your authorized deployment before marking the source verified. An iphmx.com hostname alone is not proof that traffic belongs to you.
- Enable issue notifications. In Suped's notification settings, enable Issues detected and Sending sources need verification emails. Send them to the team responsible for Cisco configuration and DNS changes.
- Investigate the failing records. Filter by Cisco source and sending IP, then inspect the detailed SPF and DKIM results. Compare DNS history with the time failures started.
- Close the loop. Apply the fix in Cisco or authoritative DNS, send another test message and review fresh receiver reports. Keep monitoring after a gateway upgrade or key rotation.
Cisco's logs show what the gateway processed. Suped shows the authentication results reported by participating external receivers, including traffic that bypasses Cisco.
I use both views during an incident. Suped alerts depend on the data available to it; aggregate DMARC reporting does not provide an instant event for every message.
Cisco gateway checks
Inspect the selected relay policy and profile. Run Test Profile and trace message processing in mail logs.
Use this evidence to fix signing and routing inside the gateway.
Suped receiver reports
Review source-specific authentication failures and investigate unexpected sending IPs.
Use issue notifications and DNS history to confirm that a configuration change caused or resolved the problem.
For delivery failures after authentication passes, inspect the SMTP response separately. An IP blocklist (blacklist) entry is a separate investigation from a missing DKIM signature.
Suped's blocklist monitoring adds context when a Cisco egress IP has a blacklist listing. Authentication passing does not guarantee inbox placement or remove a blocklist entry.
Secure your domain with p=reject
I move to p=reject after the reports account for legitimate mail and testing confirms its authentication. Cisco is only one sending path, so enforcement readiness must cover every service using the domain.
- Inventory legitimate senders. Use Suped's source table to identify Cisco and every other authorized sender. Investigate unknown traffic before deciding whether it is a missed business system or unauthorized use.
- Fix legitimate failures. Resolve missing Cisco signatures, incorrect envelope domains and failover IP omissions. Use Suped's record diagnostics and steps to fix to check each failing stream.
- Cover the sending cycle. Observe enough traffic to include infrequent mail such as billing runs and alerts. A high overall pass rate does not prove that a low-volume critical sender is ready.
- Stage enforcement. Move a new p=none deployment to p=quarantine, review the resulting failures, then change to p=reject. For an already enforced domain, fix Cisco while keeping the current policy.
- Review subdomains. Check explicit subdomain policies and any sp setting. Confirm that enforcement will cover the intended domains without disrupting a legitimate subdomain sender.
- Keep reporting enabled. Retain rua when changing policy. Continue Suped issue notifications and retest after changes to Cisco routing, signing keys or DNS.
Suped's hosted DMARC keeps policy changes in the dashboard after its DNS delegation is configured. It gives the team reviewing receiver reports a practical way to manage each enforcement stage.
For a directly managed TXT record, the example below changes only the policy. Replace the report mailbox with your real destination and preserve the other valid settings in your existing record.
Enforced example: TXT value at _dmarc.example.comtext
v=DMARC1; p=reject; rua=mailto:dmarc@example.com
The policy requests rejection of messages that fail DMARC. Receivers apply their own handling rules, and p=reject does not stop someone using a different lookalike domain.
If legitimate mail starts failing, inspect the affected source and restore its authentication. Keep a known-good configuration available so an enforcement change has a controlled recovery path.
Enforce after every legitimate path passes
Check production and failover Cisco traffic, then the remaining authorized sources. Use Suped's source-level results rather than a domain-wide average to approve the change to p=reject.
For future DKIM rotations, publish the new selector before switching production signing. Keep the old public key available long enough for mail signed with the old key to finish delivery and verification.
After the switch, retest each Cisco egress path and review new reports in Suped. Remove the retired selector only after its in-transit mail no longer needs that key.
Frequency asked questions
Cisco Secure Email Cloud Gateway uses iphmx.com infrastructure. Cisco's Load Balancer FAQ documents outbound reverse DNS in the form esa.allocation.iphmx.com, with allocation and regional details specific to the customer. Self-managed gateways can have customer-owned PTR names. Confirm the sending IP and authentication results before treating a source as authorized.
No. For the AsyncOS Cloud Gateway deployment described here, use the allocation-specific exists mechanism Cisco provides during activation. For a self-managed gateway, authorize its public egress IPs. Keep unrelated deployment values out of your SPF record.
Yes. DMARC passes when at least one valid DKIM signature has alignment with the visible From domain, even if SPF fails or its envelope domain lacks alignment. Fix SPF for direct Cisco delivery where you control the envelope domain, while keeping DKIM working on every sending path.
The passing DKIM signature can use a signing domain unrelated to the visible From domain. Check header.d, header.from and any strict adkim setting. In Cisco, also inspect profile selection and Use From header for DKIM Signing. SPF must independently pass with alignment if DKIM does not provide it.
No. That setting evaluates incoming messages against other domains' policies. Your sending policy is a TXT record in authoritative DNS at _dmarc followed by your domain. Publishing that record and configuring outbound DKIM are separate tasks.
Use evidence rather than a fixed number of days. Wait for receiver reports and include the domain's full sending cycle, especially infrequent business mail and failover tests. Move to enforcement after all known legitimate streams pass DMARC; continue monitoring them after the policy change.




