
How to set up DMARC/DKIM/SPF for Check Point

Published 21 Nov 2026
Updated 21 Nov 2026
13 min read
Summarize with
For Check Point Cloud SMTP Relay, onboard your sending domain, publish its relay MX record, authorize spfr.cpmails.com in SPF, and add all five DKIM CNAME records. Then publish DMARC at _dmarc.example.com and test a message delivered through the relay.
I check the sending path first. Microsoft 365 outbound inline protection and custom notifications use spfa.cpmails.com instead of the relay include. If Check Point only inspects messages through an API without rerouting outbound mail, keep the sending mail host's authentication configuration.
Add your domain
These onboarding steps apply to Cloud SMTP Relay. For an existing Microsoft 365 inline deployment or custom notifications, use the domain already protected in your Check Point tenant.
- Open the portal: Sign in to the Check Point Email Security Administrator Portal. Go to Security Settings > Relay > Domains. If Relay is unavailable, ask Check Point Support to confirm access for your tenant.
- Onboard the domain: Click Onboard Domain. Enter your sending domain in Domain address, keep External for external delivery, enter a description, and click Onboard. Use the existing row if it is already present.
- Configure relay MX: Open the domain's actions menu and select Configure MX. Publish the displayed relay subdomain, regional destination, priority, and TTL in your authoritative DNS. Click Verify.
- Complete verification: Publish and verify the SPF and DKIM records in the following steps. Adding the domain to the portal alone does not complete DNS verification.
The relay MX applies to a bounce subdomain such as cpmails.example.com. Keep the main domain's existing mailbox MX records. Use the regional destination shown in your tenant rather than copying another region's value.
I copy the host fields exactly, accounting for DNS providers that append the zone name automatically. Check Point's 'Configure the Relay MX Record' instructions use a one-hour TTL.
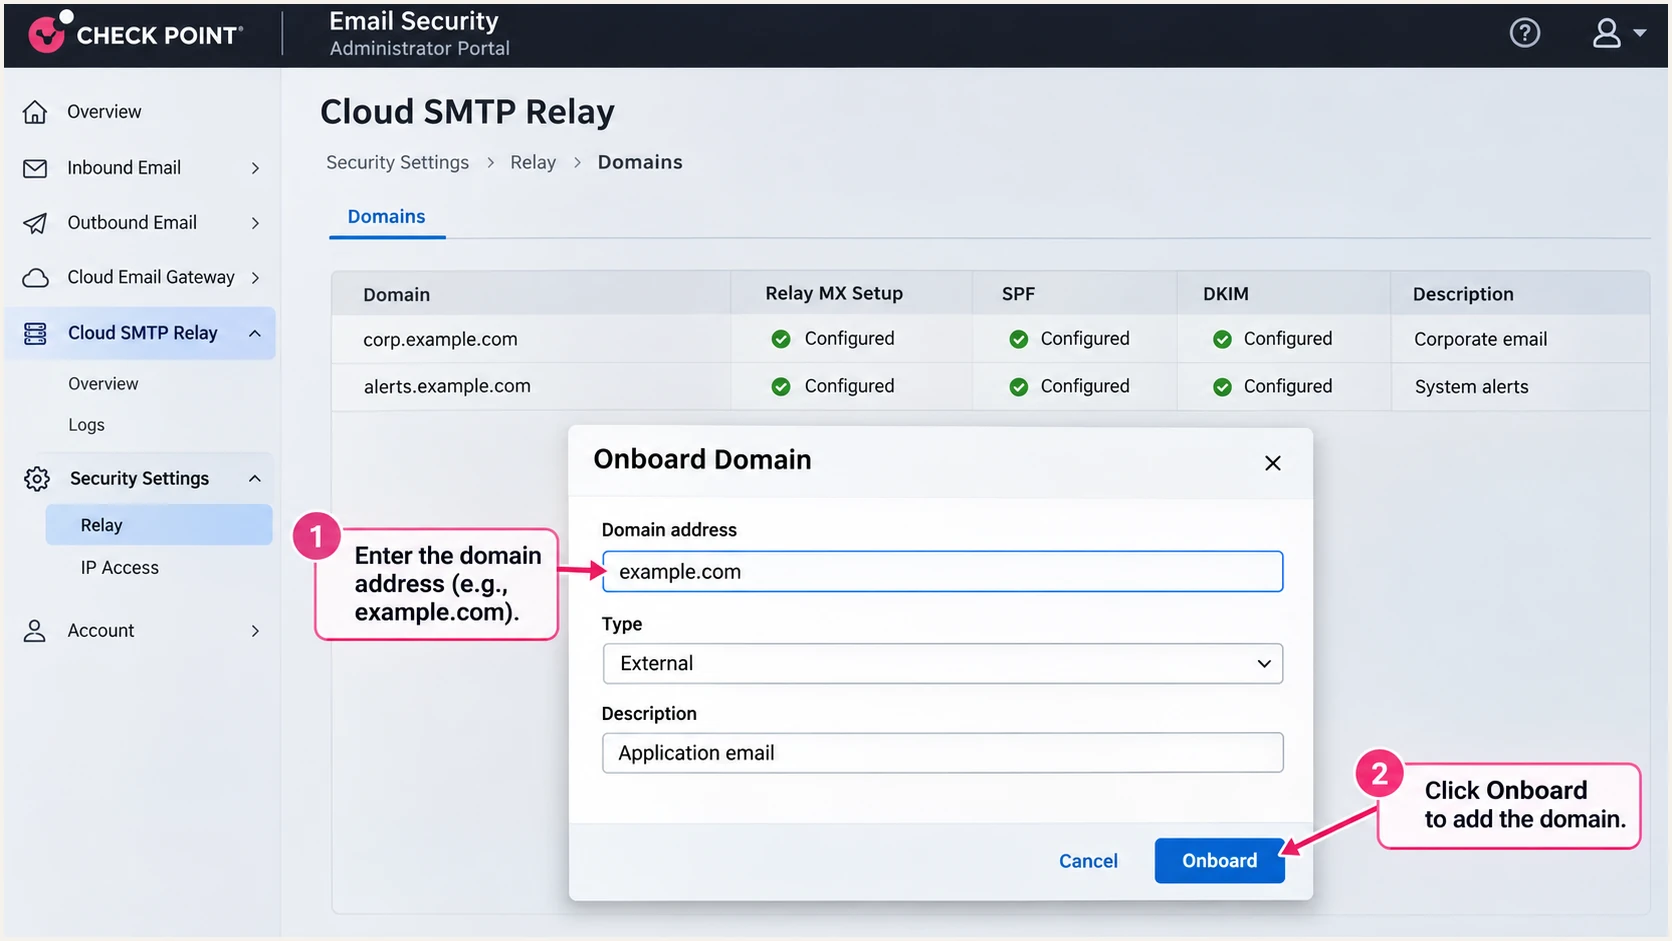
Illustration of Check Point's Onboard Domain dialog for Cloud SMTP Relay.
Set up SPF
Check Point's Cloud SMTP Relay instructions specify spfr.cpmails.com. Its 'Prerequisites to Avoid Failing SPF Checks' and custom-notification instructions specify spfa.cpmails.com for those separate sending paths.
SPF is a TXT record at the SMTP MAIL FROM domain, normally visible in the delivered Return-Path. A record at example.com does not automatically authorize mail using cpmails.example.com.
|
|
|
|---|---|---|
Cloud relay | Relay bounce domain | spfr.cpmails.com |
Microsoft 365 inline | Envelope domain | spfa.cpmails.com |
Custom notifications | Custom sender domain | spfa.cpmails.com |
API inspection only | Existing sender | Keep existing authorization |
Choose the SPF authorization for the actual sending path.
- Open SPF setup: For Cloud SMTP Relay, go to Security Settings > Relay > Domains, open the domain's actions menu, and click Configure SPF. Copy the DNS host shown there.
- Update one record: Publish the relay value below as TXT. If the host already has SPF, merge the required include before its final all mechanism. Keep one v=spf1 record per DNS name.
- Preserve other senders: For Microsoft 365 outbound inline protection, add include:spfa.cpmails.com to the existing SPF record for the relevant envelope domain before enabling the outgoing policy.
- Check lookup limits: Keep evaluated DNS lookup terms within SPF's limit of 10, including nested includes and redirects. Preserve the existing all qualifier unless you are deliberately changing the authorization policy.
The first example is the documented relay value for a dedicated bounce subdomain. Publish SPF as TXT, even though one Check Point documentation table labels its SPF example as MX. The relay MX is a separate record.
The second example assumes Microsoft 365 is your only other approved sender. Preserve additional authorized senders when editing a live record.
SPF TXT values for two different sending pathsdns
; Cloud SMTP Relay: TXT at cpmails.example.com
v=spf1 include:spfr.cpmails.com ~all

; Microsoft 365 inline: TXT at example.com
v=spf1 include:spf.protection.outlook.com include:spfa.cpmails.com ~all
For custom notifications, go to Security Settings > User Interaction > Quarantine > End User Notifications. Select Custom under From address, enter the sender prefix, choose a protected domain, add spfa.cpmails.com to that domain's existing SPF record, and click Save and Apply.
Check Point keeps its default notification sender until SPF validation succeeds. For the relay, return to Configure SPF and click Verify after publishing the record.
SPF checker
Find SPF syntax issues, lookup limits, and weak records.
?/16tests passed
Check the exact SPF hostname shown by the relay, not only your main domain. Resolve duplicate records or lookup-limit errors before sending production traffic.
Cloud SMTP Relay supports a return path under your domain. With default relaxed SPF alignment, cpmails.example.com and a visible From domain of example.com share the required organizational domain. Strict alignment requires an exact domain match.
Set up DKIM
Check Point's 'Configure the DKIM Record' instructions require all five relay DKIM records. The CNAME destinations are tenant-specific; do not copy another account's selector targets.
- Open DKIM setup: Go to Security Settings > Relay > Domains, open the domain's actions menu, and select Configure DKIM.
- Publish every CNAME: Copy all five DNS entries into your DNS provider. Preserve each selector hostname and target exactly. Use the TTL displayed in the dialog.
- Keep DNS resolvable: Use DNS-only CNAMEs, without a web proxy. Do not put a TXT record or another CNAME at the same selector hostname. Keep unrelated working selectors.
- Verify and test: Click Verify after the records resolve. Send through the relay and confirm a passing signature whose d= domain matches your From domain under the DMARC alignment mode.
I keep existing Microsoft 365 or Google Workspace selectors while adding relay selectors. Publishing a CNAME proves that a key is discoverable; a delivered message proves that the sending path uses it.
For Microsoft 365 inline protection, retain custom-domain DKIM at Microsoft 365 and verify that its signature survives Check Point processing. The five-CNAME relay procedure applies when Cloud SMTP Relay signs the message.
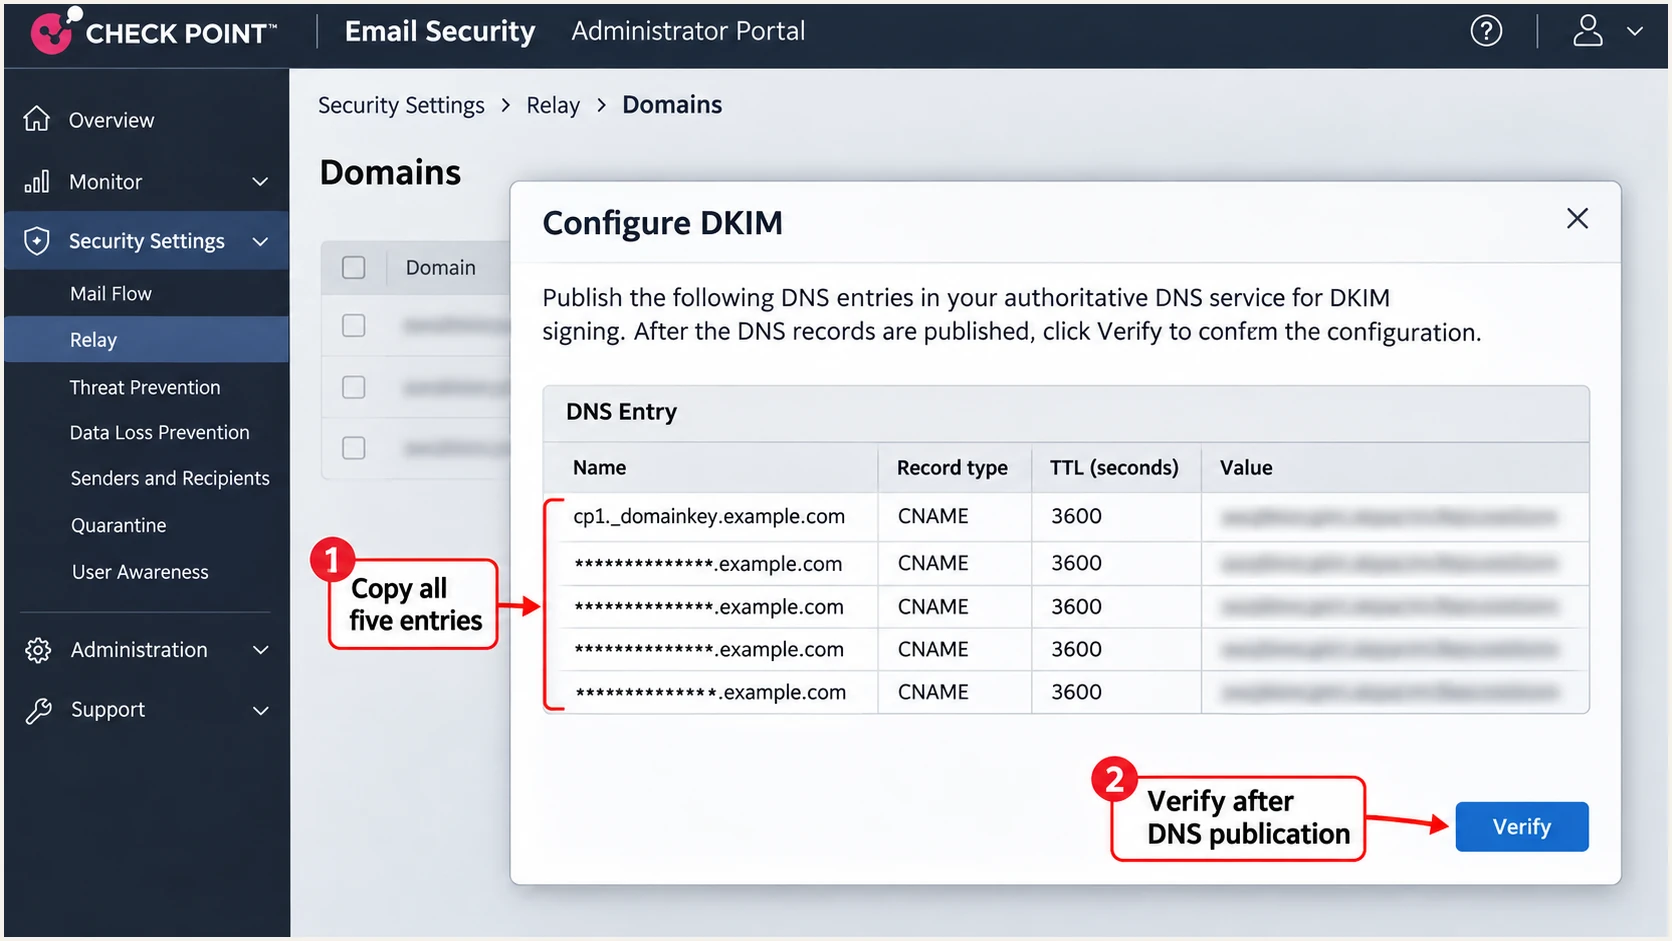
Illustration of Check Point's Configure DKIM dialog with five required CNAME entries.
Read d= and s= in the delivered DKIM-Signature header. The selector locates the key, while the signing domain determines DMARC alignment. A passing signature for an unrelated provider domain does not authenticate your visible From domain.
If DKIM passes before a gateway and fails afterward, investigate changes to signed headers or message content. Correct the transformation or arrange signing after it, then repeat the same delivery test.
Set up DMARC
DMARC is published in DNS for the visible From domain. I start a new deployment at p=none so reports can expose legitimate senders that still need work.
- Inspect the live policy: Look up TXT records at _dmarc.example.com. Edit the existing DMARC record rather than creating a second one.
- Publish the baseline: For a new deployment, add the exact TXT value below at _dmarc.example.com. Replace the example domain and report mailbox with values you control.
- Deliver the reports: Make sure the rua mailbox or reporting service accepts aggregate XML reports. An external reporting destination also needs the receiving domain's authorization.
Use our DMARC record generator to build the record with your actual reporting destination. DNS providers that append example.com to names usually need only _dmarc in the host field.
This baseline requests monitoring without asking receivers to quarantine or reject mail because of DMARC failure. Other recipient filtering still applies.
Initial DMARC TXT value at _dmarc.example.comdns
v=DMARC1; p=none; rua=mailto:dmarc@example.com
The default SPF and DKIM alignment modes are relaxed. At least one mechanism must pass authentication and meet its domain-matching requirement for DMARC to pass.
I leave relaxed alignment in place while validating a relay bounce subdomain. Adding aspf=s requires the envelope domain to match the visible From domain exactly.
Keep existing enforcement
If your domain already uses p=quarantine or p=reject, keep that policy. Preserve its reporting destinations and other intentional settings while adding Check Point. Do not replace it with the monitoring example.
Check the visible From domain on the real message. A sending subdomain can have its own DMARC record; otherwise the applicable parent policy can govern it.
Validate the public DNS record before testing delivery. A successful DNS lookup confirms publication and syntax, while message headers confirm the sending configuration.
DMARC checker
Look up a domain's DMARC record and catch policy issues.
?/7tests passed
Run the lookup for your actual From domain and confirm that only one valid DMARC record is returned. Keep collecting reports after changing policy.
Verify and troubleshoot
Portal verification checks DNS. I also test each approved application through the final outbound path, including any gateway processing.
- Recheck DNS: Go to Security Settings > Relay > Domains. Open the domain's actions menu and select Re-Check DNS Records if validation has stopped. Check Point documents verification windows of up to 72 hours.
- Authorize the application: Go to Security Settings > Relay > Relay Sources and click Add Relay Sources. Set the source name and authorized public egress IP, SMTP credentials, or both. Save generated credentials securely.
- Activate the source: Open the relay source's actions menu, select Enable source, review the displayed relay host and port, and click Activate. Configure your application to use those SMTP settings with TLS.
- Check authentication: Send a message through that application. Inspect the final receiver's Authentication-Results for spf=pass, dkim=pass, and dmarc=pass, together with the evaluated domains.
- Diagnose the failure: For SPF permerror, check duplicate records and DNS lookup limits. For DKIM failure, check selector targets and message modification. For DMARC failure, compare authenticated domains with the visible From domain.
When both IP restrictions and SMTP credentials are configured, Check Point requires both checks to pass. Use your application's public NAT address, not its private LAN address.
The Domains table shows relay MX, SPF, and DKIM status. Successful DNS verification does not replace enabling a relay source or testing the application's SMTP connection.
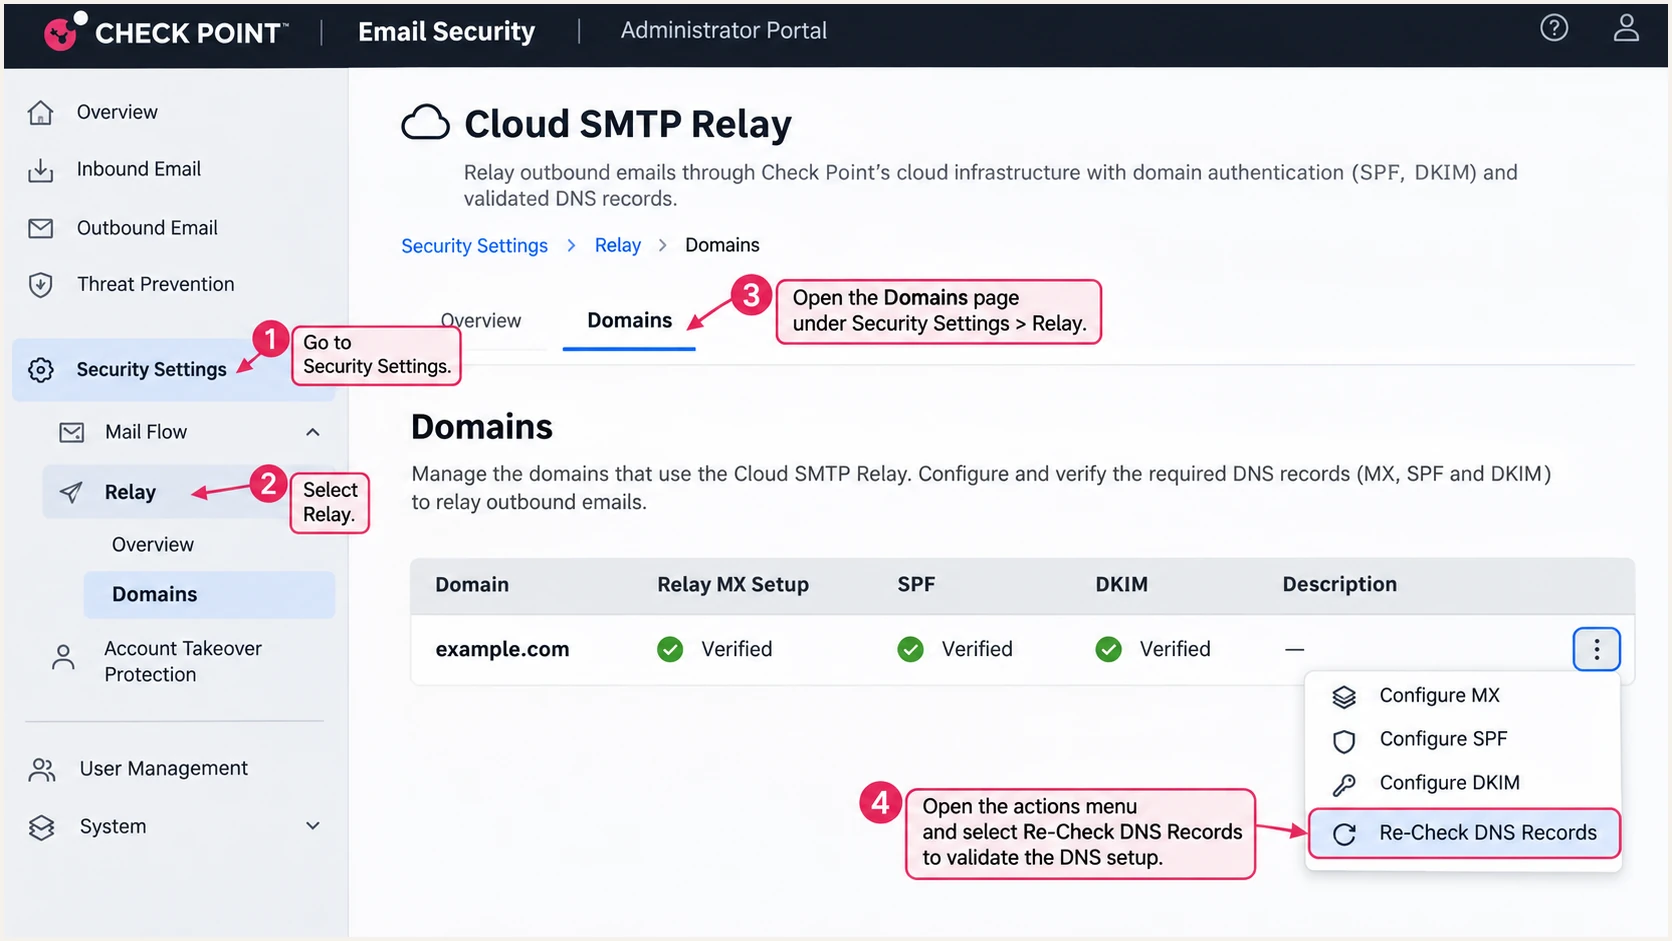
Illustration of Check Point's domain DNS statuses and Re-Check DNS Records action.
The email tester below prompts you to send a message to a generated test address, then returns an authentication diagnosis. This is the quickest check of whether your delivered sample has the expected SPF and DKIM results.
Send the test through the application and Check Point route you are configuring. A message sent directly through a different mailbox tests a different configuration.
Email tester
Send a real email to this address. Suped shows a results button when the test is ready.
?/43tests passed
Read the diagnosis together with the receiver's headers. SPF authentication alone is insufficient when the authenticated envelope domain does not match the visible From domain under the applicable alignment mode.
A valid DKIM signature with the required domain match is enough for DMARC even when SPF fails or lacks alignment. For a relay that supports a custom return path, investigate unexpected SPF mismatches rather than assuming they are unavoidable.
SPF passes, DMARC fails
SPF passes for a provider's domain. DKIM is absent or also uses an unrelated domain. Neither result authenticates the visible From domain, so DMARC fails.
SPF fails, DMARC passes
Forwarding changes the source IP, causing SPF failure. A surviving DKIM signature passes with the required From-domain match, so DMARC passes.
Get alerted when it breaks
Suped is our DMARC platform for keeping this configuration healthy after the initial test. Our DMARC monitoring connects source verification with authentication diagnostics and issue notifications.
For Check Point deployments, this workflow helps identify whether a failure followed a DNS edit, a new sending application, or a change in the outbound route.
- Enable issue alerts: In Suped, open Settings > Notifications and enable Issues detected. Configure the intended recipients for authentication notifications.
- Review new sources: Enable Sending sources need verification. Verify a Check Point source only after matching its IP and authentication domains to your approved sending route.
- Investigate the detail: Open the affected record's detail view to inspect SPF, DKIM, DMARC, and rDNS checks. Follow the issue's Steps to fix and verify the correction.
- Track DNS changes: Use DNS history to compare the old and new record values around the failure. Enable DMARC summary emails to review trends between incidents.
I account for reporting delay: aggregate reports commonly arrive daily. Suped's notifications act on received data, so a fresh test message is the faster check after an immediate configuration change.
Confirm who controls the Check Point hop
A cloud-sec-av.com source in a report also occurs when a recipient uses Check Point. Compare the source IP, reporter, and message route before authorizing it. A hostname alone is not a reason to add an SPF include.
Secure your domain with p=reject
Move to p=reject after every approved sending path has demonstrated a DMARC pass. I base this decision on sender coverage and representative traffic, including infrequent application emails.
Suped's verified sources and detailed failure diagnostics make that decision reviewable. A high domain-wide pass rate alone can hide a small but important application that still fails.
- Inventory approved mail: Check relay applications, normal mailbox traffic, custom notifications, and other business senders. Identify the owner and expected authentication for each path.
- Resolve legitimate failures: Fix DNS errors and domain mismatches. Confirm that each path has at least one passing authentication mechanism with the required domain match.
- Stage enforcement: Change the existing policy to p=quarantine while keeping rua reporting. Review complete reporting cycles covering your normal and scheduled sending activity.
- Request rejection: When approved mail is consistently passing, change that same record to p=reject. Review subdomain policies and any explicit exceptions before applying broader enforcement.
- Continue monitoring: Keep source-verification and issue alerts enabled in Suped. Investigate new legitimate failures before making another policy change.
Our Hosted DMARC lets you manage subsequent policy changes in Suped after its initial DNS setup. Use the source evidence to progress through monitoring and quarantine before selecting reject.
If you manage DMARC directly in DNS, edit the existing TXT record instead. Preserve your real report destination and other intentional tags; this is an example of the resulting reject value.
Example DMARC reject TXT valuedns
v=DMARC1; p=reject; rua=mailto:dmarc@example.com
The reject policy requests rejection when DMARC fails, subject to receiver handling. Mail that passes DMARC through DKIM remains eligible for delivery even if SPF alone fails.
Record the policy change time and compare later DMARC reporting windows when checking the result. Earlier failures remain visible in historical reports.
Frequency asked questions
Check Point Email Security, also known as Harmony Email & Collaboration and formerly Avanan, uses cloud-sec-av.com infrastructure. Documented regional names include us.cloud-sec-av.com, eu.cloud-sec-av.com, au.cloud-sec-av.com, and ca.cloud-sec-av.com. A matching hostname identifies infrastructure, not authorization to send for your domain. Confirm the IP and mail path before changing SPF.
Cloud SMTP Relay documents include:spfr.cpmails.com for its relay bounce domain. Microsoft 365 outbound inline protection and custom-domain notifications document include:spfa.cpmails.com. Follow the instructions for your enabled sending function; do not add both indiscriminately at the same hostname.
Yes. A passing DKIM signature with the required From-domain match is sufficient. If a sending function cannot customize its return path, changing your domain's SPF will not fix that domain mismatch. Keep DKIM passing with the required domain match. Check Point Cloud SMTP Relay supports a return path under your domain, so verify that setup when using the relay.
Yes. Its current Configure the DKIM Record instructions require all five CNAME entries. Copy the exact names and destinations from your tenant, publish them without conflicting records, click Verify, and test a delivered message. Existing mail-host selectors can remain alongside separate relay selectors.
Check the authoritative DNS values, relative hostnames, regional MX target, and all five DKIM CNAMEs. Check Point documents verification windows of up to 72 hours. If automatic verification has stopped, open the domain's actions menu and select Re-Check DNS Records. Publishing records at the wrong hostname will not resolve with waiting.
No. First determine whether Check Point is your approved outbound relay, a recipient's scanning system, or the reporting organization. Recipient-side processing does not automatically justify sender authorization. Match headers and message traces to the approved route before editing DNS.




