
How to set up DMARC/DKIM/SPF for Bell

Published 22 Nov 2026
Updated 22 Nov 2026
13 min read
Summarize with
For a custom domain hosted by Bell, publish the SPF settings Bell confirms for your sending service, have Bell enable DKIM if your plan supports it, and publish DMARC in your domain's DNS. For an address ending in bell.net, sympatico.ca or bellnet.ca, Bell controls those DNS records. You cannot configure their SPF, DKIM or DMARC yourself.
I check the mailbox product first: Bell Internet email, Bell website hosting email and Microsoft 365 purchased through Bell have different setup paths. A Bell Internet connection alone does not mean Bell sends your custom-domain email. The steps below focus on Bell-hosted custom-domain mail, with the consumer-account limits called out where they matter.
Add your domain
Use a domain you own and can edit in DNS. Bell's public hosting documentation describes provisioning a domain with the hosting service and creating mailboxes in EasyMail Setup; it does not document a universal self-service domain verification wizard.
- Confirm the service. Check your welcome email or bill for Bell website hosting with email. If it says Microsoft 365, configure authentication in that tenant using its supplied DNS values.
- Provision the domain. Supply your domain when ordering Bell hosting. For an existing account, ask Bell hosting support to associate the domain if it is missing; do not substitute an alias for domain provisioning.
- Open mailbox setup. Sign in to the Bell hosting Portal. Select Add an Email under Quick Access, or Advanced Tools > Email > EasyMail Setup. Bell documents both routes in its website tool upgrade support article.
- Create a mailbox. Create the required address and password in EasyMail Setup. Open its Help option for the SMTP settings applicable to your account. Use those settings for sending.
- Verify the connection. Complete any ownership check Bell supplies using the exact token and location requested. Confirm the domain is available in the hosting account, then test sending and receiving. Change MX records only when connecting or migrating inbound email, using Bell's account-specific values.
DNS changes belong at the provider listed by your authoritative nameservers. Bell can host the mailbox while another provider hosts DNS. I check the delegation before editing records, because changes in an inactive DNS zone have no effect.
Bell's older 'Web Hosting from Bell: Building tips and tools' document describes DNS Manager > Edit Zone File > Next. Use that path only if your account has the legacy interface. If TXT editing is unavailable, ask the authoritative DNS provider to publish the authentication records.
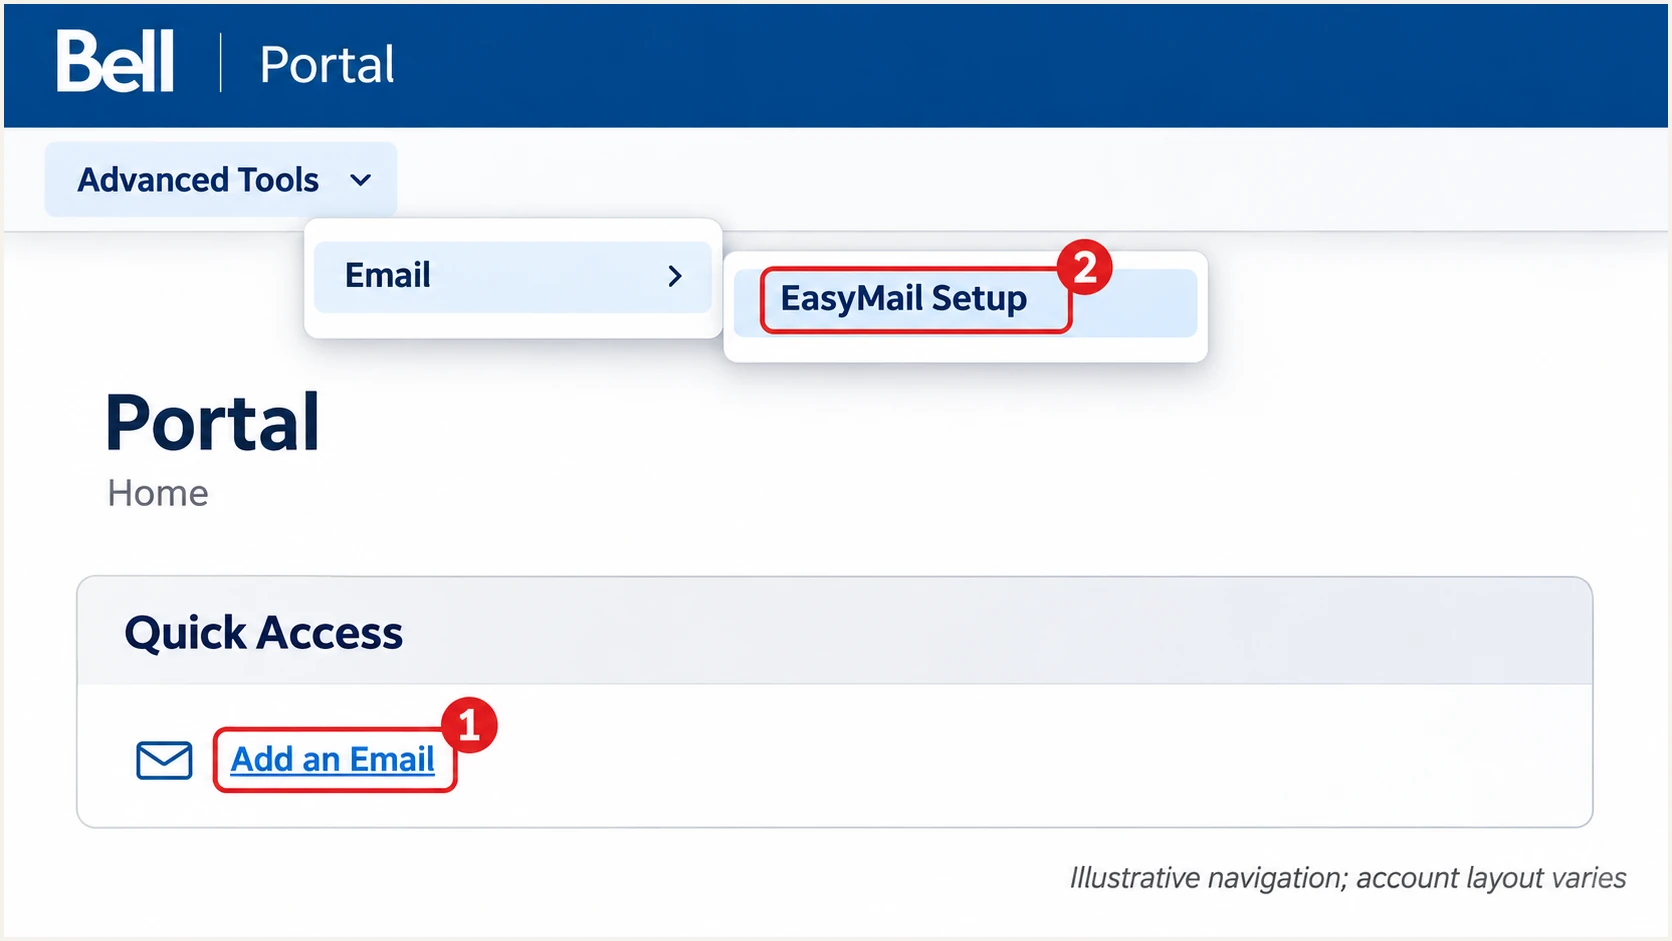
Illustrative Bell Portal navigation to Add an Email and EasyMail Setup.
For consumer bell.net or sympatico.ca mailboxes, skip custom-domain provisioning. Bell's 'Using Bell email' support page lists smtphm.sympatico.ca as the SMTP server, port 587, authentication required and TLS/SSL enabled. Use the settings for your actual account; Bell Business bellnet.ca has a separate configuration.
Set up SPF
SPF authorizes sending IP addresses for the envelope sender, usually visible in the delivered message's Return-Path. I verify that domain before adding anything to DNS. The SMTP submission hostname is not automatically the SPF include hostname.
- Get Bell's values. Ask Bell hosting support for the SPF include hostname or approved outbound IP ranges for your account's sending pool. Do not copy Bell's corporate SPF record or assume include:bell.ca is valid.
- Check the return path. Send a message through Bell and inspect smtp.mailfrom in the recipient's authentication results. If it uses your domain, publish SPF there. If it uses a subdomain, publish SPF at that subdomain as instructed by Bell.
- Edit one TXT record. Add Bell's confirmed authorization to the existing v=spf1 record before its final all mechanism. Keep other authorized senders. Publish only one SPF record per hostname.
- Check the limit. Keep evaluation within SPF's limit of 10 DNS-lookup-causing terms, including nested includes. Remove obsolete authorizations rather than adding a second SPF record.
For normal relaxed SPF alignment, the envelope sender and visible From address must share the same organizational domain. For example, a Return-Path under bounce.example.com can satisfy that check for a From address at example.com. Strict alignment requires an exact domain match.
Enter the actual envelope-sender domain below to check its SPF syntax and lookup usage. A valid DNS record still needs a message test to confirm that it authorizes the IP Bell uses to deliver your mail.
SPF checker
Find SPF syntax issues, lookup limits, and weak records.
?/16tests passed
If Bell keeps the envelope sender on a Bell-owned domain, changing your own SPF record will not fix SPF alignment for that message. Ask whether your specific service supports a custom return path; support differs between mailbox products.
When a custom return path is unavailable, DMARC can still pass through a valid DKIM signature whose signing domain matches your From domain under the applicable alignment mode. An SPF alignment warning is acceptable for that message when this DKIM path passes. Other senders using your envelope-sender domain still need correct SPF.
Do not guess a Bell SPF record
A hostname used for SMTP submission, inbound MX or reverse DNS is not proof of an SPF authorization. Get the supported value for your account before publishing it. Adding your home Internet IP does not authorize Bell's outbound servers.
Set up DKIM
DKIM requires Bell's outbound server to sign messages and DNS to publish the matching public key. Creating a DNS record alone cannot enable signing. Bell's public consumer setup articles do not document a customer-controlled DKIM switch or a universal selector.
- Confirm signing support. Ask Bell hosting support whether your custom-domain service signs outbound mail with your domain. Request the signing domain, selector and exact TXT value or CNAME target.
- Publish the supplied record. Add the record at the hostname Bell supplies, normally selector._domainkey followed by your signing domain. Use TXT or CNAME exactly as instructed. Never publish the private key.
- Enable server signing. Have Bell activate signing for the domain after DNS is available. A key you generate elsewhere will not work unless Bell installs its matching private key.
- Inspect a fresh message. Find DKIM-Signature and read its d= and s= values. Confirm d= matches your visible From domain under the configured DMARC alignment mode, and that the recipient reports dkim=pass.
I use the selector in a real message to locate the DNS key. In the illustrative message below, d=example.com and s=bell1 identify bell1._domainkey.example.com. The selector bell1 is an example, not a documented Bell default.
Illustrative DKIM fields, not a Bell configuration valuetext
DKIM-Signature: v=1; a=rsa-sha256;
  d=example.com; s=bell1; ...
If Bell cannot sign with your custom domain, document that limitation before enforcing DMARC. SPF with a matching envelope-sender domain can pass DMARC for direct delivery, but forwarding often breaks SPF. A supported domain-specific DKIM signing path is the more resilient setup.
Set up DMARC
DMARC is published for the visible From domain, not necessarily the mailbox login domain or return-path domain. For mail sent as user@example.com, publish the policy at _dmarc.example.com.
- Keep existing enforcement. Look up _dmarc for your From domain first. If p=quarantine or p=reject is already in use, keep that policy while fixing Bell's authentication.
- Start new policies in monitoring. If you have no policy, create one TXT record at _dmarc with the p=none example below. Do not add a second DMARC record beside an existing one.
- Choose a report mailbox. Replace dmarc@example.com with a real aggregate-report destination before publishing. If the reporting domain differs, ensure its operator authorizes external reports.
- Save and validate. Publish at the authoritative DNS provider, allow cached answers to expire, then check the final public record. Confirm it exists at _dmarc.example.com rather than a duplicated domain name.
Initial DMARC value for a domain without an existing policytext
v=DMARC1; p=none; rua=mailto:dmarc@example.com
The example requests reports and does not ask receivers to quarantine or reject failures. Receiving servers still apply their own filtering rules. I keep reporting enabled during every policy change so legitimate Bell traffic can be checked against the proposed enforcement.
Use the DMARC record generator to build the value, then check the published From-domain policy below. A DNS check confirms the record's structure; it does not prove Bell messages pass authentication.
DMARC checker
Look up a domain's DMARC record and catch policy issues.
?/7tests passed
After publication, send fresh messages through each Bell sending route. A DMARC pass requires at least one successful authentication method, SPF or DKIM, with a domain that satisfies the matching requirement for your visible From address.
Aggregate reports arrive on the receiver's schedule, commonly daily. They describe reported traffic rather than every message you send, so check both live messages and the report history before increasing enforcement.
Verify and troubleshoot
I test the actual sending route, including any desktop client, webmail or application that sends as the domain. A successful webmail test does not establish that a website form is using the same server.
- Check public DNS. Query the From domain's DMARC record, the envelope-sender domain's SPF record and the selector found in a fresh DKIM signature. Compare results with the records you intended to publish.
- Send a real test. Use the email tester below, copy its destination address and send a new message through Bell. Review the diagnosis for SPF, DKIM and DMARC, including their domain matching results.
- Read trusted results. Inspect Authentication-Results added by the receiving server. Compare header.from with smtp.mailfrom for SPF and with header.d for DKIM. Do not trust an authentication header supplied by the sender.
- Isolate the failure. Repeat the test through Bell webmail and your configured client. If only one route fails, check its SMTP server and From identity before changing DNS.
DNS checks, replace example names with your actual domainsbash
dig +short NS example.com
dig +short TXT example.com
dig +short TXT _dmarc.example.com
dig +short TXT bell1._domainkey.example.com
dig +short CNAME bell1._domainkey.example.com
The SPF query above assumes the envelope sender uses example.com; query its actual domain when different. Replace bell1 with the real selector. For a CNAME-based DKIM setup, also confirm the target publishes the expected key.
The email tester is the quickest check of a complete message. Send to the address it provides through the same Bell account and route you intend to use, then review the full diagnosis rather than relying only on the overall score.
Email tester
Send a real email to this address. Suped shows a results button when the test is ready.
?/43tests passed
For direct custom-domain mail, target SPF pass with a matching envelope-sender domain and DKIM pass with a matching signing domain. DMARC needs only one of those paths, but both give you better coverage when routing changes.
For consumer Bell mail, use Bell's documented SMTP configuration for that account and compare it with a webmail test. If both fail authentication on a Bell-owned domain, send Bell support the full rejection and message headers; you cannot repair Bell's DNS yourself.
|
|
|---|---|
SPF fail | Outbound IP authorization |
SPF permerror | Duplicate record or lookup limit |
DKIM none | Bell server signing |
DKIM fail | Selector key or message changes |
DMARC fail | From-domain matching |
Use the receiving server's results to choose the next check.
Escalate with the UTC timestamp, sender, recipient, connecting IP and full headers. Include the complete SMTP rejection if the message bounced. Bell's hosting support documentation lists 1-866-303-0332 for assistance; use the support channel for your actual service.
Get alerted when it breaks
For a domain you control, Suped, our DMARC reporting and email authentication platform, turns aggregate reports into source-level authentication issues and notifications. It gives teams a practical way to detect Bell sending changes after the initial setup.
- Review notifications. In Suped's notification settings, enable Issues detected, Sending sources need verification and DMARC summary emails as needed. Confirm the intended recipients receive them.
- Verify Bell traffic. Review the source table and mark a source as verified only after matching it to your account's legitimate sending activity. Check the reported IP and authentication domains, not only the source name.
- Investigate failures. Open the affected record's detail view, inspect SPF and DKIM diagnostics, and compare recent DNS changes in DNS history. Send Bell the evidence if the signing or outbound pool changed.
- Confirm recovery. Apply the relevant fix, send another test message and check subsequent reports for the affected source. Keep alerts enabled after the issue is resolved.
Suped's DMARC monitoring keeps Bell traffic visible alongside other senders using your domain. Issue detection and the detailed fix steps reduce the manual work of reading XML reports. They do not change Bell's server settings.
Report-based notifications depend on receivers delivering aggregate reports. I use a fresh message test for immediate confirmation and report monitoring for ongoing coverage. A consumer mailbox on a Bell-owned domain does not give you control of that domain's reporting destination.
Secure your domain with p=reject
Move a new policy to p=reject after every legitimate sending route has a reliable DMARC pass. I judge readiness by identified sources and representative traffic, including infrequent billing runs, rather than by an arbitrary number of days.
- Inventory all senders. Use Suped's source table to confirm Bell mailboxes and every other authorized sender. Investigate unknown sources before authorizing them; failing unauthorized traffic is expected.
- Fix legitimate failures. Resolve missing SPF authorization, incorrect return paths and unsupported DKIM signing. Recheck forwarded mail where relevant, because a direct SPF pass alone is fragile.
- Stage enforcement. For a domain currently at p=none, move to p=quarantine after legitimate traffic is ready. Review new reports and delivery failures before changing to p=reject. Keep an existing stronger policy in place.
- Check policy scope. Review subdomains, explicit subdomain policies and any sp= setting. A parent-domain enforcement change affects subdomains that inherit its policy.
- Keep watching. Maintain Suped notifications through the change and inspect the next report cycles. Retest after changes to Bell mailboxes, DNS or sending applications.
Suped combines the source inventory with authentication diagnostics, so enforcement decisions can be checked against actual reported Bell traffic. Hosted DMARC also lets teams manage policy in the dashboard once configured. DNS-based policies can be staged at your authoritative DNS provider.
The comparison below describes the requested treatment of DMARC failures. Receiving servers retain their own handling rules. No DMARC policy guarantees inbox placement or prevents impersonation using a different domain.
p=none during setup
Requests aggregate reports without requesting enforcement against messages that fail DMARC.
- Use it for discovery. Identify legitimate Bell traffic and fix authentication before a new policy is enforced.
- Keep the limit clear. It does not request rejection of messages that fail DMARC.
p=reject after verification
Requests rejection of messages that fail DMARC under the applicable policy.
- Use it after validation. Confirm each legitimate sending route has a working DMARC authentication path.
- Retain monitoring. Watch for new senders and authentication regressions after enforcement.
When the source checks support enforcement, replace p=none or p=quarantine in the existing record with p=reject. Preserve your real reporting destination and any intentional policy settings.
Final policy example, use your real reporting destinationtext
v=DMARC1; p=reject; rua=mailto:dmarc@example.com
Approve the change against evidence
Bell messages pass through a matching SPF or DKIM domain, other legitimate senders have been checked, subdomain scope is understood and reporting is active. Publish the policy change, then verify DNS and send a new test message.
Record the change time and retain the previous TXT value. When reviewing reports after deployment, check their reporting periods so traffic sent before the change is not mistaken for a new regression.
If legitimate mail fails after enforcement, identify the affected sender and repair its authentication path. Compare a new message test with the next aggregate reports before treating the incident as resolved.
Frequency asked questions
No. Bell controls DNS for those domains, including their SPF, DKIM and DMARC records. Use Bell's supported sending route and ask Bell to investigate failures. The custom-domain steps apply only where you control the From domain's DNS.
Get the include hostname or authorized outbound IP ranges for your exact service from Bell hosting support. Bell consumer email, custom-domain hosting and Microsoft 365 subscriptions are different sending services. Do not derive an SPF include from the SMTP hostname or copy Bell's corporate record.
Bell's public setup documentation does not establish a universal selector or customer-controlled DKIM option for every product. Ask support whether your service supports signing with your domain and request its exact selector and DNS record. Publishing an arbitrary public key does not make Bell sign messages.
Yes. A valid DKIM signature with a signing domain that satisfies DMARC's match requirement for the visible From domain is sufficient. This matters when the return path stays on a provider-owned domain. A raw DKIM pass with an unrelated signing domain is insufficient.
A bell.net suffix is a clue to Bell-associated infrastructure, not proof of the sending platform or authorization. Check the connecting IP, its PTR and forward DNS, the trusted Received headers and authentication domains. Bell network addresses also carry customer traffic. Do not authorize an SPF source solely because its rDNS mentions Bell.
Keep an existing p=quarantine or p=reject policy and fix the failing legitimate route. Start with p=none when introducing a new policy on a domain without one. Monitor source-level results before increasing enforcement, and retain aggregate reporting after reaching p=reject.




