
How to set up DMARC/DKIM/SPF for Barracuda

Published 21 Nov 2026
Updated 21 Nov 2026
11 min read
Summarize with
For Barracuda Email Gateway Defense, add the correct regional Barracuda include to your outbound domain's SPF record, enable DKIM signing on your originating mail system, and publish a DMARC TXT record in DNS. Start a new DMARC deployment with p=none; keep an existing quarantine or reject policy.
I check the outbound route first. An inbound-only Barracuda deployment does not require Barracuda in SPF. Email Gateway Defense, formerly Email Security Service, uses regional cloud includes. An on-premises Barracuda Email Security Gateway needs authorization for its actual outbound public IP or relay instead.
Add your domain
I verify domain ownership in Barracuda before routing mail through it. Ownership verification and authentication DNS records are separate requirements.
- Open Domains: Sign in to Barracuda Cloud Control as an administrator. Select Email Gateway Defense > Domains, then Add Domain.
- Enter the destination: Enter your domain and its actual destination in Mail Server. Use the mailbox platform's destination server, not the Barracuda inbound MX hostname. Click Add Domain.
- Verify ownership: Return to Domains, click Verify Ownership, and choose CNAME Records. Publish the exact CNAME name and target Barracuda supplies, then finish the verification prompts.
- Confirm status: Check that ownership is verified. Review MX status separately if you are also deploying inbound filtering. Repeat for every domain that will send through the gateway.
- Check outbound access: For Microsoft 365, have Barracuda support confirm Outbound Groups are enabled. Copy the domain's Outbound Smarthost Configuration hostname for your mail system's outbound connector.
CNAME ownership verification avoids changing inbound mail routing merely to prove control. If you choose MX verification instead, use the exact MX values and migration sequence displayed by Barracuda.
A verified domain does not automatically route outbound messages. The originating mail system must send them through the assigned Barracuda smarthost.
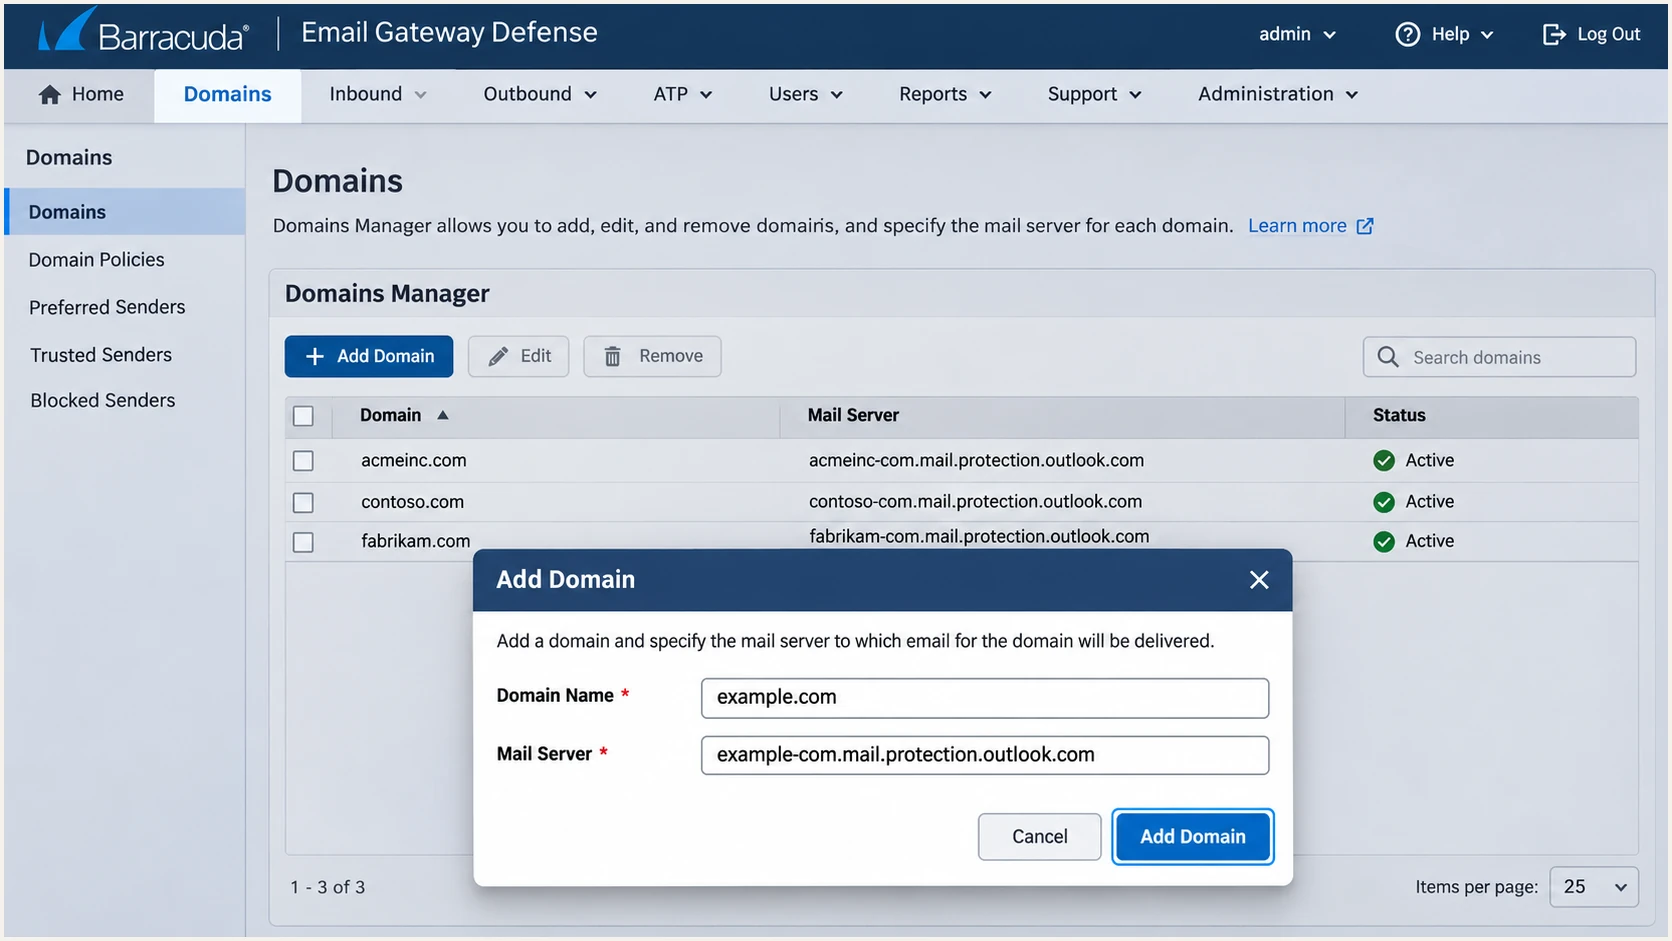
Barracuda Add Domain dialog with domain and destination mail server fields.
Enter only the DNS host portion your DNS provider requires. Providers that append the zone automatically will otherwise create a duplicated domain suffix.
I retain Barracuda's verification CNAME and confirm the destination mail server is reachable before changing production routing.
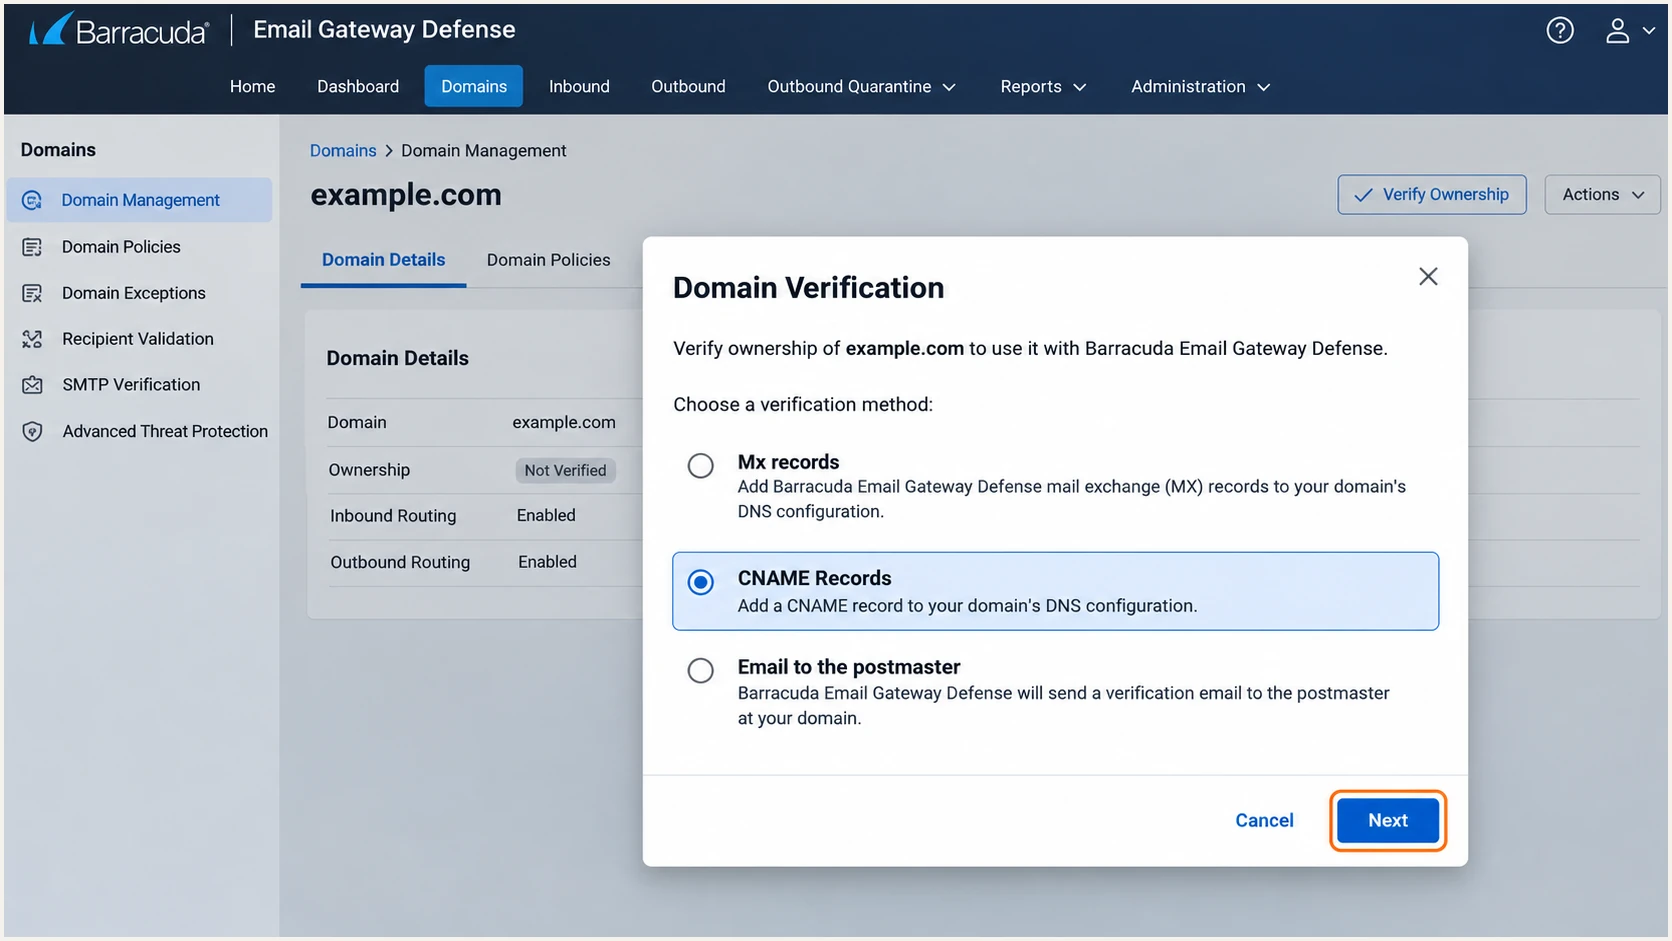
Barracuda domain ownership verification with CNAME Records selected.
Choose Next to obtain the account-specific verification record. Copy its actual value instead of deriving a token from the domain name.
After public DNS resolves the CNAME, complete ownership verification in Barracuda and confirm the domain status has updated.
Set up SPF
Publish SPF for the domain used in the SMTP MAIL FROM address, which normally appears as Return-Path on delivered messages. Barracuda outbound relay supports SPF alignment when that domain matches the visible From domain under your DMARC policy.
- Check the envelope: Send a message externally and inspect Return-Path. If it uses a sending subdomain, publish SPF there; an SPF record at the parent domain is not inherited.
- Choose your region: Use the region assigned to your Barracuda tenant. Barracuda's Sender Policy Framework for Outbound Mail documentation lists the six includes shown below.
- Edit one record: Find the TXT record beginning v=spf1 at that DNS name. Insert the matching include before the final all mechanism. Keep other authorized senders and only one SPF record.
- Validate lookups: Keep the evaluated SPF policy within the 10 DNS-lookup-term limit, including nested includes. Do not add every Barracuda region.
Barracuda regional includes, choose the matching tenant regiontext
# Australia
include:spf.ess.au.barracudanetworks.com

# Canada
include:spf.ess.ca.barracudanetworks.com

# Germany
include:spf.ess.de.barracudanetworks.com

# India
include:spf.ess.in.barracudanetworks.com

# United Kingdom
include:spf.ess.uk.barracudanetworks.com

# United States
include:spf.ess.barracudanetworks.com
These are include mechanisms to merge into SPF, not six separate TXT records. If no SPF record exists, start with v=spf1, add the appropriate include and every other authorized sender, then add one final all mechanism.
The following US example authorizes only Barracuda. Use it unchanged only when Barracuda is the sole outbound service for that envelope domain.
Example SPF TXT value for a Barracuda-only US outbound domaintext
v=spf1 include:spf.ess.barracudanetworks.com -all
A passing SPF check authenticates the envelope domain. DMARC also requires that domain to match the visible From domain, exactly under strict SPF alignment or at the organizational-domain level under relaxed alignment.
Run the SPF checker against the actual envelope domain after publishing. Resolve duplicate records and lookup errors before testing mail again.
SPF checker
Find SPF syntax issues, lookup limits, and weak records.
?/16tests passed
If the delivered Return-Path belongs to an unrelated provider domain, adding Barracuda to your visible From domain's SPF does not repair alignment. Correct the envelope sender on the originating system where supported.
For a route that cannot use your domain in Return-Path, expect SPF alignment failures and require a passing DKIM signature with a matching signing domain. DMARC needs one passing method with the required domain match.
Set up DKIM
Enable DKIM on the mail system that originates messages before they reach Barracuda. Barracuda's documented Inbound Settings > Sender Authentication controls validate incoming signatures; they do not configure outbound signing.
- Microsoft 365: Open Email & collaboration > Policies & rules > Threat policies > Email authentication settings > DKIM. Select your custom domain, obtain both CNAME records, publish their exact tenant-specific targets, and enable signing after DNS is detected.
- Google Workspace: Open Apps > Google Workspace > Gmail > Authenticate email. Select the domain, generate a 2048-bit key, publish the supplied TXT record, then click Start authentication. Keep an existing working key unless rotation is needed.
- Other mail servers: Enable the server's supported DKIM signer for your From domain. Publish its public key at the supplied selector under _domainkey. Keep the private key on the signing server.
- Preserve signatures: Review Barracuda Outbound Settings > Tagline/Footer. Move required disclaimers before DKIM signing and stop the gateway appending the same content afterward. Test other content-changing policies separately.
I inspect the final message's DKIM-Signature header for its d= signing domain and s= selector. A signature using an unrelated provider domain does not satisfy your domain's DMARC requirement.
For example, d=example.com and s=selector1 direct the receiver to selector1._domainkey.example.com. Use the selector actually issued by your mail system.
Inbound checking
Barracuda: Inbound Settings > Sender Authentication.
Controls how incoming signatures and sender policies are evaluated. It does not sign your outgoing messages.
Outbound signing
Originating mail system: custom-domain DKIM configuration.
Creates the signature. Its DNS selector must resolve, and signed content must remain intact through Barracuda.
Publishing a key without enabling the signer leaves outgoing messages unsigned. I verify a newly delivered message after enabling signing.
Barracuda's Outbound Mail Scanning documentation explicitly warns that its outbound footer breaks existing DKIM signatures.
Check changes made after signing
A DKIM body-hash failure after Barracuda processing points to modified content. Put mandatory footer text before signing, preserve required security policies, and retest the delivered message. An inbound DKIM exemption does not repair an outbound signature.
If encryption or another required gateway action changes the message, test that route independently. Confirm passing SPF with the required domain match while resolving the signing design.
Use Barracuda support and your mail-system administrator to resolve routes that cannot preserve signed content. Do not assume ordinary mail and encrypted notifications authenticate identically.
Set up DMARC
Publish DMARC at _dmarc followed by the visible From domain. A new monitoring policy collects authentication reports without requesting quarantine or rejection.
- Check the current policy: Look up the existing DMARC TXT record. Keep p=quarantine or p=reject if already deployed, and preserve existing reporting destinations.
- Build the record: For a new deployment, use the DMARC record generator with p=none and an aggregate-report destination you control.
- Publish the TXT: For example.com, create one TXT record with host _dmarc. Use the example value below, replacing the reporting mailbox with a real destination.
- Retain reporting: Keep rua configured through each policy change. If reports go to another organization's domain, confirm that destination has published any required external-report authorization.
Starter DMARC TXT value at _dmarc.example.comtext
v=DMARC1; p=none; rua=mailto:dmarc@example.com
The address dmarc@example.com is a placeholder. A working mailbox receives aggregate XML reports; a monitoring service supplies its own report address for processing them.
Check the published DNS record below. A valid record confirms policy syntax and discovery, while a real message test confirms the sending route.
DMARC checker
Look up a domain's DMARC record and catch policy issues.
?/7tests passed
Confirm the lookup finds one DMARC record at the intended name. Correct duplicated zone suffixes or multiple DMARC records before relying on the policy.
Aggregate reports usually arrive after the receiving provider's reporting interval, often within 24-48 hours. p=none does not request blocking of impersonated mail.
Verify and troubleshoot
I test an external delivery through the complete production route. A message delivered only inside your organization does not prove Barracuda outbound authentication works.
- Confirm the route: In Barracuda Message Log, find your test by sender and recipient. Confirm outbound processing and inspect any rejection details. Verify the received message also contains the expected gateway hop.
- Read receiver results: Inspect the final recipient's Authentication-Results, Return-Path, and DKIM-Signature headers. Trust results added by that recipient's mail system.
- Check domain matches: Require dmarc=pass with your visible From domain. Inspect SPF's smtp.mailfrom and DKIM's header.d separately to identify which method satisfies DMARC.
- Test every route: Repeat for each sending domain and application. Include messages with disclaimers and gateway encryption, plus any direct-send routes that bypass Barracuda.
The email tester gives the quickest configuration diagnosis: send a message to its generated address through your normal Barracuda route.
It checks the received message for authentication and reports failures together. Keep the test results so the next test can confirm the effect of a change.
Email tester
Send a real email to this address. Suped shows a results button when the test is ready.
?/43tests passed
If SPF passes but DMARC fails, compare the envelope domain with From. If DKIM passes but DMARC fails, compare the signing domain with From.
For lookup failures, check authoritative DNS and cached results after the applicable TTL. For DKIM body-hash failures, inspect content changes after signing.
|
|
|
|---|---|---|
SPF permerror | Record count | Merge SPF |
SPF fail | Region and IP | Correct include |
DKIM none | Origin signer | Enable signing |
DKIM body hash | Outbound footer | Sign after edits |
DMARC fail | Domain match | Correct identity |
Relay denied | Domain and relay | Verify access |
Use the receiver result to choose the next check.
A relay-denied error requires a Barracuda routing or authorization fix. Editing a DMARC policy does not grant outbound relay access.
For custom mail servers, check Outbound Settings > Sender IP Address Ranges and authorize their actual public source IPs. A display name or logging-domain label does not establish DMARC alignment.
Get alerted when it breaks
Suped is our DMARC platform for keeping this setup working after DNS and routing changes. Its DMARC monitoring connects source-level authentication results with detected issues and steps to fix them.
- Enable issue notifications: With DMARC reports flowing, enable Issues detected notifications in Suped so authentication problems reach the people maintaining Barracuda and DNS.
- Review new sources: Enable Sending sources need verification. Investigate unfamiliar IPs against Barracuda routing and your approved sending-system inventory before marking a source verified.
- Trace each failure: Open the affected records, compare SPF and DKIM domains, and inspect DNS history for recent include, selector, or DMARC policy changes.
- Confirm recovery: Apply the fix in Barracuda, the originating mail system, or DNS. Send another test and confirm subsequent report data shows recovery. Use DMARC summary emails to review ongoing results.
I keep Barracuda delivery logs and DMARC monitoring side by side. Barracuda explains gateway processing; receiver reports show whether the delivered messages satisfy DMARC.
Suped also brings domain and IP blocklist (blacklist) monitoring into the investigation when authentication passes but delivery problems continue.
Alerts depend on available evidence
Suped alerts on detected issues as data becomes available. Aggregate DMARC reporting has receiver-controlled delays, so use an immediate message test and Barracuda logs for urgent incidents.
After a connector edit, regional migration, or DKIM rotation, I run a fresh external test immediately and review incoming reports afterward.
Keep notification recipients current and assign someone to investigate unfamiliar sources before changing the enforcement policy.
Secure your domain with p=reject
I increase enforcement only after every legitimate sending route passes DMARC. Suped's source reports and tailored issue diagnostics make that decision based on actual mail rather than a clean DNS lookup alone.
- Inventory senders: Review a complete business sending cycle, including infrequent billing or application messages. Identify legitimate senders outside Barracuda as well as gateway traffic.
- Resolve failures: Confirm each legitimate source has passing SPF or DKIM with the required domain match. Prefer working DKIM as well as SPF so ordinary forwarding is less dependent on the original sending IP.
- Stage enforcement: Change p=none to p=quarantine after legitimate failures are resolved. Inspect reports and delivery complaints before advancing. Keep a pre-existing quarantine or reject policy during Barracuda setup.
- Manage policy changes: Use Suped's hosted DMARC for staged policy changes through the dashboard, or edit your existing DNS record directly. Keep your real reporting destination.
- Apply reject: Change the policy to p=reject when legitimate routes remain healthy. Review inherited subdomain policy and any sp override, then test again and continue monitoring.
Enforcement example, retain your real reporting destinationtext
v=DMARC1; p=reject; rua=mailto:dmarc@example.com
Edit the existing record rather than adding another DMARC TXT record. Preserve other intentional tags and replace the example mailbox with your actual report destination.
p=reject asks receivers to reject messages that fail DMARC; their local policies still determine handling. Continue reviewing Suped alerts when new senders or gateway policies are introduced.
Frequency asked questions
The Inbound Settings > Sender Authentication DKIM control checks incoming signatures. Configure outbound DKIM signing on your originating mail system, publish its selector records, and preserve the signature through Barracuda processing.
No. Add a Barracuda regional include only when that service sends outbound mail for the SPF domain. An inbound MX record pointing to Barracuda does not establish a need to authorize Barracuda as an outbound sender.
Barracuda Email Gateway Defense uses infrastructure under ess.barracudanetworks.com. If that suffix appears in a sending IP's rDNS, investigate Barracuda as the relay and confirm the IP against its regional outbound ranges and your message logs. A hostname alone does not prove which customer originated the message.
These SPF include domains belong to Barracuda Email Gateway Defense: the first is the US include and the second is the UK include. Barracuda also documents separate Australia, Canada, Germany, and India includes. Choose the documented include for your actual tenant region, rather than copying an associated hostname found in a report.
SPF authenticates the MAIL FROM domain. DMARC also requires a match with the visible From domain under the applicable alignment mode. If SPF passes for an unrelated domain and no matching DKIM signature passes, DMARC fails. Correct the originating envelope sender or configure custom-domain DKIM signing.
Keep your existing quarantine or reject policy while configuring Barracuda. Validate the outbound route and fix authentication problems without removing protection for the whole domain. The p=none starter record is for a new monitoring deployment.




