
How to set up DMARC/DKIM/SPF for AXC DOMAIN REGISTRY

Published 21 Nov 2026
Updated 21 Nov 2026
11 min read
Summarize with
Set up AXC DOMAIN REGISTRY email authentication by publishing the SPF record for your hosting environment, enabling DKIM signing in DirectAdmin, and adding a DMARC TXT record at _dmarc. Start a new DMARC deployment with p=none. Keep p=quarantine or p=reject if either is already active.
I check the sending route before changing DNS. Versio's public support article 'AXC white label brand bij Versio' identifies AXC as its reseller brand. AXC registration alone does not identify your outgoing mail service. For AXC/Versio hosting, the relevant controls are DirectAdmin and your authoritative DNS zone.
Add your domain
Select the domain already attached to your hosting package. Add it only if it is missing; registering a domain and enabling hosting for it are separate operations.
- Open hosting. Use the hosting login supplied by your reseller. In Mijn Versio, open Hosting, select your package, and use Naar DirectAdmin under Hosting instellingen.
- Add the domain. At User Level, open Account Manager > Domain Setup. Choose Add New, or Add Another Domain on older skins, enter your domain without www, and select Create.
- Confirm activation. Complete any pending registrant contact verification requested by your reseller. Under E-mail Manager > E-mail Accounts, create the mailbox your application will use.
- Locate live DNS. Check your domain's NS records. Publish authentication records in the zone served by those nameservers. A local DirectAdmin zone does not publish records to an external DNS service.
Versio's 'DNS beheren' instructions put DNS editing under Domeinnamen, the domain's settings, then DNS Beheer. If your reseller provides another panel, use its DNS editor for the authoritative zone.
Keep a copy of the current records. Adding authentication does not require changing nameservers or moving existing inbound mail. Contact verification confirms registration details; message tests verify email authentication.
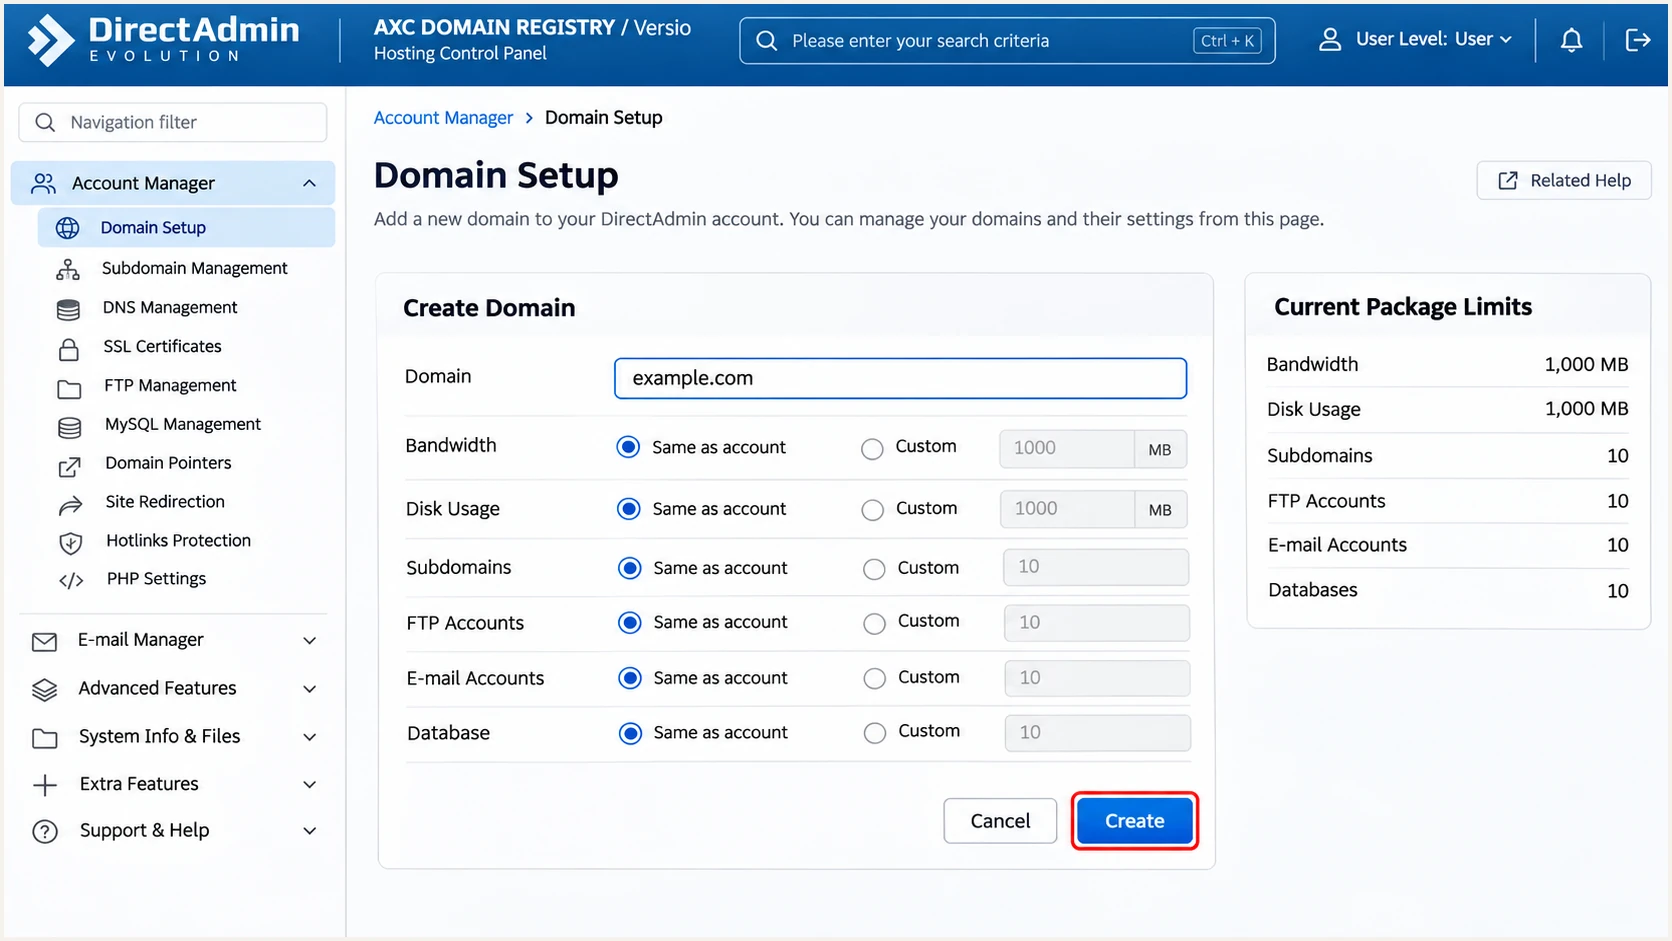
Illustrative DirectAdmin screen for adding a domain to AXC hosting.
Set up SPF
Versio's 'Een SPF record aanmaken' support article documents different defaults for older AXC hosting and the newer Versio environment. Match your package's outgoing route before selecting a record.
- Find the policy. Open Account Manager > DNS Management, or your authoritative DNS editor. Edit the existing TXT record beginning with v=spf1. Keep exactly one SPF policy per hostname.
- Choose the route. Use the appropriate default below, preserving any account-specific IP authorizations supplied by your host. Ask your reseller which environment your package uses if this is unclear.
- Set the envelope sender. Configure the application's SMTP envelope sender as an address on your domain, such as no-reply@example.com. Changing the visible From address alone does not set the Return-Path.
- Preserve other senders. Merge other authorized services before the final all mechanism. Use TXT records and keep SPF evaluation within the 10 DNS-lookup term limit, including nested includes.
Older AXC hosting
Use this documented default only for a package on the older outgoing infrastructure.
SPF TXT value for older AXC hostingtext
v=spf1 a mx a:spf.spamexperts.axc.nl -all
Newer Versio environment
Use this documented default only when your package uses the newer outgoing infrastructure.
SPF TXT value for the newer environmenttext
v=spf1 a mx include:spf.versio.nl -all
Publish the policy at the envelope sender domain. For no-reply@example.com, that is example.com; a Return-Path under bounce.example.com needs its own applicable SPF policy.
Run the checker against that exact domain. I check syntax and lookup usage here, then test an actual message to confirm the outgoing IP is authorized.
SPF checker
Find SPF syntax issues, lookup limits, and weak records.
?/16tests passed
AXC-hosted applications can use your domain for the Return-Path. Confirm the received message actually does so. With default relaxed SPF alignment, its organizational domain must match the visible From domain. Set this through the application or SMTP service, never by inserting a Return-Path header.
If a particular relay forces a provider-owned Return-Path, adding it to your From domain's SPF does not fix that mismatch. SPF setup on your domain is unnecessary for that route alone. Expect SPF alignment errors until the envelope domain changes; DMARC still passes when DKIM passes with the required From-domain match.
Set up DKIM
Enable signing on the sending server and publish its matching public key. I keep an existing working key rather than generating an unrelated replacement in DNS.
- Enable signing. Select your domain in DirectAdmin, then open E-mail Manager > E-mail Accounts. Click Enable DKIM if offered. A Disable DKIM button means signing is already enabled.
- Copy the key. Open Account Manager > DNS Management and find the generated DKIM TXT record. If DNS Management is hidden, enable DNS management for the hosting package or ask your reseller for the public record.
- Publish the record. At authoritative DNS, add the complete generated TXT value under x._domainkey, unless your account uses another selector. In Mijn Versio, use TTL 600 and save with Bewaar.
- Test the signature. Send through the application's production mail route. Check that the receiver reports dkim=pass and that the signature's d= domain matches your visible From domain under DMARC rules.
Versio's 'DKIM record aanmaken' instructions use x._domainkey and a key unique to each domain. Copy the complete public value, including its DKIM tags. Keep the private key on the sending server.
Read the selector from s= in a real DKIM-Signature header if it differs from x. Publishing a public key alone does not enable signing, and enabling signing in DirectAdmin does not update an external DNS zone.
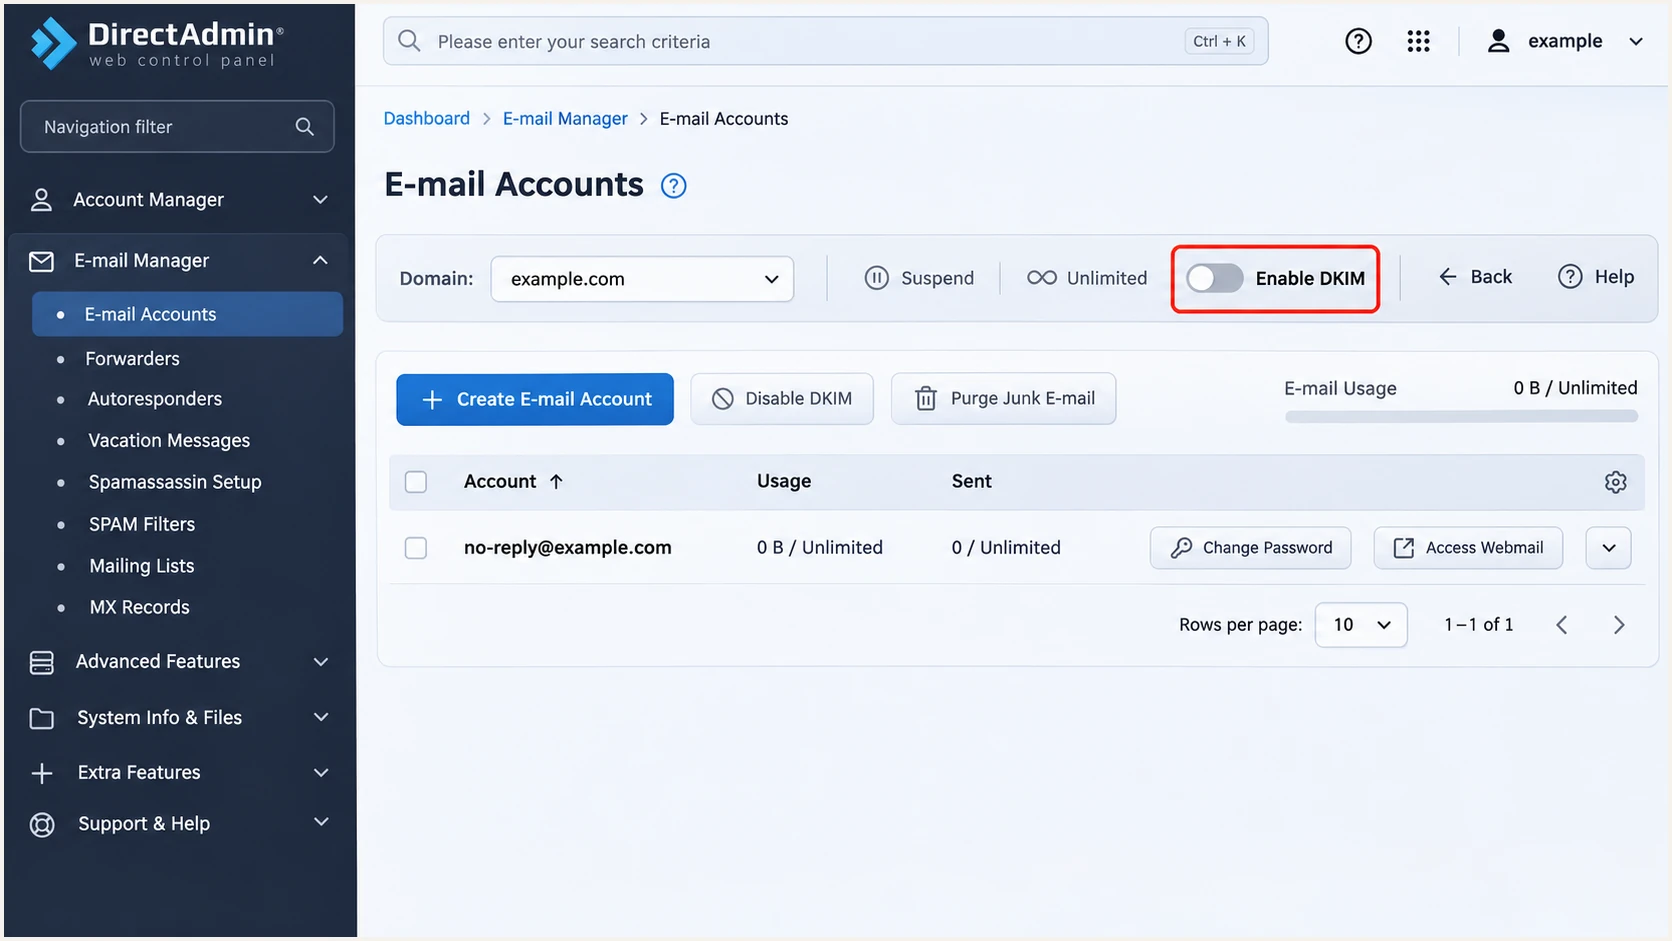
Illustrative DirectAdmin DKIM activation for an AXC-hosted domain.
Set up DMARC
DMARC evaluates the visible From domain. A message passes when SPF passes with the required domain match, or DKIM passes with the required domain match. Both mechanisms do not have to pass for DMARC.
- Inspect the policy. Look up TXT records at _dmarc.example.com. Preserve an existing quarantine or reject policy while repairing authentication.
- Create the TXT record. For a new deployment, use host _dmarc and the monitoring value below. Build it with our DMARC record generator.
- Set reporting. Replace dmarc@example.com with a report inbox you control. For a reporting service, use its assigned address and complete any required external reporting authorization.
- Save one policy. Keep one DMARC record at _dmarc. If that name already has a CNAME for managed DMARC, update the managed policy instead of adding a conflicting TXT record.
Initial DMARC TXT value at _dmarctext
v=DMARC1; p=none; rua=mailto:dmarc@example.com
Keep existing enforcement
p=none requests monitoring without DMARC-based quarantine or rejection. It does not guarantee delivery. Do not replace a working p=quarantine or p=reject policy with this starter value.
In DirectAdmin DNS Management, select TXT and enter the _dmarc host. Some editors require the full name _dmarc.example.com.; others append the zone name automatically. Check the resulting hostname before saving.
After the previous DNS TTL expires, check the live record. The lookup must return the intended policy and reporting address without a duplicate DMARC policy.
DMARC checker
Look up a domain's DMARC record and catch policy issues.
?/7tests passed
A successful DNS check confirms the published policy. It does not prove that a website or application is signing its outgoing messages correctly.
Send fresh tests after saving. Aggregate DMARC reports commonly take 24-48 hours to arrive and depend on receiving providers generating reports for your traffic.
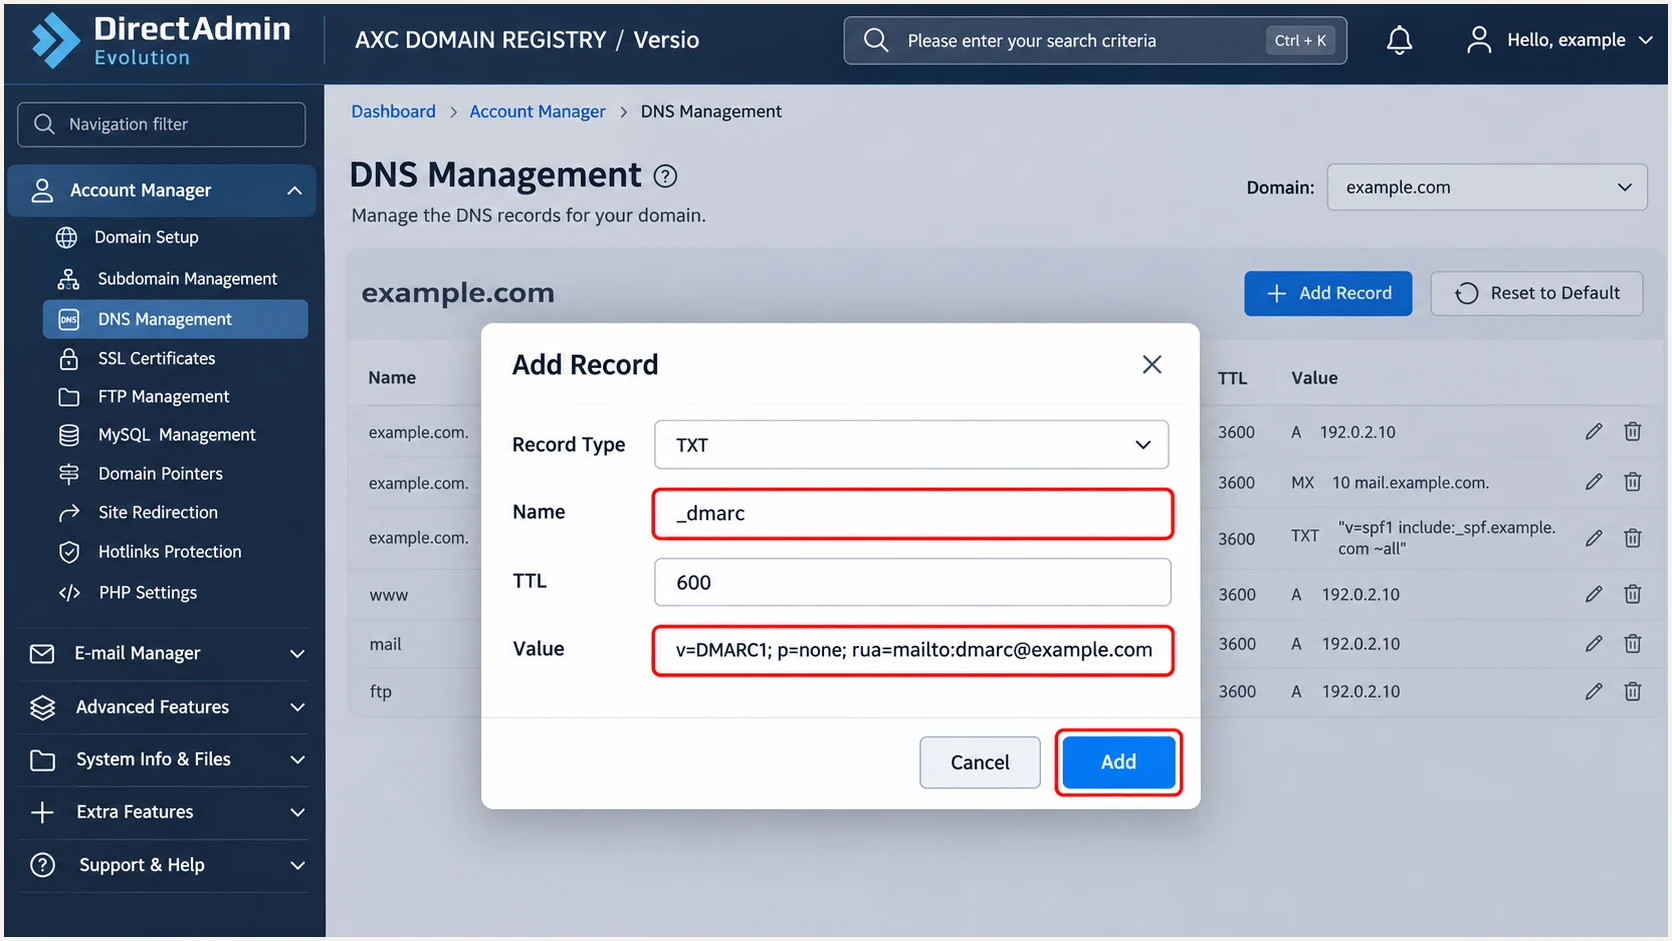
Illustrative DirectAdmin form for publishing the initial DMARC record.
Verify and troubleshoot
I test mailbox mail and website-generated mail separately. A working mailbox does not prove that contact forms or scheduled application messages use the same SMTP route.
Use the email tester to generate a test recipient, then send a fresh message directly through AXC hosting. It provides a diagnosis of the received message, including authentication. Avoid forwarding an existing message for this test.
Email tester
Send a real email to this address. Suped shows a results button when the test is ready.
?/43tests passed
Read the receiving server's trusted Authentication-Results header. Compare the visible From domain with smtp.mailfrom for SPF and header.d for DKIM. Trust the recipient's results rather than sender-inserted authentication headers.
A successful test covers the route used for that message. Repeat it for each application and after hosting migrations or DKIM key changes.
- Check DNS. Run the lookups below with your own domain. Query your authoritative nameservers directly if cached answers disagree.
- Check the sender. Require SPF pass for the intended envelope domain and DKIM pass for the signing domain. Confirm at least one has the required match to From.
- Repair the route. For unsigned website mail, configure authenticated SMTP through the hosting service that signs for your domain. Re-test after the application change.
- Escalate precisely. Give AXC or your reseller the sending IP, message time, full headers, and any SMTP rejection code. Ask them to check signing and the outbound relay.
DNS checks, replacing example.combash
dig NS example.com +short
dig TXT example.com +short
dig TXT x._domainkey.example.com +short
dig TXT _dmarc.example.com +short
|
|
|
|---|---|---|
SPF permerror | Duplicates or limit | Merge; count lookups |
SPF mismatch | Provider Return-Path | Envelope domain |
DKIM fail | Wrong public key | Active selector |
DKIM absent | Unsigned route | Signing SMTP |
DMARC fail | Domain mismatch | From and auth domains |
Common authentication failures and the next check.
Authentication does not guarantee inbox delivery
If authentication passes but delivery fails, inspect the SMTP response. A shared IP blocklist (blacklist) listing is a separate issue to raise with AXC or your reseller. The IP operator also controls PTR records.
Get alerted when it breaks
Our DMARC platform, Suped, combines source diagnostics with issue notifications. Its DMARC monitoring makes it practical to detect authentication changes after the initial AXC setup.
- Verify sources. In Suped, confirm which reported sources belong to your AXC mailboxes and applications. Mark only confirmed legitimate sources as verified; rDNS alone is insufficient.
- Enable notifications. Turn on Issues detected and Sending sources need verification notifications. Enable DMARC summary emails for routine review.
- Investigate failures. Open the affected source and its record details. Inspect SPF and DKIM results alongside the sending IP and rDNS to identify the broken route.
- Confirm the repair. Apply the suggested fix in hosting or DNS, re-test the message, then check fresh reports. Use DNS history when a record change explains the regression.
DMARC traffic alerts depend on reports arriving from receivers, usually in daily batches. They are not instantaneous notifications for every failed message. Use the email tester immediately after a configuration change.
Secure your domain with p=reject
I move to p=reject after every legitimate sending route passes DMARC across a representative sending cycle. Include infrequent billing runs and automated website messages; one successful test is insufficient.
- Audit legitimate traffic. Use Suped's source table and record details to investigate failures before enforcement. Separate unauthorized traffic from real applications that need repair.
- Fix domain matching. Keep working DKIM for each sender and correct the envelope sender where supported. Start with default relaxed matching unless a specific requirement calls for strict matching.
- Stage enforcement. For a new deployment, move p=none to p=quarantine, review legitimate delivery, then set p=reject. Check subdomain policies separately. Keep existing stronger policies in place.
- Manage the policy. Our hosted DMARC lets you manage policy in Suped after the initial DNS connection. Continue checking source results at each stage instead of advancing solely because time has passed.
Final DMARC TXT value after validationtext
v=DMARC1; p=reject; rua=mailto:dmarc@example.com
Replace the example report address with your actual destination. p=reject asks receivers to reject messages that fail DMARC; receivers retain their own handling rules. Re-test new AXC mail routes before enabling production sending.
Frequency asked questions
Versio documents a:spf.spamexperts.axc.nl for older AXC hosting and include:spf.versio.nl for its newer environment. Use the configuration assigned to your package, preserving other authorized senders in the same SPF record.
Versio's documented DirectAdmin setup uses selector x, published at x._domainkey. Confirm s= in an actual DKIM-Signature header and copy the matching public key generated for your domain.
SPF can pass for a provider-owned envelope domain while the visible From address uses your domain. DMARC also requires the domain match. Configure your own envelope domain or use passing DKIM with the required From-domain match.
AXC/Versio is the provider to investigate first for these suffixes. Versio identifies AXC as its reseller brand and documents axc.nl in email settings. A shared infrastructure hostname does not identify the customer or application. Confirm the sending IP and message headers before authorizing traffic.
No. MX records route inbound mail. SPF and DMARC use TXT policies, and this DirectAdmin DKIM setup uses a TXT public key. Keep existing MX records unless you are deliberately moving inbound email hosting.
Cached DNS answers remain until their TTL expires. Send a fresh test after the new records are visible. Aggregate DMARC reports commonly arrive within 24-48 hours, depending on receiver reporting and traffic. Check all legitimate senders before enforcing rejection.




